
TravelMate 800 Service Guide
Page 7
... 52 Removing the ODD Module 52 Removing the HDD Module 52 Removing the Wireless LAN Card 52 Removing the Memory 53 Removing the LCD Module / Keyboard / Function Keyboard 53 Removing the Function Keyboard 55 Disassembling the Main Unit 55 Removing the Touchpad 57 Removing the Memory 57 Removing the Thermal Module 58 VII
... 52 Removing the ODD Module 52 Removing the HDD Module 52 Removing the Wireless LAN Card 52 Removing the Memory 53 Removing the LCD Module / Keyboard / Function Keyboard 53 Removing the Function Keyboard 55 Disassembling the Main Unit 55 Removing the Touchpad 57 Removing the Memory 57 Removing the Thermal Module 58 VII

TravelMate 800 Service Guide
Page 8
... 61 Chapter 4 Troubleshooting 63 System Check Procedures 64 External Diskette Drive Check 64 External CD-ROM/DVD-ROM Drive Check 64 Keyboard or Auxiliary Input Device Check 65 Memory Check 65 Power System Check 65 Touchpad Check 67 Display Check 67 Sound Check 68...Problems 76 Index of AFlash BIOS Error Message 77 Chapter 5 FRU (Field Replaceable Unit) List 79 Appendix A Model Definition and Configuration 96 TravelMate 800 Series 96 Main Features 97 Appendix B Test Compatible Components 99 Microsoft® Windows® XP Environment Test 100 Microsoft® Windows®...
... 61 Chapter 4 Troubleshooting 63 System Check Procedures 64 External Diskette Drive Check 64 External CD-ROM/DVD-ROM Drive Check 64 Keyboard or Auxiliary Input Device Check 65 Memory Check 65 Power System Check 65 Touchpad Check 67 Display Check 67 Sound Check 68...Problems 76 Index of AFlash BIOS Error Message 77 Chapter 5 FRU (Field Replaceable Unit) List 79 Appendix A Model Definition and Configuration 96 TravelMate 800 Series 96 Main Features 97 Appendix B Test Compatible Components 99 Microsoft® Windows® XP Environment Test 100 Microsoft® Windows®...

TravelMate 800 Service Guide
Page 9
... drive and optical drive) • Rugged, yet extremely portable, construction • Stylish appearance • Full-size keyboard with 4 programmable launch keys • Comfortable palm rest area with 1600 x 1200 pixel resolution, 16.7 million colors TravelMate 800 series notebook computer features an accelerated graphics port (AGP) video system in mind. Here are just a few...
... drive and optical drive) • Rugged, yet extremely portable, construction • Stylish appearance • Full-size keyboard with 4 programmable launch keys • Comfortable palm rest area with 1600 x 1200 pixel resolution, 16.7 million colors TravelMate 800 series notebook computer features an accelerated graphics port (AGP) video system in mind. Here are just a few...

TravelMate 800 Service Guide
Page 10
SG_TM800.book Page 2 Thursday, February 27, 2003 10:21 PM Keyboard and Pointing Device • 84-/85-/88-key Windows keyboard • Ergonomically-centered touchpad pointing device I/O Ports One PCMCIA slot (type II or type III) One RJ-11 modem jack (V.90, 56K) One RJ-45 ...
SG_TM800.book Page 2 Thursday, February 27, 2003 10:21 PM Keyboard and Pointing Device • 84-/85-/88-key Windows keyboard • Ergonomically-centered touchpad pointing device I/O Ports One PCMCIA slot (type II or type III) One RJ-11 modem jack (V.90, 56K) One RJ-45 ...

TravelMate 800 Service Guide
Page 14
..., The left and right buttons function like the left and right center and right) mouse buttons; the center button serves as you use the computer. 6 Keyboard Inputs data into your hands when you would with a desktop PC. mail program and to launch Internet browser, E- Front Open View # Icon Item Description 1 Display...
..., The left and right buttons function like the left and right center and right) mouse buttons; the center button serves as you use the computer. 6 Keyboard Inputs data into your hands when you would with a desktop PC. mail program and to launch Internet browser, E- Front Open View # Icon Item Description 1 Display...
TravelMate 800 Service Guide
Page 21
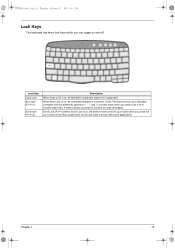
A better solution would be to do a lot of numeric data entry. SG_TM800.book Page 13 Thursday, February 27, 2003 10:21 PM Lock Keys The keyboard has three lock keys which you can toggle on , all alphabetic characters typed are in numeric mode. Chapter 1 13 When Num Lock is on, the ...
A better solution would be to do a lot of numeric data entry. SG_TM800.book Page 13 Thursday, February 27, 2003 10:21 PM Lock Keys The keyboard has three lock keys which you can toggle on , all alphabetic characters typed are in numeric mode. Chapter 1 13 When Num Lock is on, the ...

TravelMate 800 Service Guide
Page 22
... Shift while using cursor-control keys. It is indicated by small characters located on embedded keypad. Type the letters in a normal manner. To simplify the keyboard legend, cursor-control key symbols are not printed on embedded keypad Main keyboard keys Num Lock On Type numbers in a normal manner. 14 Chapter 1
... Shift while using cursor-control keys. It is indicated by small characters located on embedded keypad. Type the letters in a normal manner. To simplify the keyboard legend, cursor-control key symbols are not printed on embedded keypad Main keyboard keys Num Lock On Type numbers in a normal manner. 14 Chapter 1

TravelMate 800 Service Guide
Page 23
Combinations with this key perform shortcut functions. dialog box) Opens a context menu (same as a right-click). SG_TM800.book Page 15 Thursday, February 27, 2003 10:21 PM Windows Keys The keyboard has two keys that perform Windows-specific functions. Key Windows logo key Application key Icon Description Start button. Below are a few examples: + Tab (Activates next taskbar button) + E (Explores My Computer) + F (Finds Document) + M (Minimizes All) Shift + + M (Undoes Minimize All) + R (Displays the Run... Chapter 1 15
Combinations with this key perform shortcut functions. dialog box) Opens a context menu (same as a right-click). SG_TM800.book Page 15 Thursday, February 27, 2003 10:21 PM Windows Keys The keyboard has two keys that perform Windows-specific functions. Key Windows logo key Application key Icon Description Start button. Below are a few examples: + Tab (Activates next taskbar button) + E (Explores My Computer) + F (Finds Document) + M (Minimizes All) Shift + + M (Undoes Minimize All) + R (Displays the Run... Chapter 1 15

TravelMate 800 Service Guide
Page 26
... first set to United States-International. Double-click on OK. 5. Please refer to United States-International. For the Euro symbol to work, the keyboard layout has to be set to www.microsoft.com/ typography/faq/faq12.htm for more information. 18 Chapter 1 Click on Start, Control Panel....Windows Millennium Edition and Windows 2000, follow the steps below : 1. Click on OK. Click on OK. Click on the Language tab and click on Keyboard. 3. Double-click on Details. 4. If not, select and click on ADD; If not, select and click on Properties; To type the Euro ...
... first set to United States-International. Double-click on OK. 5. Please refer to United States-International. For the Euro symbol to work, the keyboard layout has to be set to www.microsoft.com/ typography/faq/faq12.htm for more information. 18 Chapter 1 Click on Start, Control Panel....Windows Millennium Edition and Windows 2000, follow the steps below : 1. Click on OK. Click on OK. Click on the Language tab and click on Keyboard. 3. Double-click on Details. 4. If not, select and click on ADD; If not, select and click on Properties; To type the Euro ...

TravelMate 800 Service Guide
Page 27
Launch Key Email Web browser P1 P2 Default application Email application Internet browser application User-programmable User-programmable Chapter 1 19 To the right of the power button are five buttons. SG_TM800.book Page 19 Thursday, February 27, 2003 10:21 PM Launch Keys Located above the keyboard are the four launch keys. The left-most button is the power button. They are designated as the mail button, the web browser button, and two programmable buttons (P1 and P2).
Launch Key Email Web browser P1 P2 Default application Email application Internet browser application User-programmable User-programmable Chapter 1 19 To the right of the power button are five buttons. SG_TM800.book Page 19 Thursday, February 27, 2003 10:21 PM Launch Keys Located above the keyboard are the four launch keys. The left-most button is the power button. They are designated as the mail button, the web browser button, and two programmable buttons (P1 and P2).

TravelMate 800 Service Guide
Page 28
... Manager icon on the taskbar and click on E-Mail Detection. Aside from the email checking function, there is a mail button that is located above the keyboard right below the LCD. 20 Chapter 1 The POP3 Server is the mail server where you have an email account, you can fill in User Name...
... Manager icon on the taskbar and click on E-Mail Detection. Aside from the email checking function, there is a mail button that is located above the keyboard right below the LCD. 20 Chapter 1 The POP3 Server is the mail server where you have an email account, you can fill in User Name...

TravelMate 800 Service Guide
Page 30
... Supports memory size per socket Supports maximum memory size Supports DIMM type Supports DIMM Speed Supports DIMM voltage Supports DIMM package Memory module combinations Specification Acer 1.0 Flash ROM 512KB PLCC ACPI 1.0b, APM 1.2, PC Card 95, SM BIOS 2.3, EPP/IEE 1284, ECP/IEEE 1284 1.7 & 1.9, ...PCI 2.2, PnP 1.0a, DMI 2.0, USB, VESA VGA BIOS, BBC2B, CD-ROM bootable, Windows keyboard Microsoft Simple Boot Flag Set by setup manual Built-in CPU 1MB Always enabled Always enabled Specification Specification Intel ODEM 0MB 2 sockets 512MB 1024MB Synchronous...
... Supports memory size per socket Supports maximum memory size Supports DIMM type Supports DIMM Speed Supports DIMM voltage Supports DIMM package Memory module combinations Specification Acer 1.0 Flash ROM 512KB PLCC ACPI 1.0b, APM 1.2, PC Card 95, SM BIOS 2.3, EPP/IEE 1284, ECP/IEEE 1284 1.7 & 1.9, ...PCI 2.2, PnP 1.0a, DMI 2.0, USB, VESA VGA BIOS, BBC2B, CD-ROM bootable, Windows keyboard Microsoft Simple Boot Flag Set by setup manual Built-in CPU 1MB Always enabled Always enabled Specification Specification Intel ODEM 0MB 2 sockets 512MB 1024MB Synchronous...

TravelMate 800 Service Guide
Page 34
... Board Major Chips Item System core logic Super I/O controller Audio controller Video controller Hard disk drive controller Keyboard controller RTC Keyboard Item Keyboard controller Keyboard vendor & model name Total number of keypads Windows 95 keys Internal & external keyboard work simultaneously TI TSB43AB21 1 Left panel Specification Specification 2.0 USB 2.0 4 Left panel Enable/Disable/Auto by BIOS Setup...
... Board Major Chips Item System core logic Super I/O controller Audio controller Video controller Hard disk drive controller Keyboard controller RTC Keyboard Item Keyboard controller Keyboard vendor & model name Total number of keypads Windows 95 keys Internal & external keyboard work simultaneously TI TSB43AB21 1 Left panel Specification Specification 2.0 USB 2.0 4 Left panel Enable/Disable/Auto by BIOS Setup...

TravelMate 800 Service Guide
Page 35
... LCD brightness. Avoid touching the DC-AC inverter area while the system is also responsible for LCD backlight (Vrms) 14.1 TFT XGA (1024x768) 16.7 million Keyboard hotkey No Yes 3.3 660 (typ.) Specification LG LP150E02-A2P1 Hitachi TX38D81VC1CAB AU B150XG01 15.0 TFT SXGA (1400X1050) 16.7 million...
... LCD brightness. Avoid touching the DC-AC inverter area while the system is also responsible for LCD backlight (Vrms) 14.1 TFT XGA (1024x768) 16.7 million Keyboard hotkey No Yes 3.3 660 (typ.) Specification LG LP150E02-A2P1 Hitachi TX38D81VC1CAB AU B150XG01 15.0 TFT SXGA (1400X1050) 16.7 million...

TravelMate 800 Service Guide
Page 37
Display Standby Mode Keyboard, built-in touchpad, and an external PS/2 pointing device are set to 90% RH, non-condensing (unpacked) Non (storage package) 5~500Hz: 1.0Grms (random) 5~500Hz: 2.16Grms (...
Display Standby Mode Keyboard, built-in touchpad, and an external PS/2 pointing device are set to 90% RH, non-condensing (unpacked) Non (storage package) 5~500Hz: 1.0Grms (random) 5~500Hz: 2.16Grms (...

TravelMate 800 Service Guide
Page 38
...IRQ05 IRQ06 IRQ07 IRQ08 IRQ09 IRQ10 IRQ11 IRQ12 IRQ13 IRQ14 IRQ15 Interrupt Channel 30 Function DMA controller-1 Interrupt controller-1 Timer 1 Keyboard controller 38859 chip select System speaker out DMA controller-1 System speaker Real-time clock and NMI mask DMA page register Interrupt ...port 3 Paraller port 1 Video Controller Standard Floppy Disk Controller Floppy disk controller DMA controller-1 PCI configuration register Function(Hardware) System Timer Keyboard IrDA Fast Infrared Port Communications Port (COM1) LAN, USB Free Free System CMOS / realtime clock SCI IRQ used by ACPI bus, ...
...IRQ05 IRQ06 IRQ07 IRQ08 IRQ09 IRQ10 IRQ11 IRQ12 IRQ13 IRQ14 IRQ15 Interrupt Channel 30 Function DMA controller-1 Interrupt controller-1 Timer 1 Keyboard controller 38859 chip select System speaker out DMA controller-1 System speaker Real-time clock and NMI mask DMA page register Interrupt ...port 3 Paraller port 1 Video Controller Standard Floppy Disk Controller Floppy disk controller DMA controller-1 PCI configuration register Function(Hardware) System Timer Keyboard IrDA Fast Infrared Port Communications Port (COM1) LAN, USB Free Free System CMOS / realtime clock SCI IRQ used by ACPI bus, ...

TravelMate 800 Service Guide
Page 57
Chapter 3 49 For example, if you want to remove the system board, you on the entire disassembly sequence and instructs you must first remove the keyboard, then disassemble the inside assembly frame in that need to be removed during servicing. SG_TM800.book Page 49 Thursday, February 27, 2003 10:21 PM Disassembly Procedure Flowchart The flowchart on the succeeding page gives you a graphic representation on the components that order.
Chapter 3 49 For example, if you want to remove the system board, you on the entire disassembly sequence and instructs you must first remove the keyboard, then disassemble the inside assembly frame in that need to be removed during servicing. SG_TM800.book Page 49 Thursday, February 27, 2003 10:21 PM Disassembly Procedure Flowchart The flowchart on the succeeding page gives you a graphic representation on the components that order.

TravelMate 800 Service Guide
Page 61
SG_TM800.book Page 53 Thursday, February 27, 2003 10:21 PM Removing the Memory 1. Unscrew the 1 screw that secure the LCD module on the other 2 screws on one side. 4. Disconnect the LCD cable. 3. Then unscrew the other side. 5. Removing the LCD Module / Keyboard / Function Keyboard Removing the LCD Module 1. Remove the entire LCD module. Remove the middle cover as shown. 2. Unscrew the 2 screws that secures the Dimm door. 2. Chapter 3 53 Remove the Dimm door.
SG_TM800.book Page 53 Thursday, February 27, 2003 10:21 PM Removing the Memory 1. Unscrew the 1 screw that secure the LCD module on the other 2 screws on one side. 4. Disconnect the LCD cable. 3. Then unscrew the other side. 5. Removing the LCD Module / Keyboard / Function Keyboard Removing the LCD Module 1. Remove the entire LCD module. Remove the middle cover as shown. 2. Unscrew the 2 screws that secures the Dimm door. 2. Chapter 3 53 Remove the Dimm door.

TravelMate 800 Service Guide
Page 62
SG_TM800.book Page 54 Thursday, February 27, 2003 10:21 PM Removing the Keyboard 1. Disconnect the keyboard cable from the main board as "K", on the front panel. 3. Turn the main unit over and unscrew 3 screws on the bottom panel holding the keyboard. 2. Unscrew the 2 screws, marked as shown. 54 Chapter 3
SG_TM800.book Page 54 Thursday, February 27, 2003 10:21 PM Removing the Keyboard 1. Disconnect the keyboard cable from the main board as "K", on the front panel. 3. Turn the main unit over and unscrew 3 screws on the bottom panel holding the keyboard. 2. Unscrew the 2 screws, marked as shown. 54 Chapter 3

TravelMate 800 Service Guide
Page 63
Disconnect the long touchpad FFC from the main unit. Then remove function keyboard from the main board. 2. SG_TM800.book Page 55 Thursday, February 27, 2003 10:21 PM Removing the Function Keyboard 1. Unscrew 2 screws that secure the function keyboard. 2. Then unscrew the other screw and detach the left wireless LAN antenna. Chapter 3 55 Disassembling the Main Unit 1. Unscrew the 1 screw and detach the right wireless LAN antenna as shown. 3.
Disconnect the long touchpad FFC from the main unit. Then remove function keyboard from the main board. 2. SG_TM800.book Page 55 Thursday, February 27, 2003 10:21 PM Removing the Function Keyboard 1. Unscrew 2 screws that secure the function keyboard. 2. Then unscrew the other screw and detach the left wireless LAN antenna. Chapter 3 55 Disassembling the Main Unit 1. Unscrew the 1 screw and detach the right wireless LAN antenna as shown. 3.


