TravelMate 660 Service Guide
Page 7
... Optical Module/HDD Module/Wireless Lan Card and LCD module . .53 Removing the Optical Module 53 Removing the HDD Module 53 Removing the Wireless LAN Card 53 Removing the LCD Module 54 Disassembling the Main Unit 55 Remove the function key board and the keyboard 55 Separate the main unit into the logic upper and the...
... Optical Module/HDD Module/Wireless Lan Card and LCD module . .53 Removing the Optical Module 53 Removing the HDD Module 53 Removing the Wireless LAN Card 53 Removing the LCD Module 54 Disassembling the Main Unit 55 Remove the function key board and the keyboard 55 Separate the main unit into the logic upper and the...
TravelMate 660 Service Guide
Page 57
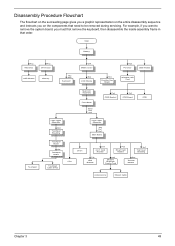
...Board Hx4 Touchpad Holder Touchpad Cable (FFC) Logic Lower Assembly Ax4 Hx1 Hx1 Main Board CPU Dimm Dx3 4-in that need to remove the system board, you on the components that order. Disassembly Procedure Flowchart The flowchart on the succeeding page gives you a graphic ...representation on the entire disassembly sequence and instructs you must first remove the keyboard, then disassemble the inside assembly frame in -1 Card Rearder Fx2 Smart Card Reader Hx1 Top Cover Shielding Tx2 HDD Bracket Hx2 Modem...
...Board Hx4 Touchpad Holder Touchpad Cable (FFC) Logic Lower Assembly Ax4 Hx1 Hx1 Main Board CPU Dimm Dx3 4-in that need to remove the system board, you on the components that order. Disassembly Procedure Flowchart The flowchart on the succeeding page gives you a graphic ...representation on the entire disassembly sequence and instructs you must first remove the keyboard, then disassemble the inside assembly frame in -1 Card Rearder Fx2 Smart Card Reader Hx1 Top Cover Shielding Tx2 HDD Bracket Hx2 Modem...
TravelMate 660 Service Guide
Page 63
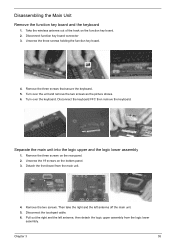
...panel. 3. Separate the main unit into the logic upper and the logic lower assembly 1. Disconnect the keyboard FFC then remove the keyboard. Detach the front bezel from the logic lower assembly. Remove the two screws. Pull out the right and the left antenna off the main unit. 5. Turn ...over the unit and remove the two screws as the picture shows. 6. Turn over the keyboard. Remove the three screws on the rear panel. 2. Disassembling the Main Unit Remove the function key board and the keyboard 1. Unscrew the three screws holding the function key board....
...panel. 3. Separate the main unit into the logic upper and the logic lower assembly 1. Disconnect the keyboard FFC then remove the keyboard. Detach the front bezel from the logic lower assembly. Remove the two screws. Pull out the right and the left antenna off the main unit. 5. Turn ...over the unit and remove the two screws as the picture shows. 6. Turn over the keyboard. Remove the three screws on the rear panel. 2. Disassembling the Main Unit Remove the function key board and the keyboard 1. Unscrew the three screws holding the function key board....
TravelMate 660 Service Guide
Page 72
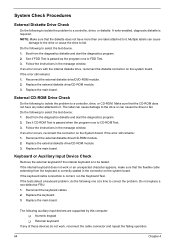
..., reconnect the connector on the system board. The following auxiliary input devices are supported by this computer: T Numeric keypad T External keyboard If any label attached to be tested. If the error still remains: 1. Make sure that the CD-ROM does not have more...following to isolate the problem to select the test device. 1. Keyboard or Auxiliary Input Device Check Remove the external keyboard if the internal keyboard is correctly seated in the connector on the system board. Reconnect the keyboard cables. 2. System Check Procedures External Diskette Drive Check Do ...
..., reconnect the connector on the system board. The following auxiliary input devices are supported by this computer: T Numeric keypad T External keyboard If any label attached to be tested. If the error still remains: 1. Make sure that the CD-ROM does not have more...following to isolate the problem to select the test device. 1. Keyboard or Auxiliary Input Device Check Remove the external keyboard if the internal keyboard is correctly seated in the connector on the system board. Reconnect the keyboard cables. 2. System Check Procedures External Diskette Drive Check Do ...
TravelMate 660 Service Guide
Page 113
... size 23 caps lock on indicator 12 CardBus 28 CPU core voltage 23 package 23 type 23 D DIMM 23 Combinations 24 external 53 package 23 removing 53 Speed 23 voltage 23 Index Index Disassembly Battery Pack 50 CD-ROM/DVD-ROM Module 55 Floppy Disk Drive 59 Procedure Flowchart 49 Display... Symptom-to-Spare Part Index 67 External CD-ROM Drive Check 64 External Diskette Drive Check 64 F Features 1 features 93 Flash Utility 45 Floppy Disk removing the 59 FRU (Field Replaceable Unit) List 81 H Hard disk 25 HDD 25 Hot Keys 13 I Indicators 12 Intermittent Problems 74 J Jumper and Connector Locations...
... size 23 caps lock on indicator 12 CardBus 28 CPU core voltage 23 package 23 type 23 D DIMM 23 Combinations 24 external 53 package 23 removing 53 Speed 23 voltage 23 Index Index Disassembly Battery Pack 50 CD-ROM/DVD-ROM Module 55 Floppy Disk Drive 59 Procedure Flowchart 49 Display... Symptom-to-Spare Part Index 67 External CD-ROM Drive Check 64 External Diskette Drive Check 64 F Features 1 features 93 Flash Utility 45 Floppy Disk removing the 59 FRU (Field Replaceable Unit) List 81 H Hard disk 25 HDD 25 Hot Keys 13 I Indicators 12 Intermittent Problems 74 J Jumper and Connector Locations...

Travelmate 660 User Guide
Page 37
... the building. then slide and release the power switch. English 29 Moving around or traveling with your TravelMate This section gives you tips and hints to place it in progress. 2 Remove any media, diskette or compact disc, from the drive(s). 3 Shut down the computer. 4 Close ... or select Turn Off (Windows XP). Disconnecting from the desktop Follow these steps to disconnect your computer from the AC adapter. 6 Disconnect the keyboard, pointing device, printer, external monitor, and other external devices. 7 Disconnect the Kensington lock if you are taking the computer to a client...
... the building. then slide and release the power switch. English 29 Moving around or traveling with your TravelMate This section gives you tips and hints to place it in progress. 2 Remove any media, diskette or compact disc, from the drive(s). 3 Shut down the computer. 4 Close ... or select Turn Off (Windows XP). Disconnecting from the desktop Follow these steps to disconnect your computer from the AC adapter. 6 Disconnect the keyboard, pointing device, printer, external monitor, and other external devices. 7 Disconnect the Kensington lock if you are taking the computer to a client...

Travelmate 660 User Guide
Page 75
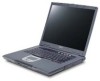
...Audio • 16-bit AC'97 stereo audio • Dual speakers and one slot for headphone-out, line-in devices Keyboard and pointing device • 84-/85-/88-key Windows keyboard • Ergonomically-centered touchpad pointing device with 1024KB L2 cache Memory • Main memory expandable up to 1024 x 768 ... DDR RAM modules • 512 KB Flash ROM BIOS Data storage • One high-capacity, Enhanced-IDE hard disk • One 5.25-inch internal removable optical drive (AcerMedia bay) Display and video • Thin-Film Transistor (TFT) liquid crystal display (LCD) displaying 32-
...Audio • 16-bit AC'97 stereo audio • Dual speakers and one slot for headphone-out, line-in devices Keyboard and pointing device • 84-/85-/88-key Windows keyboard • Ergonomically-centered touchpad pointing device with 1024KB L2 cache Memory • Main memory expandable up to 1024 x 768 ... DDR RAM modules • 512 KB Flash ROM BIOS Data storage • One high-capacity, Enhanced-IDE hard disk • One 5.25-inch internal removable optical drive (AcerMedia bay) Display and video • Thin-Film Transistor (TFT) liquid crystal display (LCD) displaying 32-

