TravelMate 6291/6292/6231 User's Guide EN
Page 35
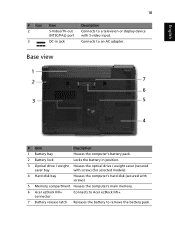
... position. 3 Optical drive / weight Houses the optical drive / weight saver (secured saver bay with screw) (for selected models) 4 Hard disk bay Houses the computer's hard disk (secured with S-video input. Connects to remove the battery pack. ...Base view 7 6 3 5 4 # Item Description 1 Battery bay Houses the computer's battery pack. 2 Battery lock Locks the battery in jack Description Connects to a television or display device with screws) 5 Memory compartment Houses the computer's main memory. 6 Acer ezDock II/II+ connector Connects to Acer...
... position. 3 Optical drive / weight Houses the optical drive / weight saver (secured saver bay with screw) (for selected models) 4 Hard disk bay Houses the computer's hard disk (secured with S-video input. Connects to remove the battery pack. ...Base view 7 6 3 5 4 # Item Description 1 Battery bay Houses the computer's battery pack. 2 Battery lock Locks the battery in jack Description Connects to a television or display device with screws) 5 Memory compartment Houses the computer's main memory. 6 Acer ezDock II/II+ connector Connects to Acer...
Service Guide for TravelMate 6291, 6292, 6231
Page 53
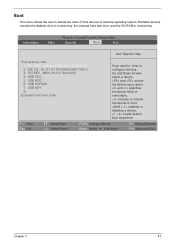
Loads default boot sequence. and specifies the device fixed or removable. F1 Help Esc Exit Select Item Select Menu F5/F6 Change Values Enter Select Sub-Menu F9 Setup Defaults F10 Save and Exit Chapter 2 47 ... down. exclude or include the device to view or configure devices : Up and Down arrows select a device. Bootable devices includes the diskette drive in module bay, the onboard hard disk drive, and the CD-ROM in module bay. Information Main Phoenix TrustedCore(tm) Setup Utility Security Boot Exit Item Specific Help Boot priority...
Loads default boot sequence. and specifies the device fixed or removable. F1 Help Esc Exit Select Item Select Menu F5/F6 Change Values Enter Select Sub-Menu F9 Setup Defaults F10 Save and Exit Chapter 2 47 ... down. exclude or include the device to view or configure devices : Up and Down arrows select a device. Bootable devices includes the diskette drive in module bay, the onboard hard disk drive, and the CD-ROM in module bay. Information Main Phoenix TrustedCore(tm) Setup Utility Security Boot Exit Item Specific Help Boot priority...

Service Guide for TravelMate 6291, 6292, 6231
Page 71
two on each side. 2. Remove the four screws holding the optical bracket. 2. Carefully take out the hard disk drive from the optical disk drive. Then remove the optical bracket from the HDD case. Disassembling the ODD Module 1. Remove the two screws holding the HDD (hard disk drive) case; Chapter 3 65 Disassembling the External Modules Disassembling the HDD Module 1.
two on each side. 2. Remove the four screws holding the optical bracket. 2. Carefully take out the hard disk drive from the optical disk drive. Then remove the optical bracket from the HDD case. Disassembling the ODD Module 1. Remove the two screws holding the HDD (hard disk drive) case; Chapter 3 65 Disassembling the External Modules Disassembling the HDD Module 1.

Service Guide for TravelMate 6291, 6292, 6231
Page 88
... Board Ensure the "Serial Port" in Sequence Enter BIOS Setup Utility to Enabled. External display does not work correctly. Reconnect hard disk/CD-ROM/diskette drives. Action in this list and the problem remains, see "Undetermined Problems" on page 84. 82 Chapter 4 Press Fn+F5... Ensure the "Parallel Port" in Windows doesn't go higher than 90%. Remove battery pack and let it cool for 2 hours. Refresh battery (continue use battery until power off, then charge battery). Hard disk connection board System board Peripheral-Related Symptoms Symptom / Error System configuration ...
... Board Ensure the "Serial Port" in Sequence Enter BIOS Setup Utility to Enabled. External display does not work correctly. Reconnect hard disk/CD-ROM/diskette drives. Action in this list and the problem remains, see "Undetermined Problems" on page 84. 82 Chapter 4 Press Fn+F5... Ensure the "Parallel Port" in Windows doesn't go higher than 90%. Remove battery pack and let it cool for 2 hours. Refresh battery (continue use battery until power off, then charge battery). Hard disk connection board System board Peripheral-Related Symptoms Symptom / Error System configuration ...

Service Guide for TravelMate 6291, 6292, 6231
Page 90
If the problem does not recur, reconnect the removed devices one at a time until you find the failing FRU. 7. Power-on page 69.): 1. NOTE: Verify that the power supply being used at the time .... 6. If the problem remains, replace the following devices: T Non-Acer devices T Printer, mouse, and other external devices T Battery pack T Hard disk drive T DIMM T CD-ROM/Diskette drive Module T PC Cards 4. NOTE: Verify that all of the failure is inoperative. Visually check them for damage. Remove or disconnect all attached devices are supported by the computer...
If the problem does not recur, reconnect the removed devices one at a time until you find the failing FRU. 7. Power-on page 69.): 1. NOTE: Verify that the power supply being used at the time .... 6. If the problem remains, replace the following devices: T Non-Acer devices T Printer, mouse, and other external devices T Battery pack T Hard disk drive T DIMM T CD-ROM/Diskette drive Module T PC Cards 4. NOTE: Verify that all of the failure is inoperative. Visually check them for damage. Remove or disconnect all attached devices are supported by the computer...


