
User Manual
Page 21
...would like to the TravelMate User's Manual. YOUR GUIDES To help you to your new computer. It covers basic topics such as system utilities, data recovery, expansion options and troubleshooting. This guide contains detailed information on how your computer can help you use your Acer notebook, we have ...meeting your computer. For more productive, please refer to thank you get started with setting up your mobile computing needs. The TravelMate User's Manual contains useful information applying to the basic features and functions of guides: First off, the setup poster helps you for...
...would like to the TravelMate User's Manual. YOUR GUIDES To help you to your new computer. It covers basic topics such as system utilities, data recovery, expansion options and troubleshooting. This guide contains detailed information on how your computer can help you use your Acer notebook, we have ...meeting your computer. For more productive, please refer to thank you get started with setting up your mobile computing needs. The TravelMate User's Manual contains useful information applying to the basic features and functions of guides: First off, the setup poster helps you for...

User Manual
Page 26
Turning your computer on and off 22 Taking care of your computer 22 Taking care of your AC adapter 23 Taking care of your battery pack 23 Cleaning and servicing 24 Your Acer notebook tour 30 Top view 31 Left view 33 Right view 34 Base view 36 Touchpad 37 Touchpad basics (with two buttons) 37 Using the keyboard 39 Lock keys and embedded numeric keypad 39 Hotkeys 40 Windows keys 42 Acer Backup Manager 44 Acer eRecovery Management 46 Creating a recovery backup 47 Recovering your system 50 26
Turning your computer on and off 22 Taking care of your computer 22 Taking care of your AC adapter 23 Taking care of your battery pack 23 Cleaning and servicing 24 Your Acer notebook tour 30 Top view 31 Left view 33 Right view 34 Base view 36 Touchpad 37 Touchpad basics (with two buttons) 37 Using the keyboard 39 Lock keys and embedded numeric keypad 39 Hotkeys 40 Windows keys 42 Acer Backup Manager 44 Acer eRecovery Management 46 Creating a recovery backup 47 Recovering your system 50 26

User Manual
Page 27
To recover your system Types of recovery Recovering pre-installed software and drivers Returning to a previous system condition Returning your system to its factory condition Taking your notebook PC with you Disconnecting ...
To recover your system Types of recovery Recovering pre-installed software and drivers Returning to a previous system condition Returning your system to its factory condition Taking your notebook PC with you Disconnecting ...

User Manual
Page 28
Using passwords 65 Entering passwords 66 Setting passwords 67 BIOS utility 68 Boot sequence 68 Enable disk-to-disk recovery 68 Setting passwords 68 Connecting to a network 69 Connectivity options 69 Built-in network feature 69 Playing DVD movies 71 Upgrading memory 73 Universal Serial Bus (USB) 75 Battery pack 76 Battery pack characteristics 76 28
Using passwords 65 Entering passwords 66 Setting passwords 67 BIOS utility 68 Boot sequence 68 Enable disk-to-disk recovery 68 Setting passwords 68 Connecting to a network 69 Connectivity options 69 Built-in network feature 69 Playing DVD movies 71 Upgrading memory 73 Universal Serial Bus (USB) 75 Battery pack 76 Battery pack characteristics 76 28

User Manual
Page 46
... Retain User Data • Reinstall Drivers or Applications This chapter will guide you should create a recovery backup as soon as possible. Backup: • Create Factory Default Backup • Backup Drivers and Applications 2. Acer eRecovery Management consists of the following functions: 1. ACER ERECOVERY MANAGEMENT If your computer when needed, you through each process. 46
... Retain User Data • Reinstall Drivers or Applications This chapter will guide you should create a recovery backup as soon as possible. Backup: • Create Factory Default Backup • Backup Drivers and Applications 2. Acer eRecovery Management consists of the following functions: 1. ACER ERECOVERY MANAGEMENT If your computer when needed, you through each process. 46

User Manual
Page 47
CREATING A RECOVERY BACKUP To reinstall using a backup on optical discs, you must first set by onscreen instructions. Throughout the process, you will be guided by launching Acer eRecovery Management and clicking Settings. Please read them carefully! The password is set the password. Acer eRecovery Management - 47 To use the password protection feature of Acer eRecovery Management, you must create the recovery disc beforehand.
CREATING A RECOVERY BACKUP To reinstall using a backup on optical discs, you must first set by onscreen instructions. Throughout the process, you will be guided by launching Acer eRecovery Management and clicking Settings. Please read them carefully! The password is set the password. Acer eRecovery Management - 47 To use the password protection feature of Acer eRecovery Management, you must create the recovery disc beforehand.
User Manual
Page 48
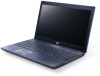
... Create Factory Default Backup dialog box tells you the number of blank, recordable discs you create each type of recovery backup as soon as possible. OR To create a recovery disc for the hard drive's entire original contents, including Windows and all factory-loaded software and drivers, click ...Create Factory Default Disc. - 1. Important: We recommend that you will need to complete the recovery discs. 48 To create recovery discs for only the factory-loaded software and drivers, click Create Drivers and Applications Backup Disc. Click Start > All Programs...
... Create Factory Default Backup dialog box tells you the number of blank, recordable discs you create each type of recovery backup as soon as possible. OR To create a recovery disc for the hard drive's entire original contents, including Windows and all factory-loaded software and drivers, click ...Create Factory Default Disc. - 1. Important: We recommend that you will need to complete the recovery discs. 48 To create recovery discs for only the factory-loaded software and drivers, click Create Drivers and Applications Backup Disc. Click Start > All Programs...
User Manual
Page 50
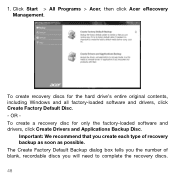
... and mark it . 3. This will restore your problem, you will be shown the backup progress on each disc as 'Windows Recovery Disc 1 of 2' or 'Apps/Drivers Recovery disc'. If multiple discs are required, insert a new disc when prompted, then click OK. The drive ejects each disc, such...the process is complete. Insert a blank disc into the drive indicated in a safe place that you can use the Acer eRecovery Management program. 2. RECOVERING YOUR SYSTEM If calling Acer support did not help fix your computer to list, then click Next. Note: Write a unique, descriptive label on ...
... and mark it . 3. This will restore your problem, you will be shown the backup progress on each disc as 'Windows Recovery Disc 1 of 2' or 'Apps/Drivers Recovery disc'. If multiple discs are required, insert a new disc when prompted, then click OK. The drive ejects each disc, such...the process is complete. Insert a blank disc into the drive indicated in a safe place that you can use the Acer eRecovery Management program. 2. RECOVERING YOUR SYSTEM If calling Acer support did not help fix your computer to list, then click Next. Note: Write a unique, descriptive label on ...

User Manual
Page 52
TYPES OF RECOVERY Recovering pre-installed software and drivers As a troubleshooting step, you may need to recover device drivers that did not come pre-installed on your computer ... need to reinstall the software and device drivers that did not come pre- OR - 52 You can recover using either your hard drive or the recovery discs you have created. • New software: If you need to recover software that came pre-installed on your pre-installed software and drivers: Click...
TYPES OF RECOVERY Recovering pre-installed software and drivers As a troubleshooting step, you may need to recover device drivers that did not come pre-installed on your computer ... need to reinstall the software and device drivers that did not come pre- OR - 52 You can recover using either your hard drive or the recovery discs you have created. • New software: If you need to recover software that came pre-installed on your pre-installed software and drivers: Click...

User Manual
Page 53
... device drivers. 3. Click Contents to - In most cases of hard-to show a list of your driver and application recovery disc, insert it into the disc drive, then go to complete the installation. Acer eRecovery Management - 53 Click the Restore tab, then click Reinstall Drivers or Applications to reinstall. If you are recovering...
... device drivers. 3. Click Contents to - In most cases of hard-to show a list of your driver and application recovery disc, insert it into the disc drive, then go to complete the installation. Acer eRecovery Management - 53 Click the Restore tab, then click Reinstall Drivers or Applications to reinstall. If you are recovering...

User Manual
Page 54
...will appear. 4. Returning your system to return your computer. Click Start > Control Panel > System and Security > Action Center, then click Recovery. 2. Click Yes. Select the restore point you install software or device drivers. Windows automatically creates an additional restore point each day, and ...Microsoft System Restore, click Start, then click Help and Support. Click Open System Restore, then Next. 3. Warning: This complete recovery deletes everything to its factory condition If your computer experiences problems that 54 Type windows system restore in the Search Help box, ...
...will appear. 4. Returning your system to return your computer. Click Start > Control Panel > System and Security > Action Center, then click Recovery. 2. Click Yes. Select the restore point you install software or device drivers. Windows automatically creates an additional restore point each day, and ...Microsoft System Restore, click Start, then click Help and Support. Click Open System Restore, then Next. 3. Warning: This complete recovery deletes everything to its factory condition If your computer experiences problems that 54 Type windows system restore in the Search Help box, ...

User Manual
Page 55
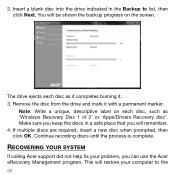
...display information about the hard drive that the operating system will erase all pre-installed software and drivers: Click Start > All Programs > Acer, then click Acer eRecovery Management. Click OK. were pre-installed on page 55. If you cannot run Windows and your original hard drive has been completely... by copying files to Factory Defaults. Recovering from the hard drive during startup" on page 56. This process may take a while, the Acer eRecovery Management screen displays the progress. Click Yes, then Start. The recovery process begins by restarting your system.
...display information about the hard drive that the operating system will erase all pre-installed software and drivers: Click Start > All Programs > Acer, then click Acer eRecovery Management. Click OK. were pre-installed on page 55. If you cannot run Windows and your original hard drive has been completely... by copying files to Factory Defaults. Recovering from the hard drive during startup" on page 56. This process may take a while, the Acer eRecovery Management screen displays the progress. Click Yes, then Start. The recovery process begins by restarting your system.
User Manual
Page 56
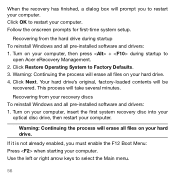
...be recovered. Recovering from the hard drive during startup to open Acer eRecovery Management. 2. Warning: Continuing the process will erase all files on your hard drive. Turn on your computer, insert the first system recovery disc into your optical disc drive, then restart your computer. ...reinstall Windows and all pre-installed software and drivers: 1. Your hard drive's original, factory-loaded contents will take several minutes. When the recovery has finished, a dialog box will prompt you must enable the F12 Boot Menu: Press when starting your computer. Follow the onscreen prompts...
...be recovered. Recovering from the hard drive during startup to open Acer eRecovery Management. 2. Warning: Continuing the process will erase all files on your hard drive. Turn on your computer, insert the first system recovery disc into your optical disc drive, then restart your computer. ...reinstall Windows and all pre-installed software and drivers: 1. Your hard drive's original, factory-loaded contents will take several minutes. When the recovery has finished, a dialog box will prompt you must enable the F12 Boot Menu: Press when starting your computer. Follow the onscreen prompts...

User Manual
Page 57
...open the boot menu. Press the down key until F12 Boot Menu is selected, press to change this line may start from the recovery disc you inserted. 3. Acer eRecovery Management - 57 Your computer will install from , such as the hard drive or an optical disc. 2. Use your arrow... keys to select the line CDROM/DVD (this setting to start with 'IDE 1...'), then press . Windows will restart. 1. Insert the second recovery disc when prompted...
...open the boot menu. Press the down key until F12 Boot Menu is selected, press to change this line may start from the recovery disc you inserted. 3. Acer eRecovery Management - 57 Your computer will install from , such as the hard drive or an optical disc. 2. Use your arrow... keys to select the line CDROM/DVD (this setting to start with 'IDE 1...'), then press . Windows will restart. 1. Insert the second recovery disc when prompted...

User Manual
Page 68
ENABLE DISK-TO-DISK RECOVERY To enable disk-to-disk recovery (hard disk recovery), activate the BIOS utility, then select Main from the categories listed at the top of the screen. Find Password on boot, activate the BIOS utility, ... to run this value to run it. BOOT SEQUENCE To set a password on boot: and use the and keys to set this utility. Find D2D Recovery at the top of the screen.
ENABLE DISK-TO-DISK RECOVERY To enable disk-to-disk recovery (hard disk recovery), activate the BIOS utility, then select Main from the categories listed at the top of the screen. Find Password on boot, activate the BIOS utility, ... to run this value to run it. BOOT SEQUENCE To set a password on boot: and use the and keys to set this utility. Find D2D Recovery at the top of the screen.

User Manual
Page 83
...below to a power outlet and that the printer cable is Enabled. Make sure the D2D Recovery setting in Main is connected securely to a USB port on the printer. Try attaching an ... back up all data will be reformatted and all data files before using this option. This recovery process helps you restore the C: drive with the original software content that is installed when you... you purchased your C: drive. (Your C: drive will be the only option for future recovery operations. Before performing a restore operation, please check the BIOS settings. 1. Frequently asked questions - 83...
...below to a power outlet and that the printer cable is Enabled. Make sure the D2D Recovery setting in Main is connected securely to a USB port on the printer. Try attaching an ... back up all data will be reformatted and all data files before using this option. This recovery process helps you restore the C: drive with the original software content that is installed when you... you purchased your C: drive. (Your C: drive will be the only option for future recovery operations. Before performing a restore operation, please check the BIOS settings. 1. Frequently asked questions - 83...
User Manual
Page 84
..., you can still get in contact with your hard disk. The system will reboot. Refer to the onscreen instructions to enter the recovery process. 3. If the country you are there to know about the ITW program. Restart the system. 2. This feature occupies 15 ...Please visit www.acer.com. 84 A list of service centers are traveling in this passport thoroughly. 3. Note: To activate the BIOS utility, press during POST. REQUESTING SERVICE International Travelers Warranty (ITW) Your computer is showing, press + at the same time to perform system recovery. Our worldwide network...
..., you can still get in contact with your hard disk. The system will reboot. Refer to the onscreen instructions to enter the recovery process. 3. If the country you are there to know about the ITW program. Restart the system. 2. This feature occupies 15 ...Please visit www.acer.com. 84 A list of service centers are traveling in this passport thoroughly. 3. Note: To activate the BIOS utility, press during POST. REQUESTING SERVICE International Travelers Warranty (ITW) Your computer is showing, press + at the same time to perform system recovery. Our worldwide network...


