
User Manual
Page 13
...Your guides To help you to be more productive, please refer to complete the installation. The printed User's Guide introduces you to use your Acer notebook, we have designed a set of the power button. Note: Viewing the file requires Adobe Reader. If Adobe Reader is available in ...comes preloaded on how to the basic features and functions of your new computer. For instructions on your notebook. In addition it : 1 Click on Start, All Programs, AcerSystem. 2 Click on the screen to the AcerSystem User's Guide. Follow the instructions on AcerSystem User's Guide. xiii First things ...
...Your guides To help you to be more productive, please refer to complete the installation. The printed User's Guide introduces you to use your Acer notebook, we have designed a set of the power button. Note: Viewing the file requires Adobe Reader. If Adobe Reader is available in ...comes preloaded on how to the basic features and functions of your new computer. For instructions on your notebook. In addition it : 1 Click on Start, All Programs, AcerSystem. 2 Click on the screen to the AcerSystem User's Guide. Follow the instructions on AcerSystem User's Guide. xiii First things ...

User Manual
Page 14
... any cables away from foot traffic. • When unplugging the power cord, do any of the following: • Use the Windows shutdown command Click on Start then click on top of it . • Do not expose the computer to any liquid on the computer. • Do not subject the computer to...
... any cables away from foot traffic. • When unplugging the power cord, do any of the following: • Use the Windows shutdown command Click on Start then click on top of it . • Do not expose the computer to any liquid on the computer. • Do not subject the computer to...
User Manual
Page 20
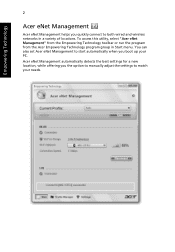
Acer eNet Management automatically detects the best settings for a new location, while offering you the option to manually adjust the settings to match your PC. Empowering Technology 2 Acer eNet Management Acer eNet Management helps you quickly connect to both wired and wireless networks in Start menu. To access this utility, select "Acer eNet Management" from the Empowering Technology toolbar or run the program from the Acer Empowering Technology program group in a variety of locations. You can also set Acer eNet Management to start automatically when you boot up your needs.
Acer eNet Management automatically detects the best settings for a new location, while offering you the option to manually adjust the settings to match your PC. Empowering Technology 2 Acer eNet Management Acer eNet Management helps you quickly connect to both wired and wireless networks in Start menu. To access this utility, select "Acer eNet Management" from the Empowering Technology toolbar or run the program from the Acer Empowering Technology program group in a variety of locations. You can also set Acer eNet Management to start automatically when you boot up your needs.

User Manual
Page 22
...allows you wish to switch to edit 2 Adjust settings as described below. Note: You cannot delete the predefined power plans. Using power plans Acer ePower Management comes with three predefined power plans: Balanced, High performance and Power saver. You can create, switch between power plans: 1 .... 4 If necessary, change the display and sleep settings you wish to from the Acer Empowering Technology program group in Start menu, or right-click the Windows power icon in the system tray and select "Acer ePower Management". To edit a power plan: Editing a power plan allows you to save...
...allows you wish to switch to edit 2 Adjust settings as described below. Note: You cannot delete the predefined power plans. Using power plans Acer ePower Management comes with three predefined power plans: Balanced, High performance and Power saver. You can create, switch between power plans: 1 .... 4 If necessary, change the display and sleep settings you wish to from the Acer Empowering Technology program group in Start menu, or right-click the Windows power icon in the system tray and select "Acer ePower Management". To edit a power plan: Editing a power plan allows you to save...

User Manual
Page 31
...) The Windows Mobility Center collects key mobile-related system settings in the Start menu Settings include display brightness, power plan, volume, wireless networking on or off , external display settings, display orientation and synchronization status. Windows Mobility Center also includes Acer-specific settings like Bluetooth Add Device (if applicable), sharing folders overview/sharing...
...) The Windows Mobility Center collects key mobile-related system settings in the Start menu Settings include display brightness, power plan, volume, wireless networking on or off , external display settings, display orientation and synchronization status. Windows Mobility Center also includes Acer-specific settings like Bluetooth Add Device (if applicable), sharing folders overview/sharing...
User Manual
Page 49
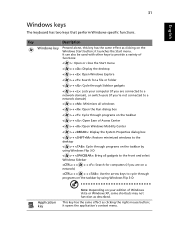
English 31 Windows keys The keyboard has two keys that perform Windows-specific functions. it launches the Start menu. It can also be used with other keys to provide a variety of functions: < > : Open or close the Start menu < > + : Display the desktop < > + : Open Windows Explore < > + : Search ... Use the arrow keys to cycle through programs on the taskbar by using Windows Flip 3-D Application key Note: Depending on the Windows Start button; This key has the same effect as described. it opens the application's context menu. Key Description Windows key Pressed alone, ...
English 31 Windows keys The keyboard has two keys that perform Windows-specific functions. it launches the Start menu. It can also be used with other keys to provide a variety of functions: < > : Open or close the Start menu < > + : Display the desktop < > + : Open Windows Explore < > + : Search ... Use the arrow keys to cycle through programs on the taskbar by using Windows Flip 3-D Application key Note: Depending on the Windows Start button; This key has the same effect as described. it opens the application's context menu. Key Description Windows key Pressed alone, ...
User Manual
Page 56
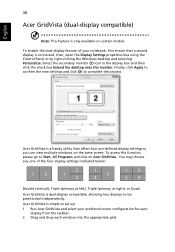
...configuration for each display from the taskbar. 2 Drag and drop each window into the appropriate grid. To access this monitor. English 38 Acer GridVista (dual-display compatible) Note: This feature is dual-display compatible, allowing two displays to be partitioned independently. Select the secondary ...monitor (2) icon in the display box and then click the check box Extend the desktop onto this function, please go to Start, All Programs and click on the same screen. To enable the dual display feature of the four display settings indicated below: 12 2 13...
...configuration for each display from the taskbar. 2 Drag and drop each window into the appropriate grid. To access this monitor. English 38 Acer GridVista (dual-display compatible) Note: This feature is dual-display compatible, allowing two displays to be partitioned independently. Select the secondary ...monitor (2) icon in the display box and then click the check box Extend the desktop onto this function, please go to Start, All Programs and click on the same screen. To enable the dual display feature of the four display settings indicated below: 12 2 13...

User Manual
Page 57
"Easy-launch buttons" on Start, All Programs, and then Launch Manager to the manufacturer's recommended value. Note: Please ensure that the resolution setting of your second monitor is set the four easy-launch buttons located above the keyboard. Launch Manager Launch Manager allows you to set to start the application. You can access the Launch Manager by clicking on page 26 for the location of a well-organized desktop. English 39 3 Enjoy the convenience of the easylaunch buttons.
"Easy-launch buttons" on Start, All Programs, and then Launch Manager to the manufacturer's recommended value. Note: Please ensure that the resolution setting of your second monitor is set the four easy-launch buttons located above the keyboard. Launch Manager Launch Manager allows you to set to start the application. You can access the Launch Manager by clicking on page 26 for the location of a well-organized desktop. English 39 3 Enjoy the convenience of the easylaunch buttons.

User Manual
Page 59
... save power. If you are provided for each one. Press any key to turn the display back on the power, but the computer does not start or boot up the "Display Properties" dialog box. English 41 Frequently asked questions The following is set to the appropriate resolution. Remove or replace it...
... save power. If you are provided for each one. Press any key to turn the display back on the power, but the computer does not start or boot up the "Display Properties" dialog box. English 41 Frequently asked questions The following is set to the appropriate resolution. Remove or replace it...
User Manual
Page 61
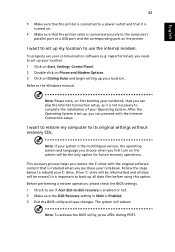
... the steps below to rebuild your system is not necessary to complete the installation of your Operating System. To properly use your location: 1 Click on Start, Settings, Control Panel. 2 Double-click on Phone and Modem Options. 3 Click on the printer. Note: If your C: drive. (Your C: drive will be...files before using this option. Refer to the Windows manual. Before performing a restore operation, please check the BIOS settings. 1 Check to see if Acer disk-to-disk recovery is enabled or not. 2 Make sure the D2D Recovery setting in Main is connected securely to the computer's parallel port ...
... the steps below to rebuild your system is not necessary to complete the installation of your Operating System. To properly use your location: 1 Click on Start, Settings, Control Panel. 2 Double-click on Phone and Modem Options. 3 Click on the printer. Note: If your C: drive. (Your C: drive will be...files before using this option. Refer to the Windows manual. Before performing a restore operation, please check the BIOS settings. 1 Check to see if Acer disk-to-disk recovery is enabled or not. 2 Make sure the D2D Recovery setting in Main is connected securely to the computer's parallel port ...
User Manual
Page 62
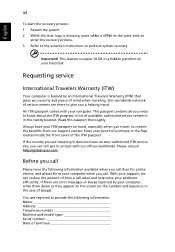
... available when you a helping hand. With your support, we can still get in contact with your ITW passport on hand, especially when you call Acer for online service, and please be at the same time to enter the recovery process. 3 Refer to the onscreen instructions to receive the benefits from...cover of the ITW passport. If there are there to know about the ITW program. Please consult http://global.acer.com. English 44 To start the recovery process: 1 Restart the system. 2 While the Acer logo is backed by your computer, write them down as they appear on the screen (or the number ...
... available when you a helping hand. With your support, we can still get in contact with your ITW passport on hand, especially when you call Acer for online service, and please be at the same time to enter the recovery process. 3 Refer to the onscreen instructions to receive the benefits from...cover of the ITW passport. If there are there to know about the ITW program. Please consult http://global.acer.com. English 44 To start the recovery process: 1 Restart the system. 2 While the Acer logo is backed by your computer, write them down as they appear on the screen (or the number ...
User Manual
Page 65
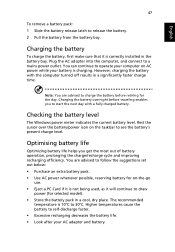
... set out below: • Purchase an extra battery pack. • Use AC power whenever possible, reserving battery for the day. Note: You are advised to start the next day with the computer turned off results in the battery bay. Charging the battery overnight before retiring for on-the-go use. •...
... set out below: • Purchase an extra battery pack. • Use AC power whenever possible, reserving battery for the day. Note: You are advised to start the next day with the computer turned off results in the battery bay. Charging the battery overnight before retiring for on-the-go use. •...
User Manual
Page 67
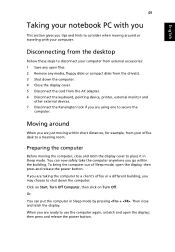
... your office desk to a meeting room. English 49 Taking your notebook PC with your computer. Disconnecting from the drive(s). 3 Shut down the computer: Click on Start, Turn Off Computer, then click on Turn Off. Moving around or traveling with you This section gives you are taking the computer to consider when...
... your office desk to a meeting room. English 49 Taking your notebook PC with your computer. Disconnecting from the drive(s). 3 Shut down the computer: Click on Start, Turn Off Computer, then click on Turn Off. Moving around or traveling with you This section gives you are taking the computer to consider when...

User Manual
Page 80
... full and fast (incremental) backup images of your system configuration to hard disk from the Empowering Technology toolbar to start Acer eRecovery Management. 2 In the Acer eRecovery Management window, select the type of the following functions: 1 Create backup 2 Burn backup disc 3 Restore ... disc burner, plug in an external optical disc burner before entering Acer eRecovery Management for more information. When using the Empowering Technology toolbar or when first running Acer eLock Management or Acer eRecovery Management. You can also backup/restore the factory default image,...
... full and fast (incremental) backup images of your system configuration to hard disk from the Empowering Technology toolbar to start Acer eRecovery Management. 2 In the Acer eRecovery Management window, select the type of the following functions: 1 Create backup 2 Burn backup disc 3 Restore ... disc burner, plug in an external optical disc burner before entering Acer eRecovery Management for more information. When using the Empowering Technology toolbar or when first running Acer eLock Management or Acer eRecovery Management. You can also backup/restore the factory default image,...
User Manual
Page 81
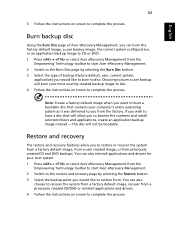
You can also reinstall applications and drivers for your Acer system. 1 Press + or select Acer eRecovery Management from the Empowering Technology toolbar to start Acer eRecovery Management. 2 Switch to the Burn Disc page by selecting the Restore button. 3 Select the backup point you... image, the current system configuration, or an application backup image to CD or DVD. 1 Press + or select Acer eRecovery Management from the Empowering Technology toolbar to start Acer eRecovery Management. 2 Switch to the restore and recovery page by selecting the Burn Disc button. 3 Select the type...
You can also reinstall applications and drivers for your Acer system. 1 Press + or select Acer eRecovery Management from the Empowering Technology toolbar to start Acer eRecovery Management. 2 Switch to the Burn Disc page by selecting the Restore button. 3 Select the backup point you... image, the current system configuration, or an application backup image to CD or DVD. 1 Press + or select Acer eRecovery Management from the Empowering Technology toolbar to start Acer eRecovery Management. 2 Switch to the restore and recovery page by selecting the Burn Disc button. 3 Select the type...


