
TravelMate 4230/4530 Quick Guide
Page 5
...first We would like to thank you for making an Acer notebook your choice for your notebook. The printed TravelMate Series Generic User Guide contains useful information applying to all models in the text with setting up your Acer notebook, we have designed a set of guides: ... notices for meeting your computer, clicking on such subjects as Acer's Empowering Technology, using the keyboard, Audio, etc. The printed Quick Guide introduces you to functions or features which are marked in the TravelMate product series. This guide contains detailed information on AcerSystem User's...
...first We would like to thank you for making an Acer notebook your choice for your notebook. The printed TravelMate Series Generic User Guide contains useful information applying to all models in the text with setting up your Acer notebook, we have designed a set of guides: ... notices for meeting your computer, clicking on such subjects as Acer's Empowering Technology, using the keyboard, Audio, etc. The printed Quick Guide introduces you to functions or features which are marked in the TravelMate product series. This guide contains detailed information on AcerSystem User's...

TravelMate 4230/4530 Quick Guide
Page 7
... serves as Acer BioProtect fingerprint reader supporting Acer FingerNav 4-way control function. 9 Status indicators Light-Emitting Diodes (LEDs) that light up to show the status of the computer's functions and components. 4 Speakers Left and right speakers deliver stereo audio output. 5 Keyboard For entering data...function like the left and (left, center* and right mouse buttons. right) *The center button serves as Acer Bio-Protection fingerprint reader supporting Acer FingerNav 4-way control function (only for certain models). 11 Power button Turns the computer on and off. 12...
... serves as Acer BioProtect fingerprint reader supporting Acer FingerNav 4-way control function. 9 Status indicators Light-Emitting Diodes (LEDs) that light up to show the status of the computer's functions and components. 4 Speakers Left and right speakers deliver stereo audio output. 5 Keyboard For entering data...function like the left and (left, center* and right mouse buttons. right) *The center button serves as Acer Bio-Protection fingerprint reader supporting Acer FingerNav 4-way control function (only for certain models). 11 Power button Turns the computer on and off. 12...
TravelMate 4230/4530 Quick Guide
Page 14
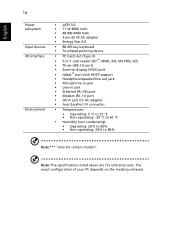
... • ACPI 3.0 • 71 W 4800 mAh • 48.8W 4400 mAh • 3-pin 65 W AC adapter • Energy Star 4.0 • 88-/89-key keyboard • Touchpad pointing device • PC Card slot (Type II) • 5-in-1 card reader (SD™, MMC, MS, MS PRO, xD) • Three USB 2.0...; Microphone-in jack • Line-in jack • Ethernet (RJ-45) port • Modem (RJ-11) port • DC-in jack for AC adapter • Acer EasyPort IV connector • Temperature: • Operating: 5 °C to 35 °C • Non-operating: -20 °C to 65 °C • Humidity (non-...
... • ACPI 3.0 • 71 W 4800 mAh • 48.8W 4400 mAh • 3-pin 65 W AC adapter • Energy Star 4.0 • 88-/89-key keyboard • Touchpad pointing device • PC Card slot (Type II) • 5-in-1 card reader (SD™, MMC, MS, MS PRO, xD) • Three USB 2.0...; Microphone-in jack • Line-in jack • Ethernet (RJ-45) port • Modem (RJ-11) port • DC-in jack for AC adapter • Acer EasyPort IV connector • Temperature: • Operating: 5 °C to 35 °C • Non-operating: -20 °C to 65 °C • Humidity (non-...

Service Guide
Page 8
... T Ergonomically-centered touchpad pointing device T Acer FineTouch keyboard with a 5-degree curve T Internet 4-way scroll button Keyboard and Pointing Device T 88/89-key Windows keyboard T Ergonomically-centered touchpad pointing device with scroll function T Acer FineTouchTM keyboard with a 5-degree curve Expansion T T T One Type II CardBus PC Card slot Upgradeable memory modules Acer EasyPort (only in TravelMate 4500) I/O Ports T T T T T T T T T T T T T T One Type...
... T Ergonomically-centered touchpad pointing device T Acer FineTouch keyboard with a 5-degree curve T Internet 4-way scroll button Keyboard and Pointing Device T 88/89-key Windows keyboard T Ergonomically-centered touchpad pointing device with scroll function T Acer FineTouchTM keyboard with a 5-degree curve Expansion T T T One Type II CardBus PC Card slot Upgradeable memory modules Acer EasyPort (only in TravelMate 4500) I/O Ports T T T T T T T T T T T T T T One Type...

Service Guide
Page 9
... D 1 MIC IN Page:13 LINE SPEKER IN Page:13 Page:13 LINE OUT Page:13 RJ11 Page:12 DOCKING PS2 Page:16 Touchpad Page:15 Keyboard Page:16 IrDA Page:16 DOCKING Print Port Page:16 DOCKING COM Port Page:16 PCI ROUTING TABLE REQ0# / GNT0# REQ1# / GNT1# REQ2# / GNT2# REQ3... LAN MINI-PCI TI 7411 2 3 4 5 6 SYSTEM 3 DOCKING 2 MINI-USB USB PORT USB PORT Page : 15 Page : 15 Page: 15 D USB2,3,5 USB0,1 USB4 PROJECT:Kestrel Series Acer Incorporated Size Document Number BLOCK DIAGRAM Date: Friday, June 04, 2004 7 Sheet 1 of 8 Rev A1A 35 Chapter 1
... D 1 MIC IN Page:13 LINE SPEKER IN Page:13 Page:13 LINE OUT Page:13 RJ11 Page:12 DOCKING PS2 Page:16 Touchpad Page:15 Keyboard Page:16 IrDA Page:16 DOCKING Print Port Page:16 DOCKING COM Port Page:16 PCI ROUTING TABLE REQ0# / GNT0# REQ1# / GNT1# REQ2# / GNT2# REQ3... LAN MINI-PCI TI 7411 2 3 4 5 6 SYSTEM 3 DOCKING 2 MINI-USB USB PORT USB PORT Page : 15 Page : 15 Page: 15 D USB2,3,5 USB0,1 USB4 PROJECT:Kestrel Series Acer Incorporated Size Document Number BLOCK DIAGRAM Date: Friday, June 04, 2004 7 Sheet 1 of 8 Rev A1A 35 Chapter 1

Service Guide
Page 10
Board Layout Top View 1 Keyboard Connector 2 Bluetooth Board Connector 3 LCD Cable Connector 4 LED Board Connector 5 Lid Switch 6 Modem Cable Connector 7 3 in 1 Connector 8 Speaker Connector 9 Internal Microphone Connector 10 Modem Board Connector 11 Touchpad Board Connector 4 Chapter 1 download service manual and resetter printer at http://printer1.blogspot.com
Board Layout Top View 1 Keyboard Connector 2 Bluetooth Board Connector 3 LCD Cable Connector 4 LED Board Connector 5 Lid Switch 6 Modem Cable Connector 7 3 in 1 Connector 8 Speaker Connector 9 Internal Microphone Connector 10 Modem Board Connector 11 Touchpad Board Connector 4 Chapter 1 download service manual and resetter printer at http://printer1.blogspot.com

Service Guide
Page 13
...to show you use the computer. 5 Click buttons (Left, The left and right buttons function like a computer mouse. A TravelMate tour After knowing your computer features, let us show the status of the computer's function and components. 8 Launch keys Buttons ... Description 1 Display screen Also called LCD (liquid-crystal display), displays computer output. 2 Microphone Internal microphone for sound recording. 3 Keyboard Inputs data into your computer. 4 Palmrest Comfortable support area for launching frequently used programs. Chapter 1 7 download service manual and...
...to show you use the computer. 5 Click buttons (Left, The left and right buttons function like a computer mouse. A TravelMate tour After knowing your computer features, let us show the status of the computer's function and components. 8 Launch keys Buttons ... Description 1 Display screen Also called LCD (liquid-crystal display), displays computer output. 2 Microphone Internal microphone for sound recording. 3 Keyboard Inputs data into your computer. 4 Palmrest Comfortable support area for launching frequently used programs. Chapter 1 7 download service manual and...

Service Guide
Page 20
Num lock Lights when Num Lock is activated. 14 Chapter 1 download service manual and resetter printer at http://printer1.blogspot.com Indicators The computer has three easy-to-read status icons on the upper-right above the keyboard. Media Activity Lights when the disc or AcerMedia is activated. Icon Function Caps lock Description Lights when Caps Lock is activated.
Num lock Lights when Num Lock is activated. 14 Chapter 1 download service manual and resetter printer at http://printer1.blogspot.com Indicators The computer has three easy-to-read status icons on the upper-right above the keyboard. Media Activity Lights when the disc or AcerMedia is activated. Icon Function Caps lock Description Lights when Caps Lock is activated.

Service Guide
Page 22
Lock Keys The keyboard has three lock keys which you need to connect an external keypad. Lock Key Caps Lock Num lock (Fn-F11) Scroll lock (Fn-F12) Description .... When Num Lock is on, the embedded keypad is on and off. Scroll Lock does not work with the arithmetic operators +, -, *, and /). Using the Keyboard The keyboard has full-sized keys and an embedded keypad, separate cursor keys, two Windows keys and twelve function keys. A better solution would be to do a lot...
Lock Keys The keyboard has three lock keys which you need to connect an external keypad. Lock Key Caps Lock Num lock (Fn-F11) Scroll lock (Fn-F12) Description .... When Num Lock is on, the embedded keypad is on and off. Scroll Lock does not work with the arithmetic operators +, -, *, and /). Using the Keyboard The keyboard has full-sized keys and an embedded keypad, separate cursor keys, two Windows keys and twelve function keys. A better solution would be to do a lot...

Service Guide
Page 23
To simplify the keyboard legend, cursor-control key symbols are not printed on embedded keypad. Num Lock Off Hold Fn while using cursor-control keys. Embedded Numeric Keypad The .... Hold Fn while typing letters on the keys. Type the letters in a normal manner. It is indicated by small characters located on embedded keypad Main keyboard keys Num Lock On Type numbers in a normal manner.
To simplify the keyboard legend, cursor-control key symbols are not printed on embedded keypad. Num Lock Off Hold Fn while using cursor-control keys. Embedded Numeric Keypad The .... Hold Fn while typing letters on the keys. Type the letters in a normal manner. It is indicated by small characters located on embedded keypad Main keyboard keys Num Lock On Type numbers in a normal manner.

Service Guide
Page 24
Windows Keys The keyboard has two keys that perform Windows-specific functions. Key Windows key Application key Icon Description Pressed alone, this key has the same effect as clicking ...
Windows Keys The keyboard has two keys that perform Windows-specific functions. Key Windows key Application key Icon Description Pressed alone, this key has the same effect as clicking ...

Service Guide
Page 27
The US dollar sign 1. Chapter 1 21 download service manual and resetter printer at the upper-center and/or bottom-right of your keyboard. To type: The Euro symbol 1. Special Key You can locate the Euro symbol and US dollar sign at http://printer1.blogspot.com Either directly press ...the Euro symbol at the bottom-right of the keyboard, or hold Alt Gr and then press the dollar sign at the upper-center of the keyboard. Open a text editor or word processor. 2. Open a text editor or word processor. 2. Either directly press the ...
The US dollar sign 1. Chapter 1 21 download service manual and resetter printer at the upper-center and/or bottom-right of your keyboard. To type: The Euro symbol 1. Special Key You can locate the Euro symbol and US dollar sign at http://printer1.blogspot.com Either directly press ...the Euro symbol at the bottom-right of the keyboard, or hold Alt Gr and then press the dollar sign at the upper-center of the keyboard. Open a text editor or word processor. 2. Open a text editor or word processor. 2. Either directly press the ...

Service Guide
Page 28
...-programmable) Internet browser application (user programmable) Acer eManager application (userprogrammable) User-programmable 22 Chapter 1 download service manual and resetter printer at the upper-right above the keyboard are called launch keys. Launch Keys Located at http://printer1.blogspot.com Press the Acer Empowering Key to run the acer Launch Manager. These buttons are four...
...-programmable) Internet browser application (user programmable) Acer eManager application (userprogrammable) User-programmable 22 Chapter 1 download service manual and resetter printer at the upper-right above the keyboard are called launch keys. Launch Keys Located at http://printer1.blogspot.com Press the Acer Empowering Key to run the acer Launch Manager. These buttons are four...

Service Guide
Page 32
... Flash Memory 512KB 32-pin PLCC ACPI 1.0b, PC Card 95, SM BIOS 2.3, IEEE1284-ECP/EPP, PCI 2.2, PnP 1.0a, DMI 2.0, PS/2 keyboard and mouse, USB 2.0, VGA BIOS, CD-ROM bootable, IEEE 1394 Set by setup manual Specification Built-in CPU 512K for Intel® Celeron M processor... at 1.3~1.4GHz-TravelMate 2300 2MB for Intel® Pentium M processor at 1.5~1.6GHz (Dothan)-TravelMate 4000 2MB for Intel® Pentium M processor at 1.8GHz (Dothan)-TravelMate 4500 Always enabled Always enabled Fixed in write-back Specification Intel® 855GME...
... Flash Memory 512KB 32-pin PLCC ACPI 1.0b, PC Card 95, SM BIOS 2.3, IEEE1284-ECP/EPP, PCI 2.2, PnP 1.0a, DMI 2.0, PS/2 keyboard and mouse, USB 2.0, VGA BIOS, CD-ROM bootable, IEEE 1394 Set by setup manual Specification Built-in CPU 512K for Intel® Celeron M processor... at 1.3~1.4GHz-TravelMate 2300 2MB for Intel® Pentium M processor at 1.5~1.6GHz (Dothan)-TravelMate 4000 2MB for Intel® Pentium M processor at 1.8GHz (Dothan)-TravelMate 4500 Always enabled Always enabled Fixed in write-back Specification Intel® 855GME...
Service Guide
Page 38
... (mm) Active Area (mm) Display resolution (pixels) Controller Intel® 855GME+ICH4 (TravelMate 4000/4500) Intel® 852GM+ICH4 (TravelMate 2300) ATI Mobility RADEON 9700 (optional for TravelMate 4000/4500) BroadCom BCM4401 (10/100M); Use port replicator then plug a USB/PS 2 keyboard to the USB port directly: Yes 2. System Board Major Chips Item Core...
... (mm) Active Area (mm) Display resolution (pixels) Controller Intel® 855GME+ICH4 (TravelMate 4000/4500) Intel® 852GM+ICH4 (TravelMate 2300) ATI Mobility RADEON 9700 (optional for TravelMate 4000/4500) BroadCom BCM4401 (10/100M); Use port replicator then plug a USB/PS 2 keyboard to the USB port directly: Yes 2. System Board Major Chips Item Core...
Service Guide
Page 60
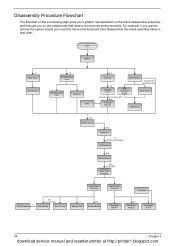
...representation on the entire disassembly sequence and instructs you on the components that order. For example, if you must first remove the keyboard, then disassemble the inside assembly frame in -1 Cover *4 Speaker Set B*2 Modem Board Upper Case Assembly Touchpad Touchpad Bracket B*2 ...Module *2 back side *4 left/right side ODD Connector Board ODD Holder special screw for thermal*3 Ex1 Thermal Module ODD Drive E*3 Middle Cover B*2 Keyboard *4 (right and left hinges) LCD Module B*2 Switch Board B*5 E*16+B*2 Lower and Upper Case Assembly Lower Case Assembly *3 VGA Heatsink E*2...
...representation on the entire disassembly sequence and instructs you on the components that order. For example, if you must first remove the keyboard, then disassemble the inside assembly frame in -1 Cover *4 Speaker Set B*2 Modem Board Upper Case Assembly Touchpad Touchpad Bracket B*2 ...Module *2 back side *4 left/right side ODD Connector Board ODD Holder special screw for thermal*3 Ex1 Thermal Module ODD Drive E*3 Middle Cover B*2 Keyboard *4 (right and left hinges) LCD Module B*2 Switch Board B*5 E*16+B*2 Lower and Upper Case Assembly Lower Case Assembly *3 VGA Heatsink E*2...

Service Guide
Page 65
... you reattach the ODD, please make sure you can not fasten the screw and the screw may damage the main board. . Disconnect the keyboard cable from the main unit. Open the LCD module as shown. 4. Chapter 3 59 download service manual and resetter printer at http://printer1.... 6. Removing the LCD Module 1. Remove the three screws holding the middle cover. 2. Turn over the keyboard as the picture shown then detach the keyboard cover from the main board then remove the keyboard. 5. Otherwise, you attach the ODD module completely to the main unit. Removing the ODD Module 1.
... you reattach the ODD, please make sure you can not fasten the screw and the screw may damage the main board. . Disconnect the keyboard cable from the main unit. Open the LCD module as shown. 4. Chapter 3 59 download service manual and resetter printer at http://printer1.... 6. Removing the LCD Module 1. Remove the three screws holding the middle cover. 2. Turn over the keyboard as the picture shown then detach the keyboard cover from the main board then remove the keyboard. 5. Otherwise, you attach the ODD module completely to the main unit. Removing the ODD Module 1.

Service Guide
Page 66
. 3. Then detach the LCD module from the main unit. . 6. Turn over the keyboard as shown. 4. Remove the four screws holding the right and the left hinge. Two on each side. 8. Disconnect the LCD coaxial cable. 7. Pull out the antenna set with a tweezers then take out the antenna set from the main unit. . 60 Chapter 3 download service manual and resetter printer at http://printer1.blogspot.com Remove the two screws that secure the keyboard as shown and disconnect the keyboard cable then remove the keyboard. 5.
. 3. Then detach the LCD module from the main unit. . 6. Turn over the keyboard as shown. 4. Remove the four screws holding the right and the left hinge. Two on each side. 8. Disconnect the LCD coaxial cable. 7. Pull out the antenna set with a tweezers then take out the antenna set from the main unit. . 60 Chapter 3 download service manual and resetter printer at http://printer1.blogspot.com Remove the two screws that secure the keyboard as shown and disconnect the keyboard cable then remove the keyboard. 5.

Service Guide
Page 76
...board. Press F2 in the test items. 3. External CD-ROM Drive Check Do the following one at http://printer1.blogspot.com Reconnect the keyboard cables. 2. Memory check Memory errors might stop system operations, show error messages on the system board. If the error still remains: ... is fully installed into the connector. Do not replace a non-defective FRU: 1. Replace the main board. Boot from the keyboard is correct, run the Keyboard Test. Go to be tested. NOTE: Make sure that the flexible cable extending from the diagnostics diskette and start the diagnostics program...
...board. Press F2 in the test items. 3. External CD-ROM Drive Check Do the following one at http://printer1.blogspot.com Reconnect the keyboard cables. 2. Memory check Memory errors might stop system operations, show error messages on the system board. If the error still remains: ... is fully installed into the connector. Do not replace a non-defective FRU: 1. Replace the main board. Boot from the keyboard is correct, run the Keyboard Test. Go to be tested. NOTE: Make sure that the flexible cable extending from the diagnostics diskette and start the diagnostics program...

Service Guide
Page 80
... Main baord "Load Default Settings" in BIOS Setup Utility. Default configuration used Invalid System Configuration Data Operating system not found FRU/Action in Sequence See "Keyboard or Auxiliary Input Device Check" on page 70 RTC battery Run BIOS Setup Utility to reconfigure system time, then reboot system. Default configuration used Real...
... Main baord "Load Default Settings" in BIOS Setup Utility. Default configuration used Invalid System Configuration Data Operating system not found FRU/Action in Sequence See "Keyboard or Auxiliary Input Device Check" on page 70 RTC battery Run BIOS Setup Utility to reconfigure system time, then reboot system. Default configuration used Real...


