Travelmate 2300 User's Guide
Page 37
...If you are taking the computer to a client's office or a different building, you may choose to place it in progress. 2 Remove any media or compact disc from your office desk to a meeting room" Preparing the computer Before moving around or traveling with your computer...out of Sleep mode, open the display. Disconnecting from the desktop Follow these steps to disconnect your computer from the AC adapter. 7 Disconnect the keyboard, pointing device, printer, external monitor, and other external devices. 8 Disconnect the Kensington lock if you are just moving within the building. English 29...
...If you are taking the computer to a client's office or a different building, you may choose to place it in progress. 2 Remove any media or compact disc from your office desk to a meeting room" Preparing the computer Before moving around or traveling with your computer...out of Sleep mode, open the display. Disconnecting from the desktop Follow these steps to disconnect your computer from the AC adapter. 7 Disconnect the keyboard, pointing device, printer, external monitor, and other external devices. 8 Disconnect the Kensington lock if you are just moving within the building. English 29...
TravelMate 2300/4000/4500 Service Guide
Page 61
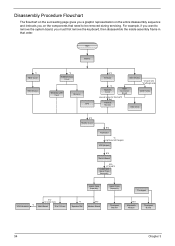
... *2 back side *4 left/right side ODD Connector Board ODD Holder special screw for thermal*3 Ex1 Thermal Module ODD Drive E*3 Middle Cover B*2 Keyboard *4 (right and left hinges) LCD Module B*2 Switch Board B*5 E*16+B*2 Lower and Upper Case Assembly Lower Case Assembly *3 VGA Heatsink ...Flowchart The flowchart on the succeeding page gives you a graphic representation on the entire disassembly sequence and instructs you must first remove the keyboard, then disassemble the inside assembly frame in -1 Cover *4 Speaker Set B*2 Modem Board Upper Case Assembly Touchpad Touchpad Bracket...
... *2 back side *4 left/right side ODD Connector Board ODD Holder special screw for thermal*3 Ex1 Thermal Module ODD Drive E*3 Middle Cover B*2 Keyboard *4 (right and left hinges) LCD Module B*2 Switch Board B*5 E*16+B*2 Lower and Upper Case Assembly Lower Case Assembly *3 VGA Heatsink ...Flowchart The flowchart on the succeeding page gives you a graphic representation on the entire disassembly sequence and instructs you must first remove the keyboard, then disassemble the inside assembly frame in -1 Cover *4 Speaker Set B*2 Modem Board Upper Case Assembly Touchpad Touchpad Bracket...

TravelMate 2300/4000/4500 Service Guide
Page 66
... detach the LCD module from the main unit. . 6. Release the ODD latch. 2. Remove the ODD module from the main unit. . 3. Remove the four screws holding the keyboard cover. 2. Removing the ODD Module 1. Open the LCD module as the picture shown then detach the... keyboard cover from the main unit. . Two on each side. 8. Chapter 3 59 Removing the LCD Module 1. Remove the two screws that secure the keyboard as shown and disconnect the keyboard cable then remove the keyboard. 5. Turn over the keyboard as shown. 4. Disconnect the LCD...
... detach the LCD module from the main unit. . 6. Release the ODD latch. 2. Remove the ODD module from the main unit. . 3. Remove the four screws holding the keyboard cover. 2. Removing the ODD Module 1. Open the LCD module as the picture shown then detach the... keyboard cover from the main unit. . Two on each side. 8. Chapter 3 59 Removing the LCD Module 1. Remove the two screws that secure the keyboard as shown and disconnect the keyboard cable then remove the keyboard. 5. Turn over the keyboard as shown. 4. Disconnect the LCD...

TravelMate 2300/4000/4500 Service Guide
Page 77
.... If the error still remains: 1. Replace the external diskette drive/CD-ROM module. 3. Keyboard or Auxiliary Input Device Check Remove the external keyboard if the internal keyboard is fully installed into the connector. If the internal keyboard does not work , reconnect the cable connector and repeat the failing operation. Do not replace a non-defective FRU...
.... If the error still remains: 1. Replace the external diskette drive/CD-ROM module. 3. Keyboard or Auxiliary Input Device Check Remove the external keyboard if the internal keyboard is fully installed into the connector. If the internal keyboard does not work , reconnect the cable connector and repeat the failing operation. Do not replace a non-defective FRU...


