TravelMate 3040 Service Guide
Page 32
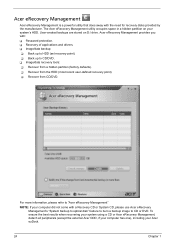
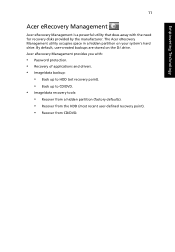
.../data backup: T Back up to HDD (set recovery point). Acer eRecovery Management provides you with a Recovery CD or System CD, please use Acer eRecovery Management's "System backup to optical disk" feature to burn a backup image to "Acer eRecovery Management" NOTE: If your computer did not come.... For more information, please refer to CD or DVD. Acer eRecovery Management Acer eRecovery Management is a powerful utility that does away with the need for recovery disks provided by the manufacturer. The Acer eRecovery Management utility occupies space in a hidden partition on D:\...
.../data backup: T Back up to HDD (set recovery point). Acer eRecovery Management provides you with a Recovery CD or System CD, please use Acer eRecovery Management's "System backup to optical disk" feature to burn a backup image to "Acer eRecovery Management" NOTE: If your computer did not come.... For more information, please refer to CD or DVD. Acer eRecovery Management Acer eRecovery Management is a powerful utility that does away with the need for recovery disks provided by the manufacturer. The Acer eRecovery Management utility occupies space in a hidden partition on D:\...

TravelMate 3040 Service Guide
Page 45
... Specification at least 5ms (@115 Vac input, full load) 29V Output current limit is 5A(Max mode) Output can be shorted without damage, and auto recovery 15kV (at air discharge) 8kV (at contact discharge) 2150VDC for 1 sec less than 100uA 1. VCCI Class II Hard Disk Drive Interface Item Vendor & Model Name...
... Specification at least 5ms (@115 Vac input, full load) 29V Output current limit is 5A(Max mode) Output can be shorted without damage, and auto recovery 15kV (at air discharge) 8kV (at contact discharge) 2150VDC for 1 sec less than 100uA 1. VCCI Class II Hard Disk Drive Interface Item Vendor & Model Name...
TravelMate 3040 Service Guide
Page 53
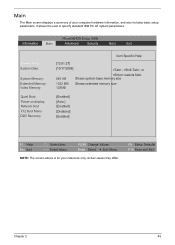
... Advanced Security Boot Exit System Time: System Date: System Memory: Extended Memory: Video Memory: Quiet Boot: Power on display: Network boot F12 Boot Menu D2D Recovery Item Specific Help [13:51:27] [10/17/2006] , , or 640 KB selects field. Shows system base memory size 1022 MB 128MB Shows extended memory...
... Advanced Security Boot Exit System Time: System Date: System Memory: Extended Memory: Video Memory: Quiet Boot: Power on display: Network boot F12 Boot Menu D2D Recovery Item Specific Help [13:51:27] [10/17/2006] , , or 640 KB selects field. Shows system base memory size 1022 MB 128MB Shows extended memory...
TravelMate 3040 Service Guide
Page 54
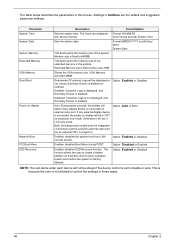
... is connected on display will be in this screen. Option: Disabled or Enabled Enables, disables D2D Recovery function. The function allows the user to create a hidden partition on display Network Boot F12 Boot Menu D2D Recovery Description Format/Option Sets the system time. Option: Enabled or Disabled NOTE: The sub-items under...
... is connected on display will be in this screen. Option: Disabled or Enabled Enables, disables D2D Recovery function. The function allows the user to create a hidden partition on display Network Boot F12 Boot Menu D2D Recovery Description Format/Option Sets the system time. Option: Enabled or Disabled NOTE: The sub-items under...
TravelMate 3040 Service Guide
Page 63
... finish BIOS flash, you run the Phlash. 1. The flash utility has auto-execution function. NOTE: If you do not have a crisis recovery diskette at hand, then you should create a Crisis Recovery Diskette before you use the AC adaptor power supply when you may not boot the system because the BIOS is required...
... finish BIOS flash, you run the Phlash. 1. The flash utility has auto-execution function. NOTE: If you do not have a crisis recovery diskette at hand, then you should create a Crisis Recovery Diskette before you use the AC adaptor power supply when you may not boot the system because the BIOS is required...
TravelMate 3040 Service Guide
Page 91
... Setup System Management Mode (SMM) area Display external L2 cache size Load custom defaults (optional) Display shadow-area message Display possible high address for UMB recovery Display error messages Check for configuration errors Check for keyboard errors Set up hardware interrupt vectors Initialize coprocessor if present Disable onboard Super I/O ports and...
... Setup System Management Mode (SMM) area Display external L2 cache size Load custom defaults (optional) Display shadow-area message Display possible high address for UMB recovery Display error messages Check for configuration errors Check for keyboard errors Set up hardware interrupt vectors Initialize coprocessor if present Disable onboard Super I/O ports and...
TravelMate 3040 Service Guide
Page 93
... I/O and memory for boot block in Flash ROM Initialize the chipset Initialize the bridge Initialize the CPU Initialize the system timer Initialize system I/O Check force recovery boot Checksum BIOS ROM Go to BIOS Set Huge Segment Initialize Multi Processor Initialize OEM special code Initialize PIC and DMA Initialize Memory type Initialize...
... I/O and memory for boot block in Flash ROM Initialize the chipset Initialize the bridge Initialize the CPU Initialize the system timer Initialize system I/O Check force recovery boot Checksum BIOS ROM Go to BIOS Set Huge Segment Initialize Multi Processor Initialize OEM special code Initialize PIC and DMA Initialize Memory type Initialize...
TravelMate 3040 User's Guide EN
Page 12
poster helps you for making an Acer notebook your choice for the location of the power button. For more productive, please refer to use your computer. It is not installed on your .... Note: Viewing the file requires Adobe Reader. For instructions on such subjects as system utilities, data recovery, expansion options and troubleshooting. The printed User's Guide introduces you to thank you get started with setting up your Acer notebook, we have designed a set of guides: First off To turn on the computer, simply...
poster helps you for making an Acer notebook your choice for the location of the power button. For more productive, please refer to use your computer. It is not installed on your .... Note: Viewing the file requires Adobe Reader. For instructions on such subjects as system utilities, data recovery, expansion options and troubleshooting. The printed User's Guide introduces you to thank you get started with setting up your Acer notebook, we have designed a set of guides: First off To turn on the computer, simply...
TravelMate 3040 User's Guide EN
Page 17
... port 59 PC Card slot 60 Installing memory 61 BIOS utility 61 Boot sequence 61 Enable disk-to-disk recovery 62 Password 62 Using software 62 Playing DVD movies 62 Power management 63 Acer eRecovery Management 64 Create backup 64 Restore from backup 65 Create factory default image CD 65 Re-install...
... port 59 PC Card slot 60 Installing memory 61 BIOS utility 61 Boot sequence 61 Enable disk-to-disk recovery 62 Password 62 Using software 62 Playing DVD movies 62 Power management 63 Acer eRecovery Management 64 Create backup 64 Restore from backup 65 Create factory default image CD 65 Re-install...
TravelMate 3040 User's Guide EN
Page 29
... occupies space in a hidden partition on the D:\ drive. Empowering Technology 11 Acer eRecovery Management Acer eRecovery Management is a powerful utility that does away with : • Password protection. • Recovery of applications and drivers. • Image/data backup: • Back up to HDD (set recovery point). • Back up to CD/DVD. • Image/data...
... occupies space in a hidden partition on the D:\ drive. Empowering Technology 11 Acer eRecovery Management Acer eRecovery Management is a powerful utility that does away with : • Password protection. • Recovery of applications and drivers. • Image/data backup: • Back up to HDD (set recovery point). • Back up to CD/DVD. • Image/data...
TravelMate 3040 User's Guide EN
Page 30
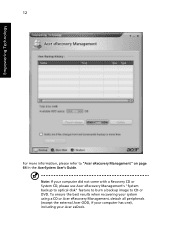
Empowering Technology 12 For more information, please refer to CD or DVD. To ensure the best results when recovering your system using a CD or Acer eRecovery Management, detach all peripherals (except the external Acer ODD, if your computer has one), including your computer did not come with a Recovery CD or System CD, please use Acer eRecovery Management's "System backup to optical disk" feature to burn a backup image to "Acer eRecovery Management" on page 64 in the AcerSystem User's Guide. Note: If your Acer ezDock.
Empowering Technology 12 For more information, please refer to CD or DVD. To ensure the best results when recovering your system using a CD or Acer eRecovery Management, detach all peripherals (except the external Acer ODD, if your computer has one), including your computer did not come with a Recovery CD or System CD, please use Acer eRecovery Management's "System backup to optical disk" feature to burn a backup image to "Acer eRecovery Management" on page 64 in the AcerSystem User's Guide. Note: If your Acer ezDock.
TravelMate 3040 User's Guide EN
Page 67
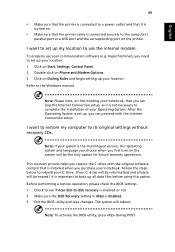
... up all data will be the only option for future recovery operations. I want to restore my computer to its original settings without recovery CDs. Before performing a restore operation, please check the BIOS settings. 1 Check to see if Acer disk-to the Windows manual. The system will be erased...you can skip the Internet Connection setup, as it is turned on. • Make sure that is installed when you purchase your notebook. This recovery process helps you restore the C: drive with the Internet Connection setup. Follow the steps below to rebuild your C: drive. (Your C: drive will...
... up all data will be the only option for future recovery operations. I want to restore my computer to its original settings without recovery CDs. Before performing a restore operation, please check the BIOS settings. 1 Check to see if Acer disk-to the Windows manual. The system will be erased...you can skip the Internet Connection setup, as it is turned on. • Make sure that is installed when you purchase your notebook. This recovery process helps you restore the C: drive with the Internet Connection setup. Follow the steps below to rebuild your C: drive. (Your C: drive will...

TravelMate 3040 User's Guide EN
Page 68
...gives you a helping hand. You are required to provide the following information available when you call Acer for online service, and please be at the same time to enter the recovery process. 3 Refer to the onscreen instructions to know about the ITW program. Requesting service International ...by your computer, write them down as they appear on hand, especially when you need to perform system recovery. Read this handy booklet. Please consult http://global.acer.com. With your problems efficiently. If there are traveling in contact with your ITW passport on the screen...
...gives you a helping hand. You are required to provide the following information available when you call Acer for online service, and please be at the same time to enter the recovery process. 3 Refer to the onscreen instructions to know about the ITW program. Requesting service International ...by your computer, write them down as they appear on hand, especially when you need to perform system recovery. Read this handy booklet. Please consult http://global.acer.com. With your problems efficiently. If there are traveling in contact with your ITW passport on the screen...

TravelMate 3040 User's Guide EN
Page 80
...), after a few seconds. Refer to the table below for the first time, the program asks you can set . English 62 Enable disk-to-disk recovery To enable disk-to-disk recovery (hard disk recovery), activate the BIOS utility, then select Main from the categories listed at the top of the screen. Find D2D...
...), after a few seconds. Refer to the table below for the first time, the program asks you can set . English 62 Enable disk-to-disk recovery To enable disk-to-disk recovery (hard disk recovery), activate the BIOS utility, then select Main from the categories listed at the top of the screen. Find D2D...
TravelMate 3040 User's Guide EN
Page 82
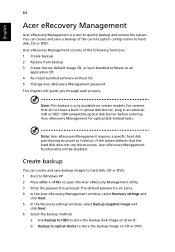
... hard disk partitioning structure to hard disk, CD or DVD. The default password is six zeros. 4 In the Acer eRecovery Management window, select Recovery settings and click Next. 5 In the Recovery settings window, select Backup snapshot image and click Next. 6 Select the backup method. You can create and save ... do not have a built-in optical disk burner, plug in an external USB or IEEE 1394-compatible optical disk burner before entering Acer eRecovery Management for optical disk-related tasks. b Backup to optical device to quickly backup and restore the system. For systems that the...
... hard disk partitioning structure to hard disk, CD or DVD. The default password is six zeros. 4 In the Acer eRecovery Management window, select Recovery settings and click Next. 5 In the Recovery settings window, select Backup snapshot image and click Next. 6 Select the backup method. You can create and save ... do not have a built-in optical disk burner, plug in an external USB or IEEE 1394-compatible optical disk burner before entering Acer eRecovery Management for optical disk-related tasks. b Backup to optical device to quickly backup and restore the system. For systems that the...
TravelMate 3040 User's Guide EN
Page 83
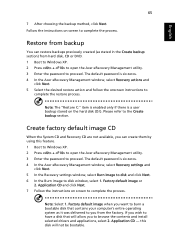
...stated in the Create backup section) from the factory. The default password is six zeros. 4 In the Acer eRecovery Management window, select Recovery settings and click Next. 5 In the Recovery settings window, select Burn image to disk and click Next. 6 In the Burn image to proceed. ... the backup method, click Next. Note: The "Restore C:" item is enabled only if there is six zeros. 4 In the Acer eRecovery Management window, select Recovery actions and click Next. 5 Select the desired restore action and follow the onscreen instructions to you can restore backups previously created (as...
...stated in the Create backup section) from the factory. The default password is six zeros. 4 In the Acer eRecovery Management window, select Recovery settings and click Next. 5 In the Recovery settings window, select Burn image to disk and click Next. 6 In the Burn image to proceed. ... the backup method, click Next. Note: The "Restore C:" item is enabled only if there is six zeros. 4 In the Acer eRecovery Management window, select Recovery actions and click Next. 5 Select the desired restore action and follow the onscreen instructions to you can restore backups previously created (as...
TravelMate 3040 User's Guide EN
Page 84
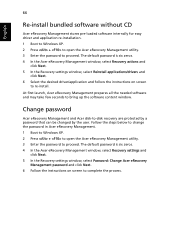
...utility. 3 Enter the password to proceed. The default password is six zeros. 4 In the Acer eRecovery Management window, select Recovery actions and click Next. 5 In the Recovery settings window, select Reinstall applications/drivers and click Next. 6 Select the desired driver/application and ...the software content window. The default password is six zeros. 4 In the Acer eRecovery Management window, select Recovery settings and click Next. 5 In the Recovery settings window, select Password: Change Acer eRecovery Management password and click Next. 6 Follow the instructions on screen to re...
...utility. 3 Enter the password to proceed. The default password is six zeros. 4 In the Acer eRecovery Management window, select Recovery actions and click Next. 5 In the Recovery settings window, select Reinstall applications/drivers and click Next. 6 Select the desired driver/application and ...the software content window. The default password is six zeros. 4 In the Acer eRecovery Management window, select Recovery settings and click Next. 5 In the Recovery settings window, select Password: Change Acer eRecovery Management password and click Next. 6 Follow the instructions on screen to re...


