
TravelMate 270 Service Guide
Page 7
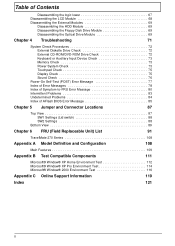
...Module 69 Chapter 4 Troubleshooting 71 System Check Procedures 72 External Diskette Drive Check 72 External CD-ROM/DVD-ROM Drive Check 72 Keyboard or Auxiliary Input Device Check 73 Memory Check 73 Power System Check 73 Touchpad Check 75 Display Check 75 Sound Check 76 ... 87 Top View 87 SW1 Settings (Lid switch 88 SW2 Settings 88 Bottom View 89 Chapter 6 FRU (Field Replaceable Unit) List 91 TravelMate 270 Series 108 Appendix A Model Definition and Configuration 108 Main Features 109 Appendix B Test Compatible Components 111 Microsoft® Window® XP Home...
...Module 69 Chapter 4 Troubleshooting 71 System Check Procedures 72 External Diskette Drive Check 72 External CD-ROM/DVD-ROM Drive Check 72 Keyboard or Auxiliary Input Device Check 73 Memory Check 73 Power System Check 73 Touchpad Check 75 Display Check 75 Sound Check 76 ... 87 Top View 87 SW1 Settings (Lid switch 88 SW2 Settings 88 Bottom View 89 Chapter 6 FRU (Field Replaceable Unit) List 91 TravelMate 270 Series 108 Appendix A Model Definition and Configuration 108 Main Features 109 Appendix B Test Compatible Components 111 Microsoft® Window® XP Home...
TravelMate 270 Service Guide
Page 9
...-centered touchpad pointing device Expansion K K Two type II or one type III cardBus PC Card slots Upgradeable memory Keyboard and Pointing Device K Acer FineTouch keyboard: with ergonomic buttons and 4-way integrated scroll key K 12 function keys; 4 cursor keys; hotkey controls K 5 launch keys, including Internet browser, email (with LED for AC ...
...-centered touchpad pointing device Expansion K K Two type II or one type III cardBus PC Card slots Upgradeable memory Keyboard and Pointing Device K Acer FineTouch keyboard: with ergonomic buttons and 4-way integrated scroll key K 12 function keys; 4 cursor keys; hotkey controls K 5 launch keys, including Internet browser, email (with LED for AC ...

TravelMate 270 Service Guide
Page 13
... at the top of ports allow you would with a desktop PC. P1, P2 and P3 launch user-programmable applications; Outlook View A general introduction of the keyboard are designated as you to connect peripheral devices, as P1, P2, P3, E-mail button and Web browser button.
... at the top of ports allow you would with a desktop PC. P1, P2 and P3 launch user-programmable applications; Outlook View A general introduction of the keyboard are designated as you to connect peripheral devices, as P1, P2, P3, E-mail button and Web browser button.

TravelMate 270 Service Guide
Page 14
Outputs sound. 10 Keyboard Inputs data into your hands when you use the computer. the center button serves as a 4-way scroll button. 6 Floppy disk drive (or Reads/writes data ...
Outputs sound. 10 Keyboard Inputs data into your hands when you use the computer. the center button serves as a 4-way scroll button. 6 Floppy disk drive (or Reads/writes data ...

TravelMate 270 Service Guide
Page 16
Right Panel # Icon Item Description 1 Microphone/Line-in Accepts audio line-in devices (e.g., jack microphone, audio CD player, stereo walkman). 2 Headphone/Speaker/ Connects to audio line-out devices (e.g., Line-out jack headphones, speakers). 3 PC card eject buttons Eject the PC Card from the slot. 4 PC card slots Accepts two Type II or one TypeIII PC cards. 5 Modem jack Connects to a phone line. 6 Network jack Connects to an Ethernet 10/100-based network. 7 PS/2 port Connects to a PS/2 keyboard or mouse. Chapter 1 11
Right Panel # Icon Item Description 1 Microphone/Line-in Accepts audio line-in devices (e.g., jack microphone, audio CD player, stereo walkman). 2 Headphone/Speaker/ Connects to audio line-out devices (e.g., Line-out jack headphones, speakers). 3 PC card eject buttons Eject the PC Card from the slot. 4 PC card slots Accepts two Type II or one TypeIII PC cards. 5 Modem jack Connects to a phone line. 6 Network jack Connects to an Ethernet 10/100-based network. 7 PS/2 port Connects to a PS/2 keyboard or mouse. Chapter 1 11
TravelMate 270 Service Guide
Page 20
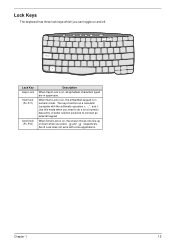
... in uppercase. When Scroll Lock is on , all alphabetic characters typed are in numeric mode. When Num Lock is on and off. Lock Keys The keyboard has three lock keys which you can toggle on , the screen moves one line up or down when you need to connect an external keypad.
... in uppercase. When Scroll Lock is on , all alphabetic characters typed are in numeric mode. When Num Lock is on and off. Lock Keys The keyboard has three lock keys which you can toggle on , the screen moves one line up or down when you need to connect an external keypad.

TravelMate 270 Service Guide
Page 21
.... Num Lock Off Hold Fn while using cursor-control keys. Hold j while using cursorcontrol keys. Main keyboard keys Hold Fn while typing letters on the upper right corner of the keycaps. To simplify the keyboard legend, cursor-control key symbols are not printed on embedded keypad Type numbers in a normal manner. 16...
.... Num Lock Off Hold Fn while using cursor-control keys. Hold j while using cursorcontrol keys. Main keyboard keys Hold Fn while typing letters on the upper right corner of the keycaps. To simplify the keyboard legend, cursor-control key symbols are not printed on embedded keypad Type numbers in a normal manner. 16...

TravelMate 270 Service Guide
Page 22
dialog box) Opens a context menu (same as a right-click). Chapter 1 17 Combinations with this key perform special functions. Key Windows logo key Application key Icon Description Start button. Windows Keys The keyboard has two keys that perform Windows-specific functions. Below are a few examples: + Tab (Activates next taskbar button) + E (Explores My Computer) + F (Finds Document) + M (Minimizes All) j + Windows logo key + M (Undoes Minimize All) + R (Displays the Run...
dialog box) Opens a context menu (same as a right-click). Chapter 1 17 Combinations with this key perform special functions. Key Windows logo key Application key Icon Description Start button. Windows Keys The keyboard has two keys that perform Windows-specific functions. Below are a few examples: + Tab (Activates next taskbar button) + E (Explores My Computer) + F (Finds Document) + M (Minimizes All) j + Windows logo key + M (Undoes Minimize All) + R (Displays the Run...
TravelMate 270 Service Guide
Page 25
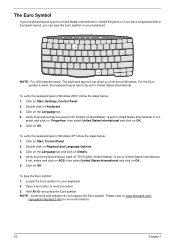
... refer to United States-International. Double-click on Regional and Language Options. 3. To type the Euro symbol: 1. For the Euro symbol to work, the keyboard layout has to be set to www.microsoft.com/ typography/faq/faq12.htm for more information. 20 Chapter 1 Double-click on... OK. 5. then select United States-International and click on Properties; NOTE: Some fonts and software do not support the Euro symbol. Verify that the keyboard layout used for "En English (United States)" is set when you can type the Euro symbol on the Language tab. 4. Locate the Euro symbol...
... refer to United States-International. Double-click on Regional and Language Options. 3. To type the Euro symbol: 1. For the Euro symbol to work, the keyboard layout has to be set to www.microsoft.com/ typography/faq/faq12.htm for more information. 20 Chapter 1 Double-click on... OK. 5. then select United States-International and click on Properties; NOTE: Some fonts and software do not support the Euro symbol. Verify that the keyboard layout used for "En English (United States)" is set when you can type the Euro symbol on the Language tab. 4. Locate the Euro symbol...

TravelMate 270 Service Guide
Page 26
These buttons are designated as P1, P2, P3 Email button and Web browser button. Launch Key P1 P2 P3 Email Web browser Default application User-programmable User-programmable User-programmable Email application Internet browser application Chapter 1 21 They are called launch keys. This wireless communication button works for model with 802.11b wireless LAN only. Launch Keys Located at the top of these five launch keys is the wireless communication button. NOTE: To the left of keyboard are five buttons.
These buttons are designated as P1, P2, P3 Email button and Web browser button. Launch Key P1 P2 P3 Email Web browser Default application User-programmable User-programmable User-programmable Email application Internet browser application Chapter 1 21 They are called launch keys. This wireless communication button works for model with 802.11b wireless LAN only. Launch Keys Located at the top of these five launch keys is the wireless communication button. NOTE: To the left of keyboard are five buttons.

TravelMate 270 Service Guide
Page 27
Aside from the email checking function, there is a mail button that is used to enable/disable mail checking, set the time interval for mail checking, etc. The POP3 Server is located above the keyboard right below the LCD. 22 Chapter 1 If you already have the option to launch the email application. E-Mail Detection Click right button at the Launch Manager icon on the taskbar and click on E-Mail Detection. It is the mail server where you can fill in User Name, Password and POP3 Server in the dialog box. In this dialog box, you have an email account, you get your email.
Aside from the email checking function, there is a mail button that is used to enable/disable mail checking, set the time interval for mail checking, etc. The POP3 Server is located above the keyboard right below the LCD. 22 Chapter 1 If you already have the option to launch the email application. E-Mail Detection Click right button at the Launch Manager icon on the taskbar and click on E-Mail Detection. It is the mail server where you can fill in User Name, Password and POP3 Server in the dialog box. In this dialog box, you have an email account, you get your email.

TravelMate 270 Service Guide
Page 30
... Specification Phoenix 1.00 Flash ROM 512KB TSOP ACPI 1.0b,PC Card 95, SM BIOS 2.3, EPP/IEEE 1284, ECP/IEEE 1284 1.7 & 1.9, PCI 2.2, PnP 1.0a, DMI 2.0, PS/2 keyboard and mouse, USB, VGA BIOS, CD-ROM bootable, Set by setup manual Built-in CPU 512KB Always enabled Always enabled Fixed in write-back Specification...
... Specification Phoenix 1.00 Flash ROM 512KB TSOP ACPI 1.0b,PC Card 95, SM BIOS 2.3, EPP/IEEE 1284, ECP/IEEE 1284 1.7 & 1.9, PCI 2.2, PnP 1.0a, DMI 2.0, PS/2 keyboard and mouse, USB, VGA BIOS, CD-ROM bootable, Set by setup manual Built-in CPU 512KB Always enabled Always enabled Fixed in write-back Specification...

TravelMate 270 Service Guide
Page 34
...BIOS Setup) Optional parallel port IRQ (in SiS650 North Birdge ICH2 NS87591 ICH2 Keyboard Item Keyboard controller Keyboard vendor & model name Total number of keypads Windows logo key Internal & external keyboard work simultaneously Specification NS87591 Chicony 87/88/89 keys with 101/102 key emulation ...Optional ECP DMA channel (in BIOS Setup) Optional parallel port I /O controller Audio controller Video controller Hard disk drive controller Keyboard controller RTC Controller SiS650+SiS961(SB) SMC LPC47N227 Integrated Software Audio in SiS961 South Bridge with Realtek ALC202 AC97 Codec(No ...
...BIOS Setup) Optional parallel port IRQ (in SiS650 North Birdge ICH2 NS87591 ICH2 Keyboard Item Keyboard controller Keyboard vendor & model name Total number of keypads Windows logo key Internal & external keyboard work simultaneously Specification NS87591 Chicony 87/88/89 keys with 101/102 key emulation ...Optional ECP DMA channel (in BIOS Setup) Optional parallel port I /O controller Audio controller Video controller Hard disk drive controller Keyboard controller RTC Controller SiS650+SiS961(SB) SMC LPC47N227 Integrated Software Audio in SiS961 South Bridge with Realtek ALC202 AC97 Codec(No ...

TravelMate 270 Service Guide
Page 38
... contact discharge) 4242 Vdc for 690 LCD backlight (Vrms) 262K Specification 262K keyboard hotkey No Yes keyboard hotkey No Yes 3.3 3.3 690 690 262K keyboard hotkey No Yes 3.3 690 262K keyboard hotkey No Yes 3.3 690 AC Adapter Item Vendor & model name Input Requirements...B requirements(German) 3. FCC class B requirements(USA) 2. LCD Item Supports colors 262K Optical Specification Brightness control keyboard hotkey Contrast control No Suspend/Standby Yes control Electrical Specification Supply voltage for 3.3 LCD display (V) Supply voltage for 1 second 60uA at...
... contact discharge) 4242 Vdc for 690 LCD backlight (Vrms) 262K Specification 262K keyboard hotkey No Yes keyboard hotkey No Yes 3.3 3.3 690 690 262K keyboard hotkey No Yes 3.3 690 262K keyboard hotkey No Yes 3.3 690 AC Adapter Item Vendor & model name Input Requirements...B requirements(German) 3. FCC class B requirements(USA) 2. LCD Item Supports colors 262K Optical Specification Brightness control keyboard hotkey Contrast control No Suspend/Standby Yes control Electrical Specification Supply voltage for 3.3 LCD display (V) Supply voltage for 1 second 60uA at...

TravelMate 270 Service Guide
Page 40
...Channel Size 64KB 128 KB 640KB Function System BIOS VGA BIOS Video memory (VRAM) Conventional memory Function DMA controller-1 Interrupt controller-1 Timer 1 Keyboard controller 38859 chip select System speaker out DMA controller-1 System speaker Real-time clock and NMI mask DMA page register Interrupt controller-2 DMA controller-2...Parallel port 3 Paraller port 1 Video Controller Standard Floppy Disk Controller Floppy disk controller DMA controller-1 PCI configuration register Function(Hardware) System timer Keyboard Programmable Interrup Controller Free by default or Generic Chapter 1 35
...Channel Size 64KB 128 KB 640KB Function System BIOS VGA BIOS Video memory (VRAM) Conventional memory Function DMA controller-1 Interrupt controller-1 Timer 1 Keyboard controller 38859 chip select System speaker out DMA controller-1 System speaker Real-time clock and NMI mask DMA page register Interrupt controller-2 DMA controller-2...Parallel port 3 Paraller port 1 Video Controller Standard Floppy Disk Controller Floppy disk controller DMA controller-1 PCI configuration register Function(Hardware) System timer Keyboard Programmable Interrup Controller Free by default or Generic Chapter 1 35

TravelMate 270 Service Guide
Page 54
...system because the BIOS is not completely loaded. The Phlash utility has auto-execution function. The system diagnostic utilities is for the Acer TravelMate 270 series notebook machine. Panel ID Utility 2. NOTE: This program contains a readme.txt file. Chapter 2 49 If the battery ...bootable diskette. Mother Board Data Utility To use for TravelMate 270 series is required for system components test: SIO/PIO loopback, diskette, mouse (PS/2), CD-Disk (Test Program), battery pack, SYS_card (Card Bus)X2, AC-adapter, keyboard, external speaker and feather. 1 New added description....
...system because the BIOS is not completely loaded. The Phlash utility has auto-execution function. The system diagnostic utilities is for the Acer TravelMate 270 series notebook machine. Panel ID Utility 2. NOTE: This program contains a readme.txt file. Chapter 2 49 If the battery ...bootable diskette. Mother Board Data Utility To use for TravelMate 270 series is required for system components test: SIO/PIO loopback, diskette, mouse (PS/2), CD-Disk (Test Program), battery pack, SYS_card (Card Bus)X2, AC-adapter, keyboard, external speaker and feather. 1 New added description....

TravelMate 270 Service Guide
Page 58
You can confirm the function by a feather. 10. Keyboard Test b Press all keys according to this order--from left to right and from up to down to continue the next test. 11. 32bit Systemcard Test Insert two pieces of Syscard (Card bus) into PCMCIA slots for test. If pass then press + Break to test each key's function. Chapter 2 53 FAN Test Check if the fan has turned on or not. 9.
You can confirm the function by a feather. 10. Keyboard Test b Press all keys according to this order--from left to right and from up to down to continue the next test. 11. 32bit Systemcard Test Insert two pieces of Syscard (Card bus) into PCMCIA slots for test. If pass then press + Break to test each key's function. Chapter 2 53 FAN Test Check if the fan has turned on or not. 9.

TravelMate 270 Service Guide
Page 62
For example, if you must first remove the keyboard, then disassemble the inside assembly frame in that order. Screw List Item Description A CPU FRAME NUT B Screw, #4-40UNF C Screw, M2.0X2.5NL D Screw, M2.0X3 E Screw, M2.0X3NL F Screw, M2.0X5 G Screw, M2.0X7 Chapter 3 57 Disassembly Procedure Flowchart The flowchart on the succeeding page gives you a graphic representation on the entire disassembly sequence and instructs you on the components that need to remove the system board, you want to be removed during servicing.
For example, if you must first remove the keyboard, then disassemble the inside assembly frame in that order. Screw List Item Description A CPU FRAME NUT B Screw, #4-40UNF C Screw, M2.0X2.5NL D Screw, M2.0X3 E Screw, M2.0X3NL F Screw, M2.0X5 G Screw, M2.0X7 Chapter 3 57 Disassembly Procedure Flowchart The flowchart on the succeeding page gives you a graphic representation on the entire disassembly sequence and instructs you on the components that need to remove the system board, you want to be removed during servicing.

TravelMate 270 Service Guide
Page 68
Disconnect the keyboard cable.. 7. Disconnect the LCD power cable. 8. Then, remove the two screws as shown here. 5. Prize the middle cover with a plastic flat head screwdriver. 4. One on ... as the picture shows. 6. Remove the two screws holding the middle cover. 2. Removing the LCD Module and Switch Board Removing the LCD Module 1. Place the keyboard as shown here. Use a tool to pull the...
Disconnect the keyboard cable.. 7. Disconnect the LCD power cable. 8. Then, remove the two screws as shown here. 5. Prize the middle cover with a plastic flat head screwdriver. 4. One on ... as the picture shows. 6. Remove the two screws holding the middle cover. 2. Removing the LCD Module and Switch Board Removing the LCD Module 1. Place the keyboard as shown here. Use a tool to pull the...

TravelMate 270 Service Guide
Page 78
...power supply check in the connector on the main board. Disconnect the power adapter and install the charged battery pack; If the internal keyboard does not work , reconnect the cable connector and repeat the failing operation. Power System Check To verify the symptom of the following... auxiliary input devices are supported by the battery pack. If the keyboard cable connection is supplied. 3. Reconnect the keyboard cables. 2. If you need to check memory but have no testing program or diagonositc utility at a time to be...
...power supply check in the connector on the main board. Disconnect the power adapter and install the charged battery pack; If the internal keyboard does not work , reconnect the cable connector and repeat the failing operation. Power System Check To verify the symptom of the following... auxiliary input devices are supported by the battery pack. If the keyboard cable connection is supplied. 3. Reconnect the keyboard cables. 2. If you need to check memory but have no testing program or diagonositc utility at a time to be...


