
Travelmate 2300 User's Guide
Page 85
...;FFNET NICHT DEM STRAHLL AUSSETZEN Adjust only those controls that are followed. Do not disassemble or dispose of used with the same type as the product's battery we recommend in your accessories box) for service. 12 The TravelMate series uses the lithium battery. f If the product exhibits a distinct change in fire. EVITTER... length is 15 feet (4.6 meters). 15 Always disconnect all telephone lines from children and dispose of them away from the wall outlet before serving or disassembling this unit.
...;FFNET NICHT DEM STRAHLL AUSSETZEN Adjust only those controls that are followed. Do not disassemble or dispose of used with the same type as the product's battery we recommend in your accessories box) for service. 12 The TravelMate series uses the lithium battery. f If the product exhibits a distinct change in fire. EVITTER... length is 15 feet (4.6 meters). 15 Always disconnect all telephone lines from children and dispose of them away from the wall outlet before serving or disassembling this unit.

Travelmate 2300 User's Guide
Page 86
... with wireless LAN and/or Bluetooth® only. VARO! This has no effect on the recorded image and does not constitute a malfunction. Reverse engineering or disassembly is for limited viewing uses only. LAVATTAESSA OLET ALTTINA LASERSÅTEILYLLE. VARNING: LASERSTRÅLNING NÅR DENNA DEL ÅR ÖPPNAD ÅLÅ TUIJOTA...
... with wireless LAN and/or Bluetooth® only. VARO! This has no effect on the recorded image and does not constitute a malfunction. Reverse engineering or disassembly is for limited viewing uses only. LAVATTAESSA OLET ALTTINA LASERSÅTEILYLLE. VARNING: LASERSTRÅLNING NÅR DENNA DEL ÅR ÖPPNAD ÅLÅ TUIJOTA...
TravelMate 2300/4000/4500 Service Guide
Page 58
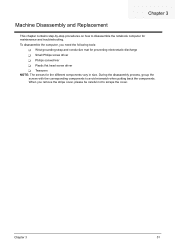
..., group the screws with the corresponding components to avoid mismatch when putting back the components. Chapter 3 51 To disassemble the computer, you remove the stripe cover, please be careful not to scrape the cover. When you need the following tools: T Wrist grounding strap and ... for preventing electrostatic discharge T Small Philips screw driver T Philips screwdriver T Plastic flat head screw driver T Tweezers NOTE: The screws for maintenance and troubleshooting. Chapter 3 Machine Disassembly and Replacement This chapter contains step-by-step procedures on how to...
..., group the screws with the corresponding components to avoid mismatch when putting back the components. Chapter 3 51 To disassemble the computer, you remove the stripe cover, please be careful not to scrape the cover. When you need the following tools: T Wrist grounding strap and ... for preventing electrostatic discharge T Small Philips screw driver T Philips screwdriver T Plastic flat head screw driver T Tweezers NOTE: The screws for maintenance and troubleshooting. Chapter 3 Machine Disassembly and Replacement This chapter contains step-by-step procedures on how to...

TravelMate 2300/4000/4500 Service Guide
Page 59
... signal cables from the system. 3. Mini PCI cover here also called RAM/Wireless cover. General Information Before You Begin Before proceeding with the disassembly procedure, make sure that you have to remove the HDD, the heatsink cover to see these screws. NOTE: The screws used to secure ...heatsink cover, MIni PCI cover and HDD cover are with yellow circle) 52 Quantity Chapter 3 Please group same type of screw together as you disassemble the system for your reference. There are twenty screws holding the bottom case to group the screws on the following : 1. You may have...
... signal cables from the system. 3. Mini PCI cover here also called RAM/Wireless cover. General Information Before You Begin Before proceeding with the disassembly procedure, make sure that you have to remove the HDD, the heatsink cover to see these screws. NOTE: The screws used to secure ...heatsink cover, MIni PCI cover and HDD cover are with yellow circle) 52 Quantity Chapter 3 Please group same type of screw together as you disassemble the system for your reference. There are twenty screws holding the bottom case to group the screws on the following : 1. You may have...
TravelMate 2300/4000/4500 Service Guide
Page 61
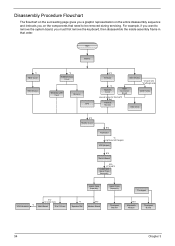
... that need to remove the system board, you on the components that order. Disassembly Procedure Flowchart The flowchart on the succeeding page gives you a graphic representation on the entire disassembly sequence and instructs you must first remove the keyboard, then disassemble the inside assembly frame in -1 Cover *4 Speaker Set B*2 Modem Board Upper Case...
... that need to remove the system board, you on the components that order. Disassembly Procedure Flowchart The flowchart on the succeeding page gives you a graphic representation on the entire disassembly sequence and instructs you must first remove the keyboard, then disassemble the inside assembly frame in -1 Cover *4 Speaker Set B*2 Modem Board Upper Case...

TravelMate 2300/4000/4500 Service Guide
Page 68
Remove the eighteen screws on the bottom as shown. 7. Disconnect the touchpad board to the lower case assembly. 8. Disassembling the Upper Case Assembly 1. Detach the upper case assembly and place it next to main board FFC. 3. Then detach the touchpad board to touchpad FFC. 2. ... the bluetooth cable. 5. Disconnect the microphone cable then remove the upper case assembly. Remove the switch board. 3. Remove the two screws holding the switch board. 2. Disassembling the Main Unit Separate the Main Unit Into the Upper and the Lower Case Assembly 1.
Remove the eighteen screws on the bottom as shown. 7. Disconnect the touchpad board to the lower case assembly. 8. Disassembling the Upper Case Assembly 1. Detach the upper case assembly and place it next to main board FFC. 3. Then detach the touchpad board to touchpad FFC. 2. ... the bluetooth cable. 5. Disconnect the microphone cable then remove the upper case assembly. Remove the switch board. 3. Remove the two screws holding the switch board. 2. Disassembling the Main Unit Separate the Main Unit Into the Upper and the Lower Case Assembly 1.

TravelMate 2300/4000/4500 Service Guide
Page 69
Disconnect the touchpad board to touchpad FFC from the upper case assembly. 10. Remove the two screws that secure the touchpad board. 5. 4. Remove the three screws that secure the bluetooth module. 12. Remove the touchpad board from the upper case. 11. Disconnect the bluetooth module then remove it. Remove the four screws holding the touchpad bracket. 9. Remove the touchpad from the upper case. 6. Detach the touchpad bracket from the uppwer case assembly. 8. Disassembling the Lower Case Assembly 62 Chapter 3 Remove the touchpad board to touchpad FFC. 7.
Disconnect the touchpad board to touchpad FFC from the upper case assembly. 10. Remove the two screws that secure the touchpad board. 5. 4. Remove the three screws that secure the bluetooth module. 12. Remove the touchpad board from the upper case. 11. Disconnect the bluetooth module then remove it. Remove the four screws holding the touchpad bracket. 9. Remove the touchpad from the upper case. 6. Detach the touchpad bracket from the uppwer case assembly. 8. Disassembling the Lower Case Assembly 62 Chapter 3 Remove the touchpad board to touchpad FFC. 7.

TravelMate 2300/4000/4500 Service Guide
Page 72
... another screw holding the LCD bezel. 3. Remove the four screw caps as shown. 2. Remove the four screws holding the LCD bracket on the other side. 9. Disassembling the LCD Module 1.
... another screw holding the LCD bezel. 3. Remove the four screw caps as shown. 2. Remove the four screws holding the LCD bracket on the other side. 9. Disassembling the LCD Module 1.

TravelMate 2300/4000/4500 Service Guide
Page 74
Then take the hard disc drive out from the HDD bracket. Remove the two screws that secure the optical disc drive and the ODD holder. 3. Disconnect the ODD connector board then remove it. Push the ODD holder as the picture shows. 2. Remove another two screws holding the HDD bracket on the other side. 3. Disassembling the External Modules Disassembling the HDD Module 1. Disassembling the Optical Drive Module 1. Remove the two screws holding the HDD bracket on one side. 2. Detach the ODD holder. 5. Remove the four screws as shown. 4. Chapter 3 67
Then take the hard disc drive out from the HDD bracket. Remove the two screws that secure the optical disc drive and the ODD holder. 3. Disconnect the ODD connector board then remove it. Push the ODD holder as the picture shows. 2. Remove another two screws holding the HDD bracket on the other side. 3. Disassembling the External Modules Disassembling the HDD Module 1. Disassembling the Optical Drive Module 1. Remove the two screws holding the HDD bracket on one side. 2. Detach the ODD holder. 5. Remove the four screws as shown. 4. Chapter 3 67

TravelMate 2300/4000/4500 Service Guide
Page 76
...Test (POST) Error Message" on page 73 Use the customer-reported symptoms and go on or stay on page 85 Chapter 4 69 Non-Acer products, prototype cards, or modified options can perform visual inspection before you fellow this model. all components appear normal. 5. POST detects an...-On Self-Test (POST) Error Message" on page 73 "Intermittent Problems" on page 84 "Undetermined Problems" on .) POST does not complete. Disassemble and assemble the unit without any problem occurs, you can give false errors and invalid system responses. 1. Other symptoms (i.e. Verify the symptoms by attempting...
...Test (POST) Error Message" on page 73 Use the customer-reported symptoms and go on or stay on page 85 Chapter 4 69 Non-Acer products, prototype cards, or modified options can perform visual inspection before you fellow this model. all components appear normal. 5. POST detects an...-On Self-Test (POST) Error Message" on page 73 "Intermittent Problems" on page 84 "Undetermined Problems" on .) POST does not complete. Disassemble and assemble the unit without any problem occurs, you can give false errors and invalid system responses. 1. Other symptoms (i.e. Verify the symptoms by attempting...


