User Manual
Page 2
...purchase information. All correspondence concerning your computer. Such changes will be made periodically to the contents hereof and specifically disclaims the implied warranties of Acer Incorporated. The serial number and model number are recorded on the label affixed to their respective companies. ...Record the model number, serial number, purchase date and place of purchase Acer and the Acer logo are used herein for a particular purpose. Acer LCD Monitor User's Guide Model number Serial number Date of purchase Place of purchase information in this...
...purchase information. All correspondence concerning your computer. Such changes will be made periodically to the contents hereof and specifically disclaims the implied warranties of Acer Incorporated. The serial number and model number are recorded on the label affixed to their respective companies. ...Record the model number, serial number, purchase date and place of purchase Acer and the Acer logo are used herein for a particular purpose. Acer LCD Monitor User's Guide Model number Serial number Date of purchase Place of purchase information in this...

User Manual
Page 19
Actual product specifications may vary. Press the MENU key to adjust the picture quality, OSD position and general settings. The OSD can be used for general reference only. ... menu can use the OSD to open the OSD. For advanced settings, please refer to following content is for adjusting the settings of your LCD Monitor. English 9 Adjusting the OSD settings Note: The following page: Adjusting the picture quality 1 Press the MENU key to adjust the current Brightness, Contrast, Colour Temp...
Actual product specifications may vary. Press the MENU key to adjust the picture quality, OSD position and general settings. The OSD can be used for general reference only. ... menu can use the OSD to open the OSD. For advanced settings, please refer to following content is for adjusting the settings of your LCD Monitor. English 9 Adjusting the OSD settings Note: The following page: Adjusting the picture quality 1 Press the MENU key to adjust the current Brightness, Contrast, Colour Temp...
User Manual
Page 23
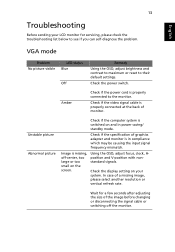
Check the power switch. Check if the specification of the image before changing or disconnecting the signal cable or switching off -center, too large or too small on your LCD monitor for servicing, please check the troubleshooting list below to their default settings. VGA mode Problem No picture ... can self-diagnose the problem. Check the display setting on the screen. Check if the video signal cable is properly connected to the monitor. Image is switched on and in compliance which may be causing the input signal frequency mismatch. Wait for a few seconds after adjusting ...
Check the power switch. Check if the specification of the image before changing or disconnecting the signal cable or switching off -center, too large or too small on your LCD monitor for servicing, please check the troubleshooting list below to their default settings. VGA mode Problem No picture ... can self-diagnose the problem. Check the display setting on the screen. Check if the video signal cable is properly connected to the monitor. Image is switched on and in compliance which may be causing the input signal frequency mismatch. Wait for a few seconds after adjusting ...


