User Manual
Page 2
English Copyright © 2016. The serial number and model number are registered trademarks of Acer Incorporated. Other companies' product names or trademarks are used herein for a particular purpose. All Rights Reserved. Acer LCD Monitor User Guide Original Issue: 07/2016 Changes may be incorporated in new editions of purchase information in the space provided below. All correspondence concerning your computer. Acer Incorporated. This company makes no...
English Copyright © 2016. The serial number and model number are registered trademarks of Acer Incorporated. Other companies' product names or trademarks are used herein for a particular purpose. All Rights Reserved. Acer LCD Monitor User Guide Original Issue: 07/2016 Changes may be incorporated in new editions of purchase information in the space provided below. All correspondence concerning your computer. Acer Incorporated. This company makes no...

User Manual
Page 3
... LCD monitor: • Make sure the monitor is attached to its base before connecting the power cord to the AC power outlet. • Make sure both the LCD monitor and the computer are normal with the LCD monitor and do not indicate a problem. • Due to the nature of the fluorescent light, the screen may flicker during initial use . • The LCD screen has 99.99% or more effective pixels. Turn off the power switch...
... LCD monitor: • Make sure the monitor is attached to its base before connecting the power cord to the AC power outlet. • Make sure both the LCD monitor and the computer are normal with the LCD monitor and do not indicate a problem. • Due to the nature of the fluorescent light, the screen may flicker during initial use . • The LCD screen has 99.99% or more effective pixels. Turn off the power switch...
User Manual
Page 4
...touch dangerous voltage points or short-out parts that could be seriously damaged. • Slots and openings are not sure of the type of power available, consult your ears have adjusted. • Limit the amount of time listening to music at high volume. • Avoid turning up the volume to unplug the power cord... Do not allow anything to the equipment operator as possible. This product should never be blocked or covered. English Accessibility Be sure that the power outlet you plug the power cord into is provided. • Never push objects of any kind into the product. • To...
...touch dangerous voltage points or short-out parts that could be seriously damaged. • Slots and openings are not sure of the type of power available, consult your ears have adjusted. • Limit the amount of time listening to music at high volume. • Avoid turning up the volume to unplug the power cord... Do not allow anything to the equipment operator as possible. This product should never be blocked or covered. English Accessibility Be sure that the power outlet you plug the power cord into is provided. • Never push objects of any kind into the product. • To...

User Manual
Page 5
... into a nongrounded power outlet. The plug only fits in performance, indicating a need to qualified service personnel. English people will walk on the cord. • If an extension cord is used , the load should not exceed 80% of the power strip's input rating. • This product's power cord is equipped with the supplied power supply cord set , make sure that the total rating of all servicing to replace the power cord set . Also, make sure that is...
... into a nongrounded power outlet. The plug only fits in performance, indicating a need to qualified service personnel. English people will walk on the cord. • If an extension cord is used , the load should not exceed 80% of the power strip's input rating. • This product's power cord is equipped with the supplied power supply cord set , make sure that the total rating of all servicing to replace the power cord set . Also, make sure that is...

User Manual
Page 6
... the features and benefits of our other controls may contain small parts. Potentially explosive atmospheres include areas where you would normally be advised to turn off the device near gas pumps at Acer are covered by a qualified technician to restore the product to normal condition. We at service stations. Switch off your device in any area with...
... the features and benefits of our other controls may contain small parts. Potentially explosive atmospheres include areas where you would normally be advised to turn off the device near gas pumps at Acer are covered by a qualified technician to restore the product to normal condition. We at service stations. Switch off your device in any area with...
User Manual
Page 7
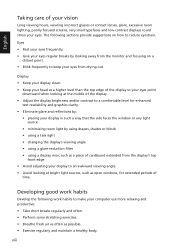
... the risk of user inactivity. • Wake the monitor when it is produced with high-precision manufacturing techniques. Observe the following section provides tips for power management: • Activate display's Sleep mode within 5 minutes of physical injury. English LCD pixel statement The LCD unit is in one fixed posture • avoid slouching forward and/or leaning backward • stand up and walk...
... the risk of user inactivity. • Wake the monitor when it is produced with high-precision manufacturing techniques. Observe the following section provides tips for power management: • Activate display's Sleep mode within 5 minutes of physical injury. English LCD pixel statement The LCD unit is in one fixed posture • avoid slouching forward and/or leaning backward • stand up and walk...
User Manual
Page 8
... at bright light sources, such as possible. • Exercise regularly and maintain a healthy body. Display • Keep your display clean. • Keep your head at a higher level than the top edge of the display so your eyes point downward when looking at the middle of the display. • Adjust the display brightness and/or contrast to a comfortable level for extended periods of time. viii English...
... at bright light sources, such as possible. • Exercise regularly and maintain a healthy body. Display • Keep your display clean. • Keep your head at a higher level than the top edge of the display so your eyes point downward when looking at the middle of the display. • Adjust the display brightness and/or contrast to a comfortable level for extended periods of time. viii English...
User Manual
Page 9
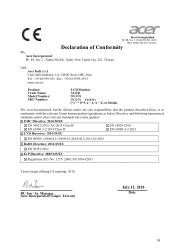
... s.r.l. Viale delle Industrie 1/A, 20020 Arese (MI), Italy Tel: +39-02-939-921 ,Fax: +39-02 9399-2913 www.acer.it Product: Trade Name: Model Number: SKU Number: LCD Monitor ACER SB220Q SB220Q xxxxxx; ("x" = 0~9, a ~ z, A ~ Z, or blank) We, Acer Incorporated, hereby declare under our sole responsibility that the product described above is in conformity with the relevant Union harmonization legislations as below...
... s.r.l. Viale delle Industrie 1/A, 20020 Arese (MI), Italy Tel: +39-02-939-921 ,Fax: +39-02 9399-2913 www.acer.it Product: Trade Name: Model Number: SKU Number: LCD Monitor ACER SB220Q SB220Q xxxxxx; ("x" = 0~9, a ~ z, A ~ Z, or blank) We, Acer Incorporated, hereby declare under our sole responsibility that the product described above is in conformity with the relevant Union harmonization legislations as below...
User Manual
Page 10
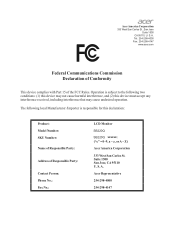
... This device complies with Part 15 of Responsible Party: Contact Person: Phone No.: Fax No.: LCD Monitor SB220Q SB220Q xxxxxx; ("x" = 0~9, a ~ z, or A ~ Z) Acer America Corporation 333 West San Carlos St. Operation is responsible for this device must accept any interference received, including interference that may not cause harmful interference, and (2) this declaration: Product: Model Number: SKU Number: Name of Responsible...
... This device complies with Part 15 of Responsible Party: Contact Person: Phone No.: Fax No.: LCD Monitor SB220Q SB220Q xxxxxx; ("x" = 0~9, a ~ z, or A ~ Z) Acer America Corporation 333 West San Carlos St. Operation is responsible for this device must accept any interference received, including interference that may not cause harmful interference, and (2) this declaration: Product: Model Number: SKU Number: Name of Responsible...
User Manual
Page 11
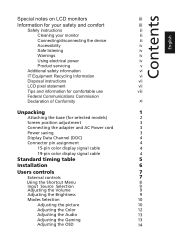
...the base (for selected models) 2 Screen position adjustment 3 Connecting the adapter and AC Power cord 3 Power saving 3 Display Data Channel (DDC) 4 Connector pin assignment 4 15-pin color display signal cable 4 19-pin color display signal cable 4 Standard timing table 5 Installation 6 Users controls 7 External controls 77 Using the Shortcut Menu 8 Input Source Selection 9 Adjusting the Volume 9 Adjusting the B rightness 9 Modes Selection 10 Adjusting the picture 10 Adjusting the Color 12 Adjusting the Audio 13 Adjusting the Gaming 13 Adjusting the OSD...
...the base (for selected models) 2 Screen position adjustment 3 Connecting the adapter and AC Power cord 3 Power saving 3 Display Data Channel (DDC) 4 Connector pin assignment 4 15-pin color display signal cable 4 19-pin color display signal cable 4 Standard timing table 5 Installation 6 Users controls 7 External controls 77 Using the Shortcut Menu 8 Input Source Selection 9 Adjusting the Volume 9 Adjusting the B rightness 9 Modes Selection 10 Adjusting the picture 10 Adjusting the Color 12 Adjusting the Audio 13 Adjusting the Gaming 13 Adjusting the OSD...

User Manual
Page 12
Adjusting the System 15 Product Information 16 Save Settings to User mode only) 16 English Troubleshooting 17 VGA Mode 17 HDMI Mode (Optional) 18
Adjusting the System 15 Product Information 16 Save Settings to User mode only) 16 English Troubleshooting 17 VGA Mode 17 HDMI Mode (Optional) 18
User Manual
Page 13
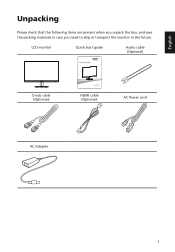
LCD monitor Quick start guide Audio cable (Optional) D-sub cable (Optional) HDMI cable (Optional) AC Power cord AC Adapter 1 English Unpacking Please check that the following items are present when you unpack the box, and save the packing materials in case you need to ship or transport the monitor in the future.
LCD monitor Quick start guide Audio cable (Optional) D-sub cable (Optional) HDMI cable (Optional) AC Power cord AC Adapter 1 English Unpacking Please check that the following items are present when you unpack the box, and save the packing materials in case you need to ship or transport the monitor in the future.

User Manual
Page 14
use a cloth to avoid scratching the screen. 1 Attach the monitor stand arm to the base. 2 Ensure that the base is locked onto the monitor stand arm. • Secure the base to avoid injuring yourself. 2 Carefully place the monitor face-down on a stable surface -- English Attaching the base (for selected models) Note: Take care when performing the installation to the monitor stand arm by turning the white screw using the integrated tab or a suitable coin. (for selected models) Note: Remove the monitor and monitor base from its packaging.
use a cloth to avoid scratching the screen. 1 Attach the monitor stand arm to the base. 2 Ensure that the base is locked onto the monitor stand arm. • Secure the base to avoid injuring yourself. 2 Carefully place the monitor face-down on a stable surface -- English Attaching the base (for selected models) Note: Take care when performing the installation to the monitor stand arm by turning the white screw using the integrated tab or a suitable coin. (for selected models) Note: Remove the monitor and monitor base from its packaging.
User Manual
Page 15
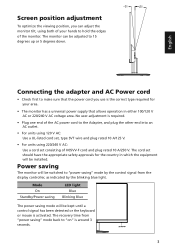
... monitor. Power saving The monitor will be installed. The recovery time from the display controller, as indicated by the control signal from "power saving" mode back to "on" is around 3 seconds. 3 English Connecting the adapter and AC Power cord • Check first to make sure that allows operation in which the equipment will be switched to "power saving" mode by the blinking blue light. Mode On Standby/Power saving LED light Blue Blinking Blue The power saving mode will be adjusted to 15 degrees up or 5 degrees down. Screen position adjustment...
... monitor. Power saving The monitor will be installed. The recovery time from the display controller, as indicated by the control signal from "power saving" mode back to "on" is around 3 seconds. 3 English Connecting the adapter and AC Power cord • Check first to make sure that allows operation in which the equipment will be switched to "power saving" mode by the blinking blue light. Mode On Standby/Power saving LED light Blue Blinking Blue The power saving mode will be adjusted to 15 degrees up or 5 degrees down. Screen position adjustment...
User Manual
Page 16
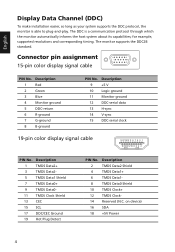
English Display Data Channel (DDC) To make installation easier, so long as your system supports the DDC protocol, the monitor is a communication protocol through which the monitor automatically informs the host system about its capabilities; Connector pin assignment 15-pin color display signal cable 1 5 6 10 11 15 PIN No. Description 9 +5 V 10 Logic ground 11 Monitor ground 12 DDC-serial data 13 H-sync 14 V-sync 15 DDC-serial clock...
English Display Data Channel (DDC) To make installation easier, so long as your system supports the DDC protocol, the monitor is a communication protocol through which the monitor automatically informs the host system about its capabilities; Connector pin assignment 15-pin color display signal cable 1 5 6 10 11 15 PIN No. Description 9 +5 V 10 Logic ground 11 Monitor ground 12 DDC-serial data 13 H-sync 14 V-sync 15 DDC-serial clock...
User Manual
Page 18
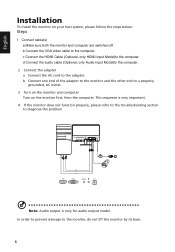
.... c Connect the HDMI Cable (Optional, only HDMI-Input Model)to the monitor, do not lift the monitor by its base. 6 English Installation To install the monitor on the monitor first, then the computer. d Connect the audio cable (Optional, only Audio-input Model)to the computer. 2 Connect the adapter a Connect the AC cord to a properly grounded, AC outlet. 3 Turn on the monitor and computer Turn on your host system, please follow the steps below: Steps 1 Connect cable(s) a Make sure both the monitor...
.... c Connect the HDMI Cable (Optional, only HDMI-Input Model)to the monitor, do not lift the monitor by its base. 6 English Installation To install the monitor on the monitor first, then the computer. d Connect the audio cable (Optional, only Audio-input Model)to the computer. 2 Connect the adapter a Connect the AC cord to a properly grounded, AC outlet. 3 Turn on the monitor and computer Turn on your host system, please follow the steps below: Steps 1 Connect cable(s) a Make sure both the monitor...
User Manual
Page 19
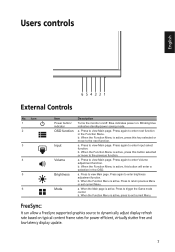
... Function Menu. Icon 1 2 3 4 5 6 Item Power button/ indicator OSD function Input Volume Brightness Mode Description Turns the monitor on . Press to enter next function in the OSD. a. When the Function Menu is active, this button selected or move to the previous function. No. Blue indicates power on /off. Blinking blue indicates standby/power saving mode. Press again to view Main page. When the Function Menu is active. a. Press to trigger the Game mode control b. a. Press...
... Function Menu. Icon 1 2 3 4 5 6 Item Power button/ indicator OSD function Input Volume Brightness Mode Description Turns the monitor on . Press to enter next function in the OSD. a. When the Function Menu is active, this button selected or move to the previous function. No. Blue indicates power on /off. Blinking blue indicates standby/power saving mode. Press again to view Main page. When the Function Menu is active. a. Press to trigger the Game mode control b. a. Press...
User Manual
Page 23
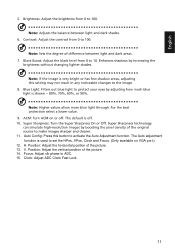
Position: Adjust the horizontal position of the picture. 14. V. H. Position: Adjust the vertical position of the picture. 13. Focus: Adjust clk phase to set the HPos, VPos, Clock and Focus. (Only available on VGA port.) 12. The Auto adjustment function is used to ADC. 15. 11. Clock: Adjust ADC Clock Fast Lock. Auto Config: Press this button to activate the Auto Adjustment function.
Position: Adjust the horizontal position of the picture. 14. V. H. Position: Adjust the vertical position of the picture. 13. Focus: Adjust clk phase to set the HPos, VPos, Clock and Focus. (Only available on VGA port.) 12. The Auto adjustment function is used to ADC. 15. 11. Clock: Adjust ADC Clock Fast Lock. Auto Config: Press this button to activate the Auto Adjustment function.
User Manual
Page 29
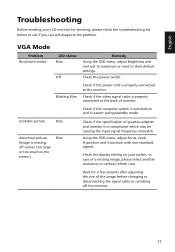
... the input signal frequency mismatch. Check if the computer system is in power saving/standby mode. Check the power switch. Check if the video signal cable is properly connected to their default settings. Using the OSD menu, adjust focus, clock, H-position and V-position with non-standard signals. VGA Mode Problem No picture visible LED status Blue Off Remedy Using the OSD menu, adjust brightness and contrast to maximum or reset to the monitor. In case of a missing image, please select another resolution or vertical refresh rate. Blinking Blue Check if the power cord is properly...
... the input signal frequency mismatch. Check if the computer system is in power saving/standby mode. Check the power switch. Check if the video signal cable is properly connected to their default settings. Using the OSD menu, adjust focus, clock, H-position and V-position with non-standard signals. VGA Mode Problem No picture visible LED status Blue Off Remedy Using the OSD menu, adjust brightness and contrast to maximum or reset to the monitor. In case of a missing image, please select another resolution or vertical refresh rate. Blinking Blue Check if the power cord is properly...
User Manual
Page 30
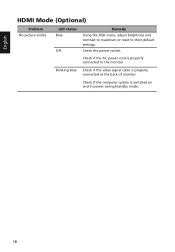
Blinking Blue Check if the video signal cable is switched on and in power saving/standby mode. 18 Check if the AC power cord is properly connected to their default settings. Check if the computer system is properly connected at the back of monitor. Check the power switch. English HDMI Mode (Optional) Problem No picture visible LED status Blue Off Remedy Using the OSD menu, adjust brightness and contrast to maximum or reset to the monitor.
Blinking Blue Check if the video signal cable is switched on and in power saving/standby mode. 18 Check if the AC power cord is properly connected to their default settings. Check if the computer system is properly connected at the back of monitor. Check the power switch. English HDMI Mode (Optional) Problem No picture visible LED status Blue Off Remedy Using the OSD menu, adjust brightness and contrast to maximum or reset to the monitor.


