User Manual
Page 3
... card 7 SIM card lock 8 Using your smartphone 9 Turning on for the first time 9 Entering your PIN 9 Activating a new SIM card 9 Using the touchscreen 9 Locking your smartphone 10 Waking your smartphone 10 Changing the lock screen wallpaper ......... 10 The Start screen 11 Rearranging the tiles on the Start screen . 11 Pinning items to the Start screen 11 Status icons and the Action center ........ 12 Notifications and quick actions 12 Action center 13 Additional menus 13 Viewing open apps 14 Adjusting the volume 14 Entering text...
... card 7 SIM card lock 8 Using your smartphone 9 Turning on for the first time 9 Entering your PIN 9 Activating a new SIM card 9 Using the touchscreen 9 Locking your smartphone 10 Waking your smartphone 10 Changing the lock screen wallpaper ......... 10 The Start screen 11 Rearranging the tiles on the Start screen . 11 Pinning items to the Start screen 11 Status icons and the Action center ........ 12 Notifications and quick actions 12 Action center 13 Additional menus 13 Viewing open apps 14 Adjusting the volume 14 Entering text...
User Manual
Page 6
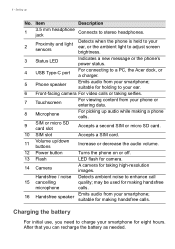
... a new message or the phone's power status. 4 USB Type-C port For connecting to your ear. 6 Front-facing camera For video calls or taking high-resolution images. Handsfree / noise Detects ambient noise to charge your smartphone; Setting up /down buttons Increase or decrease the audio volume. 12 Power button Turns the phone on or off. 13 Flash LED flash for camera. 14 Camera A camera for taking selfies. 7 Touchscreen For viewing content from your smartphone for making...
... a new message or the phone's power status. 4 USB Type-C port For connecting to your ear. 6 Front-facing camera For video calls or taking high-resolution images. Handsfree / noise Detects ambient noise to charge your smartphone; Setting up /down buttons Increase or decrease the audio volume. 12 Power button Turns the phone on or off. 13 Flash LED flash for camera. 14 Camera A camera for taking selfies. 7 Touchscreen For viewing content from your smartphone for making...
User Manual
Page 7
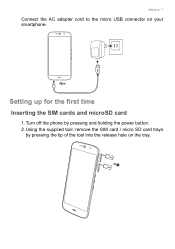
Setting up - 7 Connect the AC adapter cord to the micro USB connector on the tray. Turn off the phone by pressing the tip of the tool into the release hole on your smartphone. Using the supplied tool, remove the SIM card / micro SD card trays by pressing and holding the power button. 2. Setting up for the first time Inserting the SIM cards and microSD card 1.
Setting up - 7 Connect the AC adapter cord to the micro USB connector on the tray. Turn off the phone by pressing the tip of the tool into the release hole on your smartphone. Using the supplied tool, remove the SIM card / micro SD card trays by pressing and holding the power button. 2. Setting up for the first time Inserting the SIM cards and microSD card 1.
User Manual
Page 8
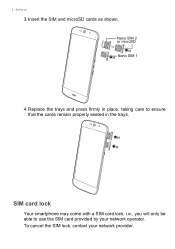
Replace the trays and press firmly in place, taking care to use the SIM card provided by your network provider. Insert the SIM and microSD cards as shown. mCiacrrodSD SIM1 SIM card lock Your smartphone may come with a SIM card lock, i.e., you will only be able to ensure that the cards remain properly seated in the trays. To cancel the SIM lock, contact your network operator. Nano SIM 2 or microSD SIM2 OR mCiacrrodSD SIM1 Nano SIM 1 4. 8 - Setting up 3.
Replace the trays and press firmly in place, taking care to use the SIM card provided by your network provider. Insert the SIM and microSD cards as shown. mCiacrrodSD SIM1 SIM card lock Your smartphone may come with a SIM card lock, i.e., you will only be able to ensure that the cards remain properly seated in the trays. To cancel the SIM lock, contact your network operator. Nano SIM 2 or microSD SIM2 OR mCiacrrodSD SIM1 Nano SIM 1 4. 8 - Setting up 3.

User Manual
Page 9
... screen to see a menu of options or information. Tap and hold: Tap and hold the power button until the screen turns on how to open lists of actions for the first time, you switch on the phone function. Follow the onscreen instructions to use some settings before you can use your smartphone. Note A Windows ID is necessary to complete setup. Depending on your settings, you are using the onscreen number...
... screen to see a menu of options or information. Tap and hold: Tap and hold the power button until the screen turns on how to open lists of actions for the first time, you switch on the phone function. Follow the onscreen instructions to use some settings before you can use your smartphone. Note A Windows ID is necessary to complete setup. Depending on your settings, you are using the onscreen number...
User Manual
Page 11
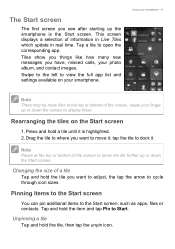
... it . Tap a tile to the Start screen, such as apps, files or contacts. Press and hold the tile you have, missed calls, your smartphone. tap the tile to dock it ; Changing the size of information in Live Tiles which update in real time. Swipe to the left to view the full app list and settings available on the Start screen 1. Drag the tile to where...
... it . Tap a tile to the Start screen, such as apps, files or contacts. Press and hold the tile you have, missed calls, your smartphone. tap the tile to dock it ; Changing the size of information in Live Tiles which update in real time. Swipe to the left to view the full app list and settings available on the Start screen 1. Drag the tile to where...
User Manual
Page 12
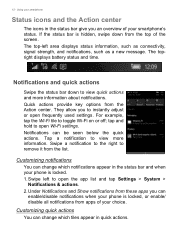
... to open frequently used settings. 12 - Using your smartphone Status icons and the Action center The icons in quick actions. Swipe left area displays status information, such as connectivity, signal strength, and notifications, such as a new message. Customizing quick actions You can be seen below the quick actions. The top-left to view more information about notifications. The topright displays battery status and time. Quick actions provide key options from the list. tap...
... to open frequently used settings. 12 - Using your smartphone Status icons and the Action center The icons in quick actions. Swipe left area displays status information, such as connectivity, signal strength, and notifications, such as a new message. Customizing quick actions You can be seen below the quick actions. The top-left to view more information about notifications. The topright displays battery status and time. Quick actions provide key options from the list. tap...
User Manual
Page 14
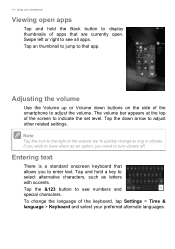
... app. To change to display thumbnails of the keyboard, tap Settings > Time & language > Keyboard and select your smartphone Viewing open apps Tap and hold a key to indicate the set level. Tap and hold the Back button to ring or vibrate. Tap an thumbnail to jump to that allows you need to quickly change the language of apps that are currently open. Note Tap the icon to the right of the volume bar to turn vibrate off. The volume bar...
... app. To change to display thumbnails of the keyboard, tap Settings > Time & language > Keyboard and select your smartphone Viewing open apps Tap and hold a key to indicate the set level. Tap and hold the Back button to ring or vibrate. Tap an thumbnail to jump to that allows you need to quickly change the language of apps that are currently open. Note Tap the icon to the right of the volume bar to turn vibrate off. The volume bar...
User Manual
Page 17
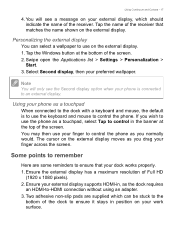
... screen. Tap the Windows button at the top of the dock to -HDMI connection without using an adapter. 3. The cursor on the external display. If you drag your finger to an external display. Ensure your preferred wallpaper. Swipe open the Applications list > Settings > Personalization > Start. 3. Two adhesive non-slip pads are some reminders to control the phone. Tap the name of the receiver...
... screen. Tap the Windows button at the top of the dock to -HDMI connection without using an adapter. 3. The cursor on the external display. If you drag your finger to an external display. Ensure your preferred wallpaper. Swipe open the Applications list > Settings > Personalization > Start. 3. Two adhesive non-slip pads are some reminders to control the phone. Tap the name of the receiver...
User Manual
Page 18
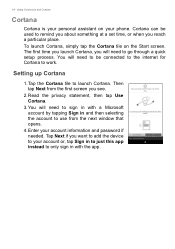
... opens. 4. You will need to go through a quick setup process. Enter your account or, tap Sign in to just this app instead to remind you about something at a set time, or when you see. 2. You will need to sign in with a Microsoft account by tapping Sign in with the app. 18 - Cortana can be connected to the internet for Cortana to use from the first screen...
... opens. 4. You will need to go through a quick setup process. Enter your account or, tap Sign in to just this app instead to remind you about something at a set time, or when you see. 2. You will need to sign in with a Microsoft account by tapping Sign in with the app. 18 - Cortana can be connected to the internet for Cortana to use from the first screen...
User Manual
Page 21
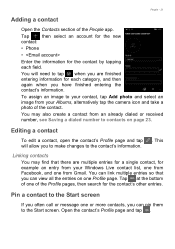
... an already dialed or received number, see Saving a dialed number to contacts on one or more contacts, you can pin them to your Albums, alternatively tap the camera icon and take a photo of the contact. You may find that you can view all the entries on page 23. Pin a contact to the Start screen If you to make changes to tap when you have finished entering the contact's information. Open the contact's Profile page...
... an already dialed or received number, see Saving a dialed number to contacts on one or more contacts, you can pin them to your Albums, alternatively tap the camera icon and take a photo of the contact. You may find that you can view all the entries on page 23. Pin a contact to the Start screen If you to make changes to tap when you have finished entering the contact's information. Open the contact's Profile page...
User Manual
Page 22
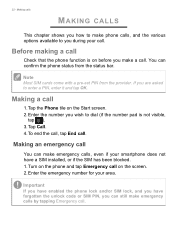
... the SIM has been blocked. 1. Note Most SIM cards come with a pre-set PIN from the status bar. If you can still make a call on the Start screen. 2. Tap Call. 4. Turn on the phone and tap Emergency call . Enter the number you wish to dial (if the number pad is on before you make emergency calls by tapping Emergency call Check that the phone function is not visible, tap ). 3. Before making a call . Making a call . Important If you have enabled the phone lock and/or SIM lock...
... the SIM has been blocked. 1. Note Most SIM cards come with a pre-set PIN from the status bar. If you can still make a call on the Start screen. 2. Tap Call. 4. Turn on the phone and tap Emergency call . Enter the number you wish to dial (if the number pad is on before you make emergency calls by tapping Emergency call Check that the phone function is not visible, tap ). 3. Before making a call . Making a call . Important If you have enabled the phone lock and/or SIM lock...
User Manual
Page 23
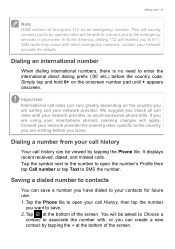
... screen. SIM cards may come with , or you want to your contacts for future use. 1. We suggest you check all recognize 112 as an emergency number. Dialing a number from your network provider for roaming rates specific to enter the international direct dialing prefix ('00' etc.) before you have dialed to save. 2. Tap the Phone tile to open the number's Profile then tap Call number or tap Text to associate the number with other emergency numbers, contact your call history...
... screen. SIM cards may come with , or you want to your contacts for future use. 1. We suggest you check all recognize 112 as an emergency number. Dialing a number from your network provider for roaming rates specific to enter the international direct dialing prefix ('00' etc.) before you have dialed to save. 2. Tap the Phone tile to open the number's Profile then tap Call number or tap Text to associate the number with other emergency numbers, contact your call history...

User Manual
Page 24
... Phone app, tap Speed dial or History and tap bottom of your contacts You can answer or ignore the call. 24 - Making calls 3. To Answer or Ignore the call , the number will be visible. 1. at the • In the People app your list of contacts. Muting the ringer If you can make a call them. Making a call to one of the page to swipe the lock screen up or down button. • Press the power button. Answering...
... Phone app, tap Speed dial or History and tap bottom of your contacts You can answer or ignore the call. 24 - Making calls 3. To Answer or Ignore the call , the number will be visible. 1. at the • In the People app your list of contacts. Muting the ringer If you can make a call them. Making a call to one of the page to swipe the lock screen up or down button. • Press the power button. Answering...
User Manual
Page 27
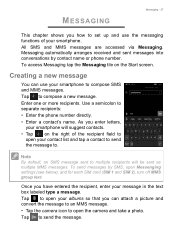
... open your message in the text box labeled type a message. Enter one or more recipients. Tap to compose a new message. All SMS and MMS messages are accessed via Messaging. Creating a new message You can attach a picture and convert the message to an MMS message. • Tap the camera icon to open Messenging settings (see below), and for each SIM card (SIM 1 and SIM 2), turn off MMS group text. Messaging automatically arranges received and sent messages into conversations by SMS, open the camera and take a photo. As you enter...
... open your message in the text box labeled type a message. Enter one or more recipients. Tap to compose a new message. All SMS and MMS messages are accessed via Messaging. Creating a new message You can attach a picture and convert the message to an MMS message. • Tap the camera icon to open Messenging settings (see below), and for each SIM card (SIM 1 and SIM 2), turn off MMS group text. Messaging automatically arranges received and sent messages into conversations by SMS, open the camera and take a photo. As you enter...
User Manual
Page 28
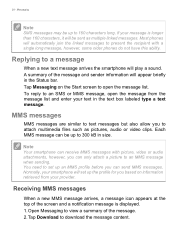
... to attach multimedia files such as multiple linked messages. A summary of the message and sender information will play a sound. Receiving MMS messages When a new MMS message arrives, a message icon appears at the top of the message. 2. Normally, your smartphone will automatically join the linked messages to an SMS or MMS message, open the message list. Open Messaging to set up to download the message content. 28 - Each MMS message can send MMS messages. You need to view a summary of the screen and a notification message is longer...
... to attach multimedia files such as multiple linked messages. A summary of the message and sender information will play a sound. Receiving MMS messages When a new MMS message arrives, a message icon appears at the top of the message. 2. Normally, your smartphone will automatically join the linked messages to an SMS or MMS message, open the message list. Open Messaging to set up to download the message content. 28 - Each MMS message can send MMS messages. You need to view a summary of the screen and a notification message is longer...
User Manual
Page 29
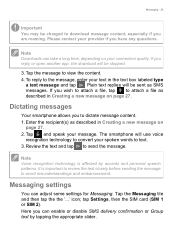
Plain text replies will use voice recognition technology to convert your spoken words to text. 3. tap Settings, then the SIM card (SIM 1 or SIM 2). Note Downloads can adjust some settings for Messaging. Tap the message to send the message. Dictating messages Your smartphone allows you reply or open another app, the download will be stopped. 3. Review the text and tap to view the content. 4. Tap the Messaging tile and then tap the the '...' Messaging settings You...
Plain text replies will use voice recognition technology to convert your spoken words to text. 3. tap Settings, then the SIM card (SIM 1 or SIM 2). Note Downloads can adjust some settings for Messaging. Tap the message to send the message. Dictating messages Your smartphone allows you reply or open another app, the download will be stopped. 3. Review the text and tap to view the content. 4. Tap the Messaging tile and then tap the the '...' Messaging settings You...
User Manual
Page 35
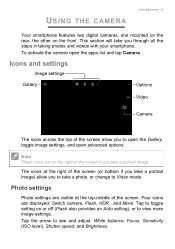
... you take a portrait image) allow you take a photo, or change to open the Gallery, toggle image settings, and open the apps list and tap Camera. To activate the camera open advanced options. Note These icons are on the front. USING THE CAMERA Using the camera - 35 Your smartphone features two digital cameras, one mounted on the rear, the other on the right of the screen if you to Video mode.
... you take a portrait image) allow you take a photo, or change to open the Gallery, toggle image settings, and open the apps list and tap Camera. To activate the camera open advanced options. Note These icons are on the front. USING THE CAMERA Using the camera - 35 Your smartphone features two digital cameras, one mounted on the rear, the other on the right of the screen if you to Video mode.
User Manual
Page 36
... default values). 2. Use a pinch action to begin recording. Use a pinch action to view more image settings. Using the camera Video settings The settings at the top of the screen to the camera app. • Photo timer: Add a timer delay when taking photos. • Bracketing: Take multiple photos with different exposure settings. • Settings: Adjust additional settings such as button functions, aspect ratio, grid, focus light, video resolution and stabilization. Tap to toggle setting on video mode...
... default values). 2. Use a pinch action to begin recording. Use a pinch action to view more image settings. Using the camera Video settings The settings at the top of the screen to the camera app. • Photo timer: Add a timer delay when taking photos. • Bracketing: Take multiple photos with different exposure settings. • Settings: Adjust additional settings such as button functions, aspect ratio, grid, focus light, video resolution and stabilization. Tap to toggle setting on video mode...
User Manual
Page 38
... the screen. 38 - Sharing your smartphone, as well as provide useful tips for security. To use a Bluetooth headset to make and receive calls. if you use Wi-Fi, you can set the connection name and a password for when you how to five clients or computers. Accessories and tips ACCESSORIES AND TIPS This chapter shows you are turned off. • To answer an incoming call, press the button...
... the screen. 38 - Sharing your smartphone, as well as provide useful tips for security. To use a Bluetooth headset to make and receive calls. if you use Wi-Fi, you can set the connection name and a password for when you how to five clients or computers. Accessories and tips ACCESSORIES AND TIPS This chapter shows you are turned off. • To answer an incoming call, press the button...


