
Service Manual
Page 7
(4) Receiving The CCD receives the light, then transfers the intensity of the object (A4 or Letter), and show the object's size and position on the scanner's window glass and close the cover, then you want to voltage signal. If the object is better to close the cover for the future process. But ... addition, user can ignore the cover. LIGHT VOLTAGE SIGNAL CCD Fig. 3-3 Receiving 3.2 Scan Process (1) Preset Put the object (it is too thick to close the scanner cover.
(4) Receiving The CCD receives the light, then transfers the intensity of the object (A4 or Letter), and show the object's size and position on the scanner's window glass and close the cover, then you want to voltage signal. If the object is better to close the cover for the future process. But ... addition, user can ignore the cover. LIGHT VOLTAGE SIGNAL CCD Fig. 3-3 Receiving 3.2 Scan Process (1) Preset Put the object (it is too thick to close the scanner cover.
Service Manual
Page 34
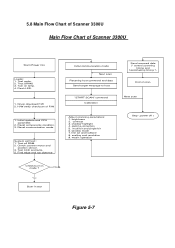
Test SRAM. 3. Initial system and CPU parameter. 2. Check scanner motor and position sensor. 3. window mode 7. Turn on lamp. 4. Driver download F/W 2. System self test : 1. gamma correction 5. Reset communication mode. Test all RAM. 2. Find edge and top distance Initial communication mode... bit 6. Reset components condition. 3. matrix operation Stop ( power off ) Check burn-in test Figure 5-7 line art and halftone 8. shadow-highlight 4. 5.8 Main Flow Chart of Scanner 3300U Main Flow Chart of Scanner 3300U Start (Power On) Loader: 1. Test motor. 2.
Test SRAM. 3. Initial system and CPU parameter. 2. Check scanner motor and position sensor. 3. window mode 7. Turn on lamp. 4. Driver download F/W 2. System self test : 1. gamma correction 5. Reset communication mode. Test all RAM. 2. Find edge and top distance Initial communication mode... bit 6. Reset components condition. 3. matrix operation Stop ( power off ) Check burn-in test Figure 5-7 line art and halftone 8. shadow-highlight 4. 5.8 Main Flow Chart of Scanner 3300U Main Flow Chart of Scanner 3300U Start (Power On) Loader: 1. Test motor. 2.
Service Manual
Page 39
... Sensor error Line Motor/Home Sensor U5 --- IC ASP A3568 6.8 Power Supply 6.8.1 No Function after Power On: Q1 --- IC A3568 6.7 Scan Quality not Good: Mechanism --Window Glass dust White/Black strip dust Old Lamp CCD Mechanism U6 --- 6.4 When MicraScan show 0XFFFF0026: DC Offset error U6 --- IC A3568 6.6 When MicraScan show 0XFFFF0027...
... Sensor error Line Motor/Home Sensor U5 --- IC ASP A3568 6.8 Power Supply 6.8.1 No Function after Power On: Q1 --- IC A3568 6.7 Scan Quality not Good: Mechanism --Window Glass dust White/Black strip dust Old Lamp CCD Mechanism U6 --- 6.4 When MicraScan show 0XFFFF0026: DC Offset error U6 --- IC A3568 6.6 When MicraScan show 0XFFFF0027...
Service Manual
Page 42
... parts. - Unplug the connector by reversing the disassembly procedure. - Never turn the power on the scanner circuit board. - Lift up the cover and cover hinge in the direction that you unplug the SLIM6 Scanner before disassembling. - If it is necessary to plug in Fig.7-2. Precautions - 7.1. Unless otherwise specified,... ...etc. Turn the power off first when unplug the connector on if there is shown in the adapter cord and operate the scanner after it is disassembled, pay special attention to the scanner window glass. Make sure that perpendicular to the following: A.
... parts. - Unplug the connector by reversing the disassembly procedure. - Never turn the power on the scanner circuit board. - Lift up the cover and cover hinge in the direction that you unplug the SLIM6 Scanner before disassembling. - If it is necessary to plug in Fig.7-2. Precautions - 7.1. Unless otherwise specified,... ...etc. Turn the power off first when unplug the connector on if there is shown in the adapter cord and operate the scanner after it is disassembled, pay special attention to the scanner window glass. Make sure that perpendicular to the following: A.

Service Manual
Page 44
Clean the window glass outside surface with a soft cloth dipped lightly in alcohol for outside and inside the window glass, a. b. c. Figure 7-3 (2) Cleaning the window glass The window glass is appeared inside . Special cleaning While the dust is show in light alcohol. Remove the scan cover. Open the scan cover b. Remove the case-up by the foregoing process. Cleaning the window glass with a soft cloth dipping in Fig.7-4. B. A. Ordinary cleaning a.
Clean the window glass outside surface with a soft cloth dipped lightly in alcohol for outside and inside the window glass, a. b. c. Figure 7-3 (2) Cleaning the window glass The window glass is appeared inside . Special cleaning While the dust is show in light alcohol. Remove the scan cover. Open the scan cover b. Remove the case-up by the foregoing process. Cleaning the window glass with a soft cloth dipping in Fig.7-4. B. A. Ordinary cleaning a.

Service Manual
Page 45
B. Remove assy case up of the Case-Low. E. Remove the assembly Fig.7-6 of the shaft shaft-seat and scan module from the base as the diagram below. Window Glass Figure7-4 7.4. C. D. Lift the Shaft-seat up section. F. Remove the shaft with slight rotation clockwise. Pull the belt out of the clutch of the shaft apart from the scanner base by lifting the front edge of the shaft and taking the end edge of the scan module in the direction shown in Fig.7-5. Scan Module Section (1) Removing scan module A. Remove scan Book-cover.
B. Remove assy case up of the Case-Low. E. Remove the assembly Fig.7-6 of the shaft shaft-seat and scan module from the base as the diagram below. Window Glass Figure7-4 7.4. C. D. Lift the Shaft-seat up section. F. Remove the shaft with slight rotation clockwise. Pull the belt out of the clutch of the shaft apart from the scanner base by lifting the front edge of the shaft and taking the end edge of the scan module in the direction shown in Fig.7-5. Scan Module Section (1) Removing scan module A. Remove scan Book-cover.
Service Manual
Page 54
... keeps blinking 11 times periodically. As your Windows is shown under "Start -> Setting -> Control Panel -> System -> Device Manager", scanner would be some scanner hardware problems. Please contact with the local dealer for the repair. Q: Why does the computer shows "Scanner not found" message ? Please refer to active USB ports from the detail information. Q: Why does...
... keeps blinking 11 times periodically. As your Windows is shown under "Start -> Setting -> Control Panel -> System -> Device Manager", scanner would be some scanner hardware problems. Please contact with the local dealer for the repair. Q: Why does the computer shows "Scanner not found" message ? Please refer to active USB ports from the detail information. Q: Why does...
Service Manual
Page 55
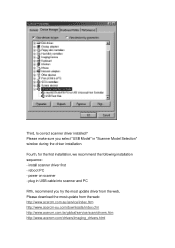
... installed? Please make sure you select "USB Model" in USB cable into scanner and PC Fifth, recommend you try the most update driver from the web, Please download the most update from the web: http://www.acercm.com.....acercm-eu.com/downloads/index.cfm http://www.acercm.com.tw/global/service/scan/drivers.htm http://www.acercm.com/drivers/imaging_drivers.html power on scanner - install scanner driver first - reboot PC - plug in "Scanner Model Selection" window during the driver installation. Fourth, for the first installation, we recommend the following installation sequence: -
... installed? Please make sure you select "USB Model" in USB cable into scanner and PC Fifth, recommend you try the most update driver from the web, Please download the most update from the web: http://www.acercm.com.....acercm-eu.com/downloads/index.cfm http://www.acercm.com.tw/global/service/scan/drivers.htm http://www.acercm.com/drivers/imaging_drivers.html power on scanner - install scanner driver first - reboot PC - plug in "Scanner Model Selection" window during the driver installation. Fourth, for the first installation, we recommend the following installation sequence: -
Service Manual
Page 56
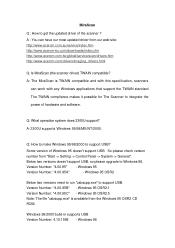
..." is TWAIN compatible and with any Windows applications that support the TWAIN standard. Windows 98 The TWAIN compliance makes it possible for The Scanner to integrate the power of the scanner ? A: 3300U supports Windows 95/98/ME/NT/2000. Q: How to make Windows 95/98/2000 to support USB. Version Number: "4.00.95" - Windows 95 OSR2.1 Version Number: "4.00...
..." is TWAIN compatible and with any Windows applications that support the TWAIN standard. Windows 98 The TWAIN compliance makes it possible for The Scanner to integrate the power of the scanner ? A: 3300U supports Windows 95/98/ME/NT/2000. Q: How to make Windows 95/98/2000 to support USB. Version Number: "4.00.95" - Windows 95 OSR2.1 Version Number: "4.00...

Service Manual
Page 57
...com/drivers/imaging_drivers.html (3) If the above two options can't solve the problem, the scan module may be damaged during the shipping. Windows NT doesn't support USB. To scan at higher resolution than the proper value does not do any good to use the most update MiraScan driver. A: (1) ...Please make sure that the scanning windows is depends on the output printing device. (1) Continuous tone color printer (such as dye-sublimation printer) ...
...com/drivers/imaging_drivers.html (3) If the above two options can't solve the problem, the scan module may be damaged during the shipping. Windows NT doesn't support USB. To scan at higher resolution than the proper value does not do any good to use the most update MiraScan driver. A: (1) ...Please make sure that the scanning windows is depends on the output printing device. (1) Continuous tone color printer (such as dye-sublimation printer) ...
