
User Manual
Page 2
...; 2010. The serial number and model number are recorded on the label affixed to their respective companies. Acer LCD Monitor User Guide Model number Serial number Date of purchase Place of purchase Acer and the Acer logo are used herein for a particular purpose. Acer LCD Monitor User Guide Original Issue: 04/2010 Changes may be incorporated in new editions of purchase information in the space provided below. Acer Incorporated. This company makes no representations...
...; 2010. The serial number and model number are recorded on the label affixed to their respective companies. Acer LCD Monitor User Guide Model number Serial number Date of purchase Place of purchase Acer and the Acer logo are used herein for a particular purpose. Acer LCD Monitor User Guide Original Issue: 04/2010 Changes may be incorporated in new editions of purchase information in the space provided below. Acer Incorporated. This company makes no representations...

User Manual
Page 3
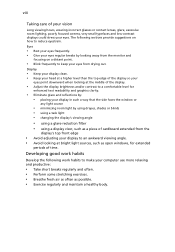
... brightness on the screen depending on again to the nature of the LCD screen, an afterimage of the fluorescent light, the screen may remain after switching the image, when the same image is displayed for future reference. Turn off the power switch for your monitor Please carefully follow these instructions carefully. Cleaning your safety and comfort Safety instructions Read these guidelines when cleaning the monitor: • Always unplug the monitor...
... brightness on the screen depending on again to the nature of the LCD screen, an afterimage of the fluorescent light, the screen may remain after switching the image, when the same image is displayed for future reference. Turn off the power switch for your monitor Please carefully follow these instructions carefully. Cleaning your safety and comfort Safety instructions Read these guidelines when cleaning the monitor: • Always unplug the monitor...
User Manual
Page 4
... plug the power cord into this product, make sure that could be seriously damaged. • Slots and openings are not sure of the type of power available, consult your ears have adjusted. • Limit the amount of time listening to music at high volume. • Avoid turning up the volume to block out noisy surroundings. • Turn the volume down if you need...
... plug the power cord into this product, make sure that could be seriously damaged. • Slots and openings are not sure of the type of power available, consult your ears have adjusted. • Limit the amount of time listening to music at high volume. • Avoid turning up the volume to block out noisy surroundings. • Turn the volume down if you need...
User Manual
Page 5
... product from unexpected noise produced by plugging in performance, indicating a need to service this product yourself, as opening or removing covers may expose you need for details. Also, make sure that the new power cord meets the following the operating instructions If power strips are used, the load should not exceed 80% of the power strip's input rating. • This product's power cord is a safety feature. Contact your...
... product from unexpected noise produced by plugging in performance, indicating a need to service this product yourself, as opening or removing covers may expose you need for details. Also, make sure that the new power cord meets the following the operating instructions If power strips are used, the load should not exceed 80% of the power strip's input rating. • This product's power cord is a safety feature. Contact your...

User Manual
Page 6
...) regulations, visit http://www.acer-group.com/public/Sustainability/sustainability01.htm chemical plants; For more information and help when recycling, please go to environmental protection and views recycling, in damage and will often require extensive work by the operating instructions, since improper adjustment of other products. vi Note: Adjust only those controls that are covered by a qualified technician to...
...) regulations, visit http://www.acer-group.com/public/Sustainability/sustainability01.htm chemical plants; For more information and help when recycling, please go to environmental protection and views recycling, in damage and will often require extensive work by the operating instructions, since improper adjustment of other products. vi Note: Adjust only those controls that are covered by a qualified technician to...
User Manual
Page 7
... for comfortable use . vii LCD pixel statement The LCD unit is produced with high-precision manufacturing techniques. Users are also at risk of the monitor, using a footrest, or raising your leg muscles The following tips: • refrain from Sleep mode by adjusting the viewing angle of physical injury after prolonged use , consult a physician immediately and inform your comfort zone by pushing the power button.
... for comfortable use . vii LCD pixel statement The LCD unit is produced with high-precision manufacturing techniques. Users are also at risk of the monitor, using a footrest, or raising your leg muscles The following tips: • refrain from Sleep mode by adjusting the viewing angle of physical injury after prolonged use , consult a physician immediately and inform your comfort zone by pushing the power button.
User Manual
Page 8
..., shades or blinds • using a task light • changing the display's viewing angle • using a glare-reduction filter • using a display visor, such as a piece of cardboard extended from the display's top front edge • Avoid adjusting your eyes from the monitor and focusing on how to an awkward viewing angle. • Avoid looking at bright light sources, such as open windows, for extended periods of time...
..., shades or blinds • using a task light • changing the display's viewing angle • using a glare-reduction filter • using a display visor, such as a piece of cardboard extended from the display's top front edge • Avoid adjusting your eyes from the monitor and focusing on how to an awkward viewing angle. • Avoid looking at bright light sources, such as open windows, for extended periods of time...
User Manual
Page 10
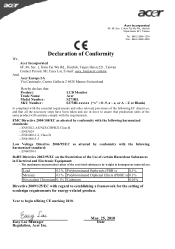
... Taipei Hsien 221, Taiwan Contact Person: Mr. Easy Lai, E-mail: easy_lai@acer.com.tw And, Acer Europe SA Via Cantonale, Centro Galleria 2 6928 Manno Switzerland Hereby declare that: Product: Trade Name: Model Number: SKU Number: LCD Monitor Acer S273HL S273HLxxxxxx ("x" = 0~9, a ~ z, or A ~ Z or Blank) Is... Ethers (PBDE's) 0.1% Hexavalent Chromium 0.1% Cadmium 0.01% Directive 2009/125/EC with regard to establishing a framework for the setting of ecodesign requirements for energy-related product. EMC Directive 2004/108/EC as attested by weight in homogenous material are in Electrical...
... Taipei Hsien 221, Taiwan Contact Person: Mr. Easy Lai, E-mail: easy_lai@acer.com.tw And, Acer Europe SA Via Cantonale, Centro Galleria 2 6928 Manno Switzerland Hereby declare that: Product: Trade Name: Model Number: SKU Number: LCD Monitor Acer S273HL S273HLxxxxxx ("x" = 0~9, a ~ z, or A ~ Z or Blank) Is... Ethers (PBDE's) 0.1% Hexavalent Chromium 0.1% Cadmium 0.01% Directive 2009/125/EC with regard to establishing a framework for the setting of ecodesign requirements for energy-related product. EMC Directive 2004/108/EC as attested by weight in homogenous material are in Electrical...
User Manual
Page 11
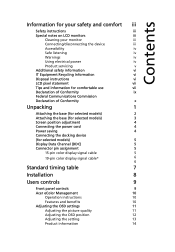
...the base (for selected models) 3 Screen position adjustment 4 Connecting the power cord 4 Power saving 4 Connecting the docking device (for selected models) 5 Display Data Channel (DDC) 5 Connector pin assignment 5 15-pin color display signal cable 5 19-pin color display signal cable* 6 6 Standard timing table 7 Installation 8 Users controls 9 Front panel controls 9 Acer eColor Management 10 Operation instructions 10 Features and benefits 10 Adjusting the OSD settings 11 Adjusting the picture quality 11 Adjusting the OSD position 12 Adjusting the setting...
...the base (for selected models) 3 Screen position adjustment 4 Connecting the power cord 4 Power saving 4 Connecting the docking device (for selected models) 5 Display Data Channel (DDC) 5 Connector pin assignment 5 15-pin color display signal cable 5 19-pin color display signal cable* 6 6 Standard timing table 7 Installation 8 Users controls 9 Front panel controls 9 Acer eColor Management 10 Operation instructions 10 Features and benefits 10 Adjusting the OSD settings 11 Adjusting the picture quality 11 Adjusting the OSD position 12 Adjusting the setting...
User Manual
Page 13
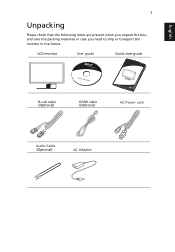
English 1 Unpacking Please check that the following items are present when you unpack the box, and save the packing materials in case you need to ship or transport the monitor in the future. LCD monitor User guide Quick start guide D-sub cable (Optional) HDMI cable (Optional) AC Power cord Audio Cable (Optional) AC Adapter
English 1 Unpacking Please check that the following items are present when you unpack the box, and save the packing materials in case you need to ship or transport the monitor in the future. LCD monitor User guide Quick start guide D-sub cable (Optional) HDMI cable (Optional) AC Power cord Audio Cable (Optional) AC Adapter
User Manual
Page 14
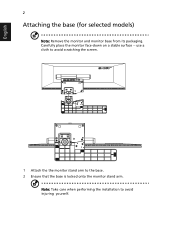
Carefully place the monitor face-down on a stable surface -- use a cloth to avoid scratching the screen. 1 Attach the the monitor stand arm to avoid injuring yourself. English 2 Attaching the base (for selected models) Note: Remove the monitor and monitor base from its packaging. Note: Take care when performing the installation to the base. 2 Ensure that the base is locked onto the monitor stand arm.
Carefully place the monitor face-down on a stable surface -- use a cloth to avoid scratching the screen. 1 Attach the the monitor stand arm to avoid injuring yourself. English 2 Attaching the base (for selected models) Note: Remove the monitor and monitor base from its packaging. Note: Take care when performing the installation to the base. 2 Ensure that the base is locked onto the monitor stand arm.
User Manual
Page 15
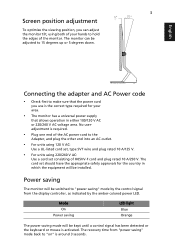
... power cord to the Adapter, and plug the other end into an AC outlet. • For units using 120 V AC: Use a UL-listed cord set consisting of the monitor. The monitor can adjust the monitor tilt, using 220/240 V AC: Use a cord set , type SVT wire and plug rated 10 A/125 V. • For units using both of your area. • The monitor has a universal power supply that the power cord you can be installed. English 3 Screen position adjustment To optimize the viewing position...
... power cord to the Adapter, and plug the other end into an AC outlet. • For units using 120 V AC: Use a UL-listed cord set consisting of the monitor. The monitor can adjust the monitor tilt, using 220/240 V AC: Use a cord set , type SVT wire and plug rated 10 A/125 V. • For units using both of your area. • The monitor has a universal power supply that the power cord you can be installed. English 3 Screen position adjustment To optimize the viewing position...
User Manual
Page 16
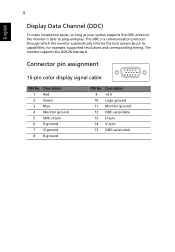
for example, supported resolutions and corresponding timing. 4 English Display Data Channel (DDC) To make installation easier, so long as your system supports the DDC protocol, the monitor is a communication protocol through which the monitor automatically informs the host system about its capabilities; The monitor supports the DDC2B standard. Description 1 Red 2 Green 3 Blue 4 Monitor ground 5 DDC-return 6 R-ground 7 G-ground 8 B-ground PIN No. Connector pin assignment 15-pin color display signal cable 1 5 6 10...
for example, supported resolutions and corresponding timing. 4 English Display Data Channel (DDC) To make installation easier, so long as your system supports the DDC protocol, the monitor is a communication protocol through which the monitor automatically informs the host system about its capabilities; The monitor supports the DDC2B standard. Description 1 Red 2 Green 3 Blue 4 Monitor ground 5 DDC-return 6 R-ground 7 G-ground 8 B-ground PIN No. Connector pin assignment 15-pin color display signal cable 1 5 6 10...
User Manual
Page 19
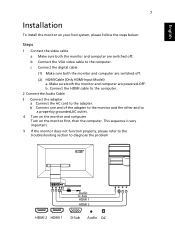
... below: Steps 1 Connect the video cable a Make sure both the monitor and computer are switched off . b Connect one and of the adapter to the monitor and the other and to diagnose the problem DC 22 1 Audio 22 1 D-Sub HDMI 1 HDMI 2 HDMI 2 HDMI 1 D-Sub Audio DC b Connect the VGA video cable to the adapter. Connect the HDMI cable to the computer. 2 Connect the Audio Cable 3 Connect the adapter a Connect the AC cord to the computer. b. English 7 Installation To install the monitor on the monitor first, then the...
... below: Steps 1 Connect the video cable a Make sure both the monitor and computer are switched off . b Connect one and of the adapter to the monitor and the other and to diagnose the problem DC 22 1 Audio 22 1 D-Sub HDMI 1 HDMI 2 HDMI 2 HDMI 1 D-Sub Audio DC b Connect the VGA video cable to the adapter. Connect the HDMI cable to the computer. 2 Connect the Audio Cable 3 Connect the adapter a Connect the AC cord to the computer. b. English 7 Installation To install the monitor on the monitor first, then the...
User Manual
Page 20
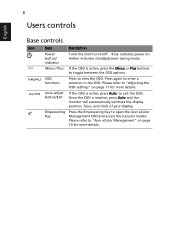
8 Users controls English Base controls Icon Item Description Power button/ indicator Turns the monitor on . Please refer to view the OSD. Blue indicates power on /off. OSD functions Press to "Adjusting the OSD settings" on page 10 for more details. Amber indicates standby/power saving mode. / Minus / Plus If the OSD is active, press the Minus or Plus buttons to exit the OSD. Auto adjust button/Exit If the OSD is inactive, press Auto and the monitor will automatically optimize the...
8 Users controls English Base controls Icon Item Description Power button/ indicator Turns the monitor on . Please refer to view the OSD. Blue indicates power on /off. OSD functions Press to "Adjusting the OSD settings" on page 10 for more details. Amber indicates standby/power saving mode. / Minus / Plus If the OSD is active, press the Minus or Plus buttons to exit the OSD. Auto adjust button/Exit If the OSD is inactive, press Auto and the monitor will automatically optimize the...
User Manual
Page 21
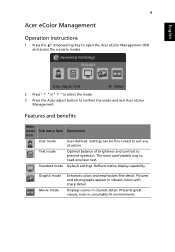
... confirm the mode and exit Acer eColor Management. Standard mode Default settings. Features and benefits Main menu Sub menu item Description icon User mode User-defined. Pictures and photographs appear in clearest detail. English 9 Acer eColor Management Operation instructions 1 Press the Empowering Key to open the Acer eColor Management OSD and access the scenario modes. 2 Press " " or " " to select the mode. 3 Press the Auto-adjust button to suit any situation. Reflects native display capability...
... confirm the mode and exit Acer eColor Management. Standard mode Default settings. Features and benefits Main menu Sub menu item Description icon User mode User-defined. Pictures and photographs appear in clearest detail. English 9 Acer eColor Management Operation instructions 1 Press the Empowering Key to open the Acer eColor Management OSD and access the scenario modes. 2 Press " " or " " to select the mode. 3 Press the Auto-adjust button to suit any situation. Reflects native display capability...
User Manual
Page 22
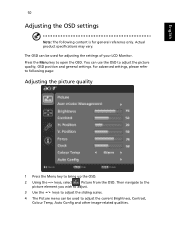
... adjusting the settings of your LCD Monitor. English 10 Adjusting the OSD settings Note: The following page: Adjusting the picture quality 1 Press the Menu key to open the OSD. Press the Menu key to bring up the OSD. 2 Using the / keys, select Picture from the OSD. Then navigate to the picture element you wish to adjust. 3 Use the / keys to adjust the sliding scales. 4 The Picture menu can be used to adjust the picture quality, OSD position and general settings...
... adjusting the settings of your LCD Monitor. English 10 Adjusting the OSD settings Note: The following page: Adjusting the picture quality 1 Press the Menu key to open the OSD. Press the Menu key to bring up the OSD. 2 Using the / keys, select Picture from the OSD. Then navigate to the picture element you wish to adjust. 3 Use the / keys to adjust the sliding scales. 4 The Picture menu can be used to adjust the picture quality, OSD position and general settings...
User Manual
Page 24
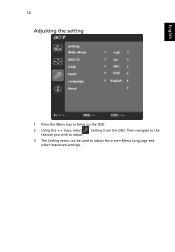
Setting from the OSD. 12 Adjusting the setting English 1 Press the Menu key to bring up the OSD. 2 Using the / keys, select feature you wish to adjust the screen Menu Language and other important settings. Then navigate to the 3 The Setting menu can be used to adjust.
Setting from the OSD. 12 Adjusting the setting English 1 Press the Menu key to bring up the OSD. 2 Using the / keys, select feature you wish to adjust the screen Menu Language and other important settings. Then navigate to the 3 The Setting menu can be used to adjust.
User Manual
Page 26
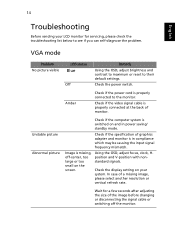
VGA mode Problem No picture visible LED status Blue Off Remedy Using the OSD, adjust brightness and contrast to maximum or reset to see if you can self-diagnose the problem. Using the OSD, adjust focus, clock, Hposition and V-position with nonstandard signals. Check if the video signal cable is properly connected to the monitor. Check the display setting on your LCD monitor for a few seconds after adjusting the size of monitor. Amber Check if the power cord is properly connected at the back of the image before...
VGA mode Problem No picture visible LED status Blue Off Remedy Using the OSD, adjust brightness and contrast to maximum or reset to see if you can self-diagnose the problem. Using the OSD, adjust focus, clock, Hposition and V-position with nonstandard signals. Check if the video signal cable is properly connected to the monitor. Check the display setting on your LCD monitor for a few seconds after adjusting the size of monitor. Amber Check if the power cord is properly connected at the back of the image before...
User Manual
Page 27
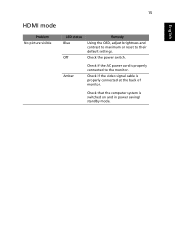
15 English HDMI mode Problem No picture visible LED status Blue Off Remedy Using the OSD, adjust brightness and contrast to maximum or reset to the monitor. Check that the computer system is properly connected at the back of monitor. Check if the video signal cable is switched on and in power saving/ standby mode. Amber Check if the AC power cord is properly connected to their default settings. Check the power switch.
15 English HDMI mode Problem No picture visible LED status Blue Off Remedy Using the OSD, adjust brightness and contrast to maximum or reset to the monitor. Check that the computer system is properly connected at the back of monitor. Check if the video signal cable is switched on and in power saving/ standby mode. Amber Check if the AC power cord is properly connected to their default settings. Check the power switch.


