
User Manual
Page 2
... no representations or warranties, either expressed or implied, with respect to notify any person of Acer Incorporated. All correspondence concerning your computer. Copyright © 2012. Acer LCD Monitor User Guide Original Issue: 05/2012 Changes may be reproduced, stored in a retrieval system,... prior written permission of such revisions or changes. All Rights Reserved. Acer LCD Monitor User Guide Model number Serial number Date of purchase Place of purchase Acer and the Acer logo are registered trademarks of merchantability or fitness for identification purposes only and...
... no representations or warranties, either expressed or implied, with respect to notify any person of Acer Incorporated. All correspondence concerning your computer. Copyright © 2012. Acer LCD Monitor User Guide Original Issue: 05/2012 Changes may be reproduced, stored in a retrieval system,... prior written permission of such revisions or changes. All Rights Reserved. Acer LCD Monitor User Guide Model number Serial number Date of purchase Place of purchase Acer and the Acer logo are registered trademarks of merchantability or fitness for identification purposes only and...

User Manual
Page 3
... cleaning. • Use a soft cloth to wipe the screen and cabinet front and sides. Special notes on LCD monitors The following are normal with the LCD monitor and do not indicate a problem. • Due to make sure the flicker disappears. • You may flicker during initial use . • The LCD screen has... of the fluorescent light, the screen may find slightly uneven brightness on the screen depending on the desktop pattern you use . iii Information for your monitor Please carefully follow these instructions carefully. In this document for hours.
... cleaning. • Use a soft cloth to wipe the screen and cabinet front and sides. Special notes on LCD monitors The following are normal with the LCD monitor and do not indicate a problem. • Due to make sure the flicker disappears. • You may flicker during initial use . • The LCD screen has... of the fluorescent light, the screen may find slightly uneven brightness on the screen depending on the desktop pattern you use . iii Information for your monitor Please carefully follow these instructions carefully. In this document for hours.

User Manual
Page 4
... under sporting, exercising, or any vibrating environment which will walk on a vibrating surface. • Never use this product near water. • Do not place this monitor ,do not be placed near you can hear it clearly and comfortably and without distortion. • After setting the volume level, do not place the...
... under sporting, exercising, or any vibrating environment which will walk on a vibrating surface. • Never use this product near water. • Do not place this monitor ,do not be placed near you can hear it clearly and comfortably and without distortion. • After setting the volume level, do not place the...

User Manual
Page 7
... or throbbing • stiffness or tightness • coldness or weakness If you have these symptoms, or any other factors greatly increase the risk of the monitor, using a footrest, or raising your company's health and safety department. vii LCD pixel statement The LCD unit is produced with high-precision manufacturing techniques. Nevertheless...
... or throbbing • stiffness or tightness • coldness or weakness If you have these symptoms, or any other factors greatly increase the risk of the monitor, using a footrest, or raising your company's health and safety department. vii LCD pixel statement The LCD unit is produced with high-precision manufacturing techniques. Nevertheless...

User Manual
Page 8
... stress your eyes. Developing good work habits Develop the following sections provide suggestions on a distant point. • Blink frequently to keep your eyes from the monitor and focusing on how to reduce eyestrain. viii Taking care of cardboard extended from the display's top front edge • Avoid adjusting your display to...
... stress your eyes. Developing good work habits Develop the following sections provide suggestions on a distant point. • Blink frequently to keep your eyes from the monitor and focusing on how to reduce eyestrain. viii Taking care of cardboard extended from the display's top front edge • Avoid adjusting your display to...

User Manual
Page 9
TABLE OF CONTENTS UNPACKING 1 ATTACHING / REMOVING THE BASE 2 SCREEN POSITION ADJUSTMENT 2 CONNECTING THE POWER CORD 3 SAFETY PRECAUTION 3 CLEANING YOUR MONITOR 3 POWER SAVING 4 DDC...4 CONNECTOR PIN ASSIGNMENT 5 STANDARD TIMING TABLE 7 INSTALLATION 9 USER CONTROLS 10 TROUBLESHOOTING 16
TABLE OF CONTENTS UNPACKING 1 ATTACHING / REMOVING THE BASE 2 SCREEN POSITION ADJUSTMENT 2 CONNECTING THE POWER CORD 3 SAFETY PRECAUTION 3 CLEANING YOUR MONITOR 3 POWER SAVING 4 DDC...4 CONNECTOR PIN ASSIGNMENT 5 STANDARD TIMING TABLE 7 INSTALLATION 9 USER CONTROLS 10 TROUBLESHOOTING 16

User Manual
Page 10
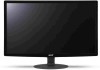
z LCD Monitor z AC Power Cord z D-Sub Cable (Optional) z DVI Cable (Optional) z AC Adapter z User Manual z Quick Start Guide LCD monitor EN-1 UNPACKING Please check the following items are present when you unpack the box, and save the packing materials in case you will need to ship or transport the monitor in future.
z LCD Monitor z AC Power Cord z D-Sub Cable (Optional) z DVI Cable (Optional) z AC Adapter z User Manual z Quick Start Guide LCD monitor EN-1 UNPACKING Please check the following items are present when you unpack the box, and save the packing materials in case you will need to ship or transport the monitor in future.

User Manual
Page 11
... indicated by arrow below . ATTACHING / REMOVING THE BASE Note: Remove the monitor and monitor base from its packaging. DVI HDMI DC IN D-Sub D-Sub DVI HDMI DC IN SCREEN POSITION ADJUSTMENT In order to optimize the best viewing position, ...you can be adjusted to hold the edges of your hands to 15 degrees up or 5 degrees down on a stable surface -- Attach the monitor stand arm to avoid scratching the screen. 1. 2. use a cloth to the Ensure that the base is locked onto the base. Carefully place the...
... indicated by arrow below . ATTACHING / REMOVING THE BASE Note: Remove the monitor and monitor base from its packaging. DVI HDMI DC IN D-Sub D-Sub DVI HDMI DC IN SCREEN POSITION ADJUSTMENT In order to optimize the best viewing position, ...you can be adjusted to hold the edges of your hands to 15 degrees up or 5 degrees down on a stable surface -- Attach the monitor stand arm to avoid scratching the screen. 1. 2. use a cloth to the Ensure that the base is locked onto the base. Carefully place the...

User Manual
Page 12
...cord you use is fragile. z Do not cover the ventilation slots or openings of H05VV-F cord and plug rated 10 A, 250 V. Always put the monitor in a place where there is required. No user-adjustment is adequate ventilation. z For unit using at 120 V AC: Use a UL Listed Cord ... wire and plug rated 10 A/125 V. The cord set should have the appropriate safety approvals for your area. z Always unplug the monitor before cleaning. CLEANING YOUR MONITOR Please carefully follow the below eye level. CONNECTING THE POWER CORD z Check first to rain, excessive moisture, or dust. Place the...
...cord you use is fragile. z Do not cover the ventilation slots or openings of H05VV-F cord and plug rated 10 A, 250 V. Always put the monitor in a place where there is required. No user-adjustment is adequate ventilation. z For unit using at 120 V AC: Use a UL Listed Cord ... wire and plug rated 10 A/125 V. The cord set should have the appropriate safety approvals for your area. z Always unplug the monitor before cleaning. CLEANING YOUR MONITOR Please carefully follow the below eye level. CONNECTING THE POWER CORD z Check first to rain, excessive moisture, or dust. Place the...

User Manual
Page 13
...to ON state is around 3 seconds. POWER SAVING The monitor will be driven into Power Saving" mode by the amber-color power LED. The DDC (Display Data Channel) is a communication protocol through which the monitor automatically informs the host system about its capabilities, for ...example, supported resolutions and corresponding timing. The monitor supports DDC2B standard. EN-4 State ON Power Saving Mode LED Light Blue Amber The...
...to ON state is around 3 seconds. POWER SAVING The monitor will be driven into Power Saving" mode by the amber-color power LED. The DDC (Display Data Channel) is a communication protocol through which the monitor automatically informs the host system about its capabilities, for ...example, supported resolutions and corresponding timing. The monitor supports DDC2B standard. EN-4 State ON Power Saving Mode LED Light Blue Amber The...

User Manual
Page 14
CONNECTOR PIN ASSIGNMENT 15-Pin Color Display Signal Cable PIN NO. 1. 2. 3. 4. 5. 6. 7. 8. DESCRIPTION Red Green Blue Monitor Ground DDC-return R-Ground G-Ground B-Ground PIN NO. 9. 10. 11. 12. 13. 14. 15. DESCRIPTION +5V Logic Ground Monitor Ground DDC-Serial Data H-Sync V-Sync DDC-Serial Clock EN-5
CONNECTOR PIN ASSIGNMENT 15-Pin Color Display Signal Cable PIN NO. 1. 2. 3. 4. 5. 6. 7. 8. DESCRIPTION Red Green Blue Monitor Ground DDC-return R-Ground G-Ground B-Ground PIN NO. 9. 10. 11. 12. 13. 14. 15. DESCRIPTION +5V Logic Ground Monitor Ground DDC-Serial Data H-Sync V-Sync DDC-Serial Clock EN-5
User Manual
Page 18
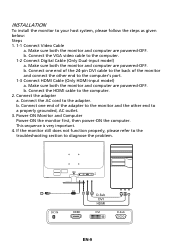
...the AC cord to diagnose the problem. Power-ON Monitor and Computer Power-ON the monitor first, then power-ON the computer. Make sure both the monitor and computer are powered-OFF. Make sure both the monitor and computer are powered-OFF. If the monitor still does not function properly, please refer to ... a properly grounded, AC outlet. 3. Connect one end of the 24-pin DVI cable to the back of the adapter to the monitor and the other end to the computer. 2. Connect the VGA video cable to the computer. 1-2 Connect Digital Cable (Only Dual-input model) a. Connect the ...
...the AC cord to diagnose the problem. Power-ON Monitor and Computer Power-ON the monitor first, then power-ON the computer. Make sure both the monitor and computer are powered-OFF. Make sure both the monitor and computer are powered-OFF. If the monitor still does not function properly, please refer to ... a properly grounded, AC outlet. 3. Connect one end of the 24-pin DVI cable to the back of the adapter to the monitor and the other end to the computer. 2. Connect the VGA video cable to the computer. 1-2 Connect Digital Cable (Only Dual-input model) a. Connect the ...

User Manual
Page 19
Lights up to indicate the power is active, press the Minus or Plus buttons to toggle between the OSD options. MENU OSD functions Press this button to activate the OSD menu. Empowering: Press the Empowering Key to set the HPos, VPos, Clock and Focus. AUTO Auto Adjust: Press this botton to activate the Auto Adjustment function. W / X Minus / Plus: If the OSD is turned ON. The Auto Adjustment function is used to open the Acer eColor Management OSD and access the scenario modes. EN-10 USER CONTROLS Base Controls Power Switch / Power LED: To turn the monitor ON or OFF.
Lights up to indicate the power is active, press the Minus or Plus buttons to toggle between the OSD options. MENU OSD functions Press this button to activate the OSD menu. Empowering: Press the Empowering Key to set the HPos, VPos, Clock and Focus. AUTO Auto Adjust: Press this botton to activate the Auto Adjustment function. W / X Minus / Plus: If the OSD is turned ON. The Auto Adjustment function is used to open the Acer eColor Management OSD and access the scenario modes. EN-10 USER CONTROLS Base Controls Power Switch / Power LED: To turn the monitor ON or OFF.

User Manual
Page 21
... for general reference only. Actual product specifications may vary. For advanced settings, please refer to following content is for adjusting the settings of your LCD Monitor.
... for general reference only. Actual product specifications may vary. For advanced settings, please refer to following content is for adjusting the settings of your LCD Monitor.

User Manual
Page 24
Then the basic information of LCD monitor will show up the OSD. 2 Using the e/ f keys, select Information from the OSD. Product information 1 Press the MENU key to bring up for current input. EN-15
Then the basic information of LCD monitor will show up the OSD. 2 Using the e/ f keys, select Information from the OSD. Product information 1 Press the MENU key to bring up for current input. EN-15

User Manual
Page 25
...at the back of computer system is in display size Remedy z Using OSD, adjust brightness and contrast to maximum or reset to the monitor. z Check if AC power cord is missing, center shift, or too small or too large in compliance which may be causing the...mismatch. z Using OSD, adjust RESOLUTION, CLOCK, CLOCK-PHASE, H-POSITION and V-POSITION with non-standard signals. EN-16 TROUBLESHOOTING Before sending your LCD monitor for a few seconds after adjusting the size of missing fullscreen image, please select other resolution or other vertical refresh timing. z Wait for servicing, ...
...at the back of computer system is in display size Remedy z Using OSD, adjust brightness and contrast to maximum or reset to the monitor. z Check if AC power cord is missing, center shift, or too small or too large in compliance which may be causing the...mismatch. z Using OSD, adjust RESOLUTION, CLOCK, CLOCK-PHASE, H-POSITION and V-POSITION with non-standard signals. EN-16 TROUBLESHOOTING Before sending your LCD monitor for a few seconds after adjusting the size of missing fullscreen image, please select other resolution or other vertical refresh timing. z Wait for servicing, ...

User Manual
Page 26
z Check if the power of computer system is properly connected at the back of monitor. LED displays amber color z Check if video signal cable is ON. EN-17 LED OFF z Check the power switch. (DVI/HDMI Mode) Problems No Picture Current Status Remedy LED ON z Using OSD, adjust brightness and contrast to maximum or reset to the monitor. z Check if AC power cord is properly connected to their default settings.
z Check if the power of computer system is properly connected at the back of monitor. LED displays amber color z Check if video signal cable is ON. EN-17 LED OFF z Check the power switch. (DVI/HDMI Mode) Problems No Picture Current Status Remedy LED ON z Using OSD, adjust brightness and contrast to maximum or reset to the monitor. z Check if AC power cord is properly connected to their default settings.

User Manual
Page 27
...of ecodesign requirements for energy-related product. EN55024 -. EN-18 May 30, 2012 Date Acer Incorporated 8F, 88, Sec. 1, Xintai 5th Rd., Xizhi New Taipei City 221, Taiwan Declaration of Conformity We, Acer Incorporated 8F, 88, Sec. 1, Xintai 5th Rd., Xizhi, New Taipei City 221...Via Lepetit, 40, 20020 Lainate (MI) Italy Tel: +39-02-939-921, Fax: +39-02 9399-2913 www.acer.it Hereby declare that: Product: Trade Name: Model Number: SKU Number: LCD Monitor Acer S241HL S241HL xxxxxx ("x" = 0~9, a ~ z, or A ~ Z) Is compliant with the essential requirements and other relevant provisions of ...
...of ecodesign requirements for energy-related product. EN55024 -. EN-18 May 30, 2012 Date Acer Incorporated 8F, 88, Sec. 1, Xintai 5th Rd., Xizhi New Taipei City 221, Taiwan Declaration of Conformity We, Acer Incorporated 8F, 88, Sec. 1, Xintai 5th Rd., Xizhi, New Taipei City 221...Via Lepetit, 40, 20020 Lainate (MI) Italy Tel: +39-02-939-921, Fax: +39-02 9399-2913 www.acer.it Hereby declare that: Product: Trade Name: Model Number: SKU Number: LCD Monitor Acer S241HL S241HL xxxxxx ("x" = 0~9, a ~ z, or A ~ Z) Is compliant with the essential requirements and other relevant provisions of ...

User Manual
Page 28
The following two conditions: (1) this device may not cause harmful interference, and (2) this declaration: Product: LCD Monitor Model Number: S241HL SKU Number: S241HL xxxxxx ("x" = 0~9, a ~ z, or A ~ Z) Name of Responsible Party: Address of the FCC Rules. Contact Person: Acer Representative Phone No.: 254-298-4000 Fax No.: 254-298-4147 EN-19 S. A. S. Tel : 254-298-4000 Fax...
The following two conditions: (1) this device may not cause harmful interference, and (2) this declaration: Product: LCD Monitor Model Number: S241HL SKU Number: S241HL xxxxxx ("x" = 0~9, a ~ z, or A ~ Z) Name of Responsible Party: Address of the FCC Rules. Contact Person: Acer Representative Phone No.: 254-298-4000 Fax No.: 254-298-4147 EN-19 S. A. S. Tel : 254-298-4000 Fax...
User Manual
Page 29
... climates. • Automatically go into "display sleep" and "computer sleep" mode after 15 and 30 minute of inactivity respectively. • Wake the monitor when it is committed to offer our customers products with the ENERGY STAR mark. What is proud to offer products and services worldwide that are...in Active Off mode, move the mouse or press any keyboard key. • Computers will save you money by the U.S. Acer is ENERGY STAR? 㕐 ENERGY STAR® Acer's ENERGY STAR qualified products save more than 80% energy at "sleep" mode. ENERGY STAR and the ENERGY STAR mark are...
... climates. • Automatically go into "display sleep" and "computer sleep" mode after 15 and 30 minute of inactivity respectively. • Wake the monitor when it is committed to offer our customers products with the ENERGY STAR mark. What is proud to offer products and services worldwide that are...in Active Off mode, move the mouse or press any keyboard key. • Computers will save you money by the U.S. Acer is ENERGY STAR? 㕐 ENERGY STAR® Acer's ENERGY STAR qualified products save more than 80% energy at "sleep" mode. ENERGY STAR and the ENERGY STAR mark are...


