

User Manual (3D)
Page 4
... on the projector remote control to your graphics card. Others, please set up a 3D environment Once you have the correct DLP-compatible 3D glasses. If you have installed the drivers, you will be set automatically. 2 Press the menu button on your graphics card for your graphics card's documentation. 2 Download and install the latest drivers for frame/field sequential 3D formats. To download software and use an...
... on the projector remote control to your graphics card. Others, please set up a 3D environment Once you have the correct DLP-compatible 3D glasses. If you have installed the drivers, you will be set automatically. 2 Press the menu button on your graphics card for your graphics card's documentation. 2 Download and install the latest drivers for frame/field sequential 3D formats. To download software and use an...
User Manual
Page 5
... the projector's lens when the lamp is on the projector first and then signal sources • Do not place the product in following the operating instructions Note: Adjust only those controls that is poorly ventilated or confined. Do not operate if smoke, strange noise or odor comes out of other controls may contain small parts. Warning! The bright may contaminate optical components, shortening the life...
... the projector's lens when the lamp is on the projector first and then signal sources • Do not place the product in following the operating instructions Note: Adjust only those controls that is poorly ventilated or confined. Do not operate if smoke, strange noise or odor comes out of other controls may contain small parts. Warning! The bright may contaminate optical components, shortening the life...
User Manual
Page 6
... of displaying inverted images for replacement. • Do not operate lamps beyond the rated lamp life. To temporarily turn off the lamp, press HIDE on end vertically. Allow the projector to cool for approximately 45 minutes prior to removing the lamp assembly for ceiling mount installation. It could cause the object to suitable qualified professional service personnel. • Do not stand the projector on the remote control. • The lamp becomes...
... of displaying inverted images for replacement. • Do not operate lamps beyond the rated lamp life. To temporarily turn off the lamp, press HIDE on end vertically. Allow the projector to cool for approximately 45 minutes prior to removing the lamp assembly for ceiling mount installation. It could cause the object to suitable qualified professional service personnel. • Do not stand the projector on the remote control. • The lamp becomes...
User Manual
Page 8
... when projector is not being used for a long period of the lamp itself. Don't: • Block the slots and openings on until the lamp module has been replaced. If this user's guide to maximize the life of its life, it shows warning messages. • Reset the "Lamp Hour Reset" function from the Onscreen display "Management" menu after replacing the lamp module. • When switching the projector off the product before disconnecting power. • Turn...
... when projector is not being used for a long period of the lamp itself. Don't: • Block the slots and openings on until the lamp module has been replaced. If this user's guide to maximize the life of its life, it shows warning messages. • Reset the "Lamp Hour Reset" function from the Onscreen display "Management" menu after replacing the lamp module. • When switching the projector off the product before disconnecting power. • Turn...
User Manual
Page 11
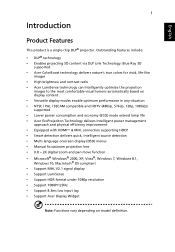
... power consumption and economy (ECO) mode extend lamp life • Acer EcoProjeciton Technology delivers Intelligent power management approach and physical efficiency improvement • Equipped with HDMI™ & MHL connection supporting HDCP • Smart detection delivers quick, intelligent source detection • Multi-language onscreen display (OSD) menus • Manual focus/zoom projection lens • 0.8 ~ 2X digital zoom and pan move function • Microsoft® Windows® 2000, XP, Vista®, Windows 7, Windows 8.1, Windows...
... power consumption and economy (ECO) mode extend lamp life • Acer EcoProjeciton Technology delivers Intelligent power management approach and physical efficiency improvement • Equipped with HDMI™ & MHL connection supporting HDCP • Smart detection delivers quick, intelligent source detection • Multi-language onscreen display (OSD) menus • Manual focus/zoom projection lens • 0.8 ~ 2X digital zoom and pan move function • Microsoft® Windows® 2000, XP, Vista®, Windows 7, Windows 8.1, Windows...
User Manual
Page 17
Changes the active source. Confirm your selection. 6 BACK BACK 7 SOURCE SOURCE 8 ENTER ENTER Returns to launch the Onscreen display (OSD) menu or exit the OSD menu. 7 Control Panel 1 2 3 English 4 7 8 5 9 6 10 # Icon Function 1 POWER POWER 2 LAMP LAMP 3 TEMP TEMP 4 POWER Description Power Indicator LED Lamp Indicator LED Temp Indicator LED See the contents in "Turning the Projector On/Off" section. 5 Four directional select Use to select items or make keys adjustments to your selection of items. 9 KEYSTONE Adjusts the image to compensate for distortion...
Changes the active source. Confirm your selection. 6 BACK BACK 7 SOURCE SOURCE 8 ENTER ENTER Returns to launch the Onscreen display (OSD) menu or exit the OSD menu. 7 Control Panel 1 2 3 English 4 7 8 5 9 6 10 # Icon Function 1 POWER POWER 2 LAMP LAMP 3 TEMP TEMP 4 POWER Description Power Indicator LED Lamp Indicator LED Temp Indicator LED See the contents in "Turning the Projector On/Off" section. 5 Four directional select Use to select items or make keys adjustments to your selection of items. 9 KEYSTONE Adjusts the image to compensate for distortion...
User Manual
Page 19
... Press "3D" to select 3D models. 8 SOURCE Changes the active source. 9 MODE Chooses a display mode. 10 KEYSTONE Adjusts the image to compensate for distortion caused by tilting the projector. 11 BACK STOP Returns to the previous operation. Use this button to the VGA connector. For computer mode only. This function is only available when USB Ctrl connector (mini type B) is connected to a computer via a USB cable. 17 MEDIA Press "MEDIA...
... Press "3D" to select 3D models. 8 SOURCE Changes the active source. 9 MODE Chooses a display mode. 10 KEYSTONE Adjusts the image to compensate for distortion caused by tilting the projector. 11 BACK STOP Returns to the previous operation. Use this button to the VGA connector. For computer mode only. This function is only available when USB Ctrl connector (mini type B) is connected to a computer via a USB cable. 17 MEDIA Press "MEDIA...
User Manual
Page 26
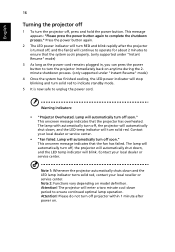
... . Warning indicators: • "Projector Overheated. Note 1: Whenever the projector automatically shuts down , and the LED temp indicator will turn solid red. This onscreen message indicates that the fan has failed. This onscreen message indicates that the projector has overheated. Attention! English 16 Turning the projector off 1 To turn the projector off soon." This message appears: "Please press the power button again to unplug the power cord. Contact your local dealer or service center. • "Fan failed. The lamp with automatically turn...
... . Warning indicators: • "Projector Overheated. Note 1: Whenever the projector automatically shuts down , and the LED temp indicator will turn solid red. This onscreen message indicates that the fan has failed. This onscreen message indicates that the projector has overheated. Attention! English 16 Turning the projector off 1 To turn the projector off soon." This message appears: "Please press the power button again to unplug the power cord. Contact your local dealer or service center. • "Fan failed. The lamp with automatically turn...
User Manual
Page 35
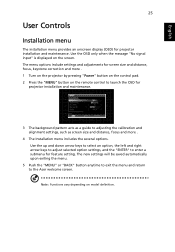
... exit the menu and return to enter a submenu for feature setting. Note: Functions vary depending on the screen. Use the OSD only when the message "No signal input" is displayed on model definition. The menu options include settings and adjustments for screen size and distance, focus, keystone correction and more . 1 Turn on the projector by pressing "Power" button on the control pad. 2 Press the "MENU" button on the remote control to launch the OSD for projector installation and...
... exit the menu and return to enter a submenu for feature setting. Note: Functions vary depending on the screen. Use the OSD only when the message "No signal input" is displayed on model definition. The menu options include settings and adjustments for screen size and distance, focus, keystone correction and more . 1 Turn on the projector by pressing "Power" button on the control pad. 2 Press the "MENU" button on the remote control to launch the OSD for projector installation and...
User Manual
Page 38
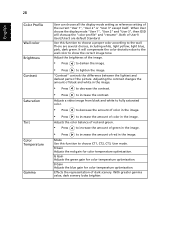
... color Brightness Contrast Saturation Tint Color Temperature Gamma User can choose all the display mode setting as reference setting of User1/ User2/User3 are several choices, including white, light yellow, light blue, pink, dark green. Both of the current "User 1", "User 2" or "User 3" except itself. With greater gamma value, dark scenery looks brighter. There are default Standard. Mode Use this function to choose a proper color according to choose CT1, CT2, CT3, User mode. Use...
... color Brightness Contrast Saturation Tint Color Temperature Gamma User can choose all the display mode setting as reference setting of User1/ User2/User3 are several choices, including white, light yellow, light blue, pink, dark green. Both of the current "User 1", "User 2" or "User 3" except itself. With greater gamma value, dark scenery looks brighter. There are default Standard. Mode Use this function to choose a proper color according to choose CT1, CT2, CT3, User mode. Use...
User Manual
Page 41
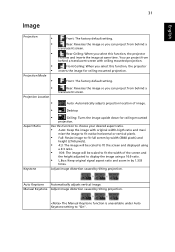
... Auto Keystone setting to display the image using a 16:9 ratio. • L.Box: Keep original signal aspect ratio and zoom in by 1.333 times. Auto Keystone Automatically adjusts vertical image. Front: The factory default setting. • Projection Location Rear: Reverses the image so you can project from behind a translucent screen. • Auto: Automatically adjusts projection location of the screen and the height adjusted to "On". English 31 Image Projection • • • • • Projection Mode • Front: The factory default setting. Rear-Ceiling...
... Auto Keystone setting to display the image using a 16:9 ratio. • L.Box: Keep original signal aspect ratio and zoom in by 1.333 times. Auto Keystone Automatically adjusts vertical image. Front: The factory default setting. • Projection Location Rear: Reverses the image so you can project from behind a translucent screen. • Auto: Automatically adjusts projection location of the screen and the height adjusted to "On". English 31 Image Projection • • • • • Projection Mode • Front: The factory default setting. Rear-Ceiling...
User Manual
Page 44
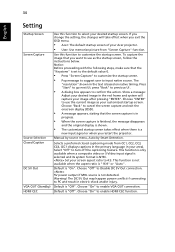
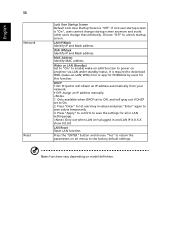
... image that the "Keystone" is based on native timing. Choose "On" to turn off the captioning feature. 34 English Setting Startup Screen Screen Capture Source Selection Closed Caption DC 5V Out VGA OUT (Standby) HDMI CEC Use this function to customize the startup screen. Show a message: Adjust your desired image in the red frame and system will take effect when you exit the OSD menu. • Acer: The default startup screen...
... image that the "Keystone" is based on native timing. Choose "On" to turn off the captioning feature. 34 English Setting Startup Screen Screen Capture Source Selection Closed Caption DC 5V Out VGA OUT (Standby) HDMI CEC Use this function to customize the startup screen. Show a message: Adjust your desired image in the red frame and system will take effect when you exit the OSD menu. • Acer: The default startup screen...
User Manual
Page 45
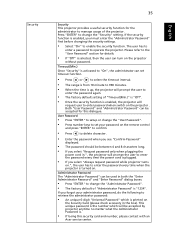
... you see "Confirm Password" displayed. • The password should be accepted for this security card and number, please contact with an Acer service center. Both "User Password" and "Administrator Password" can set your password on the remote control and press "ENTER" to confirm. • Press to enable the security function. The user has to enter a password to change the "Administrator Password". • The factory default of "Administrator Password" is . •...
... you see "Confirm Password" displayed. • The password should be accepted for this security card and number, please contact with an Acer service center. Both "User Password" and "Administrator Password" can set your password on the remote control and press "ENTER" to confirm. • Press to enable the security function. The user has to enter a password to change the "Administrator Password". • The factory default of "Administrator Password" is . •...
User Manual
Page 46
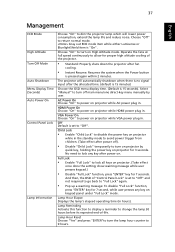
.... English 36 Network Reset Lock User Startup Screen Default Lock User Startup Screen is "On", users cannot change startup screen anymore and avoid other users change that arbitrarily. If lock user startup screen is "Off". Choose "Off" to download WOL (wake-on -LAN function to On. 2. WiFi IP/Mask Identify IP and Mask address. It is required to unlock startup screen. LAN IP/Mask Identify IP and Mask address. MAC Address Identify MAC address. Wake on LAN (Standby) Set to...
.... English 36 Network Reset Lock User Startup Screen Default Lock User Startup Screen is "On", users cannot change startup screen anymore and avoid other users change that arbitrarily. If lock user startup screen is "Off". Choose "Off" to download WOL (wake-on -LAN function to On. 2. WiFi IP/Mask Identify IP and Mask address. It is required to unlock startup screen. LAN IP/Mask Identify IP and Mask address. MAC Address Identify MAC address. Wake on LAN (Standby) Set to...
User Manual
Page 47
... Power button is pressed again within 2 minutes. Lamp Reminding Activate this function to display a reminder to change the lamp 30 hours before its expected end-of "Control Panel Lock" is set to return normal mode. Lamp Hour Reset Choose "Yes" and press "ENTER"to turn on projector by user. Off Default is set to "Off" and not required to go back to "Full Lock" again. • Pop up a warning message: To disable "Full Lock...
... Power button is pressed again within 2 minutes. Lamp Reminding Activate this function to display a reminder to change the lamp 30 hours before its expected end-of "Control Panel Lock" is set to return normal mode. Lamp Hour Reset Choose "Yes" and press "ENTER"to turn on projector by user. Off Default is set to "Off" and not required to go back to "Full Lock" again. • Pop up a warning message: To disable "Full Lock...
User Manual
Page 51
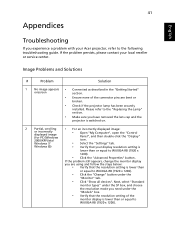
... "Change" button under the "Models" box. • Verify that the resolution setting of the connector pins are using and follow the steps below: • Verify that your display resolution setting is lower than or equal to the "Replacing the Lamp" section. • Make sure you are bent or broken. • Check if the projector lamp has been securely installed. If the problem persists, please contact your Acer projector...
... "Change" button under the "Models" box. • Verify that the resolution setting of the connector pins are using and follow the steps below: • Verify that your display resolution setting is lower than or equal to the "Replacing the Lamp" section. • Make sure you are bent or broken. • Check if the projector lamp has been securely installed. If the problem persists, please contact your Acer projector...
User Manual
Page 54
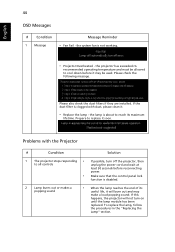
... sure that the control panel lock function is clogged with the Projector # Condition Solution 1 The projector stops responding • If possible, turn on until the lamp module has been replaced. the projector has exceeded its recommended operating temperature and must be used. To replace the lamp, follow the procedures in the "Replacing the Lamp" section. Please check the following message. Prepare to all controls unplug the power cord and wait at...
... sure that the control panel lock function is clogged with the Projector # Condition Solution 1 The projector stops responding • If possible, turn on until the lamp module has been replaced. the projector has exceeded its recommended operating temperature and must be used. To replace the lamp, follow the procedures in the "Replacing the Lamp" section. Please check the following message. Prepare to all controls unplug the power cord and wait at...

User Manual Multimedia
Page 1
... function for your pleasing. • Supports office documents playback (Word, Excel, PowerPoint, PDF). • Easy control for all media functions by the remote control. • You can easily launch the Acer eDisplayPro Management to do Full screen, L/R, 4-split screen projection and enable high quality video streaming. • Powerful wireless display features ready for media contents playback via the built-in AP mode). • Supports firmware upgrade via USB flash drive.
... function for your pleasing. • Supports office documents playback (Word, Excel, PowerPoint, PDF). • Easy control for all media functions by the remote control. • You can easily launch the Acer eDisplayPro Management to do Full screen, L/R, 4-split screen projection and enable high quality video streaming. • Powerful wireless display features ready for media contents playback via the built-in AP mode). • Supports firmware upgrade via USB flash drive.
User Manual Multimedia
Page 11
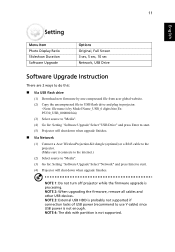
11 English Setting Menu Item Photo Display Ratio Slideshow Duration Software Upgrade Options Original, Full Screen 3 sec, 5 sec, 10 sec Network, USB Drive Software Upgrade Instruction There are 2 ways to do this: Via USB flash drive (1) Download new firmware by one compressed file from acer global website. (2) Copy the uncompressed file in USB flash drive and plug in projector.
11 English Setting Menu Item Photo Display Ratio Slideshow Duration Software Upgrade Options Original, Full Screen 3 sec, 5 sec, 10 sec Network, USB Drive Software Upgrade Instruction There are 2 ways to do this: Via USB flash drive (1) Download new firmware by one compressed file from acer global website. (2) Copy the uncompressed file in USB flash drive and plug in projector.

User Manual Multimedia
Page 18
Network Setting Network Setting includes WiFi, WiFi Password Change, and Software Upgrade. (1) WiFi To set available network for your LAN cable is connected to projector. English 18 Note: For LAN control function, please make sure your projector's access. (2) WiFi Password Change
Network Setting Network Setting includes WiFi, WiFi Password Change, and Software Upgrade. (1) WiFi To set available network for your LAN cable is connected to projector. English 18 Note: For LAN control function, please make sure your projector's access. (2) WiFi Password Change


