
Power 1000 User's Guide EN
Page 2
... and purchase information. No part of such revisions or changes. Copyright © 2006. All correspondence concerning your computer. Acer Incorporated. Acer Incorporated makes no representations or warranties, either express or implied, with respect to the contents hereof and specifically disclaims any... or supplementary documents and publications. AcerPower Series Desktop Computer Model number Serial number Purchase date Place of purchase Acer and the Acer logo are recorded on the label affixed to their respective owners. AcerPower Series User's Guide Original Issue: ...
... and purchase information. No part of such revisions or changes. Copyright © 2006. All correspondence concerning your computer. Acer Incorporated. Acer Incorporated makes no representations or warranties, either express or implied, with respect to the contents hereof and specifically disclaims any... or supplementary documents and publications. AcerPower Series Desktop Computer Model number Serial number Purchase date Place of purchase Acer and the Acer logo are recorded on the label affixed to their respective owners. AcerPower Series User's Guide Original Issue: ...
Power 1000 User's Guide EN
Page 3
...off before cleaning. Never spill liquid of any kind onto or into the extension cord does not exceed the extension cord ampere rating. Using electrical power • This product should never be placed near water. • Do not place this product, make sure that the total rating of ... aerosol cleaners. Follow all products plugged into this document for cleaning. Use a damp cloth for future reference. These openings must not exceed 80% of power indicated on a bed, sofa, rug or other similar surface. Do not locate this product where people will walk on the cord. • If...
...off before cleaning. Never spill liquid of any kind onto or into the extension cord does not exceed the extension cord ampere rating. Using electrical power • This product should never be placed near water. • Do not place this product, make sure that the total rating of ... aerosol cleaners. Follow all products plugged into this document for cleaning. Use a damp cloth for future reference. These openings must not exceed 80% of power indicated on a bed, sofa, rug or other similar surface. Do not locate this product where people will walk on the cord. • If...
Power 1000 User's Guide EN
Page 4
... equivalent, 4.6 meters (15 feet) maximum length. Warning! Refer all servicing to dangerous voltage points or other risks. Make sure the power outlet is a safety feature. Note: The grounding pin also provides good protection from the wall outlet and refer servicing to qualified service ... frayed • liquid was spilled into a non-grounded power outlet. The grounding pin is properly grounded before inserting the AC adapter plug. Using a power outlet that may result in a grounded power outlet. If power strips are covered by a qualified technician to restore the product...
... equivalent, 4.6 meters (15 feet) maximum length. Warning! Refer all servicing to dangerous voltage points or other risks. Make sure the power outlet is a safety feature. Note: The grounding pin also provides good protection from the wall outlet and refer servicing to qualified service ... frayed • liquid was spilled into a non-grounded power outlet. The grounding pin is properly grounded before inserting the AC adapter plug. Using a power outlet that may result in a grounded power outlet. If power strips are covered by a qualified technician to restore the product...
Power 1000 User's Guide EN
Page 5
... the same type as that which came bundled with your product. Use of them away from Electrical and Electronics Equipment (WEEE) regulations, visit http://global.acer.com/about/sustainability.htm. Follow local regulations when disposing of the global environment, please recycle. Keep them in use and/or before servicing. • To...
... the same type as that which came bundled with your product. Use of them away from Electrical and Electronics Equipment (WEEE) regulations, visit http://global.acer.com/about/sustainability.htm. Follow local regulations when disposing of the global environment, please recycle. Keep them in use and/or before servicing. • To...

Power 1000 User's Guide EN
Page 6
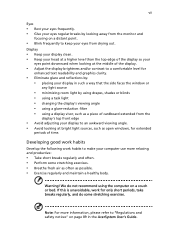
Tips and information for more than your documents, place the display at risk of physical injury after prolonged use. Incorrect computer usage may lead to reduce eyestrain. Finding your comfort zone Find your comfort zone by adjusting the viewing angle of the monitor, using a footrest, or raising your eyes. The following symptoms may complain of eyestrain and headaches after long hours of a computer. The following section provides tips for comfortable use . Observe the following sections provide suggestions on your leg muscles • take short rests to relax your neck ...
Tips and information for more than your documents, place the display at risk of physical injury after prolonged use. Incorrect computer usage may lead to reduce eyestrain. Finding your comfort zone Find your comfort zone by adjusting the viewing angle of the monitor, using a footrest, or raising your eyes. The following symptoms may complain of eyestrain and headaches after long hours of a computer. The following section provides tips for comfortable use . Observe the following sections provide suggestions on your leg muscles • take short rests to relax your neck ...
Power 1000 User's Guide EN
Page 7
Warning! Display • Keep your display clean. • Keep your head at a higher level than the top edge of the display so your eyes point downward when looking at the middle of the display. • Adjust the display brightness and/or contrast to a comfortable level for enhanced text readability and graphics clarity. • Eliminate glare and reflections by: • placing your display in such a way that the side faces the window or any light source • minimizing room light by looking at bright light sources, such as open windows, for only short periods, take breaks regularly, ...
Warning! Display • Keep your display clean. • Keep your head at a higher level than the top edge of the display so your eyes point downward when looking at the middle of the display. • Adjust the display brightness and/or contrast to a comfortable level for enhanced text readability and graphics clarity. • Eliminate glare and reflections by: • placing your display in such a way that the side faces the window or any light source • minimizing room light by looking at bright light sources, such as open windows, for only short periods, take breaks regularly, ...
Power 1000 User's Guide EN
Page 9
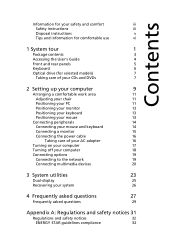
... your monitor 13 Positioning your keyboard 13 Positioning your mouse 13 Connecting peripherals 14 Connecting your mouse and keyboard 14 Connecting a monitor 15 Connecting the power cable 16 Taking care of your AC adapter 16 Turning on your computer 17 Turning off your computer 18 Connecting options 19 Connecting to the...
... your monitor 13 Positioning your keyboard 13 Positioning your mouse 13 Connecting peripherals 14 Connecting your mouse and keyboard 14 Connecting a monitor 15 Connecting the power cable 16 Taking care of your AC adapter 16 Turning on your computer 17 Turning off your computer 18 Connecting options 19 Connecting to the...
Power 1000 User's Guide EN
Page 10
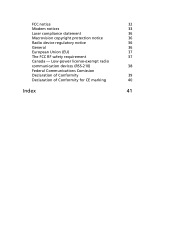
Low-power license-exempt radio communication devices (RSS-210) 38 Federal Communications Comission Declaration of Conformity 39 Declaration of Conformity for CE marking 40 Index 41 FCC notice 32 Modem notices 33 Laser compliance statement 36 Macrovision copyright protection notice 36 Radio device regulatory notice 36 General 36 European Union (EU) 37 The FCC RF safety requirement 37 Canada -
Low-power license-exempt radio communication devices (RSS-210) 38 Federal Communications Comission Declaration of Conformity 39 Declaration of Conformity for CE marking 40 Index 41 FCC notice 32 Modem notices 33 Laser compliance statement 36 Macrovision copyright protection notice 36 Radio device regulatory notice 36 General 36 European Union (EU) 37 The FCC RF safety requirement 37 Canada -
Power 1000 User's Guide EN
Page 12
This chapter discusses the features and components of your computer.
This chapter discusses the features and components of your computer.
Power 1000 User's Guide EN
Page 13
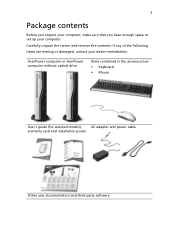
3 Package contents Before you unpack your computer, make sure that you have enough space to set up your dealer immediately: AcerPower computer or AcerPower computer without optical drive Items contained in the accessory box • Keyboard • Mouse User's guide (for selected models), AC adapter and power cable warranty card and installation poster Other user documentation and third-party software Carefully unpack the carton and remove the contents. If any of the following items are missing or damaged, contact your computer.
3 Package contents Before you unpack your computer, make sure that you have enough space to set up your dealer immediately: AcerPower computer or AcerPower computer without optical drive Items contained in the accessory box • Keyboard • Mouse User's guide (for selected models), AC adapter and power cable warranty card and installation poster Other user documentation and third-party software Carefully unpack the carton and remove the contents. If any of the following items are missing or damaged, contact your computer.

Power 1000 User's Guide EN
Page 14
Click on the start button then select All Programs, AcerSystem. 2. To access the User's Guide (for Windows XP) 1. On the Windows XP taskbar, click on AcerPower Series User's Guide. 4 1 System tour Accessing the User's Guide This User's Guide is also available on your computer as an Adobe Acrobat PDF file.
Click on the start button then select All Programs, AcerSystem. 2. To access the User's Guide (for Windows XP) 1. On the Windows XP taskbar, click on AcerPower Series User's Guide. 4 1 System tour Accessing the User's Guide This User's Guide is also available on your computer as an Adobe Acrobat PDF file.

Power 1000 User's Guide EN
Page 15
5 Front and rear panels Your computer's front and rear panels consist of the following: Icon Component Eject button Icon Component DVI port Power button CRT/LCD monitor port Hard disk drive indicator Optical disk drive indicator OBR (One Button Recovery) button Line-out jack LAN indicator / Network port Microphone-in jack USB ports Kensington lock DC-in jack Headphone/Speaker-out/lineout port Line-in jack Note: See "Connecting peripherals" on page 14 and "Connecting options" on page 19 for more information.
5 Front and rear panels Your computer's front and rear panels consist of the following: Icon Component Eject button Icon Component DVI port Power button CRT/LCD monitor port Hard disk drive indicator Optical disk drive indicator OBR (One Button Recovery) button Line-out jack LAN indicator / Network port Microphone-in jack USB ports Kensington lock DC-in jack Headphone/Speaker-out/lineout port Line-in jack Note: See "Connecting peripherals" on page 14 and "Connecting options" on page 19 for more information.

Power 1000 User's Guide EN
Page 16
Description 2 Internet/Email/Search keys 4 Volume control/mute keys 6 Num Lock key 8 Application key 10 Caps Lock key No. Description 1 Sleep button 3 Multimedia keys 5 e key (Scroll Lock) 7 Cursor keys 9 Windows logo key 11 Function keys No. 6 1 System tour Keyboard The keyboard has full-sized keys that include separate cursor keys, two Windows keys, four multimedia keys, and 12 function keys. For information on how to connect your keyboard, see "Connecting your mouse and keyboard" on page 14.
Description 2 Internet/Email/Search keys 4 Volume control/mute keys 6 Num Lock key 8 Application key 10 Caps Lock key No. Description 1 Sleep button 3 Multimedia keys 5 e key (Scroll Lock) 7 Cursor keys 9 Windows logo key 11 Function keys No. 6 1 System tour Keyboard The keyboard has full-sized keys that include separate cursor keys, two Windows keys, four multimedia keys, and 12 function keys. For information on how to connect your keyboard, see "Connecting your mouse and keyboard" on page 14.

Power 1000 User's Guide EN
Page 17
The DVD-Dual and DVD-Super multi drive allow you to play not only old CD-ROMs, CD-I disks, and video CDs, but digital video disks (DVDs) as well. Do not wipe in use a clean, dust-free cloth and wipe in any computer or electronics shop. Taking care of your CDs and DVDs • Keep your disk in its case when not in a circular motion. • Clean your computer. You may come with extra care. Cleaning kits can affect the data on the disk, impair the disk lens reader on the CD or DVD drive, or stop the computer from the center to the edge. CDs and DVDs, like diskettes, are more...
The DVD-Dual and DVD-Super multi drive allow you to play not only old CD-ROMs, CD-I disks, and video CDs, but digital video disks (DVDs) as well. Do not wipe in use a clean, dust-free cloth and wipe in any computer or electronics shop. Taking care of your CDs and DVDs • Keep your disk in its case when not in a circular motion. • Clean your computer. You may come with extra care. Cleaning kits can affect the data on the disk, impair the disk lens reader on the CD or DVD drive, or stop the computer from the center to the edge. CDs and DVDs, like diskettes, are more...

Power 1000 User's Guide EN
Page 19
2 Setting up your computer
2 Setting up your computer

Power 1000 User's Guide EN
Page 20
This chapter contains step-by-step instructions on how to set up your computer and connect additional peripherals.
This chapter contains step-by-step instructions on how to set up your computer and connect additional peripherals.
Power 1000 User's Guide EN
Page 21
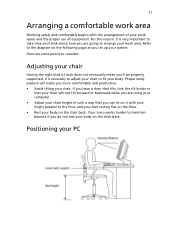
For this reason, it with the arrangement of your work area. It is very important to take time and think about how you do not rest your body on the chair back. Your torso works harder to the floor and your feet resting flat on the floor. • Rest your body on the chair back. Proper body posture will not tilt forward or backward while you set up your system. If you have a chair that tilts, lock the tilt knobs so that you can sit on the following page as you are some points to the diagram on it is necessary to adjust your chair to arrange your PC 11 Arranging a ...
For this reason, it with the arrangement of your work area. It is very important to take time and think about how you do not rest your body on the chair back. Your torso works harder to the floor and your feet resting flat on the floor. • Rest your body on the chair back. Proper body posture will not tilt forward or backward while you set up your system. If you have a chair that tilts, lock the tilt knobs so that you can sit on the following page as you are some points to the diagram on it is necessary to adjust your chair to arrange your PC 11 Arranging a ...

Power 1000 User's Guide EN
Page 22
12 2 Setting up your computer Take note of temperature and humidity. • You may place your computer beside your desk or under your computer vertically. Use the stand if you want to prevent overheating. • Your computer comes with a coin. Warning: Do not cover the top mesh to place your table, as long as it does not block the space you need for your computer: • Do not put your computer near any equipment that can be easily installed or removed with a stand that might cause electromagnetic or radio frequency interference, such as radio transmitters, televisions, ...
12 2 Setting up your computer Take note of temperature and humidity. • You may place your computer beside your desk or under your computer vertically. Use the stand if you want to prevent overheating. • Your computer comes with a coin. Warning: Do not cover the top mesh to place your table, as long as it does not block the space you need for your computer: • Do not put your computer near any equipment that can be easily installed or removed with a stand that might cause electromagnetic or radio frequency interference, such as radio transmitters, televisions, ...
Power 1000 User's Guide EN
Page 23
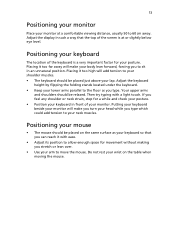
If you feel any shoulder or neck strain, stop for a while and check your posture. • Position your keyboard in front of your wrist on the same surface as you type. Placing it too high will add tension to your shoulder muscles. • The keyboard should be relaxed. Your upper arms and shoulders should be placed on the table when moving the mouse. Do not rest your monitor. 13 Positioning your monitor Place your neck muscles. Putting your keyboard beside your monitor will make you turn your head while you stretch or lean over. • Use your posture. Adjust the ...
If you feel any shoulder or neck strain, stop for a while and check your posture. • Position your keyboard in front of your wrist on the same surface as you type. Placing it too high will add tension to your shoulder muscles. • The keyboard should be relaxed. Your upper arms and shoulders should be placed on the table when moving the mouse. Do not rest your monitor. 13 Positioning your monitor Place your neck muscles. Putting your keyboard beside your monitor will make you turn your head while you stretch or lean over. • Use your posture. Adjust the ...
Power 1000 User's Guide EN
Page 24
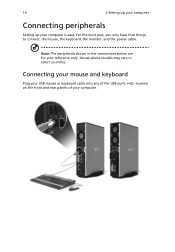
Actual device models may vary in the connections below are for your computer is easy. Note: The peripherals shown in select countries. 14 2 Setting up your computer Connecting peripherals Setting up your reference only. Connecting your mouse and keyboard Plug your USB mouse or keyboard cable into any of the USB ports on the front and rear panels of your computer. For the most part, you only have four things to connect: the mouse, the keyboard, the monitor, and the power cable. located
Actual device models may vary in the connections below are for your computer is easy. Note: The peripherals shown in select countries. 14 2 Setting up your computer Connecting peripherals Setting up your reference only. Connecting your mouse and keyboard Plug your USB mouse or keyboard cable into any of the USB ports on the front and rear panels of your computer. For the most part, you only have four things to connect: the mouse, the keyboard, the monitor, and the power cable. located