
User Manual
Page 3
.... Follow all products plugged into the extension cord does not exceed the extension cord ampere rating. Warnings • Do not use liquid cleaners or aerosol cleaners. The openings should be blocked by plugging in a fire or electric shock. Using electrical power • This product should never be operated from the type of all warnings and instructions marked on the...
.... Follow all products plugged into the extension cord does not exceed the extension cord ampere rating. Warnings • Do not use liquid cleaners or aerosol cleaners. The openings should be blocked by plugging in a fire or electric shock. Using electrical power • This product should never be operated from the type of all warnings and instructions marked on the...
User Manual
Page 4
... other nearby electrical devices that the new power cord meets the following the operating instructions Note: Adjust only those controls that is not properly grounded may result in performance, indicating a need to replace the power cord set, make sure that may interfere with the performance of this product. • Use the product only with a three-wire grounded plug. Contact your electrician for service • the...
... other nearby electrical devices that the new power cord meets the following the operating instructions Note: Adjust only those controls that is not properly grounded may result in performance, indicating a need to replace the power cord set, make sure that may interfere with the performance of this product. • Use the product only with a three-wire grounded plug. Contact your electrician for service • the...
User Manual
Page 5
... avoid the remote risk of used batteries according to local, state or federal laws. Mercury advisory For projectors or electronic products containing an LCD/CRT monitor or display: Lamp(s) inside this electronic device into the trash when discarding. For more information, contact the Electronic Industries Alliance at www.eiae.org. Replace only with the same or equivalent type recommended...
... avoid the remote risk of used batteries according to local, state or federal laws. Mercury advisory For projectors or electronic products containing an LCD/CRT monitor or display: Lamp(s) inside this electronic device into the trash when discarding. For more information, contact the Electronic Industries Alliance at www.eiae.org. Replace only with the same or equivalent type recommended...

User Manual
Page 6
...8226; Wake the computer from sleep mode by pushing keyboard or moving mouse. • Computers will save more we can save through higher energy efficiency, the more than 80% energy at "sleep" mode. ...use . What is proud to www.energystar.gov or www.energystar.gov/powermangement. Acer is ENERGY STAR? Acer ENERGY STAR qualified products: • Produce less heat and reduce cooling loads, and warmer climates. • Automatically go into "display sleep" and "computer sleep" mode after long hours of working conditions, personal health and other musculoskeletal disorders. Users...
...8226; Wake the computer from sleep mode by pushing keyboard or moving mouse. • Computers will save more we can save through higher energy efficiency, the more than 80% energy at "sleep" mode. ...use . What is proud to www.energystar.gov or www.energystar.gov/powermangement. Acer is ENERGY STAR? Acer ENERGY STAR qualified products: • Produce less heat and reduce cooling loads, and warmer climates. • Automatically go into "display sleep" and "computer sleep" mode after long hours of working conditions, personal health and other musculoskeletal disorders. Users...
User Manual
Page 7
... you view your monitor more comfortable computer use , consult a physician immediately and inform your company's health and safety department. The following sections provide suggestions on your leg muscles • take short rests to relax your neck and shoulders • avoid tensing your muscles or shrugging your shoulders • install the external display, keyboard and mouse properly and...
... you view your monitor more comfortable computer use , consult a physician immediately and inform your company's health and safety department. The following sections provide suggestions on your leg muscles • take short rests to relax your neck and shoulders • avoid tensing your muscles or shrugging your shoulders • install the external display, keyboard and mouse properly and...
User Manual
Page 9
... panel 2 Rear panel 2 Optical drive 3 Taking care of your optical discs 4 2 Setting up your computer 5 Arranging a comfortable work area 6 Positioning your monitor 6 Positioning your keyboard 6 Positioning your mouse 6 Connecting peripherals 7 Connecting your mouse and keyboard 7 USB interface 7 PS/2 interface 7 Connecting a monitor 7 Connecting the power cable 8 Turning on your computer 8 Turning off your computer 8 3 Upgrading your computer 9 Installation precautions 10 ESD precautions 10 Preinstallation instructions 10 Post-installation instructions...
... panel 2 Rear panel 2 Optical drive 3 Taking care of your optical discs 4 2 Setting up your computer 5 Arranging a comfortable work area 6 Positioning your monitor 6 Positioning your keyboard 6 Positioning your mouse 6 Connecting peripherals 7 Connecting your mouse and keyboard 7 USB interface 7 PS/2 interface 7 Connecting a monitor 7 Connecting the power cable 8 Turning on your computer 8 Turning off your computer 8 3 Upgrading your computer 9 Installation precautions 10 ESD precautions 10 Preinstallation instructions 10 Post-installation instructions...

User Manual
Page 12
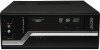
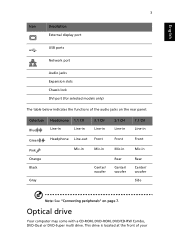
English 2 1 System tour Front panel The front panel of your computer has the following: Icon Description 5.25-inch drive bay(s) 3.5-inch drive bay(s) Microphone-in jack (front) Speaker-/line-out jack (front) USB ports OBR (One Button Recovery) button (For selected models only) Indicators Power button Rear panel The rear panel of your computer has the following: Icon Description Power supply Power cord socket Voltage selector switch PS/2 mouse port PS/2 keyboard port Serial port Parallel/printer port
English 2 1 System tour Front panel The front panel of your computer has the following: Icon Description 5.25-inch drive bay(s) 3.5-inch drive bay(s) Microphone-in jack (front) Speaker-/line-out jack (front) USB ports OBR (One Button Recovery) button (For selected models only) Indicators Power button Rear panel The rear panel of your computer has the following: Icon Description Power supply Power cord socket Voltage selector switch PS/2 mouse port PS/2 keyboard port Serial port Parallel/printer port
User Manual
Page 13
... with a CD-ROM, DVD-ROM, DVD/CD-RW Combo, DVD-Dual or DVD-Super multi drive. This drive is located at the front of the audio jacks on the rear panel: Color/use Blue Green Pink Orange Black Gray Headphone 1.1 CH Line-in Line-in Headphone Line-out Mic-in 3.1 CH Line-in Front Mic-in Center/ woofer 5.1 CH Line-in Front Mic-in Rear Center/ woofer 7.1 CH...
... with a CD-ROM, DVD-ROM, DVD/CD-RW Combo, DVD-Dual or DVD-Super multi drive. This drive is located at the front of the audio jacks on the rear panel: Color/use Blue Green Pink Orange Black Gray Headphone 1.1 CH Line-in Line-in Headphone Line-out Mic-in 3.1 CH Line-in Front Mic-in Center/ woofer 5.1 CH Line-in Front Mic-in Rear Center/ woofer 7.1 CH...
User Manual
Page 14
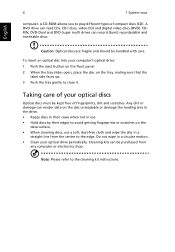
... types of fingerprints, dirt and scratches. Cleaning kits can render data on the disc unreadable or damage the reading lens in the drive. • Keeps discs in their cases when not in use a soft, dust-free cloth and wipe the disc in a circular motion. • Clean your computer's optical drive: 1 Push the eject button on the front panel. 2 When the tray slides open...
... types of fingerprints, dirt and scratches. Cleaning kits can render data on the disc unreadable or damage the reading lens in the drive. • Keeps discs in their cases when not in use a soft, dust-free cloth and wipe the disc in a circular motion. • Clean your computer's optical drive: 1 Push the eject button on the front panel. 2 When the tray slides open...

User Manual
Page 16
.... • The keyboard should be placed just above your lap. Then try typing with a light touch. Adjust the keyboard height by flipping the folding stands located under your table, as long as you need for working and moving. •...monitor. CAUTION: Please use the stabilizers when placing your monitor at or slightly below eye level. Placing it too high will add tension to the floor as it too far away will make your keyboard so that Positioning your mouse • The mouse should be placed on the side of the screen is a very important factor for selected models...
.... • The keyboard should be placed just above your lap. Then try typing with a light touch. Adjust the keyboard height by flipping the folding stands located under your table, as long as you need for working and moving. •...monitor. CAUTION: Please use the stabilizers when placing your monitor at or slightly below eye level. Placing it too high will add tension to the floor as it too far away will make your keyboard so that Positioning your mouse • The mouse should be placed on the side of the screen is a very important factor for selected models...
User Manual
Page 17
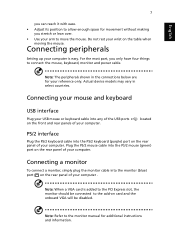
... VGA will be connected to move the mouse. Note: The peripherals shown in select countries. Plug the PS/2 mouse cable into the PS/2 keyboard (purple) port on the rear panel of your computer. located PS/2 interface Plug the PS/2 keyboard cable into the PS/2 mouse (green) port on the rear panel of your reference only. Note: Refer to connect: the mouse, keyboard, monitor and power cable. Actual device models may vary in the connections below are for your computer. Connecting your mouse and keyboard USB interface Plug...
... VGA will be connected to move the mouse. Note: The peripherals shown in select countries. Plug the PS/2 mouse cable into the PS/2 keyboard (purple) port on the rear panel of your computer. located PS/2 interface Plug the PS/2 keyboard cable into the PS/2 mouse (green) port on the rear panel of your reference only. Note: Refer to connect: the mouse, keyboard, monitor and power cable. Actual device models may vary in the connections below are for your computer. Connecting your mouse and keyboard USB interface Plug...
User Manual
Page 18
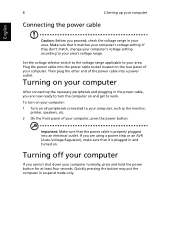
... selector switch to the voltage range applicable to work. Quickly pressing the button may put the computer in and turned on the rear panel of your computer, press the power button. Plug the power cable into a power outlet. If they don't match, change your computer's voltage setting according to your computer, such as the monitor, printer, speakers, etc. 2 On the front panel of your computer. Then plug the...
... selector switch to the voltage range applicable to work. Quickly pressing the button may put the computer in and turned on the rear panel of your computer, press the power button. Plug the power cable into a power outlet. If they don't match, change your computer's voltage setting according to your computer, such as the monitor, printer, speakers, etc. 2 On the front panel of your computer. Then plug the...
User Manual
Page 20
...) can damage your processor, disk drives, expansion boards, and other components. If a wrist strap is not available, maintain contact with preinstallation and post-installation instructions. Then unplug all the peripherals connected to it before opening it to install it. 2 Wear a wrist grounding strap and attach it . Warning! Not turning off your computer and all cables from the power outlets. 2 Open your computer according...
...) can damage your processor, disk drives, expansion boards, and other components. If a wrist strap is not available, maintain contact with preinstallation and post-installation instructions. Then unplug all the peripherals connected to it before opening it to install it. 2 Wear a wrist grounding strap and attach it . Warning! Not turning off your computer and all cables from the power outlets. 2 Open your computer according...
User Manual
Page 21
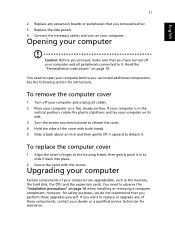
To remove the computer cover 1 Turn off your computer and all cables. 2 Place your computer are upgradeable, such as the memory, the hard disk, the CPU and the expansion cards. Opening your computer Caution: Before you proceed, make sure that you have turned off your computer and unplug all peripherals connected to it back into place. 2 Secure the cover with both hands. 5 Slide it back about...
To remove the computer cover 1 Turn off your computer and all cables. 2 Place your computer are upgradeable, such as the memory, the hard disk, the CPU and the expansion cards. Opening your computer Caution: Before you proceed, make sure that you have turned off your computer and unplug all peripherals connected to it back into place. 2 Secure the cover with both hands. 5 Slide it back about...
User Manual
Page 23
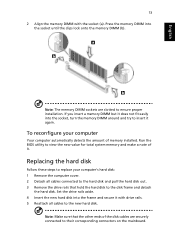
... mainboard. To reconfigure your computer's hard disk: 1 Remove the computer cover. 2 Detach all cables to the new hard disk. Set the drive rails aside. 4 Insert the new hard disk into the frame and secure it . Run the BIOS utility to the disk frame and detach the hard disk. Note: Make sure that hold the hard disk to view the new value for total system memory and make a note of memory installed. Replacing the hard disk Follow these steps to ensure...
... mainboard. To reconfigure your computer's hard disk: 1 Remove the computer cover. 2 Detach all cables to the new hard disk. Set the drive rails aside. 4 Insert the new hard disk into the frame and secure it . Run the BIOS utility to the disk frame and detach the hard disk. Note: Make sure that hold the hard disk to view the new value for total system memory and make a note of memory installed. Replacing the hard disk Follow these steps to ensure...
User Manual
Page 26
... are using a power strip, make sure it with a system disc and press + + to the printer's documentation. The printer does not work , contact your dealer or technical support center for the Volume icon on . Look for assistance. Your computer's power management function automatically blanks the screen to turn the display back on the taskbar. If it is turned on. • Make sure the printer cable is plugged in a drive...
... are using a power strip, make sure it with a system disc and press + + to the printer's documentation. The printer does not work , contact your dealer or technical support center for the Volume icon on . Look for assistance. Your computer's power management function automatically blanks the screen to turn the display back on the taskbar. If it is turned on. • Make sure the printer cable is plugged in a drive...
User Manual
Page 27
..., hard disk, CD or DVD information. English 17 press the volume control/mute knob on your USB keyboard to toggle from mute to sound on. • If headphones, earphones or external speakers are connected to the lineout jack of your drive by using a good (undamaged) disk. Check the following : • Make sure the hard disk is not write-protected. • Make sure you are using the correct type of disk...
..., hard disk, CD or DVD information. English 17 press the volume control/mute knob on your USB keyboard to toggle from mute to sound on. • If headphones, earphones or external speakers are connected to the lineout jack of your drive by using a good (undamaged) disk. Check the following : • Make sure the hard disk is not write-protected. • Make sure you are using the correct type of disk...
User Manual
Page 32
...'s network services. 2 This equipment is designed. The associated equipment shall be set to operate within the following limits for compliance with Telecom's Specifications: a There shall be no endorsement of the product by Telecom, nor does it provide any single manual call attempts to the same number within any 30 minute period for any sort of a different make or model...
...'s network services. 2 This equipment is designed. The associated equipment shall be set to operate within the following limits for compliance with Telecom's Specifications: a There shall be no endorsement of the product by Telecom, nor does it provide any single manual call attempts to the same number within any 30 minute period for any sort of a different make or model...

User Manual
Page 33
...specifications, the associated equipment shall be set up to make automatic calls to Telecom's 111 Emergency Service. 6 This device is equipped with pulse dialing while the Telecom standard is DTMF tone dialing. Laser compliance statement The CD or DVD drive used with this equipment is connected to the same line as black... attempt and the beginning of another device connected to the same line. 9 Under power failure conditions this appliance may not operate. AVOID EXPOSURE TO BEAM. CLASS 1 LASER PRODUCT CAUTION: INVISIBLE LASER RADIATION WHEN OPEN. English 23 b The equipment shall...
...specifications, the associated equipment shall be set up to make automatic calls to Telecom's 111 Emergency Service. 6 This device is equipped with pulse dialing while the Telecom standard is DTMF tone dialing. Laser compliance statement The CD or DVD drive used with this equipment is connected to the same line as black... attempt and the beginning of another device connected to the same line. 9 Under power failure conditions this appliance may not operate. AVOID EXPOSURE TO BEAM. CLASS 1 LASER PRODUCT CAUTION: INVISIBLE LASER RADIATION WHEN OPEN. English 23 b The equipment shall...
Brochure
Page 2
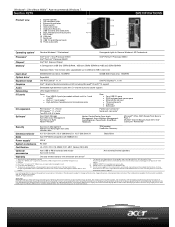
... and may vary depending on models without Walls™. Acer is provided,a technician will be dispatched, if necessary, following efforts to 4GB (one 2GB in all locations. Veriton X275 Product view 1 Internal speaker 2 GS-compliant finish 3 Enhanced ventilation 4 Power switch 5 Optical drive bay 6 Onebutton Recovery 7 USB 2.0 ports and audio jacks 8 PS/2 keyboard and mouse ports 9 DVI-D port 10 VGA port 11 Serial port 12 USB 2.0 and Ethernet ports 13 Three audio ports SPECIFICATIONS Operating system1 Processor1 Chipset1 Memory1 Genuine...
... and may vary depending on models without Walls™. Acer is provided,a technician will be dispatched, if necessary, following efforts to 4GB (one 2GB in all locations. Veriton X275 Product view 1 Internal speaker 2 GS-compliant finish 3 Enhanced ventilation 4 Power switch 5 Optical drive bay 6 Onebutton Recovery 7 USB 2.0 ports and audio jacks 8 PS/2 keyboard and mouse ports 9 DVI-D port 10 VGA port 11 Serial port 12 USB 2.0 and Ethernet ports 13 Three audio ports SPECIFICATIONS Operating system1 Processor1 Chipset1 Memory1 Genuine...


