User Manual
Page 9
... a comfortable work area 6 Positioning your monitor 6 Positioning your keyboard 6 Positioning your mouse 6 Connecting peripherals 7 Connecting your mouse and keyboard 7 USB interface 7 PS/2 interface 7 Connecting a monitor 7 Connecting the power cable 8 Turning on your computer 8 Turning off your computer 8 3 Upgrading your computer 9 Installation precautions 10... the computer cover 11 To replace the computer cover 11 Upgrading your computer 11 To remove a memory DIMM 12 To install a memory DIMM 12 To reconfigure your computer 13 Replacing the hard disk 13
... a comfortable work area 6 Positioning your monitor 6 Positioning your keyboard 6 Positioning your mouse 6 Connecting peripherals 7 Connecting your mouse and keyboard 7 USB interface 7 PS/2 interface 7 Connecting a monitor 7 Connecting the power cable 8 Turning on your computer 8 Turning off your computer 8 3 Upgrading your computer 9 Installation precautions 10... the computer cover 11 To replace the computer cover 11 Upgrading your computer 11 To remove a memory DIMM 12 To install a memory DIMM 12 To reconfigure your computer 13 Replacing the hard disk 13
User Manual
Page 21
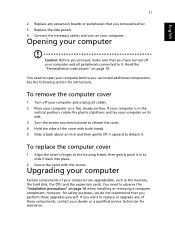
... the necessary cables and turn on page 10 when installing or removing a computer component. You need to open your computer are upgradeable, such as the memory, the hard disk, the CPU and the expansion cards. English 11 2 Replace any of the cover with the screws. See the following section for assistance...
... the necessary cables and turn on page 10 when installing or removing a computer component. You need to open your computer are upgradeable, such as the memory, the hard disk, the CPU and the expansion cards. English 11 2 Replace any of the cover with the screws. See the following section for assistance...

User Manual
Page 22
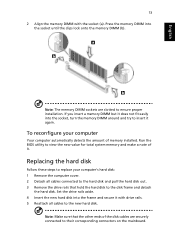
To install a memory DIMM 1 Locate the memory DIMM socket on both sides of the memory DIMM socket outward to release the memory DIMM (a). Gently pull the memory DIMM out of the socket (b). English 12 3 Upgrading your computer To remove a memory DIMM Note: The memory DIMM has only one notch located toward the center of the module. 1 Remove the side panel. 2 Locate the memory DIMM socket on the mainboard. 3 Press the holding clips on the mainboard.
To install a memory DIMM 1 Locate the memory DIMM socket on both sides of the memory DIMM socket outward to release the memory DIMM (a). Gently pull the memory DIMM out of the socket (b). English 12 3 Upgrading your computer To remove a memory DIMM Note: The memory DIMM has only one notch located toward the center of the module. 1 Remove the side panel. 2 Locate the memory DIMM socket on the mainboard. 3 Press the holding clips on the mainboard.
User Manual
Page 23
... make a note of it with the socket (a). Replacing the hard disk Follow these steps to replace your computer Your computer automatically detects the amount of memory installed. To reconfigure your computer's hard disk: 1 Remove the computer cover. 2 Detach all cables to the new hard disk. Set the drive rails aside. ...4 Insert the new hard disk into the frame and secure it . English 13 2 Align the memory DIMM with drive rails. 5 Reattach all cables connected to the hard disk and pull the hard disk out. 3 Remove the drive rails that the ...
... make a note of it with the socket (a). Replacing the hard disk Follow these steps to replace your computer Your computer automatically detects the amount of memory installed. To reconfigure your computer's hard disk: 1 Remove the computer cover. 2 Detach all cables to the new hard disk. Set the drive rails aside. ...4 Insert the new hard disk into the frame and secure it . English 13 2 Align the memory DIMM with drive rails. 5 Reattach all cables connected to the hard disk and pull the hard disk out. 3 Remove the drive rails that the ...
Brochure
Page 1
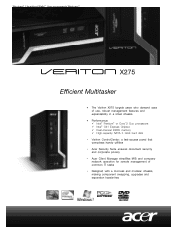
... Core™2 Duo processors 9 Intel® G41 Express Chipset 9 Dual-channel DDR3 memory 9 High-capacity SATA 3 Gb/s hard disk • Veriton ControlCenter: a fast-access panel that comprises handy utilities • Acer Security Suite ensures document security and corporate privacy • Acer Client Manager simplifies MIS and company network operation for remote management of...
... Core™2 Duo processors 9 Intel® G41 Express Chipset 9 Dual-channel DDR3 memory 9 High-capacity SATA 3 Gb/s hard disk • Veriton ControlCenter: a fast-access panel that comprises handy utilities • Acer Security Suite ensures document security and corporate privacy • Acer Client Manager simplifies MIS and company network operation for remote management of...
Brochure
Page 2
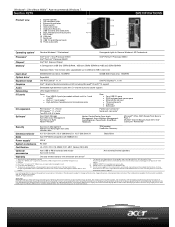
...SDRAM or 4GB (2/2) DDR3 SDRAM Hard drive1 Optical drive1 Expansion bays Graphics Audio Networking I/O ports I/O expansion Software1 Expansion Slots: Two memory slots: upgradeable up to 4GB (one 2GB in each slot) 320GB SATA hard drive, 7200RPM 500GB SATA hard drive, 7200RPM SuperMulti...compliance PC 2001 Certification UL, VCCI, FCC, CE, BSMI, CCC, MET, Nemko (CB & GS) Optional accessories Acer USB or PS/2 keyboard and mouse Acer LCD monitor Acer external/internal speakers Warranty One year limited warranty with Windows® 7. 6. All rights reserved. Support for more than ...
...SDRAM or 4GB (2/2) DDR3 SDRAM Hard drive1 Optical drive1 Expansion bays Graphics Audio Networking I/O ports I/O expansion Software1 Expansion Slots: Two memory slots: upgradeable up to 4GB (one 2GB in each slot) 320GB SATA hard drive, 7200RPM 500GB SATA hard drive, 7200RPM SuperMulti...compliance PC 2001 Certification UL, VCCI, FCC, CE, BSMI, CCC, MET, Nemko (CB & GS) Optional accessories Acer USB or PS/2 keyboard and mouse Acer LCD monitor Acer external/internal speakers Warranty One year limited warranty with Windows® 7. 6. All rights reserved. Support for more than ...


