User Manual
Page 2
...of this publication without obligation to your unit should include the serial number, model number and purchase information. Acer LCD Monitor User's Guide Original Issue: 05/2019 Changes may be reproduced, stored in a retrieval system, or transmitted, in the space ... documents and publications. Such changes will be made periodically to their respective companies. Acer LCD Monitor User's Guide Model number Serial number Date of purchase Place of purchase Acer and the Acer logo are used herein for a particular purpose. Record the model number, serial number...
...of this publication without obligation to your unit should include the serial number, model number and purchase information. Acer LCD Monitor User's Guide Original Issue: 05/2019 Changes may be reproduced, stored in a retrieval system, or transmitted, in the space ... documents and publications. Such changes will be made periodically to their respective companies. Acer LCD Monitor User's Guide Model number Serial number Date of purchase Place of purchase Acer and the Acer logo are used herein for a particular purpose. Record the model number, serial number...
User Manual
Page 3
... When you plug the power cord into is displayed for future reference. Special notes on LCD monitors The following guidelines when connecting and disconnecting power from the LCD monitor: • Make sure the monitor is attached to its base before cleaning. • Use a soft cloth to wipe the screen..., the screen may find slightly uneven brightness on the screen depending on the product. Turn off the power switch for your monitor Please carefully follow these instructions carefully. Keep this case, the screen is recovered slowly by unplugging all power cords from the electrical outlet....
... When you plug the power cord into is displayed for future reference. Special notes on LCD monitors The following guidelines when connecting and disconnecting power from the LCD monitor: • Make sure the monitor is attached to its base before cleaning. • Use a soft cloth to wipe the screen..., the screen may find slightly uneven brightness on the screen depending on the product. Turn off the power switch for your monitor Please carefully follow these instructions carefully. Keep this case, the screen is recovered slowly by unplugging all power cords from the electrical outlet....

User Manual
Page 7
...; Keep your head at a higher level than the top edge of the display so your eyes point downward when looking away from the monitor and focusing on how to carpal tunnel syndrome, tendonitis, tenosynovitis or other factors greatly increase the risk of physical injury. The following tips:...; coldness or weakness If you have these symptoms, or any light source • minimizing room light by adjusting the viewing angle of the monitor, using a task light • changing the display's viewing angle vii Observe the following section provides tips for more comfortable computer use. Users...
...; Keep your head at a higher level than the top edge of the display so your eyes point downward when looking away from the monitor and focusing on how to carpal tunnel syndrome, tendonitis, tenosynovitis or other factors greatly increase the risk of physical injury. The following tips:...; coldness or weakness If you have these symptoms, or any light source • minimizing room light by adjusting the viewing angle of the monitor, using a task light • changing the display's viewing angle vii Observe the following section provides tips for more comfortable computer use. Users...

User Manual
Page 8
viii Developing good work habits Develop the following work habits to make your display to the monitor, do not lift the monitor by its base. • using a glare-reduction filter • using a display visor, such as possible. • Exercise regularly and maintain a healthy body. • In order ...
viii Developing good work habits Develop the following work habits to make your display to the monitor, do not lift the monitor by its base. • using a glare-reduction filter • using a display visor, such as possible. • Exercise regularly and maintain a healthy body. • In order ...
User Manual
Page 9
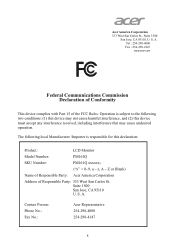
...2019 Date ix CE Declaration of Conformity Acer Incorporated 8F, 88, Sec. 1, Xintai 5th Rd., Xizhi New Taipei City 221, Taiwan Declaration of Conformity We, Acer Incorporated 8F, 88, Sec. 1, Xintai 5th Rd., Xizhi, New Taipei City 221, Taiwan And, Acer Italy s.r.l Via Lepetit, 40, 20020...MI) Italy Tel: +39-02-939-921 ,Fax: +39-02 9399-2913 www.acer.it Product: Trade Name: Model Number: SKU Number: LCD Monitor Acer PM161Q PM161Q xxxxxx; ("x" = 0~9, a ~ z, A ~ Z, or blank) We, Acer Incorporated, hereby declare under our sole responsibility that the product described above is in conformity with...
...2019 Date ix CE Declaration of Conformity Acer Incorporated 8F, 88, Sec. 1, Xintai 5th Rd., Xizhi New Taipei City 221, Taiwan Declaration of Conformity We, Acer Incorporated 8F, 88, Sec. 1, Xintai 5th Rd., Xizhi, New Taipei City 221, Taiwan And, Acer Italy s.r.l Via Lepetit, 40, 20020...MI) Italy Tel: +39-02-939-921 ,Fax: +39-02 9399-2913 www.acer.it Product: Trade Name: Model Number: SKU Number: LCD Monitor Acer PM161Q PM161Q xxxxxx; ("x" = 0~9, a ~ z, A ~ Z, or blank) We, Acer Incorporated, hereby declare under our sole responsibility that the product described above is in conformity with...
User Manual
Page 10
... device may not cause harmful interference, and (2) this declaration: Product: LCD Monitor Model Number: PM161Q SKU Number: PM161Q xxxxxx; ("x" = 0~9, a ~ z, A ~ Z or Blank) Name of Responsible Party: Acer America Corporation Address of the FCC Rules. S. Tel : 254-298-4000 Fax : 254-298-4147 www.acer.com Federal Communications Commission Declaration of Conformity This device complies with Part...
... device may not cause harmful interference, and (2) this declaration: Product: LCD Monitor Model Number: PM161Q SKU Number: PM161Q xxxxxx; ("x" = 0~9, a ~ z, A ~ Z or Blank) Name of Responsible Party: Acer America Corporation Address of the FCC Rules. S. Tel : 254-298-4000 Fax : 254-298-4147 www.acer.com Federal Communications Commission Declaration of Conformity This device complies with Part...
User Manual
Page 11
... Information for your safety and comfort iii Safety instructions iii Cleaning your monitor iii Connecting/disconnecting the device iii Accessibility iii Safe listening iv Warnings iv Using electrical power iv Product ... pixel statement vi Tips and information for comfortable use vii CE Declaration of Conformity ix Federal Communications Commission Declaration of Conformity x Unpacking 1 Attaching the monitor to the base 2 Power saving 3 Display Data Channel (DDC) 3 Connector pin assignment 4 Standard timing table 5 Installation 6 User controls 7 ...
... Information for your safety and comfort iii Safety instructions iii Cleaning your monitor iii Connecting/disconnecting the device iii Accessibility iii Safe listening iv Warnings iv Using electrical power iv Product ... pixel statement vi Tips and information for comfortable use vii CE Declaration of Conformity ix Federal Communications Commission Declaration of Conformity x Unpacking 1 Attaching the monitor to the base 2 Power saving 3 Display Data Channel (DDC) 3 Connector pin assignment 4 Standard timing table 5 Installation 6 User controls 7 ...
User Manual
Page 12
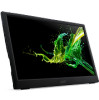
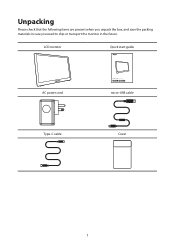
Unpacking Please check that the following items are present when you unpack the box, and save the packing materials in case you need to ship or transport the monitor in the future. LCD monitor Quick start guide AC power cord LCD monitor PM1 Series-PM161Q USER GUIDE micro-USB cable Type-C cable Cover 1
Unpacking Please check that the following items are present when you unpack the box, and save the packing materials in case you need to ship or transport the monitor in the future. LCD monitor Quick start guide AC power cord LCD monitor PM1 Series-PM161Q USER GUIDE micro-USB cable Type-C cable Cover 1
User Manual
Page 13
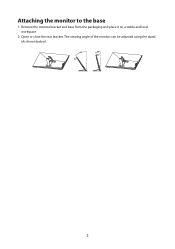
Remove the monitor bracket and base from the packaging and place it on a stable and level workspace. 2. The viewing angle of the monitor can be adjusted using the stand. (As shown below) 2 Open or close the rear bracket. Attaching the monitor to the base 1.
Remove the monitor bracket and base from the packaging and place it on a stable and level workspace. 2. The viewing angle of the monitor can be adjusted using the stand. (As shown below) 2 Open or close the rear bracket. Attaching the monitor to the base 1.
User Manual
Page 14
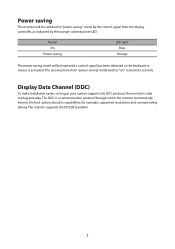
The recovery time from the display controller, as your system supports the DDC protocol, the monitor is activated. The monitor supports the DDC2B standard. 3 The DDC is around 3 seconds. Power saving The monitor will be switched to "power saving" mode by the orange-colored power LED. for example, supported resolutions and corresponding timing. Model...) To make installation easier, so long as indicated by the control signal from "power saving" mode back to "on" is a communication protocol through which the monitor automatically informs the host system about its capabilities;
The recovery time from the display controller, as your system supports the DDC protocol, the monitor is activated. The monitor supports the DDC2B standard. 3 The DDC is around 3 seconds. Power saving The monitor will be switched to "power saving" mode by the orange-colored power LED. for example, supported resolutions and corresponding timing. Model...) To make installation easier, so long as indicated by the control signal from "power saving" mode back to "on" is a communication protocol through which the monitor automatically informs the host system about its capabilities;
User Manual
Page 17
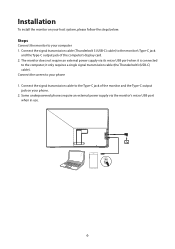
...only requires a single signal transmission cable (the Thunderbolt3 (USB-C) cable). The monitor does not require an external power supply via the monitor's micro USB port when in use. 6 it is connected to the Type-C jack of the monitor and the Type-C output jack on your host system, please follow the steps... below: Steps Connect the monitor to the monitor's Type-C jack and the Type-C output jack of the computer's display card. 2. Connect the ...
...only requires a single signal transmission cable (the Thunderbolt3 (USB-C) cable). The monitor does not require an external power supply via the monitor's micro USB port when in use. 6 it is connected to the Type-C jack of the monitor and the Type-C output jack on your host system, please follow the steps... below: Steps Connect the monitor to the monitor's Type-C jack and the Type-C output jack of the computer's display card. 2. Connect the ...
User Manual
Page 18
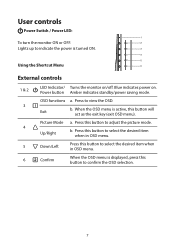
... the OSD. 3 Exit b. Power button Amber indicates standby/power saving mode. Blue indicates power on /off. User controls Power Switch / Power LED: 1 To turn the monitor ON or OFF. 2 Lights up to adjust the picture mode. 4 Up/Right b. When the OSD menu is turned ON. 3 4 5 Using the Shortcut Menu 6 External controls...
... the OSD. 3 Exit b. Power button Amber indicates standby/power saving mode. Blue indicates power on /off. User controls Power Switch / Power LED: 1 To turn the monitor ON or OFF. 2 Lights up to adjust the picture mode. 4 Up/Right b. When the OSD menu is turned ON. 3 4 5 Using the Shortcut Menu 6 External controls...

User Manual
Page 19
... OSD. "50" have no effect for adjusting the settings of difference between light and dark shades. 7. The OSD can be used to confirm your LCD Monitor. Press the key to bring up the OSD. 2. Press the key to open the OSD. Press the key to adjust the current Brightness, Contrast, Sharpness...
... OSD. "50" have no effect for adjusting the settings of difference between light and dark shades. 7. The OSD can be used to confirm your LCD Monitor. Press the key to bring up the OSD. 2. Press the key to open the OSD. Press the key to adjust the current Brightness, Contrast, Sharpness...
User Manual
Page 22
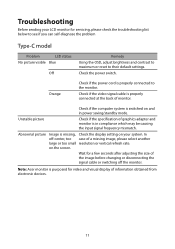
... the image before changing or disconnecting the signal cable or switching off the monitor. on your LCD monitor for video and visual display of graphics adapter and monitor is properly connected at the back of monitor. Wait for a few seconds after adjusting the size of a missing image... devices. 11 Troubleshooting Before sending your system. Abnormal picture Image is missing, Check the display setting on the screen. Note: Acer monitor is purposed for servicing, please check the troubleshooting list below to see if you can self-diagnose the problem Type-C model Problem...
... the image before changing or disconnecting the signal cable or switching off the monitor. on your LCD monitor for video and visual display of graphics adapter and monitor is properly connected at the back of monitor. Wait for a few seconds after adjusting the size of a missing image... devices. 11 Troubleshooting Before sending your system. Abnormal picture Image is missing, Check the display setting on the screen. Note: Acer monitor is purposed for servicing, please check the troubleshooting list below to see if you can self-diagnose the problem Type-C model Problem...


