

Service Guide
Page 14
Power Coard Upgrading Procedure 1. Connect Download Cable to projector 2. Setup Tool / Equipment 1. Computer 2. USB Cable (see right picture) 3. Open burning programma (DLP Composer Lite) Chapter 2 8 Chapter 2 Firmware Upgrade This chapter provides the equipment needed, setup and upgrading procedure for Firmware upgrade.
Power Coard Upgrading Procedure 1. Connect Download Cable to projector 2. Setup Tool / Equipment 1. Computer 2. USB Cable (see right picture) 3. Open burning programma (DLP Composer Lite) Chapter 2 8 Chapter 2 Firmware Upgrade This chapter provides the equipment needed, setup and upgrading procedure for Firmware upgrade.
Service Guide
Page 15
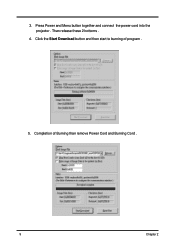
Than release these 2 bottoms . 4. Press Power and Menu button together and connect the power cord into the projector . Click the Start Download button and then start to burning of Burning than remove Power Cord and Burning Cord . 9 Chapter 2 Completion of program . 5. 3.
Than release these 2 bottoms . 4. Press Power and Menu button together and connect the power cord into the projector . Click the Start Download button and then start to burning of Burning than remove Power Cord and Burning Cord . 9 Chapter 2 Completion of program . 5. 3.
Service Guide
Page 16
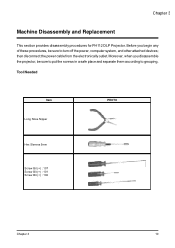
Tool Needed Item Long Nose Nipper Hex Sleeves 5mm Screw Bit (+) : 107 Screw Bit (+) : 101 Screw Bit (+) : 102 PHOTO Chapter 3 10 Before you disassemble the projector, be sure to grouping. Chapter 3 Machine Disassembly and Replacement This section provides disassembly procedures for PH112 DLP Projector. then disconnect the power cable from the electronically outlet. Moreover, when you begin any of these procedures, be sure to put the screws in a safe place and separate them according to turn off the power, computer system, and other attached devices;
Tool Needed Item Long Nose Nipper Hex Sleeves 5mm Screw Bit (+) : 107 Screw Bit (+) : 101 Screw Bit (+) : 102 PHOTO Chapter 3 10 Before you disassemble the projector, be sure to grouping. Chapter 3 Machine Disassembly and Replacement This section provides disassembly procedures for PH112 DLP Projector. then disconnect the power cable from the electronically outlet. Moreover, when you begin any of these procedures, be sure to put the screws in a safe place and separate them according to turn off the power, computer system, and other attached devices;
Service Guide
Page 18
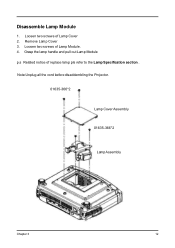
Loosen two screws of Lamp Module . 4. Note:Unplug all the cord before disaddembling the Projector. 01635-366*2 Lamp Cover Assembly 01635-366*2 Lam p Assem bly Chapter 3 12 Loosen two screws of Lamp Cover 2. Grasp the lamp handle and pull out Lamp Module p.s Related notice of replace lamp pls refer to the Lamp Specification section . Remove Lamp Cover 3. Disassemble Lamp Module 1.
Loosen two screws of Lamp Module . 4. Note:Unplug all the cord before disaddembling the Projector. 01635-366*2 Lamp Cover Assembly 01635-366*2 Lam p Assem bly Chapter 3 12 Loosen two screws of Lamp Cover 2. Grasp the lamp handle and pull out Lamp Module p.s Related notice of replace lamp pls refer to the Lamp Specification section . Remove Lamp Cover 3. Disassemble Lamp Module 1.
Service Guide
Page 43
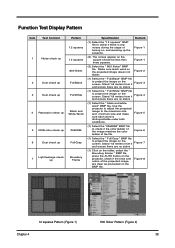
...Content 1 Noise check up 2 Dust check up 3 Dust check up 4 Resolution check up 5 RGB color check up 6 Dust check up 7 Light leakage check up the projector. Make sure teach word on the square should be less than three squares. Figure 3 (1) Select the " Full White" BMP file to project the image on... BMP file to the maximum size and minimum size and make sure each word is any noises during the stage of the file. Use the projector to adjust the projected image to project the image on the screen .Stand 1.8 meters from it and ensure there are clear as presented on ...
...Content 1 Noise check up 2 Dust check up 3 Dust check up 4 Resolution check up 5 RGB color check up 6 Dust check up 7 Light leakage check up the projector. Make sure teach word on the square should be less than three squares. Figure 3 (1) Select the " Full White" BMP file to project the image on... BMP file to the maximum size and minimum size and make sure each word is any noises during the stage of the file. Use the projector to adjust the projected image to project the image on the screen .Stand 1.8 meters from it and ensure there are clear as presented on ...


