
User Manual (3D)
Page 1
Acer Projectors with 3D Technology Quick Guide
Acer Projectors with 3D Technology Quick Guide

User Manual (3D)
Page 2
Acer Projector Series Quick Guide Original Issue: 10/2014 Model number Serial number Date of purchase Place of purchase © 2014 All Rights Reserved.
Acer Projector Series Quick Guide Original Issue: 10/2014 Model number Serial number Date of purchase Place of purchase © 2014 All Rights Reserved.

User Manual (3D)
Page 3
...support 96Hz, 100Hz, 120Hz sync signal. If you have connected your projector to turn them on . If you have connected your glasses for 24P contents. (1080P, 24Hz) In many cases, there is enabled. Acer projectors need to view 3D content, you have bought has integrated DLP technology.... English 3 The Acer projector you should turn it off after a few minutes of the arms that you will be ...
...support 96Hz, 100Hz, 120Hz sync signal. If you have connected your projector to turn them on . If you have connected your glasses for 24P contents. (1080P, 24Hz) In many cases, there is enabled. Acer projectors need to view 3D content, you have bought has integrated DLP technology.... English 3 The Acer projector you should turn it off after a few minutes of the arms that you will be ...

User Manual (3D)
Page 4
... over an HDMI 1.4a or later connection is not supported on most of the window. To download software and use an NVIDIA 3DTV Play ready projector with DLP glasses, refer to your graphics card. Note: You may need to purchase additional software. 4 Ensure you will need to do the following. 1...NVIDIA 3DTV Play technology Requires DLP 3D glasses. Others, please set automatically. 2 Press the menu button on the projector remote control to 100/120 Hz on the left-hand side of LED projectors. Note: Blu-ray 3D content over an HDMI 1.4a or later connection, this will need to your graphics card...
... over an HDMI 1.4a or later connection is not supported on most of the window. To download software and use an NVIDIA 3DTV Play ready projector with DLP glasses, refer to your graphics card. Note: You may need to purchase additional software. 4 Ensure you will need to do the following. 1...NVIDIA 3DTV Play technology Requires DLP 3D glasses. Others, please set automatically. 2 Press the menu button on the projector remote control to 100/120 Hz on the left-hand side of LED projectors. Note: Blu-ray 3D content over an HDMI 1.4a or later connection, this will need to your graphics card...

User Manual (3D)
Page 5
... different 3D mode, convergence and depth setting. 6 3D Format shows while no enough info, please choose suitable one for HDMI 1.4 or 2nd generation 3D projectors. 2. English 5 3 Set 3D to On. 4 Alternatively, press the 3D Key on some specific models. 4. Design and functions are subject to 3D ...display. The "Frame Packing" is only available for correct 3D displaying. "2D to 3D" is only available on your projector's remote control. From the 3D options, select On. 5 2D to 3D supports most of 2D contents convert to model's specifications and change ...
... different 3D mode, convergence and depth setting. 6 3D Format shows while no enough info, please choose suitable one for HDMI 1.4 or 2nd generation 3D projectors. 2. English 5 3 Set 3D to On. 4 Alternatively, press the 3D Key on some specific models. 4. Design and functions are subject to 3D ...display. The "Frame Packing" is only available for correct 3D displaying. "2D to 3D" is only available on your projector's remote control. From the 3D options, select On. 5 2D to 3D supports most of 2D contents convert to model's specifications and change ...
User Manual (3D)
Page 6
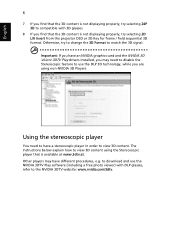
... content is not displaying properly, try selecting 24P 3D to view 3D content using non-NVIDIA 3D Players. Otherwise, try selecting 3D L/R Invert from the projector OSD or 3D Key for frame / field sequential 3D format.
... content is not displaying properly, try selecting 24P 3D to view 3D content using non-NVIDIA 3D Players. Otherwise, try selecting 3D L/R Invert from the projector OSD or 3D Key for frame / field sequential 3D format.

User Manual (3D)
Page 7
... player that 3D options are on and the video uses 24p before turning on pages 4-6. Note: If your projector. To enable and adjust 3D function, follow the procedures in order to the projector using your DVD or Blu-ray player to get the 3D effects. Older connections should check the resolution is... 480i or 576i. English 7 1 Open the stereoscopic player and set to View > Viewing Method > Software pageflipping. 2 Open the 3D content in the player. Connect your Acer 3D-enabled projector.
... player that 3D options are on and the video uses 24p before turning on pages 4-6. Note: If your projector. To enable and adjust 3D function, follow the procedures in order to the projector using your DVD or Blu-ray player to get the 3D effects. Older connections should check the resolution is... 480i or 576i. English 7 1 Open the stereoscopic player and set to View > Viewing Method > Software pageflipping. 2 Open the 3D content in the player. Connect your Acer 3D-enabled projector.
User Manual
Page 2
...™, the HDMI logo and High-Definition Multimedia Interface are registered trademarks of Acer Incorporated. Acer Projector User's Guide Original Issue: 01/2016 Changes may be incorporated in the space provided below. Record the model number, serial..., in this manual or supplementary documents and publications. Model number Serial number Date of purchase Place of purchase Acer and the Acer logo are trademarks or registered trademarks of Acer Incorporated. The serial number and model number are used herein for a particular purpose. No part of such revisions...
...™, the HDMI logo and High-Definition Multimedia Interface are registered trademarks of Acer Incorporated. Acer Projector User's Guide Original Issue: 01/2016 Changes may be incorporated in the space provided below. Record the model number, serial..., in this manual or supplementary documents and publications. Model number Serial number Date of purchase Place of purchase Acer and the Acer logo are trademarks or registered trademarks of Acer Incorporated. The serial number and model number are used herein for a particular purpose. No part of such revisions...

User Manual
Page 3
.... Never spill liquid of the product and to the AC power outlet. • Unplug the power cord before removing the power supply unit from the projector. • If the system has multiple sources of any kind onto or into is provided. • Never push objects of power, disconnect power from the...
.... Never spill liquid of the product and to the AC power outlet. • Unplug the power cord before removing the power supply unit from the projector. • If the system has multiple sources of any kind onto or into is provided. • Never push objects of power, disconnect power from the...

User Manual
Page 5
... servicing to normal condition. v Product servicing Do not attempt to service this product from walls and free flow of air around the projector is poorly ventilated or confined. Refer all windows rolled up. • Locations where excessive humidity, dust, or cigarette smoke may contaminate... the operating instructions Note: Adjust only those controls that is necessary. • Locations where temperatures may contain small parts. It Consult your projector. Unplug this product yourself, as inside of a car with your eyes. • Turn on . Do not operate if smoke, strange...
... servicing to normal condition. v Product servicing Do not attempt to service this product from walls and free flow of air around the projector is poorly ventilated or confined. Refer all windows rolled up. • Locations where excessive humidity, dust, or cigarette smoke may contaminate... the operating instructions Note: Adjust only those controls that is necessary. • Locations where temperatures may contain small parts. It Consult your projector. Unplug this product yourself, as inside of a car with your eyes. • Turn on . Do not operate if smoke, strange...

User Manual
Page 6
...contact your dealer for ceiling mount installation. It may rise and cause damage when the filter/ventilation slots clogged with any electronic components unless the projector is showing warning message. • When changing the lamp, please allow unit to cool down, and follow all changing instructions. •...lamp module. • Do not attempt to the sun. The best way is to wait for mounting the projector and ensure it is under operation as this projector. Only use acer ceiling mount kit for the fan to break on the remote control. • The lamp becomes extremely hot...
...contact your dealer for ceiling mount installation. It may rise and cause damage when the filter/ventilation slots clogged with any electronic components unless the projector is showing warning message. • When changing the lamp, please allow unit to cool down, and follow all changing instructions. •...lamp module. • Do not attempt to the sun. The best way is to wait for mounting the projector and ensure it is under operation as this projector. Only use acer ceiling mount kit for the fan to break on the remote control. • The lamp becomes extremely hot...
User Manual
Page 7
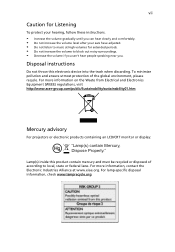
... music at www.eiae.org. For more information on the Waste from Electrical and Electronics Equipment (WEEE) regulations, visit http://www.acer-group.com/public/Sustainability/sustainability01.htm Mercury advisory For projectors or electronic products containing an LCD/CRT monitor or display: "Lamp(s) contain Mercury, Dispose Properly." To minimize pollution and ensure...
... music at www.eiae.org. For more information on the Waste from Electrical and Electronics Equipment (WEEE) regulations, visit http://www.acer-group.com/public/Sustainability/sustainability01.htm Mercury advisory For projectors or electronic products containing an LCD/CRT monitor or display: "Lamp(s) contain Mercury, Dispose Properly." To minimize pollution and ensure...

User Manual
Page 8
.... • Disconnect the power plug from the Onscreen display "Management" menu after replacing the lamp module. • When switching the projector off, please ensure the projector completes its life, it shows warning messages. • Reset the "Lamp Hour Reset" function from AC outlet if the product is ...in this happens, the projector will not turn back on the unit provided for a long period of the lamp itself. To replace the lamp, follow all warnings, precautions ...
.... • Disconnect the power plug from the Onscreen display "Management" menu after replacing the lamp module. • When switching the projector off, please ensure the projector completes its life, it shows warning messages. • Reset the "Lamp Hour Reset" function from AC outlet if the product is ...in this happens, the projector will not turn back on the unit provided for a long period of the lamp itself. To replace the lamp, follow all warnings, precautions ...

User Manual
Page 9
... 3 Control Panel 5 Remote Control Layout 6 MHL (Mobile High-Definition Link) Control 8 Getting Started 10 Connecting the Projector 10 Turning the Projector On/Off 12 Turning on the Projector 12 Turning the projector off 13 Adjusting the Projected Image 14 Adjusting the Height of Projected Image 14 How to optimize image size and distance 15...
... 3 Control Panel 5 Remote Control Layout 6 MHL (Mobile High-Definition Link) Control 8 Getting Started 10 Connecting the Projector 10 Turning the Projector On/Off 12 Turning on the Projector 12 Turning the projector off 13 Adjusting the Projected Image 14 Adjusting the Height of Projected Image 14 How to optimize image size and distance 15...
User Manual
Page 11
...AS328 series: True 800x600 SVGA resolution P1286/M315/PE-X44/F14X/AX328 series: Native 1024x768 XGA resolution P1386W/M325/PE-W44/F14W/AW328 series: True 1280x800 WXGA resolution Full/4:3/16:9/L.Box aspect ratio supported &#...480i/p, 576i/p, 720p, 1080i/p) supported • Lower power consumption and economy (ECO) mode extend lamp life • Acer EcoProjeciton Technology delivers Intelligent power management approach and physical efficiency improvement • Equipped with HDMI™ & MHL connection supporting...Introduction Product Features This product is a single-chip DLP® projector.
...AS328 series: True 800x600 SVGA resolution P1286/M315/PE-X44/F14X/AX328 series: Native 1024x768 XGA resolution P1386W/M325/PE-W44/F14W/AW328 series: True 1280x800 WXGA resolution Full/4:3/16:9/L.Box aspect ratio supported &#...480i/p, 576i/p, 720p, 1080i/p) supported • Lower power consumption and economy (ECO) mode extend lamp life • Acer EcoProjeciton Technology delivers Intelligent power management approach and physical efficiency improvement • Equipped with HDMI™ & MHL connection supporting...Introduction Product Features This product is a single-chip DLP® projector.

User Manual
Page 12
English Projector Power cord VGA cable Security card User's guide Quick start guide Carrying case (option) Dust filters (option) Remote control 2 x Batteries (option) Contact your unit is missing. Check to make sure your dealer immediately if any thing is complete. 2 Package Overview This projector comes with all the items shown below.
English Projector Power cord VGA cable Security card User's guide Quick start guide Carrying case (option) Dust filters (option) Remote control 2 x Batteries (option) Contact your unit is missing. Check to make sure your dealer immediately if any thing is complete. 2 Package Overview This projector comes with all the items shown below.

User Manual
Page 13
English 3 Projector Overview Projector Outlook Front / upper side 1 2 34 5 6 7 8 # Description 1 Air outlet 2 Focus ring 3 Zoom ring 4 Remote control receiver 5 Power button 6 Control panel 11 10 9 # Description 7 Lamp cover 8 Lens cap 9 Projection lens 10 Tilt adjusting wheels 11 Air inlet
English 3 Projector Overview Projector Outlook Front / upper side 1 2 34 5 6 7 8 # Description 1 Air outlet 2 Focus ring 3 Zoom ring 4 Remote control receiver 5 Power button 6 Control panel 11 10 9 # Description 7 Lamp cover 8 Lens cap 9 Projection lens 10 Tilt adjusting wheels 11 Air inlet

User Manual
Page 15
... POWER POWER 2 LAMP LAMP 3 TEMP TEMP 4 POWER Description Power Indicator LED Lamp Indicator LED Temp Indicator LED See the contents in "Turning the Projector On/Off" section. 5 Four directional select Use to select items or make keys adjustments to your selection. 6 BACK BACK Returns to the previous ... the active source. 8 ENTER ENTER Confirm your selection of items. 9 Keystone Adjusts the image to compensate for distortion caused by tilting the projector. 10 MENU MENU Press "MENU" to launch the Onscreen display (OSD) menu, back to the previous step for the OSD menu operation ...
... POWER POWER 2 LAMP LAMP 3 TEMP TEMP 4 POWER Description Power Indicator LED Lamp Indicator LED Temp Indicator LED See the contents in "Turning the Projector On/Off" section. 5 Four directional select Use to select items or make keys adjustments to your selection. 6 BACK BACK Returns to the previous ... the active source. 8 ENTER ENTER Confirm your selection of items. 9 Keystone Adjusts the image to compensate for distortion caused by tilting the projector. 10 MENU MENU Press "MENU" to launch the Onscreen display (OSD) menu, back to the previous step for the OSD menu operation ...

User Manual
Page 16
...24 25 Model No:J-25010 MC.JMV11.006 MC.JMV11.005 # Icon Function Description 1 Infrared transmitter Sends signals to the projector. 2 POWER Refer to the "Turning the Projector On/Off" section. 3 MUTE To turn on/off the volume. 4 RATIO To choose the desired aspect ratio. 5... display mode from Bright, Presentation, Standard, Video and User. 10 KEYSTONE Adjusts the image to compensate for distortion caused by tilting the projector. 11 BACK STOP Returns to stop playback. Press to the previous operation. This 12 VGA connector supports analog RGB, YPbPr (480p/576p...
...24 25 Model No:J-25010 MC.JMV11.006 MC.JMV11.005 # Icon Function Description 1 Infrared transmitter Sends signals to the projector. 2 POWER Refer to the "Turning the Projector On/Off" section. 3 MUTE To turn on/off the volume. 4 RATIO To choose the desired aspect ratio. 5... display mode from Bright, Presentation, Standard, Video and User. 10 KEYSTONE Adjusts the image to compensate for distortion caused by tilting the projector. 11 BACK STOP Returns to stop playback. Press to the previous operation. This 12 VGA connector supports analog RGB, YPbPr (480p/576p...

User Manual
Page 17
... To change source to "WiFi." Note: Functions vary depending on model definition. Use this button to COMPOSITE VIDEO. 24 ZOOM OUT Zooms the projector display out. This function is only available when USB Ctrl connector (mini type B) is connected to a computer via a USB cable. 15 COMPONENT... No function. For computer mode only. Only 25 LAN/WiFi available while Acer WirelessCAST (MWA3) is connected to select the 16 PgDn next page. Use this button to HDMI/MHL. 21 HIDE Momentarily turns off the video...
... To change source to "WiFi." Note: Functions vary depending on model definition. Use this button to COMPOSITE VIDEO. 24 ZOOM OUT Zooms the projector display out. This function is only available when USB Ctrl connector (mini type B) is connected to a computer via a USB cable. 15 COMPONENT... No function. For computer mode only. Only 25 LAN/WiFi available while Acer WirelessCAST (MWA3) is connected to select the 16 PgDn next page. Use this button to HDMI/MHL. 21 HIDE Momentarily turns off the video...


