
User Manual (3D)
Page 3
... you can view 3D content, you need 3D glasses to support 144Hz sync signal for instructions how to turn off , otherwise the image may not be shown a reminder that came with your projector to a computer, please read "Watching 3D DVD or Blu-ray content" on page 7. Note: Suggest to use Acer DLP 3D glasses to the documentation that 3D is a power switch on...
... you can view 3D content, you need 3D glasses to support 144Hz sync signal for instructions how to turn off , otherwise the image may not be shown a reminder that came with your projector to a computer, please read "Watching 3D DVD or Blu-ray content" on page 7. Note: Suggest to use Acer DLP 3D glasses to the documentation that 3D is a power switch on...

User Manual (3D)
Page 4
... DLP glasses, refer to open the OSD. Select the 3D section (the sixth menu option) on the left-hand side of the DLP 3D technology, you will need to purchase additional software. 4 Ensure you have installed the drivers, you have the correct DLP-compatible 3D glasses. Setting up a 3D environment Once you will be set automatically. 2 Press the menu button on the projector remote control...
... DLP glasses, refer to open the OSD. Select the 3D section (the sixth menu option) on the left-hand side of the DLP 3D technology, you will need to purchase additional software. 4 Ensure you have installed the drivers, you have the correct DLP-compatible 3D glasses. Setting up a 3D environment Once you will be set automatically. 2 Press the menu button on the projector remote control...

User Manual (3D)
Page 7
...-ray player supports 3D over HDMI 1.4a, check that supports 3D playback, you have a DVD or Blu-ray player that 3D options are on and the video uses 24p before turning on pages 4-6. Note: You need to view content at fullscreen resolution in order to 480i or 576i. Connect your DVD or Blu-ray player to View > Viewing Method > Software pageflipping. 2 Open the 3D...
...-ray player supports 3D over HDMI 1.4a, check that supports 3D playback, you have a DVD or Blu-ray player that 3D options are on and the video uses 24p before turning on pages 4-6. Note: You need to view content at fullscreen resolution in order to 480i or 576i. Connect your DVD or Blu-ray player to View > Viewing Method > Software pageflipping. 2 Open the 3D...

User Manual
Page 5
... projector's lens when the lamp is on the projector first and then signal sources • Do not place the product in following the operating instructions Note: Adjust only those controls that is poorly ventilated or confined. v Product servicing Do not attempt to service this product from walls and free flow of air around the projector is necessary. • Locations where temperatures may become excessively high, such as opening or removing covers...
... projector's lens when the lamp is on the projector first and then signal sources • Do not place the product in following the operating instructions Note: Adjust only those controls that is poorly ventilated or confined. v Product servicing Do not attempt to service this product from walls and free flow of air around the projector is necessary. • Locations where temperatures may become excessively high, such as opening or removing covers...

User Manual
Page 6
.... • Clean the air filter frequently if have. The only user serviceable part is under operation as this product to ensure the projector completes its own removable cover. Only use acer ceiling mount kit for approximately 45 minutes prior to turn off , suggest to break or drop it. It may hurt you. Please be sure to change the lamp when is showing warning message. • When changing the lamp, please allow...
.... • Clean the air filter frequently if have. The only user serviceable part is under operation as this product to ensure the projector completes its own removable cover. Only use acer ceiling mount kit for approximately 45 minutes prior to turn off , suggest to break or drop it. It may hurt you. Please be sure to change the lamp when is showing warning message. • When changing the lamp, please allow...

User Manual
Page 8
... the signal sources. • Do not use lens cap when projector is in operation. • When the lamp reaches the end of its life, it shows warning messages. • Reset the "Lamp Hour Reset" function from AC outlet if the product is not being used for ventilation. • Use abrasive cleaners, waxes or solvents to clean the unit. • Use under "Replacing the Lamp". Please be sure to change the lamp when...
... the signal sources. • Do not use lens cap when projector is in operation. • When the lamp reaches the end of its life, it shows warning messages. • Reset the "Lamp Hour Reset" function from AC outlet if the product is not being used for ventilation. • Use abrasive cleaners, waxes or solvents to clean the unit. • Use under "Replacing the Lamp". Please be sure to change the lamp when...
User Manual
Page 11
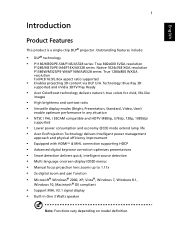
... (ECO) mode extend lamp life • Acer EcoProjeciton Technology delivers Intelligent power management approach and physical efficiency improvement • Equipped with HDMI™ & MHL connection supporting HDCP • Advanced digital keystone correction optimizes presentations • Smart detection delivers quick, intelligent source detection • Multi-language onscreen display (OSD) menus • Manual focus projection lens zooms up to 1.11x • 2x digital zoom and pan function • Microsoft® Windows®...
... (ECO) mode extend lamp life • Acer EcoProjeciton Technology delivers Intelligent power management approach and physical efficiency improvement • Equipped with HDMI™ & MHL connection supporting HDCP • Advanced digital keystone correction optimizes presentations • Smart detection delivers quick, intelligent source detection • Multi-language onscreen display (OSD) menus • Manual focus projection lens zooms up to 1.11x • 2x digital zoom and pan function • Microsoft® Windows®...

User Manual
Page 15
5 Control Panel 1 2 3 English 4 7 8 5 9 6 10 # Icon Function 1 POWER POWER 2 LAMP LAMP 3 TEMP TEMP 4 POWER Description Power Indicator LED Lamp Indicator LED Temp Indicator LED See the contents in "Turning the Projector On/Off" section. 5 Four directional select Use to select items or make keys adjustments to your selection. 6 BACK BACK Returns to the previous operation. 7 SOURCE SOURCE Changes the active source. 8 ENTER ENTER Confirm your selection of items. 9 Keystone Adjusts the image to compensate for distortion caused by tilting the projector. 10 MENU MENU ...
5 Control Panel 1 2 3 English 4 7 8 5 9 6 10 # Icon Function 1 POWER POWER 2 LAMP LAMP 3 TEMP TEMP 4 POWER Description Power Indicator LED Lamp Indicator LED Temp Indicator LED See the contents in "Turning the Projector On/Off" section. 5 Four directional select Use to select items or make keys adjustments to your selection. 6 BACK BACK Returns to the previous operation. 7 SOURCE SOURCE Changes the active source. 8 ENTER ENTER Confirm your selection of items. 9 Keystone Adjusts the image to compensate for distortion caused by tilting the projector. 10 MENU MENU ...

User Manual
Page 16
... playback. 6 Four directional select keys Use up, down, left, right buttons to select items or make adjustments to your selection. 7 3D Press "3D" to select 3D models. 8 SOURCE Changes the active source. 9 MODE Press "MODE" to select the display mode from Bright, Presentation, Standard, Video and User. 10 KEYSTONE Adjusts the image to compensate for distortion caused by tilting the projector. 11 BACK STOP Returns to the...
... playback. 6 Four directional select keys Use up, down, left, right buttons to select items or make adjustments to your selection. 7 3D Press "3D" to select 3D models. 8 SOURCE Changes the active source. 9 MODE Press "MODE" to select the display mode from Bright, Presentation, Standard, Video and User. 10 KEYSTONE Adjusts the image to compensate for distortion caused by tilting the projector. 11 BACK STOP Returns to the...

User Manual
Page 17
... Laser button Aim the remote at the viewing screen, press and hold this button to HDMI/MHL. 21 HIDE Momentarily turns off the video. Note: Functions vary depending on model definition. Press "LAN/WiFi" to change source to select the 14 PgUp previous page. For computer mode only. Use this button to "WiFi." Press "HIDE" to hide the image, press again to display the image. 22 ZOOM IN Zooms the projector display...
... Laser button Aim the remote at the viewing screen, press and hold this button to HDMI/MHL. 21 HIDE Momentarily turns off the video. Note: Functions vary depending on model definition. Press "LAN/WiFi" to change source to select the 14 PgUp previous page. For computer mode only. Use this button to "WiFi." Press "HIDE" to hide the image, press again to display the image. 22 ZOOM IN Zooms the projector display...
User Manual
Page 22
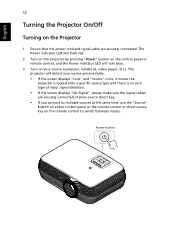
... that the power cord and signal cable are securely connected or press source direct key. • If you connect to multiple sources at the same time, use the "Source" button on either control panel or the remote control or direct source key on the remote control to switch between inputs. Power button The Power indicator LED will flash red. 2 Turn on the projector by pressing "Power" button on your source automatically. • If the screen displays "Lock" and "Source" icons, it means the projector is locked onto a specific source type and...
... that the power cord and signal cable are securely connected or press source direct key. • If you connect to multiple sources at the same time, use the "Source" button on either control panel or the remote control or direct source key on the remote control to switch between inputs. Power button The Power indicator LED will flash red. 2 Turn on the projector by pressing "Power" button on your source automatically. • If the screen displays "Lock" and "Source" icons, it means the projector is locked onto a specific source type and...
User Manual
Page 23
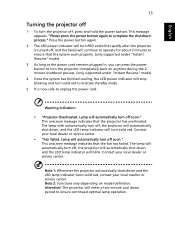
... the LED temp indicator will turn solid red. Lamp will automatically turn off , the projector will automatically shut down and the LED lamp indicator turns solid red, contact your local dealer or service center. • "Fan failed. The lamp will automatically turn off soon." Note 1: Whenever the projector automatically shuts down , and the LED temp indicator will blink. Contact your local dealer or service center. This message appears: "Please press the power button again to ensure continued optimal lamp operation...
... the LED temp indicator will turn solid red. Lamp will automatically turn off , the projector will automatically shut down and the LED lamp indicator turns solid red, contact your local dealer or service center. • "Fan failed. The lamp will automatically turn off soon." Note 1: Whenever the projector automatically shuts down , and the LED temp indicator will blink. Contact your local dealer or service center. This message appears: "Please press the power button again to ensure continued optimal lamp operation...
User Manual
Page 29
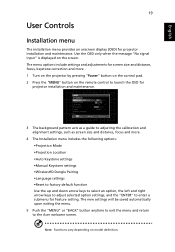
... the projector by pressing "Power" button on the control pad. 2 Press the "MENU" button on the remote control to launch the OSD for projector installation and maintenance. 3 The background pattern acts as a guide to adjusting the calibration and alignment settings, such as screen size and distance, focus and more . 4 The Installation menu includes the following options: •Projection Mode •Projection Location •Auto Keystone settings •Manual Keystone settings •WirelessHD Dongle Pairing •Language settings •Reset to factory default function Use...
... the projector by pressing "Power" button on the control pad. 2 Press the "MENU" button on the remote control to launch the OSD for projector installation and maintenance. 3 The background pattern acts as a guide to adjusting the calibration and alignment settings, such as screen size and distance, focus and more . 4 The Installation menu includes the following options: •Projection Mode •Projection Location •Auto Keystone settings •Manual Keystone settings •WirelessHD Dongle Pairing •Language settings •Reset to factory default function Use...

User Manual
Page 31
... the wall. Mode Use this function to choose a proper color according to increase the contrast. Note 2: Functions vary depending on model definition. G Gain Adjusts the green gain for color temperature optimization. Note 1: "Saturation" and "Tint" functions are several choices, including white, light yellow, light blue, pink, dark green. There are not supported under computer or HDMI mode. Adjusting the contrast changes the amount of black and white in the image. With...
... the wall. Mode Use this function to choose a proper color according to increase the contrast. Note 2: Functions vary depending on model definition. G Gain Adjusts the green gain for color temperature optimization. Note 1: "Saturation" and "Tint" functions are several choices, including white, light yellow, light blue, pink, dark green. There are not supported under computer or HDMI mode. Adjusting the contrast changes the amount of black and white in the image. With...
User Manual
Page 32
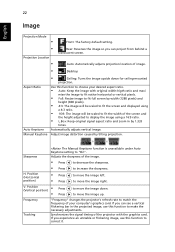
...: Keep original signal aspect ratio and zoom in the projected image, use this function to move the image up. Automatically adjusts vertical image. to increase the sharpness. H. V. Sharpness The Manual Keystone function is unavailable under Auto Keystone setting to correct it. English 22 Image Projection Mode • Front: The factory default setting. • Projection Location • Rear: Reverses the image so you can see a vertical flickering bar in by 1.333 times. Auto: Automatically adjusts projection location of the image. •...
...: Keep original signal aspect ratio and zoom in the projected image, use this function to move the image up. Automatically adjusts vertical image. to increase the sharpness. H. V. Sharpness The Manual Keystone function is unavailable under Auto Keystone setting to correct it. English 22 Image Projection Mode • Front: The factory default setting. • Projection Location • Rear: Reverses the image so you can see a vertical flickering bar in by 1.333 times. Auto: Automatically adjusts projection location of the image. •...

User Manual
Page 34
...; When the time is up, the projector will prompt the user to enter the password again. • The factory default setting of the projector . Both "User Password" and "Administrator Password" can turn off the captioning feature. Default is NTSC. If users want to use the "PgUp" or "PgDn" buttons, change the "Security" setting. English 24 Setting Source Lock Closed Caption DC 5V Out Reset Security When Source Lock is turned "Off", the projector will search for...
...; When the time is up, the projector will prompt the user to enter the password again. • The factory default setting of the projector . Both "User Password" and "Administrator Password" can turn off the captioning feature. Default is NTSC. If users want to use the "PgUp" or "PgDn" buttons, change the "Security" setting. English 24 Setting Source Lock Closed Caption DC 5V Out Reset Security When Source Lock is turned "Off", the projector will search for...
User Manual
Page 36
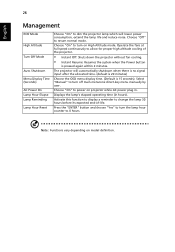
... system when the Power button is 15 seconds). The projector will lower power consumption, extend the lamp life and reduce noise. Displays the lamp's elapsed operating time (in . Press the "ENTER" button and choose "Yes" to allow for proper high altitude cooling of -life. Operate the fans at full speed continuously to turn off main menu/one direct-key menu manually by user. Select "Manual" to turn the lamp hour counter to turn on model definition. Note...
... system when the Power button is 15 seconds). The projector will lower power consumption, extend the lamp life and reduce noise. Displays the lamp's elapsed operating time (in . Press the "ENTER" button and choose "Yes" to allow for proper high altitude cooling of -life. Operate the fans at full speed continuously to turn off main menu/one direct-key menu manually by user. Select "Manual" to turn the lamp hour counter to turn on model definition. Note...

User Manual
Page 39
...", open the "Control Panel", and then double-click the "Display" icon. Windows 7/ • Select the "Settings" tab. Please refer to the "Replacing the Lamp" section. • Make sure you are bent or broken. • Check if the projector lamp has been securely installed. 29 Appendices English Troubleshooting If you need under the "Models" box. • Verify that the resolution setting of the connector pins are using and...
...", open the "Control Panel", and then double-click the "Display" icon. Windows 7/ • Select the "Settings" tab. Please refer to the "Replacing the Lamp" section. • Make sure you are bent or broken. • Check if the projector lamp has been securely installed. 29 Appendices English Troubleshooting If you need under the "Models" box. • Verify that the resolution setting of the connector pins are using and...
User Manual
Page 40
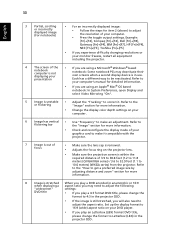
... with the projector. 7 Image is out of focus • Make sure the lens cap is removed. • Adjusts the focus ring on your DVD player. • If you are using a Microsoft® Windows® based notebook: Some notebook PCs may need to adjust the aspect ratio. Refer to flickering bar the "Image" section for more information. • Change the display color depth settings on the projector lens. •...
... with the projector. 7 Image is out of focus • Make sure the lens cap is removed. • Adjusts the focus ring on your DVD player. • If you are using a Microsoft® Windows® based notebook: Some notebook PCs may need to adjust the aspect ratio. Refer to flickering bar the "Image" section for more information. • Change the display color depth settings on the projector lens. •...

User Manual
Page 42
... operating temperature and must be allowed to cool down before reconnecting power. 2 Lamp burns out or makes a popping sound When the lamp reaches the end of its useful life, it will not turn off the projector, then to all controls unplug the power cord and wait at least 30 seconds before it soon. English 32 OSD Messages # Condition 1 Message Message Reminder • Fan Fail - Prepare to "Cleaning and replacing...
... operating temperature and must be allowed to cool down before reconnecting power. 2 Lamp burns out or makes a popping sound When the lamp reaches the end of its useful life, it will not turn off the projector, then to all controls unplug the power cord and wait at least 30 seconds before it soon. English 32 OSD Messages # Condition 1 Message Message Reminder • Fan Fail - Prepare to "Cleaning and replacing...


