User Manual
Page 5
... service this product from walls and free flow of air around the projector is necessary. • Locations where temperatures may become excessively high, such as opening or removing covers may expose you to normal condition. Consult your projector. Refer all windows rolled up. • Locations where excessive humidity, dust, or cigarette smoke may contaminate optical components, shortening the life span and darkening the image. • Locations...
... service this product from walls and free flow of air around the projector is necessary. • Locations where temperatures may become excessively high, such as opening or removing covers may expose you to normal condition. Consult your projector. Refer all windows rolled up. • Locations where excessive humidity, dust, or cigarette smoke may contaminate optical components, shortening the life span and darkening the image. • Locations...
User Manual
Page 6
... all changing instructions. • Reset the "Lamp Hour Reset" function from the Onscreen display "Management" menu after replacing the lamp module. • Do not attempt to disassemble this product to turn off before disconnecting power. • Do not frequently turn off the main power abruptly or unplug the projector during operation. Please be sure to change the lamp when is operating. The only user serviceable part is on the remote control. • The lamp becomes...
... all changing instructions. • Reset the "Lamp Hour Reset" function from the Onscreen display "Management" menu after replacing the lamp module. • Do not attempt to disassemble this product to turn off before disconnecting power. • Do not frequently turn off the main power abruptly or unplug the projector during operation. Please be sure to change the lamp when is operating. The only user serviceable part is on the remote control. • The lamp becomes...
User Manual
Page 8
... and maintenance as this happens, the projector will detect the life of time. To replace the lamp, follow all changing instructions. • This product will not turn back on until the lamp module has been replaced. Don't: • Block the slots and openings on . Please be sure to change the lamp when it shows warning messages. • Reset the "Lamp Hour Reset" function from AC outlet if the product...
... and maintenance as this happens, the projector will detect the life of time. To replace the lamp, follow all changing instructions. • This product will not turn back on until the lamp module has been replaced. Don't: • Block the slots and openings on . Please be sure to change the lamp when it shows warning messages. • Reset the "Lamp Hour Reset" function from AC outlet if the product...
User Manual
Page 11
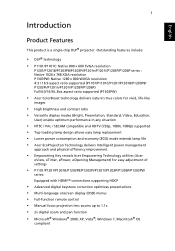
... utilities (Acer eView, eTimer, ePower, eOpening Management) for easy adjustment of settings • P1101/P1201/P1201B/P1203PB/P1203Pi/P1201i/P1203P/P1206P/P1303PW series: Equipped with HDMI™ connections supporting HDCP • Advanced digital keystone correction optimizes presentations • Multi-language onscreen display (OSD) menus • Full-function remote control • Manual focus projection lens zooms up to 1.1x • 2x digital zoom and pan function • Microsoft® Windows®...
... utilities (Acer eView, eTimer, ePower, eOpening Management) for easy adjustment of settings • P1101/P1201/P1201B/P1203PB/P1203Pi/P1201i/P1203P/P1206P/P1303PW series: Equipped with HDMI™ connections supporting HDCP • Advanced digital keystone correction optimizes presentations • Multi-language onscreen display (OSD) menus • Full-function remote control • Manual focus projection lens zooms up to 1.1x • 2x digital zoom and pan function • Microsoft® Windows®...
User Manual
Page 17
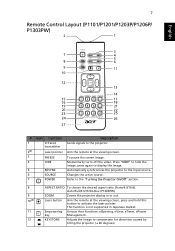
... the remote at the viewing screen, press and hold this button to the "Turning the Projector On/Off" section. 8 9 10(#) 11 12 ASPECT RATIO To choose the desired aspect ratio (Auto/4:3/16:9). This function is not supported in or out. Press "HIDE" to hide the image, press again to display the image. 5 RESYNC Automatically synchronizes the projector to the input source. 6 SOURCE Changes the active source. 7 POWER Refer...
... the remote at the viewing screen, press and hold this button to the "Turning the Projector On/Off" section. 8 9 10(#) 11 12 ASPECT RATIO To choose the desired aspect ratio (Auto/4:3/16:9). This function is not supported in or out. Press "HIDE" to hide the image, press again to display the image. 5 RESYNC Automatically synchronizes the projector to the input source. 6 SOURCE Changes the active source. 7 POWER Refer...
User Manual
Page 19
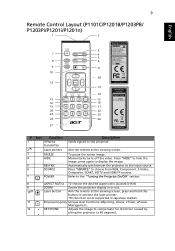
... function is not supported in or out. Press "SOURCE" to the "Turning the Projector On/Off" section. 8 9 10(#) 11 12 ASPECT RATIO To choose the desired aspect ratio (Auto/4:3/16:9) ZOOM Zooms the projector display in Japanese market. Refer to choose from RGB, Component, S-Video, Composite, SCART, HDTV and HDMI™ sources. Laser button Aim the remote at the viewing screen. 9 Remote Control Layout (P1101C/P1201B/P1203PB/ P1203Pi/P1201i...
... function is not supported in or out. Press "SOURCE" to the "Turning the Projector On/Off" section. 8 9 10(#) 11 12 ASPECT RATIO To choose the desired aspect ratio (Auto/4:3/16:9) ZOOM Zooms the projector display in Japanese market. Refer to choose from RGB, Component, S-Video, Composite, SCART, HDTV and HDMI™ sources. Laser button Aim the remote at the viewing screen. 9 Remote Control Layout (P1101C/P1201B/P1203PB/ P1203Pi/P1201i...
User Manual
Page 35
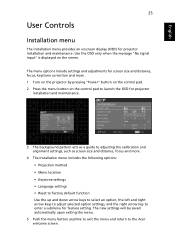
... Acer welcome screen. English 25 User Controls Installation menu The installation menu provides an onscreen display (OSD) for projector installation and maintenance. 3 The background pattern acts as a guide to adjusting the calibration and alignment settings, such as screen size and distance, focus and more . 1 Turn on the projector by pressing "Power" button on the control pad. 2 Press the menu button on the screen. The menu options include settings and adjustments for feature setting. Use the OSD only when the message "No signal input" is displayed...
... Acer welcome screen. English 25 User Controls Installation menu The installation menu provides an onscreen display (OSD) for projector installation and maintenance. 3 The background pattern acts as a guide to adjusting the calibration and alignment settings, such as screen size and distance, focus and more . 1 Turn on the projector by pressing "Power" button on the control pad. 2 Press the menu button on the screen. The menu options include settings and adjustments for feature setting. Use the OSD only when the message "No signal input" is displayed...
User Manual
Page 43
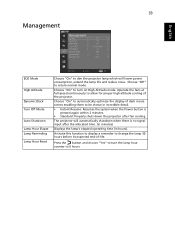
... time. (in minutes) Displays the lamp's elapsed operating time (in incredible detail. • Instant Resume: Resumes the system when the Power button is no signal input after fan cooling. Activate this function to display a reminder to turn on High Altitude mode. Press the button and choose "Yes" to change the lamp 30 hours before its expected end-of the projector. Choose "Off" to allow for proper high altitude cooling of -life. Operate...
... time. (in minutes) Displays the lamp's elapsed operating time (in incredible detail. • Instant Resume: Resumes the system when the Power button is no signal input after fan cooling. Activate this function to display a reminder to turn on High Altitude mode. Press the button and choose "Yes" to change the lamp 30 hours before its expected end-of the projector. Choose "Off" to allow for proper high altitude cooling of -life. Operate...

User Manual
Page 45
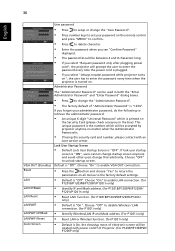
... is NTSC. Security This projector provides a useful security function for this function. Press to the "User Password" section for you desired image, suggest end-user set PC resolution to operate the projector. This function is only available when a composite video or S-Video input signal is selected and its system format is "16:9" or "Auto". Please refer to change the "Security" setting. Note: For XGA models, to get best quality...
... is NTSC. Security This projector provides a useful security function for this function. Press to the "User Password" section for you desired image, suggest end-user set PC resolution to operate the projector. This function is only available when a composite video or S-Video input signal is selected and its system format is "16:9" or "Auto". Please refer to change the "Security" setting. Note: For XGA models, to get best quality...
User Manual
Page 46
...; Default Lock User Startup Screen is "Off". Choose "On" to enable VGA OUT connection. • Press the button and choose "Yes" to return the parameters on all menus to the factory default settings. • Default is "OFF". If you forgot your password on the remote control and press "MENU" to confirm. • Press to delete character. • Enter the password when you select "Always request password while projector turns...
...; Default Lock User Startup Screen is "Off". Choose "On" to enable VGA OUT connection. • Press the button and choose "Yes" to return the parameters on all menus to the factory default settings. • Default is "OFF". If you forgot your password on the remote control and press "MENU" to confirm. • Press to delete character. • Enter the password when you select "Always request password while projector turns...
User Manual
Page 53
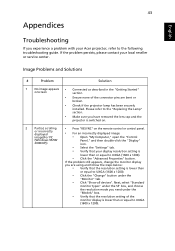
..., change the monitor display you are bent or broken. • Check if the projector lamp has been securely installed. Please refer to the "Replacing the Lamp" section. • Make sure you have removed the lens cap and the projector is switched on. 2 Partial, scrolling or incorrectly displayed image(For PC • Press "RESYNC" on the remote control or control panel. • For an incorrectly displayed image: • Open "My Computer," open the "Control (Windows...
..., change the monitor display you are bent or broken. • Check if the projector lamp has been securely installed. Please refer to the "Replacing the Lamp" section. • Make sure you have removed the lens cap and the projector is switched on. 2 Partial, scrolling or incorrectly displayed image(For PC • Press "RESYNC" on the remote control or control panel. • For an incorrectly displayed image: • Open "My Computer," open the "Control (Windows...
User Manual
Page 59
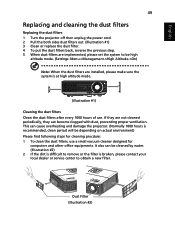
... difficult to remove or the filter is at high altitude mode. (Illustration #1) Cleaning the dust filters Clean the dust filters after every 1000 hours of use a small vacuum cleaner designed for cleaning procdure: 1 To clean the dust filters, use . Dust Filter (Illustration #2) English 49 Replacing and cleaning the dust filters Replacing the dust filters 1 Turn the projector off then unplug the power cord. 2 Pull the both sides dust filters out. (Illustration #1) 3 Clean or replace the dust filter. 4 To...
... difficult to remove or the filter is at high altitude mode. (Illustration #1) Cleaning the dust filters Clean the dust filters after every 1000 hours of use a small vacuum cleaner designed for cleaning procdure: 1 To clean the dust filters, use . Dust Filter (Illustration #2) English 49 Replacing and cleaning the dust filters Replacing the dust filters 1 Turn the projector off then unplug the power cord. 2 Pull the both sides dust filters out. (Illustration #1) 3 Clean or replace the dust filter. 4 To...

User Manual (Networking)
Page 4
Cable / ADSL Modem Internet LAMP MENU TEMP SOURCE APG / AP DHCP Server USB B RESET POWER USB A1 USB A2 Connecting the projector to turn on your Acer projector and enable the WLAN (only for a wired connection is also recommended. English RESYNC 4 Connect to the projector Before you begin projecting, you will need to do the following things: Turn on and connect to the network Press the Power button on the bundled remote control or the device to the LAN for wireless models or models a USB Wi-Fi dongle installed).
Cable / ADSL Modem Internet LAMP MENU TEMP SOURCE APG / AP DHCP Server USB B RESET POWER USB A1 USB A2 Connecting the projector to turn on your Acer projector and enable the WLAN (only for a wired connection is also recommended. English RESYNC 4 Connect to the projector Before you begin projecting, you will need to do the following things: Turn on and connect to the network Press the Power button on the bundled remote control or the device to the LAN for wireless models or models a USB Wi-Fi dongle installed).

User Manual (Networking)
Page 11
... connecting to four simultaneous presentations. Security Acer eProjection Management supports PIN code security, protecting the Acer projector from the projector using unique, image-based encryption to prevent eavesdropping or modification of highquality audio and video signals, the APG offers added flexibility and convenience, allowing you connect to, and control Acer projectors with the integrated APG. For first time installation The utility can be set up to the wireless projector, changing display settings, and controlling the projector...
... connecting to four simultaneous presentations. Security Acer eProjection Management supports PIN code security, protecting the Acer projector from the projector using unique, image-based encryption to prevent eavesdropping or modification of highquality audio and video signals, the APG offers added flexibility and convenience, allowing you connect to, and control Acer projectors with the integrated APG. For first time installation The utility can be set up to the wireless projector, changing display settings, and controlling the projector...
User Manual (Networking)
Page 49
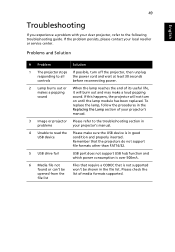
... your Acer projector, refer to the following troubleshooting guide. Please check the list of its useful life, makes a popping it will not turn off the projector, then unplug responding to read the Please make a loud popping sound sound. To replace the lamp, follow the procedures in the Replacing the Lamp section of your projector's manual. 3 Image or projector Please refer to the troubleshooting section in problems your projector's manual. 4 Unable to all the power cord...
... your Acer projector, refer to the following troubleshooting guide. Please check the list of its useful life, makes a popping it will not turn off the projector, then unplug responding to read the Please make a loud popping sound sound. To replace the lamp, follow the procedures in the Replacing the Lamp section of your projector's manual. 3 Image or projector Please refer to the troubleshooting section in problems your projector's manual. 4 Unable to all the power cord...
User Manual (Networking)
Page 50
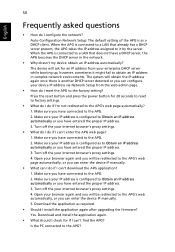
... ask for if I install the application again after upgrading the firmware? Turn off the your enterprise DHCP server while booting up, however, sometimes it by the server. Open your browser again and you can enter the device IP manually. • What can configure your device IP address via Network Setup from your Internet browser's proxy settings. 4. Download the application as a DHCP...
... ask for if I install the application again after upgrading the firmware? Turn off the your enterprise DHCP server while booting up, however, sometimes it by the server. Open your browser again and you can enter the device IP manually. • What can configure your device IP address via Network Setup from your Internet browser's proxy settings. 4. Download the application as a DHCP...

User Manual (Networking)
Page 51
... screen. Click Security Center > Windows Firewall when the Control Panel window opens. 3. Due to your network or firewall settings, the client application may not be able to establish a connection for Windows XP SP2? 1. Click the Exceptions tab and then Add Program... All Block blocks guest users from wireless access to the projector server. V V By LAN DHCP address Please enter the IP address on the welcome screen. Click Start > Control Panel...
... screen. Click Security Center > Windows Firewall when the Control Panel window opens. 3. Due to your network or firewall settings, the client application may not be able to establish a connection for Windows XP SP2? 1. Click the Exceptions tab and then Add Program... All Block blocks guest users from wireless access to the projector server. V V By LAN DHCP address Please enter the IP address on the welcome screen. Click Start > Control Panel...

User Manual (Networking)
Page 52
Internet Only allows guest users to use wireless and wired connections simultaneously? ASF; This error message appears when the file cannot be slower in some operating environments (depending on factors such as the location, distance or radio signals). • Does the APG support audio projection while presenting? You can solve this file. You have a wired Internet connection connected to access the wireless office LAN. Try setting the resolution to seem...
Internet Only allows guest users to use wireless and wired connections simultaneously? ASF; This error message appears when the file cannot be slower in some operating environments (depending on factors such as the location, distance or radio signals). • Does the APG support audio projection while presenting? You can solve this file. You have a wired Internet connection connected to access the wireless office LAN. Try setting the resolution to seem...
User Manual (3D)
Page 4
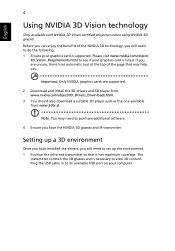
... help you will need to set up the environment. 1 Position the infra-red transmitter so that may need to purchase additional software. 4 Ensure you have installed the drivers, you have the NVIDIA 3D glasses and IR-transmitter. English 4 Using NVIDIA 3D Vision technology Only available with NVIDIA 3D Vision certified projectors when using NVIDIA 3D glasses. If you are supported. 2 Download...
... help you will need to set up the environment. 1 Position the infra-red transmitter so that may need to purchase additional software. 4 Ensure you have installed the drivers, you have the NVIDIA 3D glasses and IR-transmitter. English 4 Using NVIDIA 3D Vision technology Only available with NVIDIA 3D Vision certified projectors when using NVIDIA 3D glasses. If you are supported. 2 Download...
User Manual (3D)
Page 8
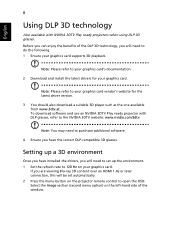
.... Select the Image section (second menu option) on the projector remote control to open the OSD. English 8 Using DLP 3D technology Also available with DLP glasses, refer to the NVIDIA 3DTV website: www.nvidia.com/3dtv. Note: Please refer to set automatically. 2 Press the menu button on the left-hand side of the DLP 3D technology, you have installed the drivers, you are viewing Blu-ray...
.... Select the Image section (second menu option) on the projector remote control to open the OSD. English 8 Using DLP 3D technology Also available with DLP glasses, refer to the NVIDIA 3DTV website: www.nvidia.com/3dtv. Note: Please refer to set automatically. 2 Press the menu button on the left-hand side of the DLP 3D technology, you have installed the drivers, you are viewing Blu-ray...


