
Lifecycle Extension Guide
Page 3
...: NOTE: For replacement parts, always use only Acer certified components in order to the product that occur during self-repair, or which has occurred as described in the "Disassembly Procedures" section, then this component is either not present on the motherboard and therefore not eligible for self-repair, but embedded on the respective model, or it is not covered by the...
...: NOTE: For replacement parts, always use only Acer certified components in order to the product that occur during self-repair, or which has occurred as described in the "Disassembly Procedures" section, then this component is either not present on the motherboard and therefore not eligible for self-repair, but embedded on the respective model, or it is not covered by the...
Lifecycle Extension Guide
Page 4
.... Press Download to start automatically once the download is complete NOTE: NOTE: Upgrading the system BIOS incorrectly, or intermittence of the recovery media through Acer Customer Service (http://www.acer.com/support) This is available in order to get the latest drivers from the list of suggested models in the User Manual of charge service. 1-2 Self-Repair For more information about the software recovery options, how to perform a software recovery or creating a Factory Default recovery media, please refer to create a Factory Default recovery media. After...
.... Press Download to start automatically once the download is complete NOTE: NOTE: Upgrading the system BIOS incorrectly, or intermittence of the recovery media through Acer Customer Service (http://www.acer.com/support) This is available in order to get the latest drivers from the list of suggested models in the User Manual of charge service. 1-2 Self-Repair For more information about the software recovery options, how to perform a software recovery or creating a Factory Default recovery media, please refer to create a Factory Default recovery media. After...

Lifecycle Extension Guide
Page 39
NOTE: NOTE: The keyboard is included as part of the top assembly and can no longer be disassembled. In the event that the USB Board, Hall Sensor Board, LCD Module, and Touchpad Module have been disassembled prior removing the top assembly. Figure 1-52. Top Assembly (Keyboard) Disassembly Procedures 1-37 Top Assembly Removal (Keyboard Removal) 0 Prerequisite: Ensure that the keyboard can not be used, replace the entire top assembly.
NOTE: NOTE: The keyboard is included as part of the top assembly and can no longer be disassembled. In the event that the USB Board, Hall Sensor Board, LCD Module, and Touchpad Module have been disassembled prior removing the top assembly. Figure 1-52. Top Assembly (Keyboard) Disassembly Procedures 1-37 Top Assembly Removal (Keyboard Removal) 0 Prerequisite: Ensure that the keyboard can not be used, replace the entire top assembly.

User Manual
Page 2
... not be supported depending on Windows OS, you registered for technical or editorial errors or omissions contained in this manual. Register your Acer product If your new device runs on the Operating System version. Model number Serial number Date of purchase Place of purchase The terms HDMI and HDMI High-Definition Multimedia Interface, and the HDMI Logo are connected to www.acer.com/register-product. 3. Enter S/N or SNID...
... not be supported depending on Windows OS, you registered for technical or editorial errors or omissions contained in this manual. Register your Acer product If your new device runs on the Operating System version. Model number Serial number Date of purchase Place of purchase The terms HDMI and HDMI High-Definition Multimedia Interface, and the HDMI Logo are connected to www.acer.com/register-product. 3. Enter S/N or SNID...

User Manual
Page 3
... keyboard 19 Lock keys 19 Special keys 19 Hotkeys 20 The Windows OS Desktop 21 Using the Precision Touchpad 22 Touchpad gestures 22 Changing touchpad settings 24 Recovery 26 Creating a file history backup 26 Backing up your wireless and LAN drivers 29 Restoring your computer 29 Reset this PC and keep my files 29 Reset this PC and remove everything ... 33 Using a Bluetooth connection 37 Enabling and disabling Bluetooth........ 37 Enable Bluetooth and add a device ....... 37 Connecting to the Internet 39 Connecting to a wireless network ....... 39 Connecting...
... keyboard 19 Lock keys 19 Special keys 19 Hotkeys 20 The Windows OS Desktop 21 Using the Precision Touchpad 22 Touchpad gestures 22 Changing touchpad settings 24 Recovery 26 Creating a file history backup 26 Backing up your wireless and LAN drivers 29 Restoring your computer 29 Reset this PC and keep my files 29 Reset this PC and remove everything ... 33 Using a Bluetooth connection 37 Enabling and disabling Bluetooth........ 37 Enable Bluetooth and add a device ....... 37 Connecting to the Internet 39 Connecting to a wireless network ....... 39 Connecting...
User Manual
Page 5
... Setup Guide helps you can also download and install the Acer identification utility that will open the Acer Support webpage. 2. Once you have found your product model, any updates, or documents will be more on such subjects as system utilities, data recovery, expansion options and troubleshooting. Your guides To help you for your product's warranty. Scroll down to Drivers and Manuals and search for making this page you have connected to...
... Setup Guide helps you can also download and install the Acer identification utility that will open the Acer Support webpage. 2. Once you have found your product model, any updates, or documents will be more on such subjects as system utilities, data recovery, expansion options and troubleshooting. Your guides To help you for your product's warranty. Scroll down to Drivers and Manuals and search for making this page you have connected to...

User Manual
Page 17
... fully charged (with microphone. Headset/ speaker jack Connects to a Kensington- USB port Connects to stay cool. Kensington lock Connects to audio devices (e.g., speakers, headphones) or a headset with the AC adapter plugged in). USB 3.2 Gen 1 information • USB 3.2 Gen 1 compatible ports are blue. • Compatible with USB 3.2 Gen 1 and earlier devices. • For optimal performance, use USB 3.2 Gen 1 certified devices. • Defined by the USB 3.2 Gen1 specification (SuperSpeed USB). Do not cover or obstruct the openings. Indicates...
... fully charged (with microphone. Headset/ speaker jack Connects to a Kensington- USB port Connects to stay cool. Kensington lock Connects to audio devices (e.g., speakers, headphones) or a headset with the AC adapter plugged in). USB 3.2 Gen 1 information • USB 3.2 Gen 1 compatible ports are blue. • Compatible with USB 3.2 Gen 1 and earlier devices. • For optimal performance, use USB 3.2 Gen 1 certified devices. • Defined by the USB 3.2 Gen1 specification (SuperSpeed USB). Do not cover or obstruct the openings. Indicates...

User Manual
Page 19
... operators +, -, *, and /). Turns the microphones on and off . Lock keys The keyboard has lock keys which you need to turn keyboard functions on and off. Icon Function Description Speaker toggle Turns the speakers on and off . Increases the screen brightness. USING THE KEYBOARD Using the keyboard - 19 The keyboard has full-sized keys, a numeric keypad, separate cursor, lock, Windows, special keys and hotkeys. The function of numeric data entry. Volume down Brightness up Increases the sound volume. Use this mode when you can use...
... operators +, -, *, and /). Turns the microphones on and off . Lock keys The keyboard has lock keys which you need to turn keyboard functions on and off. Icon Function Description Speaker toggle Turns the speakers on and off . Increases the screen brightness. USING THE KEYBOARD Using the keyboard - 19 The keyboard has full-sized keys, a numeric keypad, separate cursor, lock, Windows, special keys and hotkeys. The function of numeric data entry. Volume down Brightness up Increases the sound volume. Use this mode when you can use...

User Manual
Page 20
... Main menu and change the function key setting in the BIOS (to open the BIOS press F2 when starting your clipboard. You can enter password to Function keys). (Specifications vary depending on and off the computer's network devices. Function varies depending on or off. insert Insert Turns Insert on configuration. Hotkeys To activate hotkeys, press and hold the Fn key before pressing the other key in touchpad on model.) Adjusts keyboard backlight brightness. Using the keyboard Icon prt sc Function Display toggle Lock your work. Locks...
... Main menu and change the function key setting in the BIOS (to open the BIOS press F2 when starting your clipboard. You can enter password to Function keys). (Specifications vary depending on and off the computer's network devices. Function varies depending on or off. insert Insert Turns Insert on configuration. Hotkeys To activate hotkeys, press and hold the Fn key before pressing the other key in touchpad on model.) Adjusts keyboard backlight brightness. Using the keyboard Icon prt sc Function Display toggle Lock your work. Locks...
User Manual
Page 32
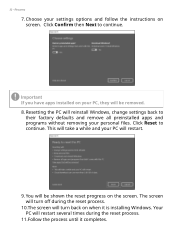
Choose your settings options and follow the instructions on your personal files. Your PC will be shown the reset progress on when it completes. Important If you have apps installed on screen. This will take a while and your PC will reinstall Windows, change settings back to their factory defaults and remove all preinstalled apps and programs without removing your PC, they will restart several...
Choose your settings options and follow the instructions on your personal files. Your PC will be shown the reset progress on when it completes. Important If you have apps installed on screen. This will take a while and your PC will reinstall Windows, change settings back to their factory defaults and remove all preinstalled apps and programs without removing your PC, they will restart several...
User Manual
Page 35
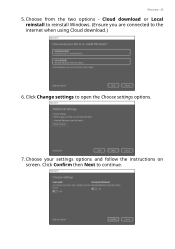
Choose your settings options and follow the instructions on screen. Click Change settings to the internet when using Cloud download.) 6. Recovery - 35 5. Cloud download or Local reinstall to reinstall Windows. (Ensure you are connected to open the Choose settings options. 7. Choose from the two options - Click Confirm then Next to continue.
Choose your settings options and follow the instructions on screen. Click Change settings to the internet when using Cloud download.) 6. Recovery - 35 5. Cloud download or Local reinstall to reinstall Windows. (Ensure you are connected to open the Choose settings options. 7. Choose from the two options - Click Confirm then Next to continue.

User Manual
Page 37
... your devices owner's manual to determine how to turn on both devices. 2. Enable Bluetooth and add a device Every new device must ensure the following : 1. To enable your computer is disabled by default. Note Please check your computer's Bluetooth adapter. Your computer will connect them. Your devices are "paired" (or connected). You only need to other devices. Press the Windows key or select the Windows Start button > Settings > Bluetooth & devices, and click the toggle under Bluetooth to transfer data wirelessly over...
... your devices owner's manual to determine how to turn on both devices. 2. Enable Bluetooth and add a device Every new device must ensure the following : 1. To enable your computer is disabled by default. Note Please check your computer's Bluetooth adapter. Your computer will connect them. Your devices are "paired" (or connected). You only need to other devices. Press the Windows key or select the Windows Start button > Settings > Bluetooth & devices, and click the toggle under Bluetooth to transfer data wirelessly over...

User Manual
Page 58
... display screen. • When the Supervisor Password is enabled, a prompt appears at boot-up. • Type the User Password and press Enter to use the computer. If you fail to access the BIOS utility. Securing your computer Entering passwords When a password is set , a prompt appears when you enter the password incorrectly, a warning message appears. 58 - Press and hold the power button for four seconds to enter a password. If you enter the BIOS utility. • Type the Supervisor Password...
... display screen. • When the Supervisor Password is enabled, a prompt appears at boot-up. • Type the User Password and press Enter to use the computer. If you fail to access the BIOS utility. Securing your computer Entering passwords When a password is set , a prompt appears when you enter the password incorrectly, a warning message appears. 58 - Press and hold the power button for four seconds to enter a password. If you enter the BIOS utility. • Type the Supervisor Password...

User Manual
Page 65
... start over a network (Wake on LAN). 1. Press the Windows key or select the Windows Start button then search for a period of time, the computer stops some or all of these devices in power management unit that monitors system activity. POWER MANAGEMENT Power management - 65 This computer has a built-in order to the computer, and video memory. Saving power Disable Fast startup Your computer uses Fast startup to start quickly, but also uses a small amount of the following devices: keyboard, mouse, hard disk, peripherals connected...
... start over a network (Wake on LAN). 1. Press the Windows key or select the Windows Start button then search for a period of time, the computer stops some or all of these devices in power management unit that monitors system activity. POWER MANAGEMENT Power management - 65 This computer has a built-in order to the computer, and video memory. Saving power Disable Fast startup Your computer uses Fast startup to start quickly, but also uses a small amount of the following devices: keyboard, mouse, hard disk, peripherals connected...

User Manual
Page 68
... the suggestions set out below 0° C (32° F) or above . • Frequent use . • Remove accessories that are advised to follow this conditioning process for all new batteries, or if a battery hasn't been used (e.g. In addition, the useful lifespan of the battery is 10° C (50° F) to self-discharge faster. • Excessive recharging decreases the battery life. a USB disk drive), as they...
... the suggestions set out below 0° C (32° F) or above . • Frequent use . • Remove accessories that are advised to follow this conditioning process for all new batteries, or if a battery hasn't been used (e.g. In addition, the useful lifespan of the battery is 10° C (50° F) to self-discharge faster. • Excessive recharging decreases the battery life. a USB disk drive), as they...

User Manual
Page 73
... charge devices such as a mouse, an external keyboard, additional storage (external hard disks), or any other devices through a USB port. Consult your peripheral. Additionally, you to a single USB port. Universal Serial Bus (USB) - 73 UNIVERSAL SERIAL BUS (USB) The USB port is in the port, while USB 3.2 Gen 1 ports have a blue tongue. USB 2.0 ports on Acer computers: USB 2.0 (High-speed USB) and USB 3.2 Gen 1 (SuperSpeed USB). Note Two USB standards are currently available on Acer computers have a black tongue in Hibernate or turned...
... charge devices such as a mouse, an external keyboard, additional storage (external hard disks), or any other devices through a USB port. Consult your peripheral. Additionally, you to a single USB port. Universal Serial Bus (USB) - 73 UNIVERSAL SERIAL BUS (USB) The USB port is in the port, while USB 3.2 Gen 1 ports have a blue tongue. USB 2.0 ports on Acer computers: USB 2.0 (High-speed USB) and USB 3.2 Gen 1 (SuperSpeed USB). Note Two USB standards are currently available on Acer computers have a black tongue in Hibernate or turned...

User Manual
Page 76
... type of port available depends on the desktop and select Display settings. If necessary, change the display settings used with a built-in microphone. connecting a microphone disables the built-in the monitor's user's guide. 5. Connecting a monitor 1. Check that allows you to connect an external microphone; Note To access the display controls, right-click anywhere on your computer's configuration. Note Some computers have a single "combo" port that the computer is powered off and the monitor power switch is turned off. 2. connecting an audio device to use...
... type of port available depends on the desktop and select Display settings. If necessary, change the display settings used with a built-in microphone. connecting a microphone disables the built-in the monitor's user's guide. 5. Connecting a monitor 1. Check that allows you to connect an external microphone; Note To access the display controls, right-click anywhere on your computer's configuration. Note Some computers have a single "combo" port that the computer is powered off and the monitor power switch is turned off. 2. connecting an audio device to use...

User Manual
Page 79
... the screen. Nothing appears on the power, but the computer does not start or boot up hotkey to adjust the brightness level. • The display device might be too low. Press the display toggle hotkey to toggle the display back to the computer. • The computer may need to wait a few minutes before trying to an external monitor. Press and release the power button to recharge the battery...
... the screen. Nothing appears on the power, but the computer does not start or boot up hotkey to adjust the brightness level. • The display device might be too low. Press the display toggle hotkey to toggle the display back to the computer. • The computer may need to wait a few minutes before trying to an external monitor. Press and release the power button to recharge the battery...

User Manual
Page 83
... choose which apps to enable/disable. Select Choose this is a new operating system that you wish to use (your Pictures folder will take some getting used to, so we've created a few pointers to help you can turn off • Select lock screen apps. Press the Windows key or select the Windows Start button and select Settings > System > Notifications. Can I set up the lock screen slideshow? 1. From here you...
... choose which apps to enable/disable. Select Choose this is a new operating system that you wish to use (your Pictures folder will take some getting used to, so we've created a few pointers to help you can turn off • Select lock screen apps. Press the Windows key or select the Windows Start button and select Settings > System > Notifications. Can I set up the lock screen slideshow? 1. From here you...

User Manual
Page 90
... card slot, you can be fast and easy and eliminates the need to see if any additional charges will be incurred, especially roaming charges. Network connections A LAN (Local Area Network) is a group of a wireless network? Wireless networks A wireless LAN or WLAN is easy and allows you and other computers in your service provider to pull cables through walls and ceilings. Also you set up a network, you require a compatible SIM card...
... card slot, you can be fast and easy and eliminates the need to see if any additional charges will be incurred, especially roaming charges. Network connections A LAN (Local Area Network) is a group of a wireless network? Wireless networks A wireless LAN or WLAN is easy and allows you and other computers in your service provider to pull cables through walls and ceilings. Also you set up a network, you require a compatible SIM card...


