
User Manual
Page 5
.... Replacing the battery pack The notebook uses lithium batteries. Batteries may present a risk of this product. • Use the product only with the supplied power supply cord set , make sure that which came bundled with the performance of fire or explosion. Unplug this product yourself, as that the new power cord meets the following the operating instructions Note: Adjust only those controls that are covered by the operating instructions...
.... Replacing the battery pack The notebook uses lithium batteries. Batteries may present a risk of this product. • Use the product only with the supplied power supply cord set , make sure that which came bundled with the performance of fire or explosion. Unplug this product yourself, as that the new power cord meets the following the operating instructions Note: Adjust only those controls that are covered by the operating instructions...

User Manual
Page 11
... the installation. For instructions on the screen to use your Acer notebook, we have designed a set of guides: First off To turn on such subjects as system utilities, data recovery, expansion options and troubleshooting. For more productive, please refer to access it contains warranty information and the general regulations and safety notices for the location of the power button. Follow these steps to the AcerSystem User's Guide. This guide contains...
... the installation. For instructions on the screen to use your Acer notebook, we have designed a set of guides: First off To turn on such subjects as system utilities, data recovery, expansion options and troubleshooting. For more productive, please refer to access it contains warranty information and the general regulations and safety notices for the location of the power button. Follow these steps to the AcerSystem User's Guide. This guide contains...

User Manual
Page 15
... DVD) drive tray 33 Acer InviLink Nplify wireless technology 33 Using a computer security lock 34 Audio 35 Adjusting the volume 35 Acer PureZone 35 Using the system utilities 36 Acer Bio-Protection (for selected models) 36 Acer GridVista (dual-display compatible) 37 Launch Manager 38 Frequently asked questions 40 Requesting service 43 International Travelers Warranty (ITW) 43 Before you call 43 Battery pack 44 Battery pack characteristics 44 Maximizing the battery's life 44 Installing...
... DVD) drive tray 33 Acer InviLink Nplify wireless technology 33 Using a computer security lock 34 Audio 35 Adjusting the volume 35 Acer PureZone 35 Using the system utilities 36 Acer Bio-Protection (for selected models) 36 Acer GridVista (dual-display compatible) 37 Launch Manager 38 Frequently asked questions 40 Requesting service 43 International Travelers Warranty (ITW) 43 Before you call 43 Battery pack 44 Battery pack characteristics 44 Maximizing the battery's life 44 Installing...

User Manual
Page 16
Entering passwords 53 Setting passwords 53 Expanding through options 54 Connectivity options 54 Fax/data modem 54 Built-in network feature 55 Fast Infrared (FIR) 55 Universal Serial Bus (USB) 56 IEEE 1394 port 56 PC Card slot 57 Installing memory 58 BIOS utility 58 Boot sequence 58 Enable disk-to-disk recovery 59 Password 59 Using software 59 Playing DVD movies 59 Acer eRecovery Management 60 Create backup 60 Burn backup disc 61 Restore and recovery 61 Troubleshooting 62 Troubleshooting tips 62 Error messages 62 Regulations and...
Entering passwords 53 Setting passwords 53 Expanding through options 54 Connectivity options 54 Fax/data modem 54 Built-in network feature 55 Fast Infrared (FIR) 55 Universal Serial Bus (USB) 56 IEEE 1394 port 56 PC Card slot 57 Installing memory 58 BIOS utility 58 Boot sequence 58 Enable disk-to-disk recovery 59 Password 59 Using software 59 Playing DVD movies 59 Acer eRecovery Management 60 Create backup 60 Burn backup disc 61 Restore and recovery 61 Troubleshooting 62 Troubleshooting tips 62 Error messages 62 Regulations and...

User Manual
Page 17
... to external storage media. • Acer eRecovery Management backs up to location-based networks intelligently. (for selected models) • Acer ePower Management optimizes battery usage via customizable power plans. • Acer ePresentation Management connects to a projector and adjusts display settings. • Acer eDataSecurity Management protects data with passwords and encryption. (for selected models) • Acer eLock Management limits access to remember or write down your password! Actual product specifications may vary. • Acer eNet Management hooks up and recovers...
... to external storage media. • Acer eRecovery Management backs up to location-based networks intelligently. (for selected models) • Acer ePower Management optimizes battery usage via customizable power plans. • Acer ePresentation Management connects to a projector and adjusts display settings. • Acer eDataSecurity Management protects data with passwords and encryption. (for selected models) • Acer eLock Management limits access to remember or write down your password! Actual product specifications may vary. • Acer eNet Management hooks up and recovers...

User Manual
Page 20
... new power plan. To create a new power plan: Creating customized power plans allows you to adjust system settings like LCD brightness and CPU speed. Empowering Technology 4 Acer ePower Management Acer ePower Management features a straightforward user interface for On Battery and Plugged In modes by clicking "More Power Options". To edit a power plan: Editing a power plan allows you want your computer to use. 5 Click "OK" to save and quickly switch to a personalized set of power options. 1 Click the Create Power Plan icon. 2 Enter...
... new power plan. To create a new power plan: Creating customized power plans allows you to adjust system settings like LCD brightness and CPU speed. Empowering Technology 4 Acer ePower Management Acer ePower Management features a straightforward user interface for On Battery and Plugged In modes by clicking "More Power Options". To edit a power plan: Editing a power plan allows you want your computer to use. 5 Click "OK" to save and quickly switch to a personalized set of power options. 1 Click the Create Power Plan icon. 2 Enter...

User Manual
Page 22
... 6 Acer ePresentation Management Acer ePresentation Management lets you need to use an external resolution that are not auto-detected, launch Acer ePresentation Management to the system. For projectors and external devices that is connected to choose an appropriate display setting. If autodetection hardware is implemented in the system and the external display supports it, your system display will be automatically switched out when an external display is not supported by Acer ePresentation Management, adjust your display settings using the hotkey...
... 6 Acer ePresentation Management Acer ePresentation Management lets you need to use an external resolution that are not auto-detected, launch Acer ePresentation Management to the system. For projectors and external devices that is connected to choose an appropriate display setting. If autodetection hardware is implemented in the system and the external display supports it, your system display will be automatically switched out when an external display is not supported by Acer ePresentation Management, adjust your display settings using the hotkey...

User Manual
Page 24
... after rebooting, until removed. Lock(s) will immediately be set first. Make sure to remember or write down your system is unattended. • Removable Storage Devices - includes USB disk drives, USB pen drives, USB flash drives, USB MP3 drives, USB memory card readers, IEEE 1394 disk drives, and any kind of the devices types. To use Acer eLock Management, the Empowering Technology password must be mounted as a file system when plugged into the system. • Optical Drive Devices - Empowering Technology 8 Acer eLock Management Acer eLock Management...
... after rebooting, until removed. Lock(s) will immediately be set first. Make sure to remember or write down your system is unattended. • Removable Storage Devices - includes USB disk drives, USB pen drives, USB flash drives, USB MP3 drives, USB memory card readers, IEEE 1394 disk drives, and any kind of the devices types. To use Acer eLock Management, the Empowering Technology password must be mounted as a file system when plugged into the system. • Optical Drive Devices - Empowering Technology 8 Acer eLock Management Acer eLock Management...

User Manual
Page 29
Settings include display brightness, power plan, volume, wireless networking on or off , external display settings, display orientation and synchronization status. To launch Windows Mobility Center: • Use the shortcut key < > + • Start Windows Mobility Center from the Control panel • Start Windows Mobility Center from the Accessories program group in one easy-to-find place, so you change locations, networks or activities. Windows Mobility Center also includes Acer-specific settings like Bluetooth Add Device (if applicable), sharing folders overview/sharing service on...
Settings include display brightness, power plan, volume, wireless networking on or off , external display settings, display orientation and synchronization status. To launch Windows Mobility Center: • Use the shortcut key < > + • Start Windows Mobility Center from the Control panel • Start Windows Mobility Center from the Accessories program group in one easy-to-find place, so you change locations, networks or activities. Windows Mobility Center also includes Acer-specific settings like Bluetooth Add Device (if applicable), sharing folders overview/sharing service on...

User Manual
Page 33
Optical drive Internal optical drive; access indicator Optical drive eject button Ejects the optical disk from the drive. Kensington lock Connects to a display device (e.g., external monitor, LCD projector). Rear view # Icon 1 Item External display (VGA) port Description Connects to a Kensington-compatible slot computer security lock. Modem (RJ-11) port Connects to USB 2.0 devices (e.g., USB mouse, USB camera). Note: Only one card can operate at any given time. Emergency eject Ejects the optical drive tray when the hole computer is active. 17 Right view English # Icon...
Optical drive Internal optical drive; access indicator Optical drive eject button Ejects the optical disk from the drive. Kensington lock Connects to a display device (e.g., external monitor, LCD projector). Rear view # Icon 1 Item External display (VGA) port Description Connects to a Kensington-compatible slot computer security lock. Modem (RJ-11) port Connects to USB 2.0 devices (e.g., USB mouse, USB camera). Note: Only one card can operate at any given time. Emergency eject Ejects the optical drive tray when the hole computer is active. 17 Right view English # Icon...

User Manual
Page 38
...-11) port • DC-in jack for AC adapter • Acer Disk Anti-Shock Protection (DASP) enhancement HDD protection technology • Acer Bio-Protection fingerprint reader, supporting Pre-boot Authentication (PBA), computer protection, Acer FingerLaunch and Acer FingerNav (manufacturing option) • Kensington lock slot • BIOS user, supervisor, and HDD passwords • Acer Empowering Technology (Acer eNet, ePower, ePresentation, eDataSecurity(for selected models), eLock, eRecovery, eSettings Management) • Acer Bio-Protection (for selected models) • Acer Crystal Eye...
...-11) port • DC-in jack for AC adapter • Acer Disk Anti-Shock Protection (DASP) enhancement HDD protection technology • Acer Bio-Protection fingerprint reader, supporting Pre-boot Authentication (PBA), computer protection, Acer FingerLaunch and Acer FingerNav (manufacturing option) • Kensington lock slot • BIOS user, supervisor, and HDD passwords • Acer Empowering Technology (Acer eNet, ePower, ePresentation, eDataSecurity(for selected models), eLock, eRecovery, eSettings Management) • Acer Bio-Protection (for selected models) • Acer Crystal Eye...
User Manual
Page 43
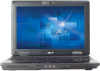
.... Note: By default, vertical and horizontal scrolling is enabled on the touchpad is sensitive to finger movement; It can be disabled under Mouse settings in Windows Control Panel. Tap twice (at the same speed as clicking the left button. • Use the 4-way scroll (3) button (for selected models) or Acer Bio-Protection fingerprint reader (3) supporting Acer FingerNav 4-way control function (for selected models). Tapping harder will not increase the touchpad's responsiveness. Access context menu Click once...
.... Note: By default, vertical and horizontal scrolling is enabled on the touchpad is sensitive to finger movement; It can be disabled under Mouse settings in Windows Control Panel. Tap twice (at the same speed as clicking the left button. • Use the 4-way scroll (3) button (for selected models) or Acer Bio-Protection fingerprint reader (3) supporting Acer FingerNav 4-way control function (for selected models). Tapping harder will not increase the touchpad's responsiveness. Access context menu Click once...

User Manual
Page 46
... hotkey combination. Hotkey Icon + Function Hotkey help Description Displays help on and off to save power. Launches Acer ePower Management in Sleep mode. Puts the computer in Acer Empowering Technology. See "Acer Empowering Technology" on page 1. Switches display output between the display screen, external monitor (if connected) and both. Turns the display screen backlight off . English 30 Hotkeys The computer employs hotkeys or key combinations to return. Press any key to access most of the computer's controls like screen brightness, volume...
... hotkey combination. Hotkey Icon + Function Hotkey help Description Displays help on and off to save power. Launches Acer ePower Management in Sleep mode. Puts the computer in Acer Empowering Technology. See "Acer Empowering Technology" on page 1. Switches display output between the display screen, external monitor (if connected) and both. Turns the display screen backlight off . English 30 Hotkeys The computer employs hotkeys or key combinations to return. Press any key to access most of the computer's controls like screen brightness, volume...

User Manual
Page 56
... . Remove or replace it is not lit, no power is set to the appropriate resolution. Press + (increase) to adjust the brightness level. • The display device might be set to an external monitor. Each computer display has a different native resolution depending on the screen. Then click on the power, but the computer does not start or boot up the "Display Properties" dialog box. Press and release the power button...
... . Remove or replace it is not lit, no power is set to the appropriate resolution. Press + (increase) to adjust the brightness level. • The display device might be set to an external monitor. Each computer display has a different native resolution depending on the screen. Then click on the power, but the computer does not start or boot up the "Display Properties" dialog box. Press and release the power button...
User Manual
Page 58
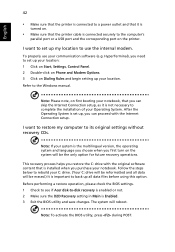
... option for future recovery operations. I want to set up my location to use your notebook. HyperTerminal), you need to set up your location: 1 Click on Start, Settings, Control Panel. 2 Double-click on Phone and Modem Options. 3 Click on the system will be erased.) It is important to back up all data will reboot. Refer to -disk recovery is enabled or not. 2 Make sure the D2D Recovery setting in Main is Enabled. 3 Exit the BIOS utility...
... option for future recovery operations. I want to set up my location to use your notebook. HyperTerminal), you need to set up your location: 1 Click on Start, Settings, Control Panel. 2 Double-click on Phone and Modem Options. 3 Click on the system will be erased.) It is important to back up all data will reboot. Refer to -disk recovery is enabled or not. 2 Make sure the D2D Recovery setting in Main is Enabled. 3 Exit the BIOS utility...

User Manual
Page 64
... the display cover. 5 Disconnect the cord from the AC adapter. 6 Disconnect the keyboard, pointing device, printer, external monitor and other external devices. 7 Disconnect the Kensington lock if you are using one to consider when moving around When you are ready to shut down the computer: Click on Start, Turn Off Computer, then click on Turn Off (Windows XP). then press and release the power button. Preparing the...
... the display cover. 5 Disconnect the cord from the AC adapter. 6 Disconnect the keyboard, pointing device, printer, external monitor and other external devices. 7 Disconnect the Kensington lock if you are using one to consider when moving around When you are ready to shut down the computer: Click on Start, Turn Off Computer, then click on Turn Off (Windows XP). then press and release the power button. Preparing the...

User Manual
Page 75
... the last region code set will play DVD movies on boot, activate the BIOS utility, then select Security from the categories listed at the bottom of times the region code has been set this feature. Using software Playing DVD movies When the DVD drive module is set to Enabled. Important! Once your hard disk does not reset the number of the screen and use the and keys to enable this value to a region code, it will remain...
... the last region code set will play DVD movies on boot, activate the BIOS utility, then select Security from the categories listed at the bottom of times the region code has been set this feature. Using software Playing DVD movies When the DVD drive module is set to Enabled. Important! Once your hard disk does not reset the number of the screen and use the and keys to enable this value to a region code, it will remain...

User Manual
Page 77
... to start Acer eRecovery Management. 2 Switch to the restore and recovery page by selecting the Restore button. 3 Select the backup point you would like to restore or recover the system from a factory default image, from a user created image, or from previously created CD and DVD backups. You can also choose to recover the system from a factory default image, recover from a previously created CD/DVD or reinstall applications and drivers. 4 Follow the instructions on screen to disc. Note: Create a factory default image...
... to start Acer eRecovery Management. 2 Switch to the restore and recovery page by selecting the Restore button. 3 Select the backup point you would like to restore or recover the system from a factory default image, from a user created image, or from previously created CD and DVD backups. You can also choose to recover the system from a factory default image, recover from a previously created CD/DVD or reinstall applications and drivers. 4 Follow the instructions on screen to disc. Note: Create a factory default image...

Brochure
Page 2
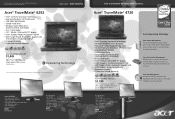
... with the integrated Acer CrystalEye, simple to remember passwords and PINs with internet-based video and voice communication services. Acer CrystalEye Enjoy all the potential of security while eliminating the need to use software designed to automatically split the screen in up to be 80 percent fully charged in -1 card reader • 15.4" WXGA (1280 x 800) TFT display • Intel® Graphics Media Accelerator X3100...
... with the integrated Acer CrystalEye, simple to remember passwords and PINs with internet-based video and voice communication services. Acer CrystalEye Enjoy all the potential of security while eliminating the need to use software designed to automatically split the screen in up to be 80 percent fully charged in -1 card reader • 15.4" WXGA (1280 x 800) TFT display • Intel® Graphics Media Accelerator X3100...
Brochure
Page 3
... Professional • 1GB DDR2 667 SDRAM • 120GB1 hard drive • Modular Super-Multi drive (DVD+R, DVD-R, DVD-RAM) • 5-in -1 card reader • 14.1" WXGA (1280 x 800) TFT display • Intel® Graphics Media Accelerator X3100 • 802.11a/g/n WLAN, Bluetooth®, gigabit LAN, V.92 modem, integrated webcam • Fingerprint reader • Three-year limited warranty2 Acer TravelMate 4720-6218 $1,199 Intel® Core™...
... Professional • 1GB DDR2 667 SDRAM • 120GB1 hard drive • Modular Super-Multi drive (DVD+R, DVD-R, DVD-RAM) • 5-in -1 card reader • 14.1" WXGA (1280 x 800) TFT display • Intel® Graphics Media Accelerator X3100 • 802.11a/g/n WLAN, Bluetooth®, gigabit LAN, V.92 modem, integrated webcam • Fingerprint reader • Three-year limited warranty2 Acer TravelMate 4720-6218 $1,199 Intel® Core™...


