
User Manual
Page 3
... sure that the power outlet you plug the power cord into is easily accessible and located as close to the equipment operator as disconnecting device Observe the following guidelines when connecting and disconnecting power to the power supply unit: Install the power supply unit before connecting the power cord to the AC power outlet. CAUTION for Listening To protect your ears have adjusted. • Do...
... sure that the power outlet you plug the power cord into is easily accessible and located as close to the equipment operator as disconnecting device Observe the following guidelines when connecting and disconnecting power to the power supply unit: Install the power supply unit before connecting the power cord to the AC power outlet. CAUTION for Listening To protect your ears have adjusted. • Do...
User Manual
Page 5
... operating instructions Note: Adjust only those controls that may result in damage and will often require extensive work by the operating instructions, since improper adjustment of other risks. Using a power outlet that is not properly grounded may interfere with the system meets the requirements for safe battery usage This notebook uses a Lithium-ion battery. Unplug this product yourself, as opening or removing covers may cause the battery to qualified service...
... operating instructions Note: Adjust only those controls that may result in damage and will often require extensive work by the operating instructions, since improper adjustment of other risks. Using a power outlet that is not properly grounded may interfere with the system meets the requirements for safe battery usage This notebook uses a Lithium-ion battery. Unplug this product yourself, as opening or removing covers may cause the battery to qualified service...
User Manual
Page 6
..., buy a new battery. Caution for Optical Drive Device (only for certain models) CAUTION: This appliance contains a laser system and is especially limited in hot or cold places, such as a coin, clip or pen causes direct connection of the positive (+) and negative (-) terminals of any charger or battery that which could affect performance. vi pierce, open or disassemble the battery. The battery can...
..., buy a new battery. Caution for Optical Drive Device (only for certain models) CAUTION: This appliance contains a laser system and is especially limited in hot or cold places, such as a coin, clip or pen causes direct connection of the positive (+) and negative (-) terminals of any charger or battery that which could affect performance. vi pierce, open or disassemble the battery. The battery can...
User Manual
Page 13
..., please refer to the AcerSystem User Guide. If Adobe Reader is available in the Aspire product series. Please understand that due to use your Acer notebook, we have designed a set of the power button. The printed Quick Guide introduces you to the basic features and functions of your computer, clicking on how to its nature, the Generic User Guide as well as system utilities, data recovery, expansion options and troubleshooting.
..., please refer to the AcerSystem User Guide. If Adobe Reader is available in the Aspire product series. Please understand that due to use your Acer notebook, we have designed a set of the power button. The printed Quick Guide introduces you to the basic features and functions of your computer, clicking on how to its nature, the Generic User Guide as well as system utilities, data recovery, expansion options and troubleshooting.
User Manual
Page 17
...care of your battery pack xv Cleaning and servicing xv Touchpad 1 Touchpad basics (with fingerprint reader) 1 Touchpad basics (with two-click buttons) 2 Using the keyboard 3 Lock keys and embedded numeric keypad* 3 Windows keys 4 Audio 5 Acer PureZone (only for certain models) 5 Tuba (only for certain models) 5 Using Dolby Home Theater for certain models) 7 Acer GridVista (dual-display compatible) 8 Acer Backup Manager 9 Power management 10 Acer eRecovery Management 11 Burn backup discs 12 Restore 13 Restore Windows from backup discs 14 Acer Arcade Deluxe...
...care of your battery pack xv Cleaning and servicing xv Touchpad 1 Touchpad basics (with fingerprint reader) 1 Touchpad basics (with two-click buttons) 2 Using the keyboard 3 Lock keys and embedded numeric keypad* 3 Windows keys 4 Audio 5 Acer PureZone (only for certain models) 5 Tuba (only for certain models) 5 Using Dolby Home Theater for certain models) 7 Acer GridVista (dual-display compatible) 8 Acer Backup Manager 9 Power management 10 Acer eRecovery Management 11 Burn backup discs 12 Restore 13 Restore Windows from backup discs 14 Acer Arcade Deluxe...
User Manual
Page 19
... International Travelers Warranty (ITW) 46 Before you call 46 Troubleshooting 47 Troubleshooting tips 47 Error messages 47 Regulations and safety notices 48 FCC statement 48 Modem notices (only for selected models) 39 To connect the digital antenna 39 Watching TV with an external antenna or cable socket 40 BIOS utility 41 Boot sequence 41 Enable disk-to RF fields (RSS-102) 54 LCD panel ergonomic specifications...
... International Travelers Warranty (ITW) 46 Before you call 46 Troubleshooting 47 Troubleshooting tips 47 Error messages 47 Regulations and safety notices 48 FCC statement 48 Modem notices (only for selected models) 39 To connect the digital antenna 39 Watching TV with an external antenna or cable socket 40 BIOS utility 41 Boot sequence 41 Enable disk-to RF fields (RSS-102) 54 LCD panel ergonomic specifications...
User Manual
Page 21
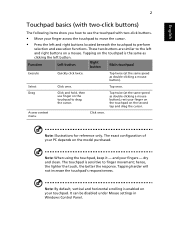
...-clicking a mouse button); Note: By default, vertical and horizontal scrolling is sensitive to finger movement; Tap twice (at the same speed as double-clicking a mouse button). Function Left button Right button Main touchpad Execute Select Drag Access context menu Quickly click twice. Tap once. rest your finger on the touchpad on a mouse. These two buttons are similar to the left and right buttons located beneath the touchpad to perform...
...-clicking a mouse button); Note: By default, vertical and horizontal scrolling is sensitive to finger movement; Tap twice (at the same speed as double-clicking a mouse button). Function Left button Right button Main touchpad Execute Select Drag Access context menu Quickly click twice. Tap once. rest your finger on the touchpad on a mouse. These two buttons are similar to the left and right buttons located beneath the touchpad to perform...
User Manual
Page 22
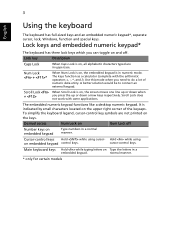
... mode. The embedded numeric keypad functions like a desktop numeric keypad. To simplify the keyboard legend, cursor-control key symbols are in a normal manner. Cursor-control keys Hold while using on , all alphabetic characters typed are not printed on , the screen moves one line up or down when + you press the up or down arrow keys respectively. Scroll Lock does not work with the arithmetic operators...
... mode. The embedded numeric keypad functions like a desktop numeric keypad. To simplify the keyboard legend, cursor-control key symbols are in a normal manner. Cursor-control keys Hold while using on , all alphabetic characters typed are not printed on , the screen moves one line up or down when + you press the up or down arrow keys respectively. Scroll Lock does not work with the arithmetic operators...
User Manual
Page 23
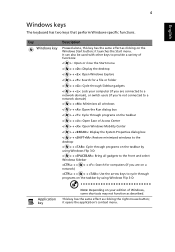
... the taskbar by using Windows Flip 3-D Application key Note: Depending on the Windows Start button; it launches the Start menu. English 4 Windows keys The keyboard has two keys that perform Windows-specific functions. Key Windows key Description Pressed alone, this key has the same effect as clicking on your computer (if you are connected to a network domain), or switch users (if you are on a + < > + : Use the arrow keys to a network domain) < > + : Minimizes all windows < > + : Open the Run dialog...
... the taskbar by using Windows Flip 3-D Application key Note: Depending on the Windows Start button; it launches the Start menu. English 4 Windows keys The keyboard has two keys that perform Windows-specific functions. Key Windows key Description Pressed alone, this key has the same effect as clicking on your computer (if you are connected to a network domain), or switch users (if you are on a + < > + : Use the arrow keys to a network domain) < > + : Minimizes all windows < > + : Open the Run dialog...
User Manual
Page 28
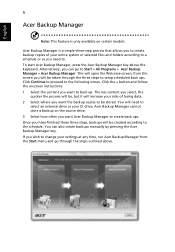
... Acer Backup Manager key. The less content you select, the quicker the process will be, but it will increase your risks of your entire system or selected files and folders according to a schedule or as you need to change your D: drive; Acer Backup Manager is only available on the source drive. 3 Select how often you want Acer Backup Manager to create back ups. from the Start menu...
... Acer Backup Manager key. The less content you select, the quicker the process will be, but it will increase your risks of your entire system or selected files and folders according to a schedule or as you need to change your D: drive; Acer Backup Manager is only available on the source drive. 3 Select how often you want Acer Backup Manager to create back ups. from the Start menu...
User Manual
Page 29
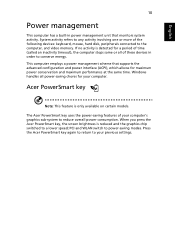
... the following devices: keyboard, mouse, hard disk, peripherals connected to reduce overall power consumption. Windows handles all of your previous settings. The Acer PowerSmart key uses the power-saving features of these devices in power management unit that supports the advanced configuration and power interface (ACPI), which allows for your computer. Press the Acer PowerSmart key again to return to power-saving modes. This computer employs a power management scheme that monitors system activity. PCI and WLAN switch to...
... the following devices: keyboard, mouse, hard disk, peripherals connected to reduce overall power consumption. Windows handles all of your previous settings. The Acer PowerSmart key uses the power-saving features of these devices in power management unit that supports the advanced configuration and power interface (ACPI), which allows for your computer. Press the Acer PowerSmart key again to return to power-saving modes. This computer employs a power management scheme that monitors system activity. PCI and WLAN switch to...
User Manual
Page 33
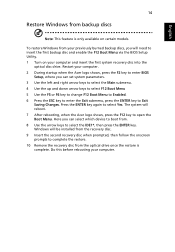
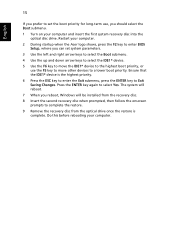
... first backup disc and enable the F12 Boot Menu via the BIOS Setup Utility. 1 Turn on certain models. Press the ENTER key again to select the IDE1*, then press the ENTER key. Restart your computer and insert the first system recovery disc into the optical disc drive. The system will need to open the Boot Menu. Here you can select which device to boot from. 8 Use the arrow keys to select Yes. English 14 Restore Windows from backup discs Note...
... first backup disc and enable the F12 Boot Menu via the BIOS Setup Utility. 1 Turn on certain models. Press the ENTER key again to select the IDE1*, then press the ENTER key. Restart your computer and insert the first system recovery disc into the optical disc drive. The system will need to open the Boot Menu. Here you can select which device to boot from. 8 Use the arrow keys to select Yes. English 14 Restore Windows from backup discs Note...
User Manual
Page 34
... will reboot. 7 When you reboot, Windows will be installed from the recovery disc. 8 Insert the second recovery disc when prompted, then follow the onscreen prompts to complete the restore. 9 Remove the recovery disc from the optical drive once the restore is the highest priority. 6 Press the ESC key to enter the Exit submenu, press the ENTER key to Exit Saving Changes. Restart your computer. 2 During startup when the Acer logo shows...
... will reboot. 7 When you reboot, Windows will be installed from the recovery disc. 8 Insert the second recovery disc when prompted, then follow the onscreen prompts to complete the restore. 9 Remove the recovery disc from the optical drive once the restore is the highest priority. 6 Press the ESC key to enter the Exit submenu, press the ENTER key to Exit Saving Changes. Restart your computer. 2 During startup when the Acer logo shows...
User Manual
Page 35
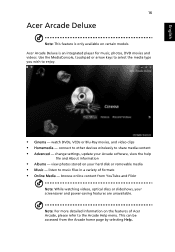
...; Albums - change settings, update your hard disk or removable media • Music - listen to music files in a variety of Acer Arcade, please refer to the Arcade Help menu. Use the MediaConsole, touchpad or arrow keys to select the media type you wish to share media content • Advanced - view photos stored on certain models. This can be accessed from YouTube and Flickr Note: While watching videos, optical discs or...
...; Albums - change settings, update your hard disk or removable media • Music - listen to music files in a variety of Acer Arcade, please refer to the Arcade Help menu. Use the MediaConsole, touchpad or arrow keys to select the media type you wish to share media content • Advanced - view photos stored on certain models. This can be accessed from YouTube and Flickr Note: While watching videos, optical discs or...
User Manual
Page 46
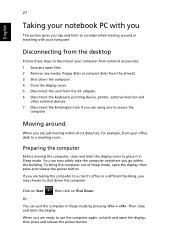
... in Sleep mode. Then close and latch the display cover to place it in Sleep mode by pressing + . Or: You can now safely take the computer anywhere you go within short distances, for example, from the AC adapter. 6 Disconnect the keyboard, pointing device, printer, external monitor and other external devices. 7 Disconnect the Kensington lock if you are using one to use the computer again, unlatch and open the display...
... in Sleep mode. Then close and latch the display cover to place it in Sleep mode by pressing + . Or: You can now safely take the computer anywhere you go within short distances, for example, from the AC adapter. 6 Disconnect the keyboard, pointing device, printer, external monitor and other external devices. 7 Disconnect the Kensington lock if you are using one to use the computer again, unlatch and open the display...
User Manual
Page 50
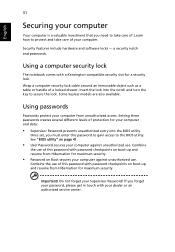
... slot for maximum security. Security features include hardware and software locks - a security notch and passwords. Wrap a computer security lock cable around an immovable object such as a table or handle of a locked drawer. Some keyless models are also available. Combine the use . See "BIOS utility" on boot-up and resume from Hibernation for a security lock. Using a computer security lock The notebook comes with password checkpoints on page 41. • User Password...
... slot for maximum security. Security features include hardware and software locks - a security notch and passwords. Wrap a computer security lock cable around an immovable object such as a table or handle of a locked drawer. Some keyless models are also available. Combine the use . See "BIOS utility" on boot-up and resume from Hibernation for a security lock. Using a computer security lock The notebook comes with password checkpoints on page 41. • User Password...
User Manual
Page 51
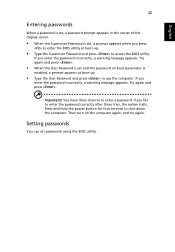
... appears. English 32 Entering passwords When a password is set, a password prompt appears in the center of the display screen. • When the Supervisor Password is enabled, a prompt appears at boot-up . • Type the User Password and press to use the computer. Press and hold the power button for four seconds to enter a password. If you press to enter the BIOS utility at boot-up . • Type the Supervisor Password and press to access the BIOS utility.
... appears. English 32 Entering passwords When a password is set, a password prompt appears in the center of the display screen. • When the Supervisor Password is enabled, a prompt appears at boot-up . • Type the User Password and press to use the computer. Press and hold the power button for four seconds to enter a password. If you press to enter the BIOS utility at boot-up . • Type the Supervisor Password and press to access the BIOS utility.
User Manual
Page 52
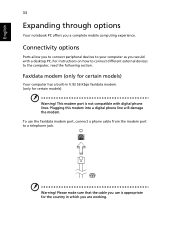
... this modem into a digital phone line will damage the modem. Please make sure that the cable you are working. Fax/data modem (only for certain models) Warning! For instructions on how to connect different external devices to a telephone jack. To use is not compatible with a desktop PC. Connectivity options Ports allow you to connect peripheral devices to your computer as you a complete mobile computing experience.
... this modem into a digital phone line will damage the modem. Please make sure that the cable you are working. Fax/data modem (only for certain models) Warning! For instructions on how to connect different external devices to a telephone jack. To use is not compatible with a desktop PC. Connectivity options Ports allow you to connect peripheral devices to your computer as you a complete mobile computing experience.
User Manual
Page 60
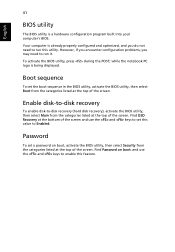
... BIOS utility, then select Security from the categories listed at the top of the screen and use the and keys to -disk recovery (hard disk recovery), activate the BIOS utility, then select Main from the categories listed at the top of the screen. English 41 BIOS utility The BIOS utility is being displayed. Boot sequence To set this utility. Find D2D Recovery at the top of the screen. However, if you encounter configuration problems, you do not need to Enabled...
... BIOS utility, then select Security from the categories listed at the top of the screen and use the and keys to -disk recovery (hard disk recovery), activate the BIOS utility, then select Main from the categories listed at the top of the screen. English 41 BIOS utility The BIOS utility is being displayed. Boot sequence To set this utility. Find D2D Recovery at the top of the screen. However, if you encounter configuration problems, you do not need to Enabled...
User Manual
Page 62
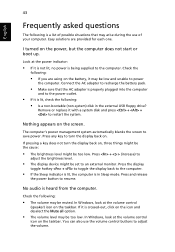
... an external monitor. If pressing a key does not turn the display back on the screen. In Windows, look at the volume control icon on the power, but the computer does not start or boot up. Press and release the power button to power the computer. Check the following: • The volume may arise during the use the volume control buttons to the computer. Press + < > (increase) to adjust the brightness level. • The display device...
... an external monitor. If pressing a key does not turn the display back on the screen. In Windows, look at the volume control icon on the power, but the computer does not start or boot up. Press and release the power button to power the computer. Check the following: • The volume may arise during the use the volume control buttons to the computer. Press + < > (increase) to adjust the brightness level. • The display device...


