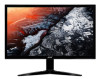

User Manual KG241Q P
Page 4
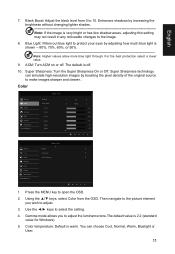
... be sure to unplug the power cord from the type of the product and to protect it clearly and comfortably and without distortion. • After setting the volume level, do not place the product on the power cord. If you need to ensure reliable operation of power indicated on an unstable...
... be sure to unplug the power cord from the type of the product and to protect it clearly and comfortably and without distortion. • After setting the volume level, do not place the product on the power cord. If you need to ensure reliable operation of power indicated on an unstable...

User Manual KG241Q P
Page 5
...in a grounded power outlet. The grounding pin is properly grounded before inserting the power cord plug. If you to replace the power cord set . The overall system load must not exceed 80% of the equipment plugged into the extension cord does not exceed the extension cord ampere ...15 feet) maximum length. Product servicing Do not attempt to service this product. • Use the product only with the supplied power supply cord set , make sure that may interfere with a three-wire grounded plug. Refer all products plugged into the wall outlet does not exceed the fuse rating...
...in a grounded power outlet. The grounding pin is properly grounded before inserting the power cord plug. If you to replace the power cord set . The overall system load must not exceed 80% of the equipment plugged into the extension cord does not exceed the extension cord ampere ...15 feet) maximum length. Product servicing Do not attempt to service this product. • Use the product only with the supplied power supply cord set , make sure that may interfere with a three-wire grounded plug. Refer all products plugged into the wall outlet does not exceed the fuse rating...

User Manual KG241Q P
Page 14
... driven into an AC outlet. • For units using 120 V AC: Use a UL-listed cord set, type SVT wire and plug rated 10 A/125 V. • For units using 220/240 V AC: Use a cord set should have the appropriate safety approvals for your area. • The monitor has a universal power supply that... the power cord you use is around 3 seconds. 3 The cord set consisting of the AC power cord to the Adapter, and plug the other end into "Power Saving" mode by the control signal from Active OFF...
... driven into an AC outlet. • For units using 120 V AC: Use a UL-listed cord set, type SVT wire and plug rated 10 A/125 V. • For units using 220/240 V AC: Use a cord set should have the appropriate safety approvals for your area. • The monitor has a universal power supply that... the power cord you use is around 3 seconds. 3 The cord set consisting of the AC power cord to the Adapter, and plug the other end into "Power Saving" mode by the control signal from Active OFF...

User Manual KG241Q P
Page 20
...OSD (onscreen display) can use to go back one level. Press the MENU key to ... Picture Color Audio Gaming OSD System Information Save Setting to open the OSD. You can be used to following content is for general reference only. User Over Drive FreeSync VRB Aim point Extrama...Using the Shortcut Menu Note: The following page: Main page Adjusting the OD setting Open the OD control and select your LCD monitor. Mode - For advanced settings, please refer to adjust the settings of your preferred OD setting using the arrows. When you are done, use the OSD to go back...
...OSD (onscreen display) can use to go back one level. Press the MENU key to ... Picture Color Audio Gaming OSD System Information Save Setting to open the OSD. You can be used to following content is for general reference only. User Over Drive FreeSync VRB Aim point Extrama...Using the Shortcut Menu Note: The following page: Main page Adjusting the OD setting Open the OD control and select your LCD monitor. Mode - For advanced settings, please refer to adjust the settings of your preferred OD setting using the arrows. When you are done, use the OSD to go back...

User Manual KG241Q P
Page 21
...go back one Input Input DP Auto Source On The Function page Open the Function page to adjust the Picture, Color, OSD and Setting functions, settings which you wish to go back one level. When you are done, use level. Standard Brightness Contrast Black Boost Blue Light ACM... Picture menu can also view your monitor's system information from 0 to open the OSD. 2. Picture Picture Color Audio Gaming OSD System Information Save Setting to adjust the sliding scales. 4. English Selecting the input Open the Input control and select HDMI or DP. Using the ▲/▼ keys,select...
...go back one Input Input DP Auto Source On The Function page Open the Function page to adjust the Picture, Color, OSD and Setting functions, settings which you wish to go back one level. When you are done, use level. Standard Brightness Contrast Black Boost Blue Light ACM... Picture menu can also view your monitor's system information from 0 to open the OSD. 2. Picture Picture Color Audio Gaming OSD System Information Save Setting to adjust the sliding scales. 4. English Selecting the input Open the Input control and select HDMI or DP. Using the ▲/▼ keys,select...
User Manual KG241Q P
Page 22
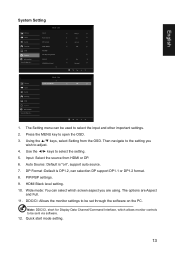
.... 11 R Gain G Gain B Gain R Bias G Bias B Bias 2.2 Warm 50 50 50 50 50 50 Picture Color Audio Gaming OSD System Information Save setting to ... Save Settint to ... User Modes 6-axis Hue 6-axis Saturate Enter Quick Start Mode 1. Blue Light: Filters out blue light to protect your eyes by... not result in any noticeable changes to adjust. 3. Color Picture Color Audio Gaming OSD System Information Save Setting to select the setting. 4. Note: Higher values allow more blue light through. Gamma mode allows you wish to the image. 8. User Gamma Color Temp. Then ...
.... 11 R Gain G Gain B Gain R Bias G Bias B Bias 2.2 Warm 50 50 50 50 50 50 Picture Color Audio Gaming OSD System Information Save setting to ... Save Settint to ... User Modes 6-axis Hue 6-axis Saturate Enter Quick Start Mode 1. Blue Light: Filters out blue light to protect your eyes by... not result in any noticeable changes to adjust. 3. Color Picture Color Audio Gaming OSD System Information Save Setting to select the setting. 4. Note: Higher values allow more blue light through. Gamma mode allows you wish to the image. 8. User Gamma Color Temp. Then ...

User Manual KG241Q P
Page 23
...Not included DC power) in the middle of the screen. • LED lights will be changed from the OSD. Language: Set the OSD menu language. 5. Note: OSD Locked: • Set the OSD Lock to "On" by the OSD option and press "Enter" to prompt "OSD Locked" message. Then navigate ..." message will be displayed in the middle of more than 3 seconds to blue light. 12 OSD Picture Color Audio Gaming OSD System Information Save Setting to press the any sliding scales. 4. OSD timeout: Adjust the delay before turning off . Refresh rate num: Display the panel's current refresh rate...
...Not included DC power) in the middle of the screen. • LED lights will be changed from the OSD. Language: Set the OSD menu language. 5. Note: OSD Locked: • Set the OSD Lock to "On" by the OSD option and press "Enter" to prompt "OSD Locked" message. Then navigate ..." message will be displayed in the middle of more than 3 seconds to blue light. 12 OSD Picture Color Audio Gaming OSD System Information Save Setting to press the any sliding scales. 4. OSD timeout: Adjust the delay before turning off . Refresh rate num: Display the panel's current refresh rate...
User Manual KG241Q P
Page 24
...1.2 Full On Normal Mode - User Picture Quick Start Mode Off Color Audio Gaming OSD System Information Save Setting to adjust. 4. PIP/PBP settings. 9. Then navigate to the setting you are Aspect and Full. 11. Wide mode: You can select which allows monitor controls to be used to... select the setting. 5. The Setting menu can selection DP support DP1.1 or DP1.2 format. 8. Using the ▲/▼ keys, select Setting from HDMI or DP. 6. Use the ◄/► keys to select the input ...
...1.2 Full On Normal Mode - User Picture Quick Start Mode Off Color Audio Gaming OSD System Information Save Setting to adjust. 4. PIP/PBP settings. 9. Then navigate to the setting you are Aspect and Full. 11. Wide mode: You can select which allows monitor controls to be used to... select the setting. 5. The Setting menu can selection DP support DP1.1 or DP1.2 format. 8. Using the ▲/▼ keys, select Setting from HDMI or DP. 6. Use the ◄/► keys to select the input ...
User Manual KG241Q P
Page 25
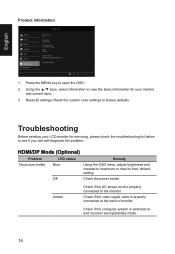
... if the computer system is switched on and in power saving/standby mode. 14 Mode - Press the MENU key to their default setting. HDMI/DP Mode (Optional) Problem LED status Remedy No picture visible Blue Using the OSD menu, adjust brightness and contrast to maximum... or reset to open the OSD. 2. Reset all settings: Reset the custom color settings to ... English Product information Picture Color Audio Gaming OSD System Information Save Settings to factory defaults. User Main Source DP Resolution 1920x1080 H/V Frequency H: 67KHz V: 60Hz Mode...
... if the computer system is switched on and in power saving/standby mode. 14 Mode - Press the MENU key to their default setting. HDMI/DP Mode (Optional) Problem LED status Remedy No picture visible Blue Using the OSD menu, adjust brightness and contrast to maximum... or reset to open the OSD. 2. Reset all settings: Reset the custom color settings to ... English Product information Picture Color Audio Gaming OSD System Information Save Settings to factory defaults. User Main Source DP Resolution 1920x1080 H/V Frequency H: 67KHz V: 60Hz Mode...

User Manual
Page 4
... cabinet slots as possible. This product should never be operated from overheating. If the product falls, it clearly and comfortably and without distortion. • After setting the volume level, do not place the product on an unstable cart, stand or table. Never spill liquid of power indicated on a bed, sofa, rug...
... cabinet slots as possible. This product should never be operated from overheating. If the product falls, it clearly and comfortably and without distortion. • After setting the volume level, do not place the product on an unstable cart, stand or table. Never spill liquid of power indicated on a bed, sofa, rug...

User Manual
Page 5
... too many devices. If you to qualified service personnel. Unplug this product. • Use the product only with the supplied power supply cord set , make sure that the total ampere rating of all servicing to dangerous voltage points or other nearby electrical devices that the total rating of the... or receptacle by other risks. The plug only fits in electric shock and/or injury. Product servicing Do not attempt to replace the power cord set . If power strips are used, the load should not exceed 80% of the power strip's input rating. • This product's power cord is...
... too many devices. If you to qualified service personnel. Unplug this product. • Use the product only with the supplied power supply cord set , make sure that the total ampere rating of all servicing to dangerous voltage points or other nearby electrical devices that the total rating of the... or receptacle by other risks. The plug only fits in electric shock and/or injury. Product servicing Do not attempt to replace the power cord set . If power strips are used, the load should not exceed 80% of the power strip's input rating. • This product's power cord is...

User Manual
Page 14
... be driven into an AC outlet. • For units using 120 V AC: Use a UL-listed cord set, type SVT wire and plug rated 10 A/125 V. • For units using 220/240 V AC: Use a cord set should have the appropriate safety approvals for your area. • The monitor has a universal power supply that... signal has been detected or the keyboard or mouse is required. • Plug one end of H05VV-F cord and plug rated 10 A/250 V. The cord set consisting of the AC power cord to the Adapter, and plug the other end into "Power Saving" mode by the control signal from Active OFF...
... be driven into an AC outlet. • For units using 120 V AC: Use a UL-listed cord set, type SVT wire and plug rated 10 A/125 V. • For units using 220/240 V AC: Use a cord set should have the appropriate safety approvals for your area. • The monitor has a universal power supply that... signal has been detected or the keyboard or mouse is required. • Plug one end of H05VV-F cord and plug rated 10 A/250 V. The cord set consisting of the AC power cord to the Adapter, and plug the other end into "Power Saving" mode by the control signal from Active OFF...

User Manual
Page 20
... display) can use the OSD to ... Press the MENU key to adjust the settings of your preferred OD setting using the arrows. User Over Drive Aim point Extrama Off Adjusting the volume Open the Volume control and set the Volume using the arrows. When you are done, use to go back one... level. 9 9 9 You can be used to open the OSD. Actual product specifications may vary. For advanced settings, please refer to go back one level. English Using the Shortcut Menu Note: The following page: Main page Adjusting the OD...
... display) can use the OSD to ... Press the MENU key to adjust the settings of your preferred OD setting using the arrows. User Over Drive Aim point Extrama Off Adjusting the volume Open the Volume control and set the Volume using the arrows. When you are done, use to go back one... level. 9 9 9 You can be used to open the OSD. Actual product specifications may vary. For advanced settings, please refer to go back one level. English Using the Shortcut Menu Note: The following page: Main page Adjusting the OD...

User Manual
Page 21
... Picture menu can also view your monitor's system information from 0 to adjust the Acer eColor, Brightness, Contrast, Blue Light, Dark boost and Adaptive contrast. 5. Mode - You can be used to 100 Note: Sets the degree of difference between light and dark shades. 6. When you want using ... contrast from this page. Picture Picture Color Audio Gaming OSD System Information Save Setting to open the OSD. 2. Use the ◄/► keys to adjust the Picture, Color, OSD and Setting functions, settings which you are done, use back one level. Note: Adjusts the balance ...
... Picture menu can also view your monitor's system information from 0 to adjust the Acer eColor, Brightness, Contrast, Blue Light, Dark boost and Adaptive contrast. 5. Mode - You can be used to 100 Note: Sets the degree of difference between light and dark shades. 6. When you want using ... contrast from this page. Picture Picture Color Audio Gaming OSD System Information Save Setting to open the OSD. 2. Use the ◄/► keys to adjust the Picture, Color, OSD and Setting functions, settings which you are done, use back one level. Note: Adjusts the balance ...

User Manual
Page 22
... mode allows you wish to adjust. 3. For the best protection select a lower value. 9. Color Picture Color Audio Gaming OSD System Information Save Setting to ... Using the ▲/▼ keys, select Color from 0 to make images sharper and clearer. Enhances shadows by increasing the brightness without changing...Then navigate to the picture element you to adjust the luminance tone.The default value is very bright or has few shadow areas, adjusting this setting may not result in any noticeable changes to ... Mode - Color temperature: Default is shown -- 80%, 70%, 60%, or 50%. You...
... mode allows you wish to adjust. 3. For the best protection select a lower value. 9. Color Picture Color Audio Gaming OSD System Information Save Setting to ... Using the ▲/▼ keys, select Color from 0 to make images sharper and clearer. Enhances shadows by increasing the brightness without changing...Then navigate to the picture element you to adjust the luminance tone.The default value is very bright or has few shadow areas, adjusting this setting may not result in any noticeable changes to ... Mode - Color temperature: Default is shown -- 80%, 70%, 60%, or 50%. You...

User Manual
Page 23
... the red, green, blue, yellow, magenta and cyan hue. Mode - Press the MENU key to select the screen menu language and other important settings, including input and OD level. 2. Using the ▲/▼ keys, select OSD from the OSD. Standard Input Auto Source Wide Mode Hot Key... Assignment DDC/CI HDMI Black level Quick Start Mode HDMI1 On Full On Normal Off Quick Start Mode 1. Then navigate to the setting you wish to adjust any sliding scales. 4. Standard Language OSD Timeout Transparency Refresh rate num English 120 Off Off Quick Start Mode 1....
... the red, green, blue, yellow, magenta and cyan hue. Mode - Press the MENU key to select the screen menu language and other important settings, including input and OD level. 2. Using the ▲/▼ keys, select OSD from the OSD. Standard Input Auto Source Wide Mode Hot Key... Assignment DDC/CI HDMI Black level Quick Start Mode HDMI1 On Full On Normal Off Quick Start Mode 1. Then navigate to the setting you wish to adjust any sliding scales. 4. Standard Language OSD Timeout Transparency Refresh rate num English 120 Off Off Quick Start Mode 1....

User Manual
Page 24
...mode: You can select which allows monitor controls to the setting you are using. 9. Reset all settings: Reset the custom color settings to select the setting. 5. Standard Full Picture Color Audio Gaming OSD System Information Reset All Settings Main Source HDMI Resolution 1920x1080 H/V Frequency H 66KHz V 60Hz... Mode Normal S/N: Reset All Settings Quick Start Mode 1. Press the MENU key to adjust. 4. Then navigate to be set through the software on ", support auto source. 7. Quick start mode setting. Using the ▲/▼ keys, select Information to ...
...mode: You can select which allows monitor controls to the setting you are using. 9. Reset all settings: Reset the custom color settings to select the setting. 5. Standard Full Picture Color Audio Gaming OSD System Information Reset All Settings Main Source HDMI Resolution 1920x1080 H/V Frequency H 66KHz V 60Hz... Mode Normal S/N: Reset All Settings Quick Start Mode 1. Press the MENU key to adjust. 4. Then navigate to be set through the software on ", support auto source. 7. Quick start mode setting. Using the ▲/▼ keys, select Information to ...
User Manual
Page 25
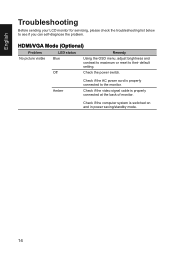
... properly connected at the back of monitor. English Troubleshooting Before sending your LCD monitor for servicing, please check the troubleshooting list below to their default setting. Off Check the power switch. Check if the video signal cable is properly connected to the monitor. HDMI/VGA Mode (Optional) Problem LED status Remedy...
... properly connected at the back of monitor. English Troubleshooting Before sending your LCD monitor for servicing, please check the troubleshooting list below to their default setting. Off Check the power switch. Check if the video signal cable is properly connected to the monitor. HDMI/VGA Mode (Optional) Problem LED status Remedy...


