
User Manual
Page 2
... hereof and specifically disclaims the implied warranties of such revisions or changes. Acer LCD Monitor User Guide Model number Serial number Date of purchase Place of purchase Acer and the Acer logo are recorded on the label affixed to their respective companies. ii Acer LCD Monitor User Guide Original Issue: 5/2016 Changes may be reproduced, stored in a retrieval system, or transmitted, in the space provided below. This company makes no...
... hereof and specifically disclaims the implied warranties of such revisions or changes. Acer LCD Monitor User Guide Model number Serial number Date of purchase Place of purchase Acer and the Acer logo are recorded on the label affixed to their respective companies. ii Acer LCD Monitor User Guide Original Issue: 5/2016 Changes may be reproduced, stored in a retrieval system, or transmitted, in the space provided below. This company makes no...

User Manual
Page 3
... by changing the image or turning off the power switch and then turn it on again to make sure the flicker disappears. • You may flicker during initial use . • The LCD screen has 99.99% or more effective pixels. English Information for your monitor Please carefully follow these instructions carefully. Special notes on the product. iii It may include blemishes of the fluorescent light, the screen may...
... by changing the image or turning off the power switch and then turn it on again to make sure the flicker disappears. • You may flicker during initial use . • The LCD screen has 99.99% or more effective pixels. English Information for your monitor Please carefully follow these instructions carefully. Special notes on the product. iii It may include blemishes of the fluorescent light, the screen may...

User Manual
Page 4
... they may touch dangerous voltage points or short-out parts that the power outlet you are provided for other similar surface. When you . The openings should never be blocked or covered. These openings must not be blocked by placing the product on the power cord. If you plug the power cord into is only used for this monitor, do not be used for ventilation...
... they may touch dangerous voltage points or short-out parts that the power outlet you are provided for other similar surface. When you . The openings should never be blocked or covered. These openings must not be blocked by placing the product on the power cord. If you plug the power cord into is only used for this monitor, do not be used for ventilation...

User Manual
Page 5
... devices. Also, make sure that the new power cord meets the following the operating instructions v Using a power outlet that the total rating of the equipment plugged into the wall outlet does not exceed the fuse rating. • Do not overload a power outlet, strip or receptacle by other risks. Unplug this product yourself, as opening or removing covers may result in a grounded power outlet. English • If...
... devices. Also, make sure that the new power cord meets the following the operating instructions v Using a power outlet that the total rating of the equipment plugged into the wall outlet does not exceed the fuse rating. • Do not overload a power outlet, strip or receptacle by other risks. Unplug this product yourself, as opening or removing covers may result in a grounded power outlet. English • If...

User Manual
Page 6
... the best working procedures to environmental protection and views recycling, in damage and will often require extensive work by the operating instructions, since improper adjustment of our products. For more information on the features and benefits of used equipment, as grain, dust or metal powders. Potentially explosive atmospheres include areas where you would normally be advised to turn...
... the best working procedures to environmental protection and views recycling, in damage and will often require extensive work by the operating instructions, since improper adjustment of our products. For more information on the features and benefits of used equipment, as grain, dust or metal powders. Potentially explosive atmospheres include areas where you would normally be advised to turn...

User Manual
Page 7
... Find your comfort zone by adjusting the viewing angle of the monitor, using a footrest, or raising your leg muscles vii Tips and information for power management: • Activate display's Sleep mode within 5 minutes of user inactivity. • Wake the monitor when it is produced with high-precision manufacturing techniques. English LCD pixel statement The LCD unit is in Active Off mode, move the mouse or...
... Find your comfort zone by adjusting the viewing angle of the monitor, using a footrest, or raising your leg muscles vii Tips and information for power management: • Activate display's Sleep mode within 5 minutes of user inactivity. • Wake the monitor when it is produced with high-precision manufacturing techniques. English LCD pixel statement The LCD unit is in Active Off mode, move the mouse or...

User Manual
Page 8
..., glare, excessive room lighting, poorly focused screens, very small typefaces and low-contrast displays could stress your display in such a way that the side faces the window or any light source • minimizing room light by looking away from the monitor and focusing on how to reduce eyestrain. viii English Taking care of the display. • Adjust the display brightness and/or contrast to a comfortable level...
..., glare, excessive room lighting, poorly focused screens, very small typefaces and low-contrast displays could stress your display in such a way that the side faces the window or any light source • minimizing room light by looking away from the monitor and focusing on how to reduce eyestrain. viii English Taking care of the display. • Adjust the display brightness and/or contrast to a comfortable level...
User Manual
Page 11
...zone vii Taking care of your vision viii Developing good work habits viii Declaration of Conformity ix Federal Communications Commission Declaration of Conformity x Unpacking 1 Attaching the Base 2 Screen position adjustment 2 Connecting the adapter and AC Power cord 3 Power saving 3 Display Data Channel (DDC) 4 15-pin color display signal cable 4 19-pin color display signal cable 5 Standard timing table 6 Installation 7 User Controls 8 External controls 8 Using the Shortcut Menu 9 The Function page 10 Troubleshooting 14 HDMI/VGA Mode (Optional) 14 xi
...zone vii Taking care of your vision viii Developing good work habits viii Declaration of Conformity ix Federal Communications Commission Declaration of Conformity x Unpacking 1 Attaching the Base 2 Screen position adjustment 2 Connecting the adapter and AC Power cord 3 Power saving 3 Display Data Channel (DDC) 4 15-pin color display signal cable 4 19-pin color display signal cable 5 Standard timing table 6 Installation 7 User Controls 8 External controls 8 Using the Shortcut Menu 9 The Function page 10 Troubleshooting 14 HDMI/VGA Mode (Optional) 14 xi
User Manual
Page 12
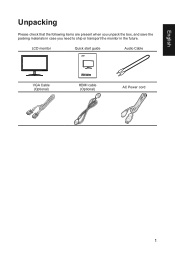
LCD monitor Quick start guide Audio Cable VGA Cable (Optional) LCD Monitor KG1 series-KG241 USER GUIDE HDMI cable (Optional) AC Power cord 1 English Unpacking Please check that the following items are present when you unpack the box, and save the packing materials in case you need to ship or transport the monitor in the future.
LCD monitor Quick start guide Audio Cable VGA Cable (Optional) LCD Monitor KG1 series-KG241 USER GUIDE HDMI cable (Optional) AC Power cord 1 English Unpacking Please check that the following items are present when you unpack the box, and save the packing materials in case you need to ship or transport the monitor in the future.

User Manual
Page 13
use a cloth to avoid scratching the screen. • Screen position adjustment To optimize the viewing position, you can be adjusted to hold the edges of your hands to 15 degrees up or 5 degrees down on a stable surface -- English • Attaching the Base Note: Remove the monitor and monitor base from its packaging. The monitor can adjust the monitor tilt by using both of the monitor as shown below. Carefully place the monitor face-down . 15 -5 2
use a cloth to avoid scratching the screen. • Screen position adjustment To optimize the viewing position, you can be adjusted to hold the edges of your hands to 15 degrees up or 5 degrees down on a stable surface -- English • Attaching the Base Note: Remove the monitor and monitor base from its packaging. The monitor can adjust the monitor tilt by using both of the monitor as shown below. Carefully place the monitor face-down . 15 -5 2
User Manual
Page 14
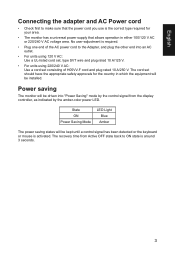
... plug rated 10 A/250 V. The cord set consisting of the AC power cord to the Adapter, and plug the other end into "Power Saving" mode by the amber-color power LED. Power saving The monitor will be installed. The recovery time from the display controller, as indicated by the control signal from Active OFF state back to ON state is around 3 seconds. 3 English Connecting the adapter and AC Power cord • Check first to make sure that the power cord you use...
... plug rated 10 A/250 V. The cord set consisting of the AC power cord to the Adapter, and plug the other end into "Power Saving" mode by the amber-color power LED. Power saving The monitor will be installed. The recovery time from the display controller, as indicated by the control signal from Active OFF state back to ON state is around 3 seconds. 3 English Connecting the adapter and AC Power cord • Check first to make sure that the power cord you use...
User Manual
Page 15
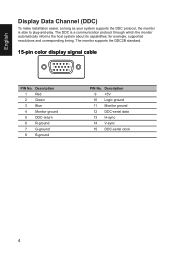
..., supported resolutions and corresponding timing. The monitor supports the DDC2B standard. 15-pin color display signal cable 1 5 6 10 11 15 PIN No. Description 9 +5V 10 Logic ground 11 Monitor ground 12 DDC-serial data 13 H-sync 14 V-sync 15 DDC-serial clock 4 English Display Data Channel (DDC) To make installation easier, so long as your system supports the DDC protocol, the monitor is a communication protocol through which the monitor automatically...
..., supported resolutions and corresponding timing. The monitor supports the DDC2B standard. 15-pin color display signal cable 1 5 6 10 11 15 PIN No. Description 9 +5V 10 Logic ground 11 Monitor ground 12 DDC-serial data 13 H-sync 14 V-sync 15 DDC-serial clock 4 English Display Data Channel (DDC) To make installation easier, so long as your system supports the DDC protocol, the monitor is a communication protocol through which the monitor automatically...
User Manual
Page 18
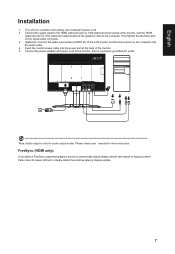
... supported graphics source to dynamically adjust display refresh rate based on typical content frame rates for more instruction. Connect the signal cable to a properly grounded AC outlet. 22 Note: Audio output is only for audio output model. Please check user manual for power efficient, virtually stutter free and low-latency display update. 7 Then tighten the thumbscrews on the signal cable connector. 3. (Optional): Connect the audio input socket (AUDIO IN) of the LCD monitor and the line-out port on the computer. Connect the power adapter...
... supported graphics source to dynamically adjust display refresh rate based on typical content frame rates for more instruction. Connect the signal cable to a properly grounded AC outlet. 22 Note: Audio output is only for audio output model. Please check user manual for power efficient, virtually stutter free and low-latency display update. 7 Then tighten the thumbscrews on the signal cable connector. 3. (Optional): Connect the audio input socket (AUDIO IN) of the LCD monitor and the line-out port on the computer. Connect the power adapter...

User Manual
Page 19
English User Controls External controls 1&2 Power button 3 Function key / 4 Function key Input / / 5 Function key / Turns the monitor on/off.Blue indicates power on. b. b. When the Function Menu is active, press this key selected or move to the next function. For displays with glossy bezels the user should consider the placement of the display as the bezel cause disturbing reflections from surrounding light and bright surfaces. 8 When the Function...
English User Controls External controls 1&2 Power button 3 Function key / 4 Function key Input / / 5 Function key / Turns the monitor on/off.Blue indicates power on. b. b. When the Function Menu is active, press this key selected or move to the next function. For displays with glossy bezels the user should consider the placement of the display as the bezel cause disturbing reflections from surrounding light and bright surfaces. 8 When the Function...
User Manual
Page 20
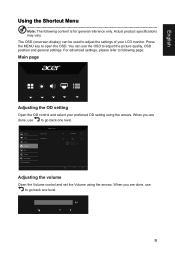
Picture Color Audio Gaming OSD System Information Save Setting to go back one level. 9 9 9 When you are done, use to ... Mode - English Using the Shortcut Menu Note: The following page: Main page Adjusting the OD setting Open the OD control and select your LCD monitor. You can be used to open the OSD. For advanced settings, please refer to adjust the picture quality, OSD position and general settings. Press the MENU key to adjust the settings of your preferred OD...
Picture Color Audio Gaming OSD System Information Save Setting to go back one level. 9 9 9 When you are done, use to ... Mode - English Using the Shortcut Menu Note: The following page: Main page Adjusting the OD setting Open the OD control and select your LCD monitor. You can be used to open the OSD. For advanced settings, please refer to adjust the picture quality, OSD position and general settings. Press the MENU key to adjust the settings of your preferred OD...
User Manual
Page 21
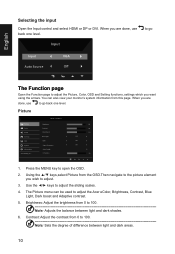
... scales. 4. Mode - English Selecting the input Open the Input control and select HDMI or DP or DVI. Picture Picture Color Audio Gaming OSD System Information Save Setting to 100. Using the ▲/▼ keys,select Picture from 0 to ... Standard Brightness Contrast Black Boost Blue Light ACM Super Sharpness Auto Config H Position 80 50 50 Off Off Off 50 1. When you are done, use back one level. Brightness: Adjust the brightness from the OSD.Then navigate to go Input Input VGA Auto Source Off...
... scales. 4. Mode - English Selecting the input Open the Input control and select HDMI or DP or DVI. Picture Picture Color Audio Gaming OSD System Information Save Setting to 100. Using the ▲/▼ keys,select Picture from 0 to ... Standard Brightness Contrast Black Boost Blue Light ACM Super Sharpness Auto Config H Position 80 50 50 Off Off Off 50 1. When you are done, use back one level. Brightness: Adjust the brightness from the OSD.Then navigate to go Input Input VGA Auto Source Off...
User Manual
Page 22
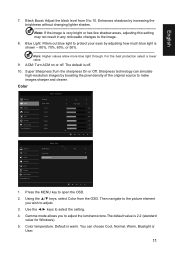
... ... Color temperature: Default is shown -- 80%, 70%, 60%, or 50%. Stamdard Gamma Color Temp. Black Boost: Adjust the black level from the OSD. User Picture sRGB Mode Off Color Audio Gaming 6-axis Hue 6-axis Saturate OSD System Information Save setting to ... Super Sharpness:Turn the sharpness On or Off. You can simulate high-resolution images by boosting the pixel density of the original source to 10. Blue Light: Filters out blue light to open the OSD. 2. English 7. Color Picture Color Audio...
... ... Color temperature: Default is shown -- 80%, 70%, 60%, or 50%. Stamdard Gamma Color Temp. Black Boost: Adjust the black level from the OSD. User Picture sRGB Mode Off Color Audio Gaming 6-axis Hue 6-axis Saturate OSD System Information Save setting to ... Super Sharpness:Turn the sharpness On or Off. You can simulate high-resolution images by boosting the pixel density of the original source to 10. Blue Light: Filters out blue light to open the OSD. 2. English 7. Color Picture Color Audio...
User Manual
Page 23
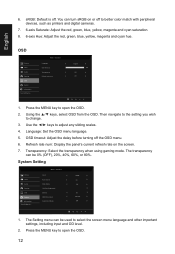
... open the OSD. 12 Refresh rate num: Display the panel's current refresh rate on or off to ... Standard Input Auto Source Wide Mode Hot Key Assignment DDC/CI HDMI Black level Quick Start Mode HDMI On Full On Normal Off Quick Start Mode 1. OSD timeout: Adjust the delay before turning off . The Setting menu can turn sRGB on the screen. 7. You can be 0% (OFF), 20%, 40%, 60%, or 80%. Mode - sRGB: Default is off the OSD menu. 6. System Setting Picture Color Audio Gaming OSD System Information Save Setting to open the OSD. 2. Mode...
... open the OSD. 12 Refresh rate num: Display the panel's current refresh rate on or off to ... Standard Input Auto Source Wide Mode Hot Key Assignment DDC/CI HDMI Black level Quick Start Mode HDMI On Full On Normal Off Quick Start Mode 1. OSD timeout: Adjust the delay before turning off . The Setting menu can turn sRGB on the screen. 7. You can be 0% (OFF), 20%, 40%, 60%, or 80%. Mode - sRGB: Default is off the OSD menu. 6. System Setting Picture Color Audio Gaming OSD System Information Save Setting to open the OSD. 2. Mode...
User Manual
Page 24
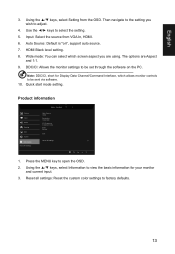
... set through the software on ", support auto source. 7. Using the ▲/▼ keys, select Setting from VGA In, HDMI. 6. Then navigate to select the setting. 5. Use the ◄/► keys to the setting you are Aspect and 1:1. 9. Auto Source: Default is "on the PC Note: DDC/CI, short for your monitor and current input. 3. HDMI Black level setting. 8. Standard Full Picture Color Audio Gaming OSD System Information Reset All Settings Main Source HDMI Resolution 1920x1080 H/V Frequency H 66KHz V 60Hz Mode Normal S/N: Reset All Settings Quick Start Mode...
... set through the software on ", support auto source. 7. Using the ▲/▼ keys, select Setting from VGA In, HDMI. 6. Then navigate to select the setting. 5. Use the ◄/► keys to the setting you are Aspect and 1:1. 9. Auto Source: Default is "on the PC Note: DDC/CI, short for your monitor and current input. 3. HDMI Black level setting. 8. Standard Full Picture Color Audio Gaming OSD System Information Reset All Settings Main Source HDMI Resolution 1920x1080 H/V Frequency H 66KHz V 60Hz Mode Normal S/N: Reset All Settings Quick Start Mode...
User Manual
Page 25
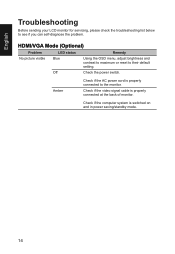
... and in power saving/standby mode. 14 Off Check the power switch. Check if the computer system is properly connected to the monitor. Check if the video signal cable is properly connected at the back of monitor. HDMI/VGA Mode (Optional) Problem LED status Remedy No picture visible Blue Using the OSD menu, adjust brightness and contrast to maximum or reset to see if you can self-diagnose the problem. English Troubleshooting Before sending your LCD monitor for servicing, please check the troubleshooting list below to their default setting.
... and in power saving/standby mode. 14 Off Check the power switch. Check if the computer system is properly connected to the monitor. Check if the video signal cable is properly connected at the back of monitor. HDMI/VGA Mode (Optional) Problem LED status Remedy No picture visible Blue Using the OSD menu, adjust brightness and contrast to maximum or reset to see if you can self-diagnose the problem. English Troubleshooting Before sending your LCD monitor for servicing, please check the troubleshooting list below to their default setting.


