
User Manual
Page 2
Acer Incorporated. Acer LCD Monitor User's Guide Original Issue: 04/2019 Changes may be reproduced, stored in a retrieval system, or transmitted, in new editions of Acer Incorporated. Record the model number, serial number, purchase date and place of purchase information in this...This company makes no representations or warranties, either expressed or implied, with respect to their respective companies. Copyright © 2019. Acer LCD Monitor User's Guide Model number Serial number Date of purchase Place of such revisions or changes. Other companies' product names or trademarks ...
Acer Incorporated. Acer LCD Monitor User's Guide Original Issue: 04/2019 Changes may be reproduced, stored in a retrieval system, or transmitted, in new editions of Acer Incorporated. Record the model number, serial number, purchase date and place of purchase information in this...This company makes no representations or warranties, either expressed or implied, with respect to their respective companies. Copyright © 2019. Acer LCD Monitor User's Guide Model number Serial number Date of purchase Place of such revisions or changes. Other companies' product names or trademarks ...

User Manual
Page 3
Information for hours. Connecting/disconnecting the device Observe the following are turned off the power switch for a few hours. • Acer monitor is purposed for future reference. It may include blemishes of 0.01% or less such as a missing pixel or a pixel lit all the time. • Due... the image or turning off before connecting the power cord to the AC power outlet. • Make sure both the LCD monitor and the computer are normal with the LCD monitor and do not indicate a problem. • Due to the nature of the previous screen may find slightly uneven brightness on...
Information for hours. Connecting/disconnecting the device Observe the following are turned off the power switch for a few hours. • Acer monitor is purposed for future reference. It may include blemishes of 0.01% or less such as a missing pixel or a pixel lit all the time. • Due... the image or turning off before connecting the power cord to the AC power outlet. • Make sure both the LCD monitor and the computer are normal with the LCD monitor and do not indicate a problem. • Due to the nature of the previous screen may find slightly uneven brightness on...

User Manual
Page 8
...This product has been shipped enabled for power management: • Activate the Display Sleep mode within 5 minutes of user inactivity. • Wake the monitor when it is in one fixed posture • avoid slouching forward and/or leaning backward • stand up and walk around regularly to achieve maximum... or persistent discomfort and/or pain related to carpal tunnel syndrome, tendonitis, tenosynovitis or other factors greatly increase the risk of the monitor, using a footrest, or raising your sitting height to remove the strain on your company's health and safety department.
...This product has been shipped enabled for power management: • Activate the Display Sleep mode within 5 minutes of user inactivity. • Wake the monitor when it is in one fixed posture • avoid slouching forward and/or leaning backward • stand up and walk around regularly to achieve maximum... or persistent discomfort and/or pain related to carpal tunnel syndrome, tendonitis, tenosynovitis or other factors greatly increase the risk of the monitor, using a footrest, or raising your sitting height to remove the strain on your company's health and safety department.

User Manual
Page 9
...; placing your display in such a way that the side faces the window or any light source • minimizing room light by looking away from the monitor and focusing on how to reduce eyestrain. ix Taking care of your vision Long viewing hours, wearing incorrect glasses or contact lenses, glare, excessive room...
...; placing your display in such a way that the side faces the window or any light source • minimizing room light by looking away from the monitor and focusing on how to reduce eyestrain. ix Taking care of your vision Long viewing hours, wearing incorrect glasses or contact lenses, glare, excessive room...

User Manual
Page 10
TABLE OF CONTENTS UNPACKING 1 ATTACHING / REMOVING THE BASE 2 SCREEN POSITION ADJUSTMENT 3 CONNECTING THE POWER CORD 4 SAFETY PRECAUTION 4 CLEANING YOUR MONITOR 4 POWER SAVING 5 DDC...5 CONNECTOR PIN ASSIGNMENT 6 STANDARD TIMING TABLE 8 INSTALLATION 9 USER CONTROLS 10 TROUBLESHOOTING 21
TABLE OF CONTENTS UNPACKING 1 ATTACHING / REMOVING THE BASE 2 SCREEN POSITION ADJUSTMENT 3 CONNECTING THE POWER CORD 4 SAFETY PRECAUTION 4 CLEANING YOUR MONITOR 4 POWER SAVING 5 DDC...5 CONNECTOR PIN ASSIGNMENT 6 STANDARD TIMING TABLE 8 INSTALLATION 9 USER CONTROLS 10 TROUBLESHOOTING 21

User Manual
Page 11
UNPACKING Please check the following items are present when you unpack the box, and save the packing materials in case you will need to ship or transport the monitor in future. LCD Monitor Quick Start Guide AC Power Cord D-Sub Cable (Optional) HDMI Cable (Optional) Audio Cable (Optional) EN-1
UNPACKING Please check the following items are present when you unpack the box, and save the packing materials in case you will need to ship or transport the monitor in future. LCD Monitor Quick Start Guide AC Power Cord D-Sub Cable (Optional) HDMI Cable (Optional) Audio Cable (Optional) EN-1

User Manual
Page 12
EN-2 monitor stand arm. use VESA mounting kit (100mm x 100mm) with a wall mounting kit, it is recommended to use a cloth to the Ensure that the base is locked onto the base. Note: If installing with M4 x 10 (L) mm screws to fix your monitor on a stable surface -- Attach the monitor stand arm to avoid scratching the screen. 1. 2. ATTACHING / REMOVING THE BASE Note: Remove the monitor and monitor base from its packaging. Carefully place the monitor face-down on the wall.
EN-2 monitor stand arm. use VESA mounting kit (100mm x 100mm) with a wall mounting kit, it is recommended to use a cloth to the Ensure that the base is locked onto the base. Note: If installing with M4 x 10 (L) mm screws to fix your monitor on a stable surface -- Attach the monitor stand arm to avoid scratching the screen. 1. 2. ATTACHING / REMOVING THE BASE Note: Remove the monitor and monitor base from its packaging. Carefully place the monitor face-down on the wall.

User Manual
Page 13
The monitor can adjust the tilt of your hands to 25 degrees up or 5 degrees down as shown in the figure below . 25 EN-3 SCREEN POSITION ADJUSTMENT In order to optimize the best viewing position, you can be adjusted to hold the edges of the monitor as indicated by using both of the monitor by arrow below .
The monitor can adjust the tilt of your hands to 25 degrees up or 5 degrees down as shown in the figure below . 25 EN-3 SCREEN POSITION ADJUSTMENT In order to optimize the best viewing position, you can be adjusted to hold the edges of the monitor as indicated by using both of the monitor by arrow below .
User Manual
Page 14
...; Refrain from use is the correct type required for the country in a place where there is adequate ventilation. Avoid placing the monitor against a bright background or where sun-light or other light sources may reflect on the power cord to avoid damage to the cable. Do ... unplug the monitor before cleaning. Use a soft cloth to wipe the screen and cabinet front and sides. NEVER SPRAY OR POUR ANY LIQUID DIRECTLY ONTO THE SCREEN OR CASE. PLEASE DO NOT USE ANY AMMONIA OR ALCOHOL-BASED CLEANERS ON THE LCD DISPLAY SCREEN OR CASE. Acer will...
...; Refrain from use is the correct type required for the country in a place where there is adequate ventilation. Avoid placing the monitor against a bright background or where sun-light or other light sources may reflect on the power cord to avoid damage to the cable. Do ... unplug the monitor before cleaning. Use a soft cloth to wipe the screen and cabinet front and sides. NEVER SPRAY OR POUR ANY LIQUID DIRECTLY ONTO THE SCREEN OR CASE. PLEASE DO NOT USE ANY AMMONIA OR ALCOHOL-BASED CLEANERS ON THE LCD DISPLAY SCREEN OR CASE. Acer will...

User Manual
Page 15
...state is activated. DDC To make your system also supports DDC protocol. POWER SAVING The monitor will be driven into "Power Saving" mode by the amber-color power LED. The monitor supports DDC2B standard. State ON Power Saving Mode LED Light Blue Amber The power saving ...the control signal from Active OFF state back to Plug and Play with your system if your installation easier, the monitor is a communication protocol through which the monitor automatically informs the host system about its capabilities, for example, supported resolutions and corresponding timing. EN-5
...state is activated. DDC To make your system also supports DDC protocol. POWER SAVING The monitor will be driven into "Power Saving" mode by the amber-color power LED. The monitor supports DDC2B standard. State ON Power Saving Mode LED Light Blue Amber The power saving ...the control signal from Active OFF state back to Plug and Play with your system if your installation easier, the monitor is a communication protocol through which the monitor automatically informs the host system about its capabilities, for example, supported resolutions and corresponding timing. EN-5

User Manual
Page 16
DESCRIPTION +5V Logic Ground Monitor Ground DDC-Serial Data H-Sync V-Sync DDC-Serial Clock EN-6 CONNECTOR PIN ASSIGNMENT 15-Pin Color Display Signal Cable 1 5 6 10 11 15 PIN NO. 1. 2. 3. 4. 5. 6. 7. 8. DESCRIPTION Red Green Blue Monitor Ground DDC-return R-Ground G-Ground B-Ground PIN NO. 9. 10. 11. 12. 13. 14. 15.
DESCRIPTION +5V Logic Ground Monitor Ground DDC-Serial Data H-Sync V-Sync DDC-Serial Clock EN-6 CONNECTOR PIN ASSIGNMENT 15-Pin Color Display Signal Cable 1 5 6 10 11 15 PIN NO. 1. 2. 3. 4. 5. 6. 7. 8. DESCRIPTION Red Green Blue Monitor Ground DDC-return R-Ground G-Ground B-Ground PIN NO. 9. 10. 11. 12. 13. 14. 15.

User Manual
Page 19
...the computer. 3. Connect the Audio Cable. (Optional) 4. Make sure both the monitor and computer are powered-OFF. Connect the HDMI cable to the computer. 2-2 Connect HDMI Cable (Only HDMI-input model) a. Insert the monitor power cable into the power port at the back of your computer and your... monitor into a nearby electrical outlet. 6. This sequence is very important HDMI D-Sub HDMI HDMI optional EN-9 Turn ...
...the computer. 3. Connect the Audio Cable. (Optional) 4. Make sure both the monitor and computer are powered-OFF. Connect the HDMI cable to the computer. 2-2 Connect HDMI Cable (Only HDMI-input model) a. Insert the monitor power cable into the power port at the back of your computer and your... monitor into a nearby electrical outlet. 6. This sequence is very important HDMI D-Sub HDMI HDMI optional EN-9 Turn ...
User Manual
Page 20
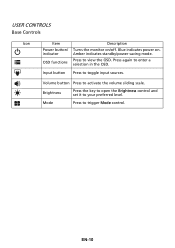
Input button Press to your preferred level. indicator Amber indicates standby/power saving mode. Brightness Press the key to open the Brightness control and set it to toggle input sources. OSD functions Press to trigger Mode control. Mode Press to view the OSD. Blue indicates power on /off. Press again to activate the volume sliding scale. EN-10 Volume button Press to enter a selection in the OSD. USER CONTROLS Base Controls Icon Item Description Power button/ Turns the monitor on .
Input button Press to your preferred level. indicator Amber indicates standby/power saving mode. Brightness Press the key to open the Brightness control and set it to toggle input sources. OSD functions Press to trigger Mode control. Mode Press to view the OSD. Blue indicates power on /off. Press again to activate the volume sliding scale. EN-10 Volume button Press to enter a selection in the OSD. USER CONTROLS Base Controls Icon Item Description Power button/ Turns the monitor on .
User Manual
Page 21
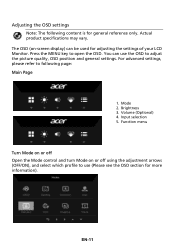
... off Open the Mode control and turn Mode on -screen display) can use (Please see the OSD section for adjusting the settings of your LCD Monitor. You can be used for more information). Brightness 3. Actual product specifications may vary. Mode 2. Adjusting the OSD settings Note: The following page: Main Page 1. The...
... off Open the Mode control and turn Mode on -screen display) can use (Please see the OSD section for adjusting the settings of your LCD Monitor. You can be used for more information). Brightness 3. Actual product specifications may vary. Mode 2. Adjusting the OSD settings Note: The following page: Main Page 1. The...
User Manual
Page 23
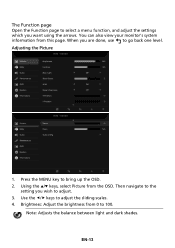
Use the / keys to bring up the OSD. 2. Press the MENU key to adjust the sliding scales. 4. You can also view your monitor's system information from the OSD. When you wish to go back one level. EN-13 Note: Adjusts the balance between light and dark shades. Then ...
Use the / keys to bring up the OSD. 2. Press the MENU key to adjust the sliding scales. 4. You can also view your monitor's system information from the OSD. When you wish to go back one level. EN-13 Note: Adjusts the balance between light and dark shades. Then ...

User Manual
Page 29
... options are Full and Aspect. 8. Adjusting the System 1. Note: DDC/CI, short for available input sources. 6. HDMI Black Level: You can select which allows monitor controls to be sent via software. 9. Quick Start Mode: Enable monitor rapidly. Hot Key Assignment: Select the function of blackness under HDMI source. DDC/CI: Allows the... monitor settings to be set through the software on the PC. The options are Normal and Low. 10. Press the MENU key to select the setting. 4. ...
... options are Full and Aspect. 8. Adjusting the System 1. Note: DDC/CI, short for available input sources. 6. HDMI Black Level: You can select which allows monitor controls to be sent via software. 9. Quick Start Mode: Enable monitor rapidly. Hot Key Assignment: Select the function of blackness under HDMI source. DDC/CI: Allows the... monitor settings to be set through the software on the PC. The options are Normal and Low. 10. Press the MENU key to select the setting. 4. ...

User Manual
Page 30
EN-20 Press the MENU key to view the basic information for your monitor and current input. 3. Using the / keys, select Information to open the OSD. 2. Reset All Settings: Resets all settings to the factory defaults. Product information 1.
EN-20 Press the MENU key to view the basic information for your monitor and current input. 3. Using the / keys, select Information to open the OSD. 2. Reset All Settings: Resets all settings to the factory defaults. Product information 1.
User Manual
Page 31
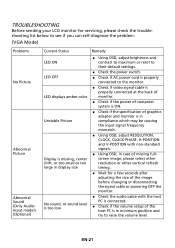
...default settings. Check the power switch. Check if AC power cord is properly connected to the monitor. Check if video signal cable is properly connected at the back of monitor. Check if the power of computer system is ON. Check if the specification of graphics ...refresh timing. Wait for a few seconds after adjusting the size of the image before changing or disconnecting the signal cable or powering OFF the monitor. Check the audio cable with the host PC is connected. Check if the volume setup of the host PC is in minimum...
...default settings. Check the power switch. Check if AC power cord is properly connected to the monitor. Check if video signal cable is properly connected at the back of monitor. Check if the power of computer system is ON. Check if the specification of graphics ...refresh timing. Wait for a few seconds after adjusting the size of the image before changing or disconnecting the signal cable or powering OFF the monitor. Check the audio cable with the host PC is connected. Check if the volume setup of the host PC is in minimum...
User Manual
Page 32
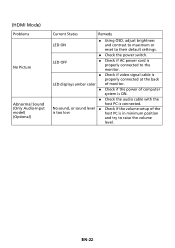
...; Check if video signal cable is properly connected at the back LED displays amber color of monitor. Check if the power of the is too low host PC is connected. EN-22 No sound, or sound level Check if the ...
...; Check if video signal cable is properly connected at the back LED displays amber color of monitor. Check if the power of the is too low host PC is connected. EN-22 No sound, or sound level Check if the ...
User Manual
Page 34
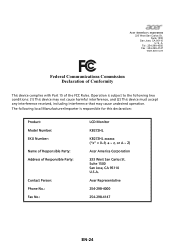
... Federal Communications Commission Declaration of Conformity This device complies with Part 15 of Responsible Party: Contact Person: Phone No.: Fax No.: LCD Monitor KB272HL KB272HL xxxxxx ("x" = 0~9, a ~ z, or A ~ Z) Acer America Corporation 333 West San Carlos St. The following two conditions: (1) This device may not cause harmful interference, and (2) This device must accept any interference ...
... Federal Communications Commission Declaration of Conformity This device complies with Part 15 of Responsible Party: Contact Person: Phone No.: Fax No.: LCD Monitor KB272HL KB272HL xxxxxx ("x" = 0~9, a ~ z, or A ~ Z) Acer America Corporation 333 West San Carlos St. The following two conditions: (1) This device may not cause harmful interference, and (2) This device must accept any interference ...


