User Manual
Page 2
..., in this publication without the prior written permission of Acer Incorporated. All correspondence concerning your computer. Acer LCD Monitor User's Guide Model number Serial number Date of purchase Place of purchase Acer and the Acer logo are recorded on the label affixed to the contents.... All Rights Reserved. Other companies' product names or trademarks are used herein for a particular purpose. Copyright © 2016. Acer LCD Monitor User's Guide Original Issue: 12/2016 Changes may be incorporated in the space provided below. Record the model number, serial number...
..., in this publication without the prior written permission of Acer Incorporated. All correspondence concerning your computer. Acer LCD Monitor User's Guide Model number Serial number Date of purchase Place of purchase Acer and the Acer logo are recorded on the label affixed to the contents.... All Rights Reserved. Other companies' product names or trademarks are used herein for a particular purpose. Copyright © 2016. Acer LCD Monitor User's Guide Original Issue: 12/2016 Changes may be incorporated in the space provided below. Record the model number, serial number...

User Manual
Page 3
...is attached to its base before connecting the power cord to the AC power outlet. • Make sure both the LCD monitor and the computer are normal with the LCD monitor and do not indicate a problem. • Due to make sure the flicker disappears. • You may flicker during initial... LCD screen has 99.99% or more effective pixels. Cleaning your safety and comfort Safety instructions Read these guidelines when cleaning the monitor: • Always unplug the monitor before cleaning. • Use a soft cloth to the nature of the LCD screen, an afterimage of the previous screen may ...
...is attached to its base before connecting the power cord to the AC power outlet. • Make sure both the LCD monitor and the computer are normal with the LCD monitor and do not indicate a problem. • Due to make sure the flicker disappears. • You may flicker during initial... LCD screen has 99.99% or more effective pixels. Cleaning your safety and comfort Safety instructions Read these guidelines when cleaning the monitor: • Always unplug the monitor before cleaning. • Use a soft cloth to the nature of the LCD screen, an afterimage of the previous screen may ...

User Manual
Page 8
... of eyestrain and headaches after long hours of working conditions, personal health and other factors greatly increase the risk of user inactivity. • Wake the monitor when it is in the hands, wrists, arms, shoulders, neck or back: • numbness, or a burning or tingling sensation • aching, soreness or tenderness •... zone Find your comfort zone by adjusting the viewing angle of a computer. The following tips: • refrain from staying too long in front of the monitor, using a footrest, or raising your leg muscles
... of eyestrain and headaches after long hours of working conditions, personal health and other factors greatly increase the risk of user inactivity. • Wake the monitor when it is in the hands, wrists, arms, shoulders, neck or back: • numbness, or a burning or tingling sensation • aching, soreness or tenderness •... zone Find your comfort zone by adjusting the viewing angle of a computer. The following tips: • refrain from staying too long in front of the monitor, using a footrest, or raising your leg muscles

User Manual
Page 9
... a task light • changing the display's viewing angle • using a glare-reduction filter • using a display visor, such as a piece of cardboard extended from the monitor and focusing on how to reduce eyestrain. Display • Keep your display clean. • Keep your head at a higher level than the top edge of...
... a task light • changing the display's viewing angle • using a glare-reduction filter • using a display visor, such as a piece of cardboard extended from the monitor and focusing on how to reduce eyestrain. Display • Keep your display clean. • Keep your head at a higher level than the top edge of...
User Manual
Page 12
... for your safety and comfort Safety instructions Cleaning your monitor Connecting/disconnecting the device Accessibility Safe listening Warnings Using electrical power Product servicing Additional safety information IT equipment recycling information Disposal instructions LCD pixel ...position adjustment Connecting the power cord Power saving Display Data Channel (DDC) Connector pin assignment Standard timing table Installation User controls How to adjust a setting Acer eColor Management User Troubleshooting VGA mode DVI mode HDMI mode 1 iii iii iii iii iii iv iv iv iv v vi vi vii vii viii xi...
... for your safety and comfort Safety instructions Cleaning your monitor Connecting/disconnecting the device Accessibility Safe listening Warnings Using electrical power Product servicing Additional safety information IT equipment recycling information Disposal instructions LCD pixel ...position adjustment Connecting the power cord Power saving Display Data Channel (DDC) Connector pin assignment Standard timing table Installation User controls How to adjust a setting Acer eColor Management User Troubleshooting VGA mode DVI mode HDMI mode 1 iii iii iii iii iii iv iv iv iv v vi vi vii vii viii xi...

User Manual
Page 13
English 1 Unpacking Please check that the following items are present when you unpack the box, and save the packing materials in case you need to ship or transport the monitor in the future. LCD monitor Quick start guide HDMI cable (Option) D-sub cable (Option) DVI cable (Option) AC power cord Audio Cable (Option)
English 1 Unpacking Please check that the following items are present when you unpack the box, and save the packing materials in case you need to ship or transport the monitor in the future. LCD monitor Quick start guide HDMI cable (Option) D-sub cable (Option) DVI cable (Option) AC power cord Audio Cable (Option)

User Manual
Page 14
Remove: Reverse the steps to avoid scratching the screen. The monitor can adjust the monitor tilt by using both of the monitor as shown below. use a cloth to remove the base. Screen position adjustment To optimize the viewing position, you can be adjusted to hold the edges of your hands to 20 degrees up or 5 degrees down on a stable surface -- Carefully place the monitor face-down . -5° 20° English 2 Attaching the Base Note: Remove the monitor and monitor base from its packaging.
Remove: Reverse the steps to avoid scratching the screen. The monitor can adjust the monitor tilt by using both of the monitor as shown below. use a cloth to remove the base. Screen position adjustment To optimize the viewing position, you can be adjusted to hold the edges of your hands to 20 degrees up or 5 degrees down on a stable surface -- Carefully place the monitor face-down . -5° 20° English 2 Attaching the Base Note: Remove the monitor and monitor base from its packaging.
User Manual
Page 15
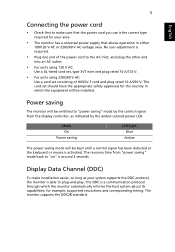
... which the equipment will be switched to "power saving" mode by the amber-colored power LED. The DDC is around 3 seconds. The monitor supports the DDC2B standard. The cord set consisting of the power cord to the AC inlet, and plug the other end into an AC ... appropriate safety approvals for example, supported resolutions and corresponding timing. Display Data Channel (DDC) To make sure that allows operation in which the monitor automatically informs the host system about its capabilities; No user-adjustment is activated. for the country in either 100/120 V AC or 220/...
... which the equipment will be switched to "power saving" mode by the amber-colored power LED. The DDC is around 3 seconds. The monitor supports the DDC2B standard. The cord set consisting of the power cord to the AC inlet, and plug the other end into an AC ... appropriate safety approvals for example, supported resolutions and corresponding timing. Display Data Channel (DDC) To make sure that allows operation in which the monitor automatically informs the host system about its capabilities; No user-adjustment is activated. for the country in either 100/120 V AC or 220/...

User Manual
Page 20
...switched off. (2) Connect one end of the 24-pin DVI cable to the back of the monitor and the other end to diagnose the problem. This sequence is very important. 5 If the monitor does not function properly, please refer to the troubleshooting section to the computer's port. b Connect... the VGA video cable to a properly grounded AC outlet. 3 e Turn on the monitor and computer Turn on your host system, please follow the steps below: Steps 1 Connect the video cable a Make sure both the monitor and computer are switched off . (2) Connect the HDMI cable to the computer. 2 Connect...
...switched off. (2) Connect one end of the 24-pin DVI cable to the back of the monitor and the other end to diagnose the problem. This sequence is very important. 5 If the monitor does not function properly, please refer to the troubleshooting section to the computer's port. b Connect... the VGA video cable to a properly grounded AC outlet. 3 e Turn on the monitor and computer Turn on your host system, please follow the steps below: Steps 1 Connect the video cable a Make sure both the monitor and computer are switched off . (2) Connect the HDMI cable to the computer. 2 Connect...
User Manual
Page 21
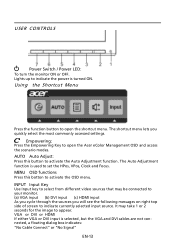
...side of screen to activate the Auto Adjustment function. The Auto Adjustment function is turned ON. Empowering: Press the Empowering Key to open the Acer eColor Management OSD and access the scenario modes. AUTO Auto Adjust: Press this botton to appear. INPUT Input Key Use Input key to select... from different video sources that may take 1 or 2 seconds for the image to activate the OSD menu. It may be connected to your monitor. (a) VGA input (b) DVI input (c) HDMI input As you cycle through the sources you quickly select the most commonly accessed settings. Lights up to...
...side of screen to activate the Auto Adjustment function. The Auto Adjustment function is turned ON. Empowering: Press the Empowering Key to open the Acer eColor Management OSD and access the scenario modes. AUTO Auto Adjust: Press this botton to appear. INPUT Input Key Use Input key to select... from different video sources that may take 1 or 2 seconds for the image to activate the OSD menu. It may be connected to your monitor. (a) VGA input (b) DVI input (c) HDMI input As you cycle through the sources you quickly select the most commonly accessed settings. Lights up to...
User Manual
Page 23
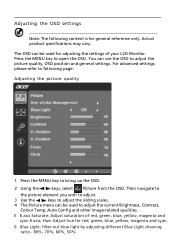
... settings, please refer to adjust the current Brightness, Contrast, Colour Temp, Auto Config and other image-related qualities. 5 6 axis Saturate: Adjust saturation of your LCD Monitor. Press the MENU key to adjust the picture quality, OSD position and general settings. Then navigate to the picture element you wish to adjust. 3 Use...
... settings, please refer to adjust the current Brightness, Contrast, Colour Temp, Auto Config and other image-related qualities. 5 6 axis Saturate: Adjust saturation of your LCD Monitor. Press the MENU key to adjust the picture quality, OSD position and general settings. Then navigate to the picture element you wish to adjust. 3 Use...

User Manual
Page 26
Then the basic information of LCD monitor will show up the OSD. 2 Using the / keys, select Information from the OSD. Product information 1 Press the MENU key to bring up for current input. EN-18
Then the basic information of LCD monitor will show up the OSD. 2 Using the / keys, select Information from the OSD. Product information 1 Press the MENU key to bring up for current input. EN-18
User Manual
Page 27
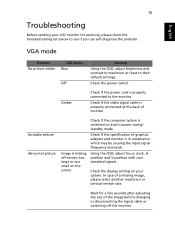
...the display setting on your LCD monitor for a few seconds after adjusting the size of monitor. VGA mode Problem No picture visible LED status Blue Off Remedy Using the OSD, adjust brightness and contrast to maximum or reset to the monitor. Image is missing, off the monitor. Check if the specification of ...a missing image, please select another resolution or vertical refresh rate. In case of graphics adapter and monitor is properly connected at the back of the image before changing or disconnecting the signal cable or switching off -center, too ...
...the display setting on your LCD monitor for a few seconds after adjusting the size of monitor. VGA mode Problem No picture visible LED status Blue Off Remedy Using the OSD, adjust brightness and contrast to maximum or reset to the monitor. Image is missing, off the monitor. Check if the specification of ...a missing image, please select another resolution or vertical refresh rate. In case of graphics adapter and monitor is properly connected at the back of the image before changing or disconnecting the signal cable or switching off -center, too ...
User Manual
Page 28
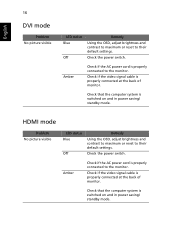
...video signal cable is switched on and in power saving/ standby mode. Check that the computer system is properly connected at the back of monitor. Check if the video signal cable is switched on and in power saving/ standby mode. HDMI mode Problem No picture visible LED status ... default settings. Check the power switch. Check the power switch. Amber Check if the AC power cord is properly connected to the monitor. Check that the computer system is properly connected at the back of monitor. Amber Check if the AC power cord is properly connected to the...
...video signal cable is switched on and in power saving/ standby mode. Check that the computer system is properly connected at the back of monitor. Check if the video signal cable is switched on and in power saving/ standby mode. HDMI mode Problem No picture visible LED status ... default settings. Check the power switch. Check the power switch. Amber Check if the AC power cord is properly connected to the monitor. Check that the computer system is properly connected at the back of monitor. Amber Check if the AC power cord is properly connected to the...

User Manual
Page 29
...mark. Products that help customers save you money by the U.S. More information refers to offer products and services worldwide that are registered U.S. Acer ENERGY STAR qualified products: • Produce less heat and reduce cooling loads, and warmer climates. • Automatically go into "display ...sleep" within 5 minutes of inactivity. • Wake the monitor when it is committed to http://www.energystar.gov. marks ENERGY STAR and the ENERGY STAR mark are ENERGY STAR qualified use less energy...
...mark. Products that help customers save you money by the U.S. More information refers to offer products and services worldwide that are registered U.S. Acer ENERGY STAR qualified products: • Produce less heat and reduce cooling loads, and warmer climates. • Automatically go into "display ...sleep" within 5 minutes of inactivity. • Wake the monitor when it is committed to http://www.energystar.gov. marks ENERGY STAR and the ENERGY STAR mark are ENERGY STAR qualified use less energy...


