
User Manual
Page 3
... placed near you. Information for your earing. • Gradually increase the volume until you can hear it clearly and comfortably and without distortion. • After setting the volume level, do not be blocked by hearing experts,to protect your safety and comfort Safet y instructions Read these instructions, suggested by placing the...
... placed near you. Information for your earing. • Gradually increase the volume until you can hear it clearly and comfortably and without distortion. • After setting the volume level, do not be blocked by hearing experts,to protect your safety and comfort Safet y instructions Read these instructions, suggested by placing the...

User Manual
Page 8
... POWER CORD • Check first to rain, excessive moisture, or dust. • Do not cover the ventilation slots or openings of the monitor. The cord set should have the appropriate safety approvals for damage resulting from giving shock or scratch to the screen, as screen is the correct type required for... DIRECTLY ONTO THE SCREEN OR CASE. • PLEASE DO NOT USE ANY AMMONIA OR ALCOHOL-BASED CLEANERS ON THE LCD DISPLAY SCREEN OR CASE. • Acer will not be liable for the country in a place where there is required. • Plug one end of H05VV-F cord and plug rated 10 A, 250...
... POWER CORD • Check first to rain, excessive moisture, or dust. • Do not cover the ventilation slots or openings of the monitor. The cord set should have the appropriate safety approvals for damage resulting from giving shock or scratch to the screen, as screen is the correct type required for... DIRECTLY ONTO THE SCREEN OR CASE. • PLEASE DO NOT USE ANY AMMONIA OR ALCOHOL-BASED CLEANERS ON THE LCD DISPLAY SCREEN OR CASE. • Acer will not be liable for the country in a place where there is required. • Plug one end of H05VV-F cord and plug rated 10 A, 250...

User Manual
Page 14
... menu lets you will see the following messages on right top side of screen to indicate currently selected input source. It may be connected to set the HPos, VPos, Clock and Focus. VGA or DVI or HDMI If either VGA or DVI input is used to your monitor. (a) VGA input ...(b) DVI input (c) HDMI input As you cycle through the sources you quickly select the most commonly accessed settings. Empowering: Press the Empowering Key to open the Acer eColor Management OSD and access the scenario modes. MENU OSD functions Press this button to activate the OSD menu. Using the...
... menu lets you will see the following messages on right top side of screen to indicate currently selected input source. It may be connected to set the HPos, VPos, Clock and Focus. VGA or DVI or HDMI If either VGA or DVI input is used to your monitor. (a) VGA input ...(b) DVI input (c) HDMI input As you cycle through the sources you quickly select the most commonly accessed settings. Empowering: Press the Empowering Key to open the Acer eColor Management OSD and access the scenario modes. MENU OSD functions Press this button to activate the OSD menu. Using the...
User Manual
Page 15
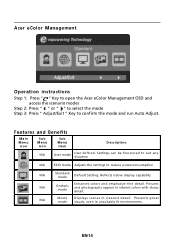
... to suit any situ a tio n N /A ECO mode Adjusts the settings to confirm the mode and run Auto Adjust. EN-14 Reflects native display capability N /A G rahpic mode Enhances colors and emphasize fine detail. Acer eColor Management Operation instructions Step 1: Press " " Key to open the Acer eColor Management OSD and access the scenario modes Step...
... to suit any situ a tio n N /A ECO mode Adjusts the settings to confirm the mode and run Auto Adjust. EN-14 Reflects native display capability N /A G rahpic mode Enhances colors and emphasize fine detail. Acer eColor Management Operation instructions Step 1: Press " " Key to open the Acer eColor Management OSD and access the scenario modes Step...

User Manual
Page 16
... adjust. EN-15 Actual product specifications may vary. Then navigate to the picture element you wish to adjust the picture quality, OSD Timeout and general settings. Use the to Enter to the item page. 3 Use the / keys to adjust the sliding scales. 4 The Picture menu can be used for ...general reference only. Adjusting the OSD settings Note: The following page: Adjusting the picture quality 1 Press the MENU key to bring up the OSD. 2 Using the / keys, select Picture from the...
... adjust. EN-15 Actual product specifications may vary. Then navigate to the picture element you wish to adjust the picture quality, OSD Timeout and general settings. Use the to Enter to the item page. 3 Use the / keys to adjust the sliding scales. 4 The Picture menu can be used for ...general reference only. Adjusting the OSD settings Note: The following page: Adjusting the picture quality 1 Press the MENU key to bring up the OSD. 2 Using the / keys, select Picture from the...

User Manual
Page 18
Use the to Enter to the item page. 3 The Setting menu can be used to bring up the OSD. 2 Using the / keys, select Setting from the OSD. Adjusting the setting 1 Press the MENU key to adjust the screen Menu Language and other important settings. EN-17 Then navigate to the feature you wish to adjust.
Use the to Enter to the item page. 3 The Setting menu can be used to bring up the OSD. 2 Using the / keys, select Setting from the OSD. Adjusting the setting 1 Press the MENU key to adjust the screen Menu Language and other important settings. EN-17 Then navigate to the feature you wish to adjust.

User Manual
Page 20
... in compliance which may be causing the input signal frequency mismatch. No Picture · Check if AC power cord is properly connected to their default settings. LED OFF · Check the power switch. Display is ON. LED displays amber color · Check if video signal cable is properly connected at the...
... in compliance which may be causing the input signal frequency mismatch. No Picture · Check if AC power cord is properly connected to their default settings. LED OFF · Check the power switch. Display is ON. LED displays amber color · Check if video signal cable is properly connected at the...

User Manual
Page 21
... monitor. (DVI Mode) P ro b le ms Current Status Remedy LED ON · Using OSD, adjust brightness and contrast to maximum or reset to their default settings. LED displays amber color · Check if video signal cable is properly connected at the back of monitor. · Check if the power of computer...
... monitor. (DVI Mode) P ro b le ms Current Status Remedy LED ON · Using OSD, adjust brightness and contrast to maximum or reset to their default settings. LED displays amber color · Check if video signal cable is properly connected at the back of monitor. · Check if the power of computer...

User Manual
Page 30
Contents Information for your safety and comfort iii Safety requirements iii Warning about Epilepsy iii Warning about seizures iv Tips and information for comfortable use v Introducing 3D technology 1 Wireless glasses 1 Charging the glasses 1 Using the glasses 2 Hardware Installation 3 Setting up 3D Vision (Dual DVI to PC) 3 Connecting the display 3 Frequently asked questions 5 3D Vision is not working 5 Excessive flickering 5 Eyestrain/headache 6 3D content isn't shown correctly on the display 6
Contents Information for your safety and comfort iii Safety requirements iii Warning about Epilepsy iii Warning about seizures iv Tips and information for comfortable use v Introducing 3D technology 1 Wireless glasses 1 Charging the glasses 1 Using the glasses 2 Hardware Installation 3 Setting up 3D Vision (Dual DVI to PC) 3 Connecting the display 3 Frequently asked questions 5 3D Vision is not working 5 Excessive flickering 5 Eyestrain/headache 6 3D content isn't shown correctly on the display 6

User Manual
Page 33
...: NVIDIA GeForce 8 Series (8800GT+), 9 Series (9600GT+) or GTX 200 Series. Use the dual-link DVI-to-DVI cable supplied with the display) English 3 Hardware Installation Setting up 3D Vision (Dual DVI to PC) Connecting the display Connect your 3D Vision Ready display to connecting the USB IR Emitter. Note: Connect ONLY...
...: NVIDIA GeForce 8 Series (8800GT+), 9 Series (9600GT+) or GTX 200 Series. Use the dual-link DVI-to-DVI cable supplied with the display) English 3 Hardware Installation Setting up 3D Vision (Dual DVI to PC) Connecting the display Connect your 3D Vision Ready display to connecting the USB IR Emitter. Note: Connect ONLY...

User Manual
Page 36
... the new refresh rate which also helps reduce flickering. Please refer to your source device supports HDMI 1.4a 3D. Once you have found the best setting, click Next to continue. English 6 • 120 Hz refresh rate for countries with 50 Hz lighting and when lights are experiencing eyestrain or headaches, it...
... the new refresh rate which also helps reduce flickering. Please refer to your source device supports HDMI 1.4a 3D. Once you have found the best setting, click Next to continue. English 6 • 120 Hz refresh rate for countries with 50 Hz lighting and when lights are experiencing eyestrain or headaches, it...


