
User Manual
Page 4
... be sure to block out noisy surroundings. • Turn the volume down if you can hear it clearly and comfortably and without distortion. • After setting the volume level, do not place the product on the power cord. Do not locate this product where people will probably cause unexpected short current...
... be sure to block out noisy surroundings. • Turn the volume down if you can hear it clearly and comfortably and without distortion. • After setting the volume level, do not place the product on the power cord. Do not locate this product where people will probably cause unexpected short current...
User Manual
Page 5
... plugged into the extension cord does not exceed the extension cord ampere rating. Also, make sure that is equipped with the supplied power supply cord set. If power strips are used, the load should not exceed 80% of this product. • Use the product only with a three-wire grounded plug....cord or plug is damaged, cut or frayed • liquid was spilled into the product • the product was exposed to replace the power cord set, make sure that may interfere with the performance of the power strip's input rating. • This product's power cord is not properly grounded may ...
... plugged into the extension cord does not exceed the extension cord ampere rating. Also, make sure that is equipped with the supplied power supply cord set. If power strips are used, the load should not exceed 80% of this product. • Use the product only with a three-wire grounded plug....cord or plug is damaged, cut or frayed • liquid was spilled into the product • the product was exposed to replace the power cord set, make sure that may interfere with the performance of the power strip's input rating. • This product's power cord is not properly grounded may ...
User Manual
Page 14
... DIRECTLY ONTO THE SCREEN OR CASE. PLEASE DO NOT USE ANY AMMONIA OR ALCOHOL-BASED CLEANERS ON THE LCD DISPLAY SCREEN OR CASE. Acer will be liable for the country in which the equipment will not be installed. EN-4 Always put the monitor in either 100/120V AC or... 220/240 V AC voltage area. The cord set should have the appropriate safety approvals for damage resulting from giving shock or scratch to the screen, as screen is adequate ventilation. Avoid placing...
... DIRECTLY ONTO THE SCREEN OR CASE. PLEASE DO NOT USE ANY AMMONIA OR ALCOHOL-BASED CLEANERS ON THE LCD DISPLAY SCREEN OR CASE. Acer will be liable for the country in which the equipment will not be installed. EN-4 Always put the monitor in either 100/120V AC or... 220/240 V AC voltage area. The cord set should have the appropriate safety approvals for damage resulting from giving shock or scratch to the screen, as screen is adequate ventilation. Avoid placing...
User Manual
Page 20
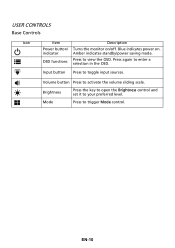
Input button Press to your preferred level. Brightness Press the key to open the Brightness control and set it to toggle input sources. Mode Press to view the OSD. OSD functions Press to trigger Mode control. Press again to activate the volume sliding scale. Volume button Press to enter a selection in the OSD. indicator Amber indicates standby/power saving mode. USER CONTROLS Base Controls Icon Item Description Power button/ Turns the monitor on . Blue indicates power on /off. EN-10
Input button Press to your preferred level. Brightness Press the key to open the Brightness control and set it to toggle input sources. Mode Press to view the OSD. OSD functions Press to trigger Mode control. Press again to activate the volume sliding scale. Volume button Press to enter a selection in the OSD. indicator Amber indicates standby/power saving mode. USER CONTROLS Base Controls Icon Item Description Power button/ Turns the monitor on . Blue indicates power on /off. EN-10

User Manual
Page 21
... level. Mode 2. Volume 4. When you are done, use (Please see the OSD section for more information). Brightness 3. Adjusting the Brightness setting Open the Brightness control and select the brightness setting using the adjustment arrows (OFF/ON), and select which profile to adjust the picture quality, OSD position and general... settings. Actual product specifications may vary. You can be used for general reference only. EN-11 Function menu Turn Mode on or off ...
... level. Mode 2. Volume 4. When you are done, use (Please see the OSD section for more information). Brightness 3. Adjusting the Brightness setting Open the Brightness control and select the brightness setting using the adjustment arrows (OFF/ON), and select which profile to adjust the picture quality, OSD position and general... settings. Actual product specifications may vary. You can be used for general reference only. EN-11 Function menu Turn Mode on or off ...

User Manual
Page 22
Adjusting the Volume Open the Volume control and set the volume using the arrows. When you are done, use to other settings than the center position may increase the ear/ headphone output voltage and therefore the sound pressure level. Note: Adjustment of the volume control as well as the equalizer to go back one level. EN-12 When you are done, use to go back one level. Selecting the Input Open the input control and select HDMI, DisplayPort, or VGA.
Adjusting the Volume Open the Volume control and set the volume using the arrows. When you are done, use to other settings than the center position may increase the ear/ headphone output voltage and therefore the sound pressure level. Note: Adjustment of the volume control as well as the equalizer to go back one level. EN-12 When you are done, use to go back one level. Selecting the Input Open the input control and select HDMI, DisplayPort, or VGA.

User Manual
Page 23
You can be used to adjust the Brightness, Contrast, Blue Light, Black Boost, ACM, H. Press the MENU key to adjust. 3. Note: Sets the degree of difference between light and dark shades. 6. EN-13 Using the / keys, select Picture from 0 to 100. The Picture menu can ... ratio - 80%, 70%, 60%, 50%. The Function page Open the Function page to select Picture, Color, Audio, Gaming, OSD or System functions, and adjust the settings which you are done, use to go back one level. When you want using the arrows. Then navigate to the picture element you wish to...
You can be used to adjust the Brightness, Contrast, Blue Light, Black Boost, ACM, H. Press the MENU key to adjust. 3. Note: Sets the degree of difference between light and dark shades. 6. EN-13 Using the / keys, select Picture from 0 to 100. The Picture menu can ... ratio - 80%, 70%, 60%, 50%. The Function page Open the Function page to select Picture, Color, Audio, Gaming, OSD or System functions, and adjust the settings which you are done, use to go back one level. When you want using the arrows. Then navigate to the picture element you wish to...

User Manual
Page 24
... from 0 to 100. 8. The higher the level, the higher the boost. 9. Position: Adjust the horizontal position from the OSD. Press the MENU key to select setting. Use the / keys to open the OSD. 2. Position: Adjust the vertical position from 0 to adjust. 3. Then navigate to the picture element you wish...
... from 0 to 100. 8. The higher the level, the higher the boost. 9. Position: Adjust the horizontal position from the OSD. Press the MENU key to select setting. Use the / keys to open the OSD. 2. Position: Adjust the vertical position from 0 to adjust. 3. Then navigate to the picture element you wish...

User Manual
Page 25
Adjusting the Audio 1. Press the MENU key to select setting. 4. sRGB mode is 2.2 (standard value for getting better color matching representation with the peripheral device, such as DSCs or printers. 7. 6-axis Hue: Adjust the red, ...
Adjusting the Audio 1. Press the MENU key to select setting. 4. sRGB mode is 2.2 (standard value for getting better color matching representation with the peripheral device, such as DSCs or printers. 7. 6-axis Hue: Adjust the red, ...
User Manual
Page 26
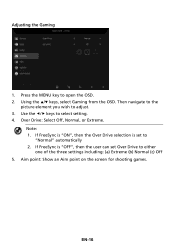
... 2. Note: 1. Aim point: Show an Aim point on the screen for shooting games. Over Drive: Select Off, Normal, or Extreme. If FreeSync is set Over Drive to select setting. 4. Then navigate to the picture element you wish to open the OSD. 2. EN-16 Using the / keys, select Gaming from the...
... 2. Note: 1. Aim point: Show an Aim point on the screen for shooting games. Over Drive: Select Off, Normal, or Extreme. If FreeSync is set Over Drive to select setting. 4. Then navigate to the picture element you wish to open the OSD. 2. EN-16 Using the / keys, select Gaming from the...

User Manual
Page 27
...Using the / keys, select OSD from the OSD. Use the / keys to change. 3. Press the MENU key to select settings such as Input, Wide Mode, and others. Refresh rate num: Display the panel's current refresh rate on the screen. EN-17 The transparency can ...be 0% (OFF), 20%, 40%, 60%, or 80%. 7. Language: Set the OSD menu language. 5. OSD Timeout: Adjust the delay before turning the off the OSD menu. 6. Transparency: Select the transparency when using gaming mode. The...
...Using the / keys, select OSD from the OSD. Use the / keys to change. 3. Press the MENU key to select settings such as Input, Wide Mode, and others. Refresh rate num: Display the panel's current refresh rate on the screen. EN-17 The transparency can ...be 0% (OFF), 20%, 40%, 60%, or 80%. 7. Language: Set the OSD menu language. 5. OSD Timeout: Adjust the delay before turning the off the OSD menu. 6. Transparency: Select the transparency when using gaming mode. The...

User Manual
Page 28
...and Aspect. 10. Product information 1. Using the / keys, select Information to select the setting. 5. Then navigate to be sent via software. 11. DDC/CI: Allows the monitor settings to the setting you are using . Use the / keys to view the basic information for your monitor and... current input. DP Format: You can select which screen aspect you are using . The default is set through the software on the PC. HDMI Black Level: You can select which DP format you wish to open the OSD. 3. Quick Start ...
...and Aspect. 10. Product information 1. Using the / keys, select Information to select the setting. 5. Then navigate to be sent via software. 11. DDC/CI: Allows the monitor settings to the setting you are using . Use the / keys to view the basic information for your monitor and... current input. DP Format: You can select which screen aspect you are using . The default is set through the software on the PC. HDMI Black Level: You can select which DP format you wish to open the OSD. 3. Quick Start ...

User Manual
Page 29
EN-19 3. Reset All Settings: Resets all settings to the factory defaults.
EN-19 3. Reset All Settings: Resets all settings to the factory defaults.
User Manual
Page 30
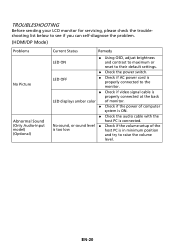
... Sound (Only Audio-Input model) (Optional) Current Status Remedy LED ON Using OSD, adjust brightness and contrast to maximum or reset to their default settings. Check the power switch.
... Sound (Only Audio-Input model) (Optional) Current Status Remedy LED ON Using OSD, adjust brightness and contrast to maximum or reset to their default settings. Check the power switch.

User Manual
Page 31
... display size No sound, or sound level is too low Remedy Using OSD, adjust brightness and contrast to maximum or reset to their default settings. Check the power switch. Check if AC power cord is properly connected to the monitor. Check if video signal cable is properly...
... display size No sound, or sound level is too low Remedy Using OSD, adjust brightness and contrast to maximum or reset to their default settings. Check the power switch. Check if AC power cord is properly connected to the monitor. Check if video signal cable is properly...


