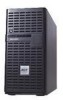
Altos G540 User's Guide EN
Page 2
...for identification purposes only and belong to their respective companies. No part of this publication without the prior written permission of Acer Inc. Acer Altos G540 Series User's Guide Changes may be made periodically to notify any means, electronic, mechanical, photocopy, recording, or otherwise, ...or implied, with respect to the unit. Copyright © 2006 Acer Incorporated All Rights Reserved. Acer Altos G540 Series Model Name : G540 Part Number: MU.R230E.001 Purchase Date: Place of Purchase: Acer and the Acer logo are recorded on the label affixed to the contents hereof and...
...for identification purposes only and belong to their respective companies. No part of this publication without the prior written permission of Acer Inc. Acer Altos G540 Series User's Guide Changes may be made periodically to notify any means, electronic, mechanical, photocopy, recording, or otherwise, ...or implied, with respect to the unit. Copyright © 2006 Acer Incorporated All Rights Reserved. Acer Altos G540 Series Model Name : G540 Part Number: MU.R230E.001 Purchase Date: Place of Purchase: Acer and the Acer logo are recorded on the label affixed to the contents hereof and...

Altos G540 User's Guide EN
Page 39
The POST messages indicate if the system is running well or not. The system starts up the system, applied power, and connected all the necessary peripherals, you can now power on the system. 29 Turning on the system After making sure that , a series of power-on self-test (POST) messages appears. After that you have properly set up and displays a welcome message on the monitor. Follow the procedure below. 1 Open the bezel door. 2 Press the power button.
The POST messages indicate if the system is running well or not. The system starts up the system, applied power, and connected all the necessary peripherals, you can now power on the system. 29 Turning on the system After making sure that , a series of power-on self-test (POST) messages appears. After that you have properly set up and displays a welcome message on the monitor. Follow the procedure below. 1 Open the bezel door. 2 Press the power button.


