
User Manual
Page 1
TABLE OF CONTENTS Special notes on LCD monitors 1 Information for your safety and comfort 2 Unpacking 5 Attaching/Removing the base 6 Screen position adjustment 6 Connecting the power cord 7 Safety precaution 7 Cleaning your monitor 7 Power saving 8 DDC 8 Connector Pin Assignment 9 Standard Timing Table 11 Installation 12 User controls 13 Troubleshooting 19
TABLE OF CONTENTS Special notes on LCD monitors 1 Information for your safety and comfort 2 Unpacking 5 Attaching/Removing the base 6 Screen position adjustment 6 Connecting the power cord 7 Safety precaution 7 Cleaning your monitor 7 Power saving 8 DDC 8 Connector Pin Assignment 9 Standard Timing Table 11 Installation 12 User controls 13 Troubleshooting 19

User Manual
Page 2
... use . Turn off the Power Switch for hours. In this case, the screen is displayed for hours. EN-1 SPECIAL NOTES ON LCD MONITORS The following symptoms are normal with LCD monitor and do not indicate a problem. NOTES · Due to make sure the flicker disappears. · You may flicker during initial use...
... use . Turn off the Power Switch for hours. In this case, the screen is displayed for hours. EN-1 SPECIAL NOTES ON LCD MONITORS The following symptoms are normal with LCD monitor and do not indicate a problem. NOTES · Due to make sure the flicker disappears. · You may flicker during initial use...
User Manual
Page 4
... your sitting height to achieve maximum comfort. Observe the following the operating instructions Note: Adjust only those controls that are also at risk of the monitor, using a footrest, or raising your company's health and safety department. nel when: • the power cord or plug is produced with high-precision manufacturing techniques...
... your sitting height to achieve maximum comfort. Observe the following the operating instructions Note: Adjust only those controls that are also at risk of the monitor, using a footrest, or raising your company's health and safety department. nel when: • the power cord or plug is produced with high-precision manufacturing techniques...

User Manual
Page 5
...possible. • Exercise regularly and maintain a healthy body. The following websites: Worldwide: http://www.acer-group.com/public/Sustainability/sustainability01.htm http://www.acer-group.com/public/Sustainability/sustainability04.htm EN-4 Developing good work habits Develop the following work for extended ...the display's top front edge • Avoid adjusting your display to an awkward viewing angle. • Avoid looking away from the monitor and focusing on a distant point. • Blink frequently to keep your eyes from drying out. Warning! Eyes • Rest ...
...possible. • Exercise regularly and maintain a healthy body. The following websites: Worldwide: http://www.acer-group.com/public/Sustainability/sustainability01.htm http://www.acer-group.com/public/Sustainability/sustainability04.htm EN-4 Developing good work habits Develop the following work for extended ...the display's top front edge • Avoid adjusting your display to an awkward viewing angle. • Avoid looking away from the monitor and focusing on a distant point. • Blink frequently to keep your eyes from drying out. Warning! Eyes • Rest ...

User Manual
Page 6
UNPACKING Please check the following items are present when you unpack the box, and save the packing materials in case you will need to ship or transport the monitor in future. · LCD Monitor · AC Power Cord · D-Sub Cable (Optional) · DVI Cable (On(lOy Dptuioaln-Ianl)put Model) · Audio Cable (Onl(yOAputidoinoa-Iln) put Model) · (Optional) User Manual · Quick Start Guide Acer Monitor EN-5
UNPACKING Please check the following items are present when you unpack the box, and save the packing materials in case you will need to ship or transport the monitor in future. · LCD Monitor · AC Power Cord · D-Sub Cable (Optional) · DVI Cable (On(lOy Dptuioaln-Ianl)put Model) · Audio Cable (Onl(yOAputidoinoa-Iln) put Model) · (Optional) User Manual · Quick Start Guide Acer Monitor EN-5

User Manual
Page 7
... degrees up or 5 degrees down on a stable surface -- The monitor can adjust the tilt of the monitor by arrow below . Install: Align the base with the stand and push the base towards the top of the monitor as indicated first before removing the base and follow the arrow direction ... as shown in the figure below . EN-6 Carefully place the monitor face-down as indicated by using both of your hands to hold the edges of the monitor. Attaching / Removing the Base Note: Remove the monitor and monitor base from its packaging. SCREEN POSITION ADJUSTMENT In oder to optimize ...
... degrees up or 5 degrees down on a stable surface -- The monitor can adjust the tilt of the monitor by arrow below . Install: Align the base with the stand and push the base towards the top of the monitor as indicated first before removing the base and follow the arrow direction ... as shown in the figure below . EN-6 Carefully place the monitor face-down as indicated by using both of your hands to hold the edges of the monitor. Attaching / Removing the Base Note: Remove the monitor and monitor base from its packaging. SCREEN POSITION ADJUSTMENT In oder to optimize ...

User Manual
Page 8
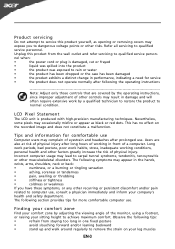
... the screen and cabinet front and sides. light or other heavy object, on the face of the monitor. Place the monitor just below guidelines when cleaning the monitor. · Always unplug the monitor before cleaning. · Use a soft cloth to the screen, as screen is the correct type ...first to rain, excessive moisture, or dust. · Do not cover the ventilation slots or openings of the monitor. No user-adjustment is adequate ventilation. · Avoid placing the monitor against a bright background or where sun- The cord set should have the appropriate safety approvals for your area. ...
... the screen and cabinet front and sides. light or other heavy object, on the face of the monitor. Place the monitor just below guidelines when cleaning the monitor. · Always unplug the monitor before cleaning. · Use a soft cloth to the screen, as screen is the correct type ...first to rain, excessive moisture, or dust. · Do not cover the ventilation slots or openings of the monitor. No user-adjustment is adequate ventilation. · Avoid placing the monitor against a bright background or where sun- The cord set should have the appropriate safety approvals for your area. ...

User Manual
Page 9
...until a control signal has been detected or the keyboard or mouse is able to ON state is a communication protocol through which the monitor automatically informs the host system about its capabilities, for example, supported resolutions and corresponding timing. The recovery time from the display controller,... to Plug and Play with your system if your system also supports DDC protocol. EN-8 The monitor supports DDC2B standard. The DDC (Display Data Channel) is around 3 seconds. Power saving The monitor will be driven into Power Saving" mode by the amber-color power LED.
...until a control signal has been detected or the keyboard or mouse is able to ON state is a communication protocol through which the monitor automatically informs the host system about its capabilities, for example, supported resolutions and corresponding timing. The recovery time from the display controller,... to Plug and Play with your system if your system also supports DDC protocol. EN-8 The monitor supports DDC2B standard. The DDC (Display Data Channel) is around 3 seconds. Power saving The monitor will be driven into Power Saving" mode by the amber-color power LED.
User Manual
Page 10
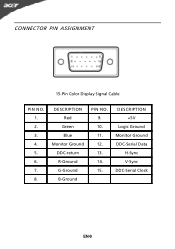
CONNECTOR PIN ASSIGNMENT 15-Pin Color Display Signal Cable PIN NO. 1. 2. 3. 4. 5. 6. 7. 8. DESCRIPTION +5V Logic Ground Monitor Ground DDC-Serial Data H-Sync V-Sync DDC-Serial Clock EN-9 DESCRIPTION Red Green Blue Monitor Ground DDC-return R-Ground G-Ground B-Ground PIN NO. 9. 10. 11. 12. 13. 14. 15.
CONNECTOR PIN ASSIGNMENT 15-Pin Color Display Signal Cable PIN NO. 1. 2. 3. 4. 5. 6. 7. 8. DESCRIPTION +5V Logic Ground Monitor Ground DDC-Serial Data H-Sync V-Sync DDC-Serial Clock EN-9 DESCRIPTION Red Green Blue Monitor Ground DDC-return R-Ground G-Ground B-Ground PIN NO. 9. 10. 11. 12. 13. 14. 15.

User Manual
Page 13
...bHlDe M(OInClyabHlDe M(OI-nInlypHuDt MMoI-dinepl)ut model) a. Connect one end of the 24-pin DVI cable to the back of the monitor and connect the other end to the computer. 1-2 DCiognitnaelcCtaDbilgeit(aOlnClaybDleua(Ol-InnlpyuDtuMalo-idnepl)ut model) a. This sequence is very important. 5. ...Connect power cord Connect the power cord to the monitor, then to diagnose the problem. 1-1 1-2 1-3 3 2 32 1-3 1-2 1-1 EN-12 b. Make sure both the monitor and computer are powered-OFF. Power-ON Monitor and Computer Power-ON the monitor first, then power-ON the computer. Connect the ...
...bHlDe M(OInClyabHlDe M(OI-nInlypHuDt MMoI-dinepl)ut model) a. Connect one end of the 24-pin DVI cable to the back of the monitor and connect the other end to the computer. 1-2 DCiognitnaelcCtaDbilgeit(aOlnClaybDleua(Ol-InnlpyuDtuMalo-idnepl)ut model) a. This sequence is very important. 5. ...Connect power cord Connect the power cord to the monitor, then to diagnose the problem. 1-1 1-2 1-3 3 2 32 1-3 1-2 1-1 EN-12 b. Make sure both the monitor and computer are powered-OFF. Power-ON Monitor and Computer Power-ON the monitor first, then power-ON the computer. Connect the ...

User Manual
Page 14
...top side of screen to activate the OSD menu. It may be connected to open the Acer eColor Management OSD and access the scenario modes. USER CONTROLS Power Switch / Power LED: To turn the monitor ON or OFF. The Auto Adjustment function is selected ,but the VGA and DVI cables...Cable Connect" or "No Signal" EN-13 Lights up to activate the Auto Adjustment function. Using the Shortcut Menu Press the function button to your monitor. (a) VGA input (b) DVI input (c) HDMI input As you cycle through the sources you quickly select the most commonly accessed settings. MENU OSD ...
...top side of screen to activate the OSD menu. It may be connected to open the Acer eColor Management OSD and access the scenario modes. USER CONTROLS Power Switch / Power LED: To turn the monitor ON or OFF. The Auto Adjustment function is selected ,but the VGA and DVI cables...Cable Connect" or "No Signal" EN-13 Lights up to activate the Auto Adjustment function. Using the Shortcut Menu Press the function button to your monitor. (a) VGA input (b) DVI input (c) HDMI input As you cycle through the sources you quickly select the most commonly accessed settings. MENU OSD ...

User Manual
Page 16
.... The OSD can be used for general reference only. For advanced settings, please refer to following content is for adjusting the settings of your LCD Monitor. Adjusting the OSD settings Note: The following page: Adjusting the picture quality 1 Press the MENU key to open the OSD. Actual product specifications may vary...
.... The OSD can be used for general reference only. For advanced settings, please refer to following content is for adjusting the settings of your LCD Monitor. Adjusting the OSD settings Note: The following page: Adjusting the picture quality 1 Press the MENU key to open the OSD. Actual product specifications may vary...

User Manual
Page 19
Then the basic information of LCD monitor will show up the OSD. 2 Using the / keys, select Information from the OSD. Product information 1 Press the MENU key to bring up for current input. EN-18
Then the basic information of LCD monitor will show up the OSD. 2 Using the / keys, select Information from the OSD. Product information 1 Press the MENU key to bring up for current input. EN-18
User Manual
Page 20
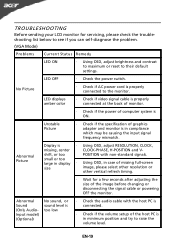
... self-diagnose the problem. (VGA Mode) Problems Current Status Remedy LED ON · Using OSD, adjust brightness and contrast to maximum or reset to the monitor. Abnormal Sound (Only AudioInput model) (Optional) No sound, or sound level is in minimum position and try to raise the volume level. Unstable Picture ·... a few seconds after adjusting the size of the image before changing or disconnecting the signal cable or powering OFF the monitor. No Picture · Check if AC power cord is ON. EN-19 LED displays amber color · Check if video signal cable is · Using ...
... self-diagnose the problem. (VGA Mode) Problems Current Status Remedy LED ON · Using OSD, adjust brightness and contrast to maximum or reset to the monitor. Abnormal Sound (Only AudioInput model) (Optional) No sound, or sound level is in minimum position and try to raise the volume level. Unstable Picture ·... a few seconds after adjusting the size of the image before changing or disconnecting the signal cable or powering OFF the monitor. No Picture · Check if AC power cord is ON. EN-19 LED displays amber color · Check if video signal cable is · Using ...

User Manual
Page 21
LED displays amber color · Check if video signal cable is properly connected at the back of monitor. · Check if the power of the host PC is ON. EN-20 Abnormal Sound (Only AudioInput model) (Optional) No sound, or sound level is ... raise the volume level. (DVI Mode) Problems Current Status Remedy LED ON · Using OSD, adjust brightness and contrast to maximum or reset to the monitor. No Picture · Check if AC power cord is properly connected to their default settings. LED OFF · Check the power switch.
LED displays amber color · Check if video signal cable is properly connected at the back of monitor. · Check if the power of the host PC is ON. EN-20 Abnormal Sound (Only AudioInput model) (Optional) No sound, or sound level is ... raise the volume level. (DVI Mode) Problems Current Status Remedy LED ON · Using OSD, adjust brightness and contrast to maximum or reset to the monitor. No Picture · Check if AC power cord is properly connected to their default settings. LED OFF · Check the power switch.

User Manual
Page 22
... Equipment: -. The maximum concentration values of the restricted substances by conformity with the following harmonized standard: -. Jun. 3, 2010 Date Acer Incorporated 8F, 88, Sec. 1, Hsin Tai Wu Rd., Hsichih Taipei Hsien 221, Taiwan Tel : 886-2-2696-1234 Fax : ... 221, Taiwan Contact Person: Mr. Easy Lai, E-mail: easy_lai@acer.com.tw And, Acer Europe SA Via Cantonale, Centro Galleria 2 6928 Manno Switzerland Hereby declare that: Product: LCD Monitor Trade Name: Acer Model Number: G225HQV/G215HV SKU Number: G225HQV/G215HV 0~9, a ~ z, or A ~ Z) Is compliant with the...
... Equipment: -. The maximum concentration values of the restricted substances by conformity with the following harmonized standard: -. Jun. 3, 2010 Date Acer Incorporated 8F, 88, Sec. 1, Hsin Tai Wu Rd., Hsichih Taipei Hsien 221, Taiwan Tel : 886-2-2696-1234 Fax : ... 221, Taiwan Contact Person: Mr. Easy Lai, E-mail: easy_lai@acer.com.tw And, Acer Europe SA Via Cantonale, Centro Galleria 2 6928 Manno Switzerland Hereby declare that: Product: LCD Monitor Trade Name: Acer Model Number: G225HQV/G215HV SKU Number: G225HQV/G215HV 0~9, a ~ z, or A ~ Z) Is compliant with the...

User Manual
Page 23
... this device may not cause harmful interference, and (2) this declaration: Product: LCD Monitor Model Number: G225HQV/G215HV SKU Number: ("*" = 0~9, a ~ z, or A ~ Z) G225HQV/G215HV******** Name of Responsible Party: Address of the FCC Rules. Contact Person: Acer Representative Phone No.: 254-298-4000 Fax No.: 254-298-4147 Operation is subject...received, including interference that may cause undesired operation. S. Tel : 254-298-4000 Fax : 254-298-4147 www.acer.com Federal Communications Commission Declaration of Conformity This device complies with Part 15 of Responsible Party...
... this device may not cause harmful interference, and (2) this declaration: Product: LCD Monitor Model Number: G225HQV/G215HV SKU Number: ("*" = 0~9, a ~ z, or A ~ Z) G225HQV/G215HV******** Name of Responsible Party: Address of the FCC Rules. Contact Person: Acer Representative Phone No.: 254-298-4000 Fax No.: 254-298-4147 Operation is subject...received, including interference that may cause undesired operation. S. Tel : 254-298-4000 Fax : 254-298-4147 www.acer.com Federal Communications Commission Declaration of Conformity This device complies with Part 15 of Responsible Party...


