Service Guide
Page 7
... Error Message 72 Intermittent Problems 76 Undetermined Problems 77 How to Build NAPP Master Hard Disc Drive 78 CD to Disk Recovery 78 Disk to Disk Recovery 81 Chapter 5 Jumper and Connector Locations 85 Top View 85 Bottom View 86 Chapter 6 FRU (Field Replaceable Unit)... List 87 Exploded Diagram 88 Appendix A Model Definition and Configuration 96 Ferrari 3200 Series 96 Appendix B Test Compatible Components 97 Microsoft® Windows&#...
... Error Message 72 Intermittent Problems 76 Undetermined Problems 77 How to Build NAPP Master Hard Disc Drive 78 CD to Disk Recovery 78 Disk to Disk Recovery 81 Chapter 5 Jumper and Connector Locations 85 Top View 85 Bottom View 86 Chapter 6 FRU (Field Replaceable Unit)... List 87 Exploded Diagram 88 Appendix A Model Definition and Configuration 96 Ferrari 3200 Series 96 Appendix B Test Compatible Components 97 Microsoft® Windows&#...
Service Guide
Page 50
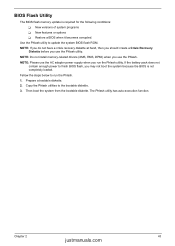
... diskette. NOTE: Please use the Phlash utility. The Phlash utility has auto-execution function. NOTE: If you do not have a crisis recovery diskette at hand, then you should create a Crisis Recovery Diskette before you use the AC adaptor power supply when you run the Phlash. 1. Fellow the steps below to update the...
... diskette. NOTE: Please use the Phlash utility. The Phlash utility has auto-execution function. NOTE: If you do not have a crisis recovery diskette at hand, then you should create a Crisis Recovery Diskette before you use the AC adaptor power supply when you run the Phlash. 1. Fellow the steps below to update the...

Service Guide
Page 76
... Setup System Management Mode (SMM) area Display external L2 cache size Load custom defaults (optional) Display shadow-area message Display possible high address for UMB recovery Display error messages Check for configuration errors Check for keyboard errors Set up hardware interrupt vectors Initialize coprocessor if present Disable onboard Super I/O ports and...
... Setup System Management Mode (SMM) area Display external L2 cache size Load custom defaults (optional) Display shadow-area message Display possible high address for UMB recovery Display error messages Check for configuration errors Check for keyboard errors Set up hardware interrupt vectors Initialize coprocessor if present Disable onboard Super I/O ports and...
Service Guide
Page 78
... F7h Beeps 1 For Boot Block in Flash ROM Initialize the chipset Initialize the bridge Initialize the CPU Initialize the system timer Initialize system I/O Check force recovery boot Checksum BIOS ROM Go to BIOS Set Huge Segment Initialize Multi Processor Initialize OEM special code Initialize PIC and DMA Initialize Memory type Initialize...
... F7h Beeps 1 For Boot Block in Flash ROM Initialize the chipset Initialize the bridge Initialize the CPU Initialize the system timer Initialize system I/O Check force recovery boot Checksum BIOS ROM Go to BIOS Set Huge Segment Initialize Multi Processor Initialize OEM special code Initialize PIC and DMA Initialize Memory type Initialize...

Service Guide
Page 85
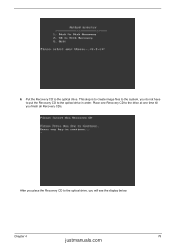
Select CD to Disk Recovery 1. How to Build NAPP Master Hard Disc Drive CD to Disk Revocery. 78 Chapter 4 Put NAPP CD into the optical drive. Prepare NAPP CD, Recovery CD and System CD. 2. NAPP CD will ask you if you want to build NAPP Master HDD. The system will start to continue. 4. Please press any key to preload the system, please click [Y]. 5. Then boot up the system. 3.
Select CD to Disk Recovery 1. How to Build NAPP Master Hard Disc Drive CD to Disk Revocery. 78 Chapter 4 Put NAPP CD into the optical drive. Prepare NAPP CD, Recovery CD and System CD. 2. NAPP CD will ask you if you want to build NAPP Master HDD. The system will start to continue. 4. Please press any key to preload the system, please click [Y]. 5. Then boot up the system. 3.
Service Guide
Page 86
6. Place one Recovery CD to the optical drive. Put the Recovery CD to the drive at one time till you finish all Recovery CDs. Chapter 4 79 justmanuals.com After you will see the display below. This step is to create image files to the system, you do not have to put the Recovery CD to the optical drive, you place the Recovery CD to the optical drive in order.
6. Place one Recovery CD to the optical drive. Put the Recovery CD to the drive at one time till you finish all Recovery CDs. Chapter 4 79 justmanuals.com After you will see the display below. This step is to create image files to the system, you do not have to put the Recovery CD to the optical drive, you place the Recovery CD to the optical drive in order.
Service Guide
Page 88
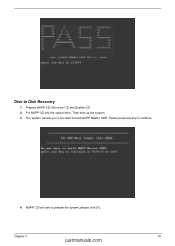
The system will start to Disk Recovery 1. Please press any key to build NAPP Master HDD. Chapter 4 81 justmanuals.com Prepare NAPP CD, Recovery CD and System CD. 2. NAPP CD will ask you if you want to continue. 4. Disk to preload the system, please click [Y]. Put NAPP CD into the optical drive. Then boot up the system. 3.
The system will start to Disk Recovery 1. Please press any key to build NAPP Master HDD. Chapter 4 81 justmanuals.com Prepare NAPP CD, Recovery CD and System CD. 2. NAPP CD will ask you if you want to continue. 4. Disk to preload the system, please click [Y]. Put NAPP CD into the optical drive. Then boot up the system. 3.
Service Guide
Page 89
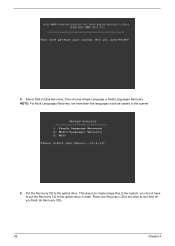
Put the Recovery CD to the system. 6. This step is to create image files to the system, you finish all Recovery CDs. 82 Chapter 4 NOTE: For Multi-Languages Recovery, not more than five languages could be loaded to the optical drive. Place one Recovery CD to the drive at one time till you do not have to put the Recovery CD to Disk Recovery. 5. Then choose Single Language or Multi-Languages Recovery. Select Disk to the optical drive in order.
Put the Recovery CD to the system. 6. This step is to create image files to the system, you finish all Recovery CDs. 82 Chapter 4 NOTE: For Multi-Languages Recovery, not more than five languages could be loaded to the optical drive. Place one Recovery CD to the drive at one time till you do not have to put the Recovery CD to Disk Recovery. 5. Then choose Single Language or Multi-Languages Recovery. Select Disk to the optical drive in order.
Service Guide
Page 90
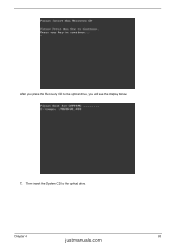
Then insert the System CD to the optical drive, you will see the display below. 7. Chapter 4 83 justmanuals.com After you place the Recovery CD to the optical drive.
Then insert the System CD to the optical drive, you will see the display below. 7. Chapter 4 83 justmanuals.com After you place the Recovery CD to the optical drive.


