
Service Guide
Page 6
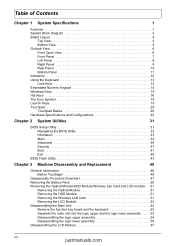
... Keys 19 Touchpad 20 Touchpad Basics 20 Hardware Specifications and Configurations 22 Chapter 2 System Utilities 31 BIOS Setup Utility 31 Navigating the BIOS Utility 32 Infomation 33 Main 34 Advanced 36 Security 37 Boot 41 Exit 42 BIOS Flash Utility 43 Chapter 3 Machine Disassembly and Replacement 45 General Information 46 Before You Begin...
... Keys 19 Touchpad 20 Touchpad Basics 20 Hardware Specifications and Configurations 22 Chapter 2 System Utilities 31 BIOS Setup Utility 31 Navigating the BIOS Utility 32 Infomation 33 Main 34 Advanced 36 Security 37 Boot 41 Exit 42 BIOS Flash Utility 43 Chapter 3 Machine Disassembly and Replacement 45 General Information 46 Before You Begin...
Service Guide
Page 29
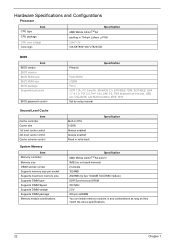
... Mobile AthlonTM 64 packing in 754-pin Lidless µ PGA 0.9V/1.2V VIA K8T800+VIA VT8235CE BIOS Item BIOS vendor BIOS Version BIOS ROM type BIOS ROM size BIOS package Supported protocols BIOS password control Second Level Cache Item Cache controller Cache size 1st level cache control 2st level cache control...module combinations Phneoix Specification Flash ROM 512KB PLCC ACPI 1.0b, PC Card 95, SM BIOS 2.3, EPP/IEEE 1284, ECP/IEEE 1284 1.7 & 1.9, PCI 2.2, PnP 1.0a, DMI 2.0, PS/2 keyboard and mouse, USB 2.0, VGA BIOS, CD-ROM bootable, IEEE 1394 Set by setup manual Built-in CPU 512KB Always ...
... Mobile AthlonTM 64 packing in 754-pin Lidless µ PGA 0.9V/1.2V VIA K8T800+VIA VT8235CE BIOS Item BIOS vendor BIOS Version BIOS ROM type BIOS ROM size BIOS package Supported protocols BIOS password control Second Level Cache Item Cache controller Cache size 1st level cache control 2st level cache control...module combinations Phneoix Specification Flash ROM 512KB PLCC ACPI 1.0b, PC Card 95, SM BIOS 2.3, EPP/IEEE 1284, ECP/IEEE 1284 1.7 & 1.9, PCI 2.2, PnP 1.0a, DMI 2.0, PS/2 keyboard and mouse, USB 2.0, VGA BIOS, CD-ROM bootable, IEEE 1394 Set by setup manual Built-in CPU 512KB Always ...

Service Guide
Page 33
...Compliancy Level OHCI Number of USB port Location Serial port function control Specification VIA VT8235CE 2.0 USB 2.0 4 Left side Enable/Disable by BIOS Setup IEEE 1394 Port Item Chipset Interface USB Compliancy Level Number of parallel port Location Connector type Parallel port function control Supports ECP/EPP...IEEE 1394 port Location Connector type TI PCI4510 IEEE 1394 1.0 1 Left side IEEE 1394 Specification 26 Chapter 1 Yes (set by BIOS Setup Note: Depending on your operating system, disabling an unused device may help free system resources for fixed resolution displays (e.g.
...Compliancy Level OHCI Number of USB port Location Serial port function control Specification VIA VT8235CE 2.0 USB 2.0 4 Left side Enable/Disable by BIOS Setup IEEE 1394 Port Item Chipset Interface USB Compliancy Level Number of parallel port Location Connector type Parallel port function control Supports ECP/EPP...IEEE 1394 port Location Connector type TI PCI4510 IEEE 1394 1.0 1 Left side IEEE 1394 Specification 26 Chapter 1 Yes (set by BIOS Setup Note: Depending on your operating system, disabling an unused device may help free system resources for fixed resolution displays (e.g.
Service Guide
Page 38
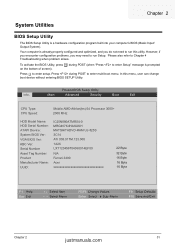
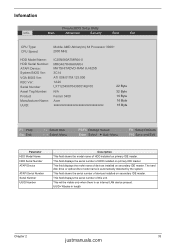
...screen). Press m to Chapter 4 Troubleshooting when problem arises. Chapter 2 System Utilities BIOS Setup Utility The BIOS Setup Utility is a hardware configuration program built into your computer's BIOS (Basic Input/ Output System). In this utility. Menu F9 Setup Defaults F10 ...Number: ATAPI Device: System BIOS Ver: VGA BIOS Ver: KBC Ver: Serial Number Asset Tag Number: Product Manufacturer Name: UUID: IC25N080ATMR04-0 MRG467K4HAKAKH MATSHITADVD-RAM UJ-825S 3C14 ATi 008.017M.123.000 1A26 LXT123456704360014EF00 N/A Ferrari 3400 Acer xxxxxxxxxxxxxxxxxxxxxxxxxxxxxxxx 22 Byte 32 Byte...
...screen). Press m to Chapter 4 Troubleshooting when problem arises. Chapter 2 System Utilities BIOS Setup Utility The BIOS Setup Utility is a hardware configuration program built into your computer's BIOS (Basic Input/ Output System). In this utility. Menu F9 Setup Defaults F10 ...Number: ATAPI Device: System BIOS Ver: VGA BIOS Ver: KBC Ver: Serial Number Asset Tag Number: Product Manufacturer Name: UUID: IC25N080ATMR04-0 MRG467K4HAKAKH MATSHITADVD-RAM UJ-825S 3C14 ATi 008.017M.123.000 1A26 LXT123456704360014EF00 N/A Ferrari 3400 Acer xxxxxxxxxxxxxxxxxxxxxxxxxxxxxxxx 22 Byte 32 Byte...
Service Guide
Page 39
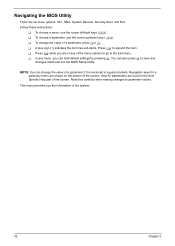
... parameter values. Navigation keys for parameters are shown on the bottom of the system. 32 Chapter 2 You can load default settings by pressing t. Navigating the BIOS Utility There are in any of the screen. T To choose a parameter, use the cursor left/right keys (zx). Follow these instructions: T To choose a menu, use...: Info., Main, System Devices, Security, Boot, and Exit. T Press ^ while you can also press u to the Exit menu. T In any changes made and exit the BIOS Setup Utility.
... parameter values. Navigation keys for parameters are shown on the bottom of the system. 32 Chapter 2 You can load default settings by pressing t. Navigating the BIOS Utility There are in any of the screen. T To choose a parameter, use the cursor left/right keys (zx). Follow these instructions: T To choose a menu, use...: Info., Main, System Devices, Security, Boot, and Exit. T Press ^ while you can also press u to the Exit menu. T In any changes made and exit the BIOS Setup Utility.
Service Guide
Page 40
...+ 2000 MHz HDD Model Name: HDD Serial Number: ATAPI Device: System BIOS Ver: VGA BIOS Ver: KBC Ver: Serial Number Asset Tag Number: Product Manufacturer Name: UUID: IC25N080ATMR04-0 MRG467K4HAKAKH MATSHITADVD-RAM UJ-825S 3C14 ATi 008.017M.123.000 1A26 LXT123456704360014EF00 N/A Ferrari 3400 Acer xxxxxxxxxxxxxxxxxxxxxxxxxxxxxxxx 22 Byte 32 Byte 16 Byte 16 Byte 16 Byte...
...+ 2000 MHz HDD Model Name: HDD Serial Number: ATAPI Device: System BIOS Ver: VGA BIOS Ver: KBC Ver: Serial Number Asset Tag Number: Product Manufacturer Name: UUID: IC25N080ATMR04-0 MRG467K4HAKAKH MATSHITADVD-RAM UJ-825S 3C14 ATi 008.017M.123.000 1A26 LXT123456704360014EF00 N/A Ferrari 3400 Acer xxxxxxxxxxxxxxxxxxxxxxxxxxxxxxxx 22 Byte 32 Byte 16 Byte 16 Byte 16 Byte...

Service Guide
Page 43
... channel [Enabled] [2F8] [IRQ 3] [DMA1] [Enabled] [ECP] [378] [IRQ 7] [DMA3] Item Specific Help Configure Infrared Port using options: [Disable] No configuration [Enabled] User configuration [Auto] BIOS or OS chooses configuration (OS Controlled) Displayed when controlled by OS F1 Help Esc Exit ↑ ↓ Select Item ← → Select Menu F5/F6...
... channel [Enabled] [2F8] [IRQ 3] [DMA1] [Enabled] [ECP] [378] [IRQ 7] [DMA3] Item Specific Help Configure Infrared Port using options: [Disable] No configuration [Enabled] User configuration [Auto] BIOS or OS chooses configuration (OS Controlled) Displayed when controlled by OS F1 Help Esc Exit ↑ ↓ Select Item ← → Select Menu F5/F6...
Service Guide
Page 45
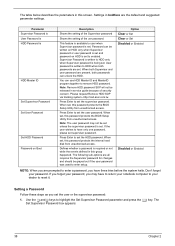
...When both Supervisor and user password are present, both passwords are set . Please request Remove HDD SOP via tracking system--http://csd.acer.com.tw Press Enter to set , this password protects the internal hard disk from unauthorized access. Note: The user password may...are all requires the Supervisor password for changes and should be released in this password protects the BIOS Setup Utility from unauthorized access. Settings in this password protects the BIOS Setup Utility from unauthorized access. If you are prompted to highlight the Set Supervisor Password parameter and...
...When both Supervisor and user password are present, both passwords are set . Please request Remove HDD SOP via tracking system--http://csd.acer.com.tw Press Enter to set , this password protects the internal hard disk from unauthorized access. Note: The user password may...are all requires the Supervisor password for changes and should be released in this password protects the BIOS Setup Utility from unauthorized access. Settings in this password protects the BIOS Setup Utility from unauthorized access. If you are prompted to highlight the Set Supervisor Password parameter and...

Service Guide
Page 46
..., press u to highlight the Set Supervisor Password parameter and press the e key. If desired, you are done, press u to save the changes and exit the BIOS Setup Utility. Use the w and y keys to enable the Password on the screen. 3. Retype the password in the Enter Current Password field and press e. IMPORTANT...
..., press u to highlight the Set Supervisor Password parameter and press the e key. If desired, you are done, press u to save the changes and exit the BIOS Setup Utility. Use the w and y keys to enable the Password on the screen. 3. Retype the password in the Enter Current Password field and press e. IMPORTANT...
Service Guide
Page 47
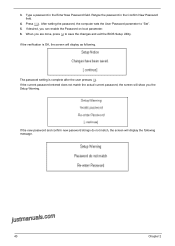
... verification is complete after the user presses u. After setting the password, the computer sets the User Password parameter to save the changes and exit the BIOS Setup Utility. Retype the password in the Enter New Password field. When you are done, press u to "Set". 5. The password setting is OK, the screen...
... verification is complete after the user presses u. After setting the password, the computer sets the User Password parameter to save the changes and exit the BIOS Setup Utility. Retype the password in the Enter New Password field. When you are done, press u to "Set". 5. The password setting is OK, the screen...
Service Guide
Page 50
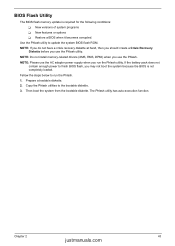
NOTE: Do not install memory-related drivers (XMS, EMS, DPMI) when you run the Phlash. 1. Fellow the steps below to update the system BIOS flash ROM. The Phlash utility has auto-execution function. Chapter 2 43 justmanuals.com Prepare a bootable diskette. 2. Use the Phlash utility to run the...system from the bootable diskette. NOTE: Please use the AC adaptor power supply when you use the Phlash utility. Copy the Phlash utilities to finish BIOS flash, you use the Phlash. NOTE: If you do not have a crisis recovery diskette at hand, then you should create a Crisis Recovery ...
NOTE: Do not install memory-related drivers (XMS, EMS, DPMI) when you run the Phlash. 1. Fellow the steps below to update the system BIOS flash ROM. The Phlash utility has auto-execution function. Chapter 2 43 justmanuals.com Prepare a bootable diskette. 2. Use the Phlash utility to run the...system from the bootable diskette. NOTE: Please use the AC adaptor power supply when you use the Phlash utility. Copy the Phlash utilities to finish BIOS flash, you use the Phlash. NOTE: If you do not have a crisis recovery diskette at hand, then you should create a Crisis Recovery ...
Service Guide
Page 72
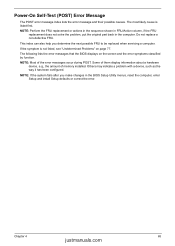
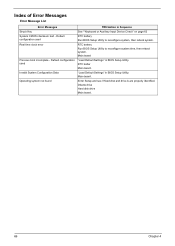
... actions in the sequence shown in FRU/Action column, if the FRU replacement does not solve the problem, put the original part back in the BIOS Setup Utility menus, reset the computer, enter Setup and install Setup defaults or correct the error. The following lists the error messages that the... BIOS displays on page 77. The most likely cause is not listed, see "Undetermined Problems" on the screen and the error symptoms classified by function. Do ...
... actions in the sequence shown in FRU/Action column, if the FRU replacement does not solve the problem, put the original part back in the BIOS Setup Utility menus, reset the computer, enter Setup and install Setup defaults or correct the error. The following lists the error messages that the... BIOS displays on page 77. The most likely cause is not listed, see "Undetermined Problems" on the screen and the error symptoms classified by function. Do ...
Service Guide
Page 73
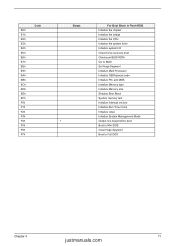
Main board "Load Default Settings" in Sequence See ""Keyboard or Auxiliary Input Device Check" on page 62 RTC battery Run BIOS Setup Utility to reconfigure system time, then reboot system. Enter Setup and see if fixed disk and drive A are properly identified. Default configuration ...used Invalid System Configuration Data Operating system not found FRU/Action in BIOS Setup Utility. Default configuration used Real time clock error Previous boot incomplete - RTC batter Main baord. "Load Default Settings" in...
Main board "Load Default Settings" in Sequence See ""Keyboard or Auxiliary Input Device Check" on page 62 RTC battery Run BIOS Setup Utility to reconfigure system time, then reboot system. Enter Setup and see if fixed disk and drive A are properly identified. Default configuration ...used Invalid System Configuration Data Operating system not found FRU/Action in BIOS Setup Utility. Default configuration used Real time clock error Previous boot incomplete - RTC batter Main baord. "Load Default Settings" in...

Service Guide
Page 75
...registers with initial POST values Restore CPU control word during warm boot Initialize PCI Bus Mastering devices Initialize keyboard controller BIOS ROM checksum Initialize cache before memory autosize 8254 timer initialization 8237 DMA controller initialization Reset Programmable Interrupt Controller Test DRAM...high byte of memory bus Test CPU bus-clock frequency Initialize Phoenix Dispatch Manager Warm start shut down Shadow system BIOS ROM Autosize cache Advanced configuration of chipset registers Load alternate registers with CMOS values Initialize interrupt vectors POST device ...
...registers with initial POST values Restore CPU control word during warm boot Initialize PCI Bus Mastering devices Initialize keyboard controller BIOS ROM checksum Initialize cache before memory autosize 8254 timer initialization 8237 DMA controller initialization Reset Programmable Interrupt Controller Test DRAM...high byte of memory bus Test CPU bus-clock frequency Initialize Phoenix Dispatch Manager Warm start shut down Shadow system BIOS ROM Autosize cache Advanced configuration of chipset registers Load alternate registers with CMOS values Initialize interrupt vectors POST device ...

Service Guide
Page 76
...video configuration against CMOS Initialize PCI bus and devices Initialize all video adapters in system QuietBoot start (optional) Shadow video BIOS ROM Display BIOS copyright notice Display CPU type and speed Initialize EISA board Test keyboard Set key click if enabled Test for unexpected ... Initialize PC-compatible PnP ISA devices Re-initialize onboard I/O ports Configure Motherboard Configurable Devices (optional) Initialize BIOS Area Enable Non-Maskable Interrupts (NMIs) Initialize Extended BIOS Data Area Test and initialize PS/2 mouse Initialize floppy controller 69 justmanuals.com
...video configuration against CMOS Initialize PCI bus and devices Initialize all video adapters in system QuietBoot start (optional) Shadow video BIOS ROM Display BIOS copyright notice Display CPU type and speed Initialize EISA board Test keyboard Set key click if enabled Test for unexpected ... Initialize PC-compatible PnP ISA devices Re-initialize onboard I/O ports Configure Motherboard Configurable Devices (optional) Initialize BIOS Area Enable Non-Maskable Interrupts (NMIs) Initialize Extended BIOS Data Area Test and initialize PS/2 mouse Initialize floppy controller 69 justmanuals.com
Service Guide
Page 78
... in Flash ROM Initialize the chipset Initialize the bridge Initialize the CPU Initialize the system timer Initialize system I/O Check force recovery boot Checksum BIOS ROM Go to BIOS Set Huge Segment Initialize Multi Processor Initialize OEM special code Initialize PIC and DMA Initialize Memory type Initialize Memory size Shadow Boot Block System...
... in Flash ROM Initialize the chipset Initialize the bridge Initialize the CPU Initialize the system timer Initialize system I/O Check force recovery boot Checksum BIOS ROM Go to BIOS Set Huge Segment Initialize Multi Processor Initialize OEM special code Initialize PIC and DMA Initialize Memory type Initialize Memory size Shadow Boot Block System...

Service Guide
Page 79
LCD cable LCD inverter LCD Main board Enter BIOS Utility to CRT port. See "Power System Check" on page 63. If the system can power off, then the main board is overheat (Heat sink ... Check" on page 63. Reconnect the LCD connectors. Action in Sequence First, plug a monitor to execute "Load Setup Default Settings", then reboot system. Next, enter BIOS utility to running "Load Default Settings" then reboot the system. LCD cable LCD inverter LCD Main board Reconnect the LCD cable LCD cable LCD Main...
LCD cable LCD inverter LCD Main board Enter BIOS Utility to CRT port. See "Power System Check" on page 63. If the system can power off, then the main board is overheat (Heat sink ... Check" on page 63. Reconnect the LCD connectors. Action in Sequence First, plug a monitor to execute "Load Setup Default Settings", then reboot system. Next, enter BIOS utility to running "Load Default Settings" then reboot the system. LCD cable LCD inverter LCD Main board Reconnect the LCD cable LCD cable LCD Main...

Service Guide
Page 80
Action in upper case Main board Chapter 4 73 justmanuals.com RAM module Main board Check BIOS revision Reinsert DIMM DIMM Main board Speaker-Related Symptoms Symptom / Error In Windows, multimedia programs, no sound. Battery pack Main board ODD/HDD/FDD/RAM ... will not enter hibernation mode The system doesn't enter standby mode after closing the lid of Power Option Properties Lid close switch in Sequence Enter BIOS Setup Utility to execute "Load Default Settings" then reboot system. Power-Related Symptoms Symptom / Error Battery can power on page 64.
Action in upper case Main board Chapter 4 73 justmanuals.com RAM module Main board Check BIOS revision Reinsert DIMM DIMM Main board Speaker-Related Symptoms Symptom / Error In Windows, multimedia programs, no sound. Battery pack Main board ODD/HDD/FDD/RAM ... will not enter hibernation mode The system doesn't enter standby mode after closing the lid of Power Option Properties Lid close switch in Sequence Enter BIOS Setup Utility to execute "Load Default Settings" then reboot system. Power-Related Symptoms Symptom / Error Battery can power on page 64.

Service Guide
Page 81
...74 Chapter 4 External display does not work . Run printer self-test. Power Management-Related Symptoms Symptom / Error Action in Sequence Enter BIOS Setup Utility to execute "Load Default Settings" then reboot the system. Hard disk drive Main board The system doesn't resume from Standby/...battery). Battery pack Main board System hangs intermittently. Reconnect hard disk/CD-ROM drives. Printer driver Printer cable Printer Main board Enter BIOS Setup Utility to execute "Load Default Settings" then reboot the system. Check if the battery is low. Keyboard Main board Reconnect...
...74 Chapter 4 External display does not work . Run printer self-test. Power Management-Related Symptoms Symptom / Error Action in Sequence Enter BIOS Setup Utility to execute "Load Default Settings" then reboot the system. Hard disk drive Main board The system doesn't resume from Standby/...battery). Battery pack Main board System hangs intermittently. Reconnect hard disk/CD-ROM drives. Printer driver Printer cable Printer Main board Enter BIOS Setup Utility to execute "Load Default Settings" then reboot the system. Check if the battery is low. Keyboard Main board Reconnect...

Service Guide
Page 108
... contacts for all models T User's manuals T Training materials T Bios updates T Software utilities T Spare parts lists T TABs (Technical Announcement Bulletin) For these purposes, we have any suggestions or comments, please do not hesitate to communicate these to facilitate the problem-free downloading of Acer's Notebook, Desktop and Server models including: T Service guides for...
... contacts for all models T User's manuals T Training materials T Bios updates T Software utilities T Spare parts lists T TABs (Technical Announcement Bulletin) For these purposes, we have any suggestions or comments, please do not hesitate to communicate these to facilitate the problem-free downloading of Acer's Notebook, Desktop and Server models including: T Service guides for...


