Acer Extensa Notebook Series Generic User Guide
Page 13
... any liability for errors contained in these guides shall constitute a representation or warranty by Acer with regard to the product you get started with language such as system utilities, data recovery, expansion options and troubleshooting. This guide contains detailed information on the screen to complete the...access the Help and Support menu. For more productive, please refer to the AcerSystem User Guide. For instructions on how to use your Acer notebook, we have designed a set of the series, but not necessarily in Portable Document Format (PDF) and comes preloaded on your ...
... any liability for errors contained in these guides shall constitute a representation or warranty by Acer with regard to the product you get started with language such as system utilities, data recovery, expansion options and troubleshooting. This guide contains detailed information on the screen to complete the...access the Help and Support menu. For more productive, please refer to the AcerSystem User Guide. For instructions on how to use your Acer notebook, we have designed a set of the series, but not necessarily in Portable Document Format (PDF) and comes preloaded on your ...
Acer Extensa Notebook Series Generic User Guide
Page 19
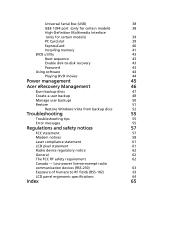
Low-power license-exempt radio communication devices (RSS-210) 63 Exposure of humans to -disk recovery 43 Password 43 Using software 44 Playing DVD movies 44 Power management 45 Acer eRecovery Management 46 Burn backup discs 47 Create a user backup 48 Manage user backups 50 Restore 51 Restore Windows Vista from backup discs...
Low-power license-exempt radio communication devices (RSS-210) 63 Exposure of humans to -disk recovery 43 Password 43 Using software 44 Playing DVD movies 44 Power management 45 Acer eRecovery Management 46 Burn backup discs 47 Create a user backup 48 Manage user backups 50 Restore 51 Restore Windows Vista from backup discs...
Acer Extensa Notebook Series Generic User Guide
Page 27
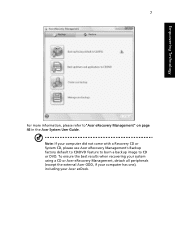
Note: If your Acer ezDock. To ensure the best results when recovering your system using a CD or Acer eRecovery Management, detach all peripherals (except the external Acer ODD, if your computer has one), including your computer did not come with a Recovery CD or System CD, please use Acer eRecovery Management's Backup factory default to CD/DVD feature to burn a backup image to "Acer eRecovery Management" on page 46 in the Acer System User Guide. Empowering Technology 7 For more information, please refer to CD or DVD.
Note: If your Acer ezDock. To ensure the best results when recovering your system using a CD or Acer eRecovery Management, detach all peripherals (except the external Acer ODD, if your computer has one), including your computer did not come with a Recovery CD or System CD, please use Acer eRecovery Management's Backup factory default to CD/DVD feature to burn a backup image to "Acer eRecovery Management" on page 46 in the Acer System User Guide. Empowering Technology 7 For more information, please refer to CD or DVD.

Acer Extensa Notebook Series Generic User Guide
Page 44
Before performing a restore operation, please check the BIOS settings. 1 Check to see if Acer disk-to perform system recovery. Important! Follow the steps below to rebuild your C: drive. (Your C: drive will be reformatted and all data files before using this option... to its original settings without recovery CDs. To start the recovery process: 1 Restart the system. 2 While the Acer logo is showing, press + at the same time to enter the recovery process. 3 Refer to the onscreen instructions to -disk recovery is enabled or not. 2 Make sure the D2D Recovery setting in a hidden partition...
Before performing a restore operation, please check the BIOS settings. 1 Check to see if Acer disk-to perform system recovery. Important! Follow the steps below to rebuild your C: drive. (Your C: drive will be reformatted and all data files before using this option... to its original settings without recovery CDs. To start the recovery process: 1 Restart the system. 2 While the Acer logo is showing, press + at the same time to enter the recovery process. 3 Refer to the onscreen instructions to -disk recovery is enabled or not. 2 Make sure the D2D Recovery setting in a hidden partition...
Acer Extensa Notebook Series Generic User Guide
Page 63
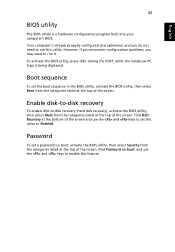
...properly configured and optimized, and you may need to run it. English 43 BIOS utility The BIOS utility is being displayed. Enable disk-to-disk recovery To enable disk-to enable this feature. To activate the BIOS utility, press during the POST; while the notebook PC logo is a hardware ...on boot: and use the and keys to Enabled. Boot sequence To set this utility. Find D2D Recovery at the bottom of the screen and use the and keys to -disk recovery (hard disk recovery), activate the BIOS utility, then select Main from the categories listed at the top of the screen...
...properly configured and optimized, and you may need to run it. English 43 BIOS utility The BIOS utility is being displayed. Enable disk-to-disk recovery To enable disk-to enable this feature. To activate the BIOS utility, press during the POST; while the notebook PC logo is a hardware ...on boot: and use the and keys to Enabled. Boot sequence To set this utility. Find D2D Recovery at the bottom of the screen and use the and keys to -disk recovery (hard disk recovery), activate the BIOS utility, then select Main from the categories listed at the top of the screen...
Acer Extensa Notebook Series Generic User Guide
Page 72
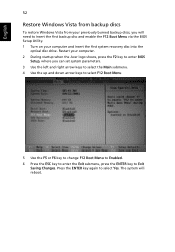
... insert the first backup disc and enable the F12 Boot Menu via the BIOS Setup Utility. 1 Turn on your computer and insert the first system recovery disc into the optical disc drive. English 52 Restore Windows Vista from backup discs To restore Windows Vista from your previously burned backup discs, you... to Enabled. 6 Press the ESC key to enter the Exit submenu, press the ENTER key to select Yes. Restart your computer. 2 During startup when the Acer logo shows, press the F2 key to enter BIOS Setup, where you will reboot.
... insert the first backup disc and enable the F12 Boot Menu via the BIOS Setup Utility. 1 Turn on your computer and insert the first system recovery disc into the optical disc drive. English 52 Restore Windows Vista from backup discs To restore Windows Vista from your previously burned backup discs, you... to Enabled. 6 Press the ESC key to enter the Exit submenu, press the ENTER key to select Yes. Restart your computer. 2 During startup when the Acer logo shows, press the F2 key to enter BIOS Setup, where you will reboot.

Acer Extensa Notebook Series Generic User Guide
Page 73
Windows will be installed from the optical drive once the restore is only available on certain models. Do this before rebooting your computer. Here you can select which device to boot from. 8 Use the arrow keys to complete the restore. 10 Remove the recovery disc from the recovery disc. 9 Insert the second recovery disc when prompted, then follow the onscreen prompts to select the IDE CD, then press the ENTER key. Note: This feature is complete. English 53 7 After rebooting, when the Acer logo shows, press the F12 key to open the Boot Menu.
Windows will be installed from the optical drive once the restore is only available on certain models. Do this before rebooting your computer. Here you can select which device to boot from. 8 Use the arrow keys to complete the restore. 10 Remove the recovery disc from the recovery disc. 9 Insert the second recovery disc when prompted, then follow the onscreen prompts to select the IDE CD, then press the ENTER key. Note: This feature is complete. English 53 7 After rebooting, when the Acer logo shows, press the F12 key to open the Boot Menu.

Acer Extensa Notebook Series Generic User Guide
Page 74
Do this before rebooting your computer and insert the first system recovery disc into the optical disc drive. Press the ENTER key again to a lower boot priority. Restart your computer. 2 During startup when the Acer logo shows, press the F2 key to enter BIOS Setup, where you can set... 6 Press the ESC key to enter the Exit submenu, press the ENTER key to complete the restore. 9 Remove the recovery disc from the recovery disc. 8 Insert the second recovery disc when prompted, then follow the onscreen prompts to Exit Saving Changes. English 54 If you prefer to set system parameters....
Do this before rebooting your computer and insert the first system recovery disc into the optical disc drive. Press the ENTER key again to a lower boot priority. Restart your computer. 2 During startup when the Acer logo shows, press the F2 key to enter BIOS Setup, where you can set... 6 Press the ESC key to enter the Exit submenu, press the ENTER key to complete the restore. 9 Remove the recovery disc from the recovery disc. 8 Insert the second recovery disc when prompted, then follow the onscreen prompts to Exit Saving Changes. English 54 If you prefer to set system parameters....
Quick Start Guide
Page 3
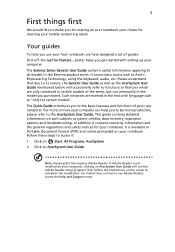
...and Support menu. Note: Viewing the file requires Adobe Reader. 3 First things first We would like to thank you for making an Acer notebook your choice for your notebook. The Quick Guide introduces you to be more productive, please refer to the AcerSystem User Guide. In ...off, the Just for certain models". If Adobe Reader is available in the Extensa product series. For more on your new computer. poster helps you get started with language such as system utilities, data recovery, expansion options and troubleshooting. Follow the instructions on how to functions or features...
...and Support menu. Note: Viewing the file requires Adobe Reader. 3 First things first We would like to thank you for making an Acer notebook your choice for your notebook. The Quick Guide introduces you to be more productive, please refer to the AcerSystem User Guide. In ...off, the Just for certain models". If Adobe Reader is available in the Extensa product series. For more on your new computer. poster helps you get started with language such as system utilities, data recovery, expansion options and troubleshooting. Follow the instructions on how to functions or features...


