
User Manual
Page 2
... written permission of this publication without obligation to the contents hereof and specifically disclaims the implied warranties of Acer Incorporated. ii Acer LCD Monitor User Guide Original Issue: 8/2016 Changes may be incorporated in the space provided below. Acer LCD Monitor User Guide Model number Serial number Date of purchase Place of purchase Acer and the Acer logo are registered trademarks of merchantability or fitness for identification purposes only...
... written permission of this publication without obligation to the contents hereof and specifically disclaims the implied warranties of Acer Incorporated. ii Acer LCD Monitor User Guide Original Issue: 8/2016 Changes may be incorporated in the space provided below. Acer LCD Monitor User Guide Model number Serial number Date of purchase Place of purchase Acer and the Acer logo are registered trademarks of merchantability or fitness for identification purposes only...
User Manual
Page 3
... slowly by changing the image or turning off the power switch and then turn it on again to make sure the flicker disappears. • You may flicker during initial use . • The LCD screen has 99.99% or more effective pixels. In this document for future reference. Turn off the power switch for a few hours. Cleaning your safety and comfort Safety instructions Read these guidelines when cleaning the monitor: •...
... slowly by changing the image or turning off the power switch and then turn it on again to make sure the flicker disappears. • You may flicker during initial use . • The LCD screen has 99.99% or more effective pixels. In this document for future reference. Turn off the power switch for a few hours. Cleaning your safety and comfort Safety instructions Read these guidelines when cleaning the monitor: •...
User Manual
Page 4
... you. The openings should be blocked or covered. iv English Accessibility Be sure that the power outlet you plug the power cord into is easily accessible and located as close to the equipment operator as they may touch dangerous voltage points or short-out parts that could be sure to block out noisy surroundings. • Turn the volume down if you...
... you. The openings should be blocked or covered. iv English Accessibility Be sure that the power outlet you plug the power cord into is easily accessible and located as close to the equipment operator as they may touch dangerous voltage points or short-out parts that could be sure to block out noisy surroundings. • Turn the volume down if you...
User Manual
Page 5
... exceed 80% of the power strip's input rating. • This product's power cord is damaged, cut or frayed • liquid was spilled into a non-grounded power outlet. If power strips are used with the supplied power supply cord set , make sure that the total ampere rating of this product. • Use the product only with this product from unexpected noise produced by plugging in too many devices...
... exceed 80% of the power strip's input rating. • This product's power cord is damaged, cut or frayed • liquid was spilled into a non-grounded power outlet. If power strips are used with the supplied power supply cord set , make sure that the total ampere rating of this product. • Use the product only with this product from unexpected noise produced by plugging in too many devices...

User Manual
Page 6
... the best working procedures to normal condition. To minimize pollution and ensure utmost protection of small children. For more information and help when recycling, please go to this electronic device into the trash when discarding. chemical plants; Areas with a potentially explosive atmosphere and obey all signs and instructions. English Note: Adjust only those controls that are covered by...
... the best working procedures to normal condition. To minimize pollution and ensure utmost protection of small children. For more information and help when recycling, please go to this electronic device into the trash when discarding. chemical plants; Areas with a potentially explosive atmosphere and obey all signs and instructions. English Note: Adjust only those controls that are covered by...
User Manual
Page 7
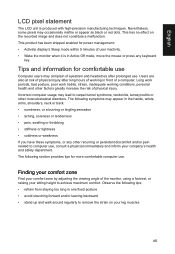
...in one fixed posture • avoid slouching forward and/or leaning backward • stand up and walk around regularly to remove the strain on the recorded image and does not constitute a malfunction. English LCD pixel statement The LCD unit is in Active Off mode, move .... Nevertheless, some pixels may appear in front of physical injury. The following symptoms may occasionally misfire or appear as black or red dots. Observe the following section provides tips for power management: • Activate display's Sleep mode within 5 minutes of the monitor, using a footrest, or...
...in one fixed posture • avoid slouching forward and/or leaning backward • stand up and walk around regularly to remove the strain on the recorded image and does not constitute a malfunction. English LCD pixel statement The LCD unit is in Active Off mode, move .... Nevertheless, some pixels may appear in front of physical injury. The following symptoms may occasionally misfire or appear as black or red dots. Observe the following section provides tips for power management: • Activate display's Sleep mode within 5 minutes of the monitor, using a footrest, or...
User Manual
Page 8
... • using a task light • changing the display's viewing angle • using a glare-reduction filter • using a display visor, such as a piece of cardboard extended from the display's top front edge • Avoid adjusting your eyes point downward when looking at the middle of the display. • Adjust the display brightness and/or contrast to keep your eyes from drying out. Display • Keep your display clean. • Keep your head...
... • using a task light • changing the display's viewing angle • using a glare-reduction filter • using a display visor, such as a piece of cardboard extended from the display's top front edge • Avoid adjusting your eyes point downward when looking at the middle of the display. • Adjust the display brightness and/or contrast to keep your eyes from drying out. Display • Keep your display clean. • Keep your head...
User Manual
Page 11
... for comfortable use vii Finding your comfort zone vii Taking care of your vision viii Developing good work habits viii Declaration of Conformity ix Federal Communications Commission Declaration of Conformity x Unpacking 1 Attaching the Base 2 Screen position adjustment 2 Connecting the adapter and AC Power cord 3 Power saving 3 Display Data Channel (DDC) 4 15-pin color display signal cable 4 19-pin color display signal cable 5 Standard timing table 6 Installation 7 User Controls 8 External controls 8 Using the Shortcut Menu 8 HDMI/VGA/DVI Mode (Optional...
... for comfortable use vii Finding your comfort zone vii Taking care of your vision viii Developing good work habits viii Declaration of Conformity ix Federal Communications Commission Declaration of Conformity x Unpacking 1 Attaching the Base 2 Screen position adjustment 2 Connecting the adapter and AC Power cord 3 Power saving 3 Display Data Channel (DDC) 4 15-pin color display signal cable 4 19-pin color display signal cable 5 Standard timing table 6 Installation 7 User Controls 8 External controls 8 Using the Shortcut Menu 8 HDMI/VGA/DVI Mode (Optional...

User Manual
Page 12
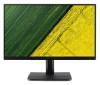
English Unpacking Please check that the following items are present when you unpack the box, and save the packing materials in case you need to ship or transport the monitor in the future. LCD monitor Quick start guide Audio Cable (Optional) ET221Q VGA Cable (Optional) HDMI cable (Optional) AC Power cord DVI Cable (Optional) 1
English Unpacking Please check that the following items are present when you unpack the box, and save the packing materials in case you need to ship or transport the monitor in the future. LCD monitor Quick start guide Audio Cable (Optional) ET221Q VGA Cable (Optional) HDMI cable (Optional) AC Power cord DVI Cable (Optional) 1

User Manual
Page 13
use a cloth to avoid scratching the screen. • Screen position adjustment To optimize the viewing position, you can be adjusted to hold the edges of the monitor as shown below. The monitor can adjust the monitor tilt by using both of your hands to 20 degrees up or 5 degrees down on a stable surface -- English • Attaching the Base Note: Remove the monitor and monitor base from its packaging. Carefully place the monitor face-down . 20 5 2
use a cloth to avoid scratching the screen. • Screen position adjustment To optimize the viewing position, you can be adjusted to hold the edges of the monitor as shown below. The monitor can adjust the monitor tilt by using both of your hands to 20 degrees up or 5 degrees down on a stable surface -- English • Attaching the Base Note: Remove the monitor and monitor base from its packaging. Carefully place the monitor face-down . 20 5 2
User Manual
Page 14
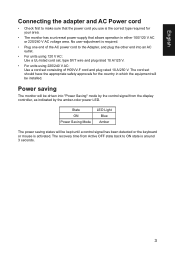
... power cord to the Adapter, and plug the other end into "Power Saving" mode by the control signal from the display controller, as indicated by the amber-color power LED. No user-adjustment is activated. State ON Power Saving Mode LED Light Blue Amber The power saving states will be driven into an AC outlet. • For units using 120 V AC: Use a UL-listed cord set, type SVT wire and plug rated 10 A/125 V. • For units using 220/240 V AC: Use a cord set...
... power cord to the Adapter, and plug the other end into "Power Saving" mode by the control signal from the display controller, as indicated by the amber-color power LED. No user-adjustment is activated. State ON Power Saving Mode LED Light Blue Amber The power saving states will be driven into an AC outlet. • For units using 120 V AC: Use a UL-listed cord set, type SVT wire and plug rated 10 A/125 V. • For units using 220/240 V AC: Use a cord set...

User Manual
Page 15
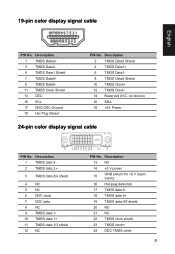
.... 15-pin color display signal cable 1 5 6 10 11 15 PIN No. for example, supported resolutions and corresponding timing. English Display Data Channel (DDC) To make installation easier, so long as your system supports the DDC protocol, the monitor is a communication protocol through which the monitor automatically informs the host system about its capabilities; The DDC is able to plug-and-play. Description 1 Red 2 Green 3 Blue 4 Monitor ground 5 DDC...
.... 15-pin color display signal cable 1 5 6 10 11 15 PIN No. for example, supported resolutions and corresponding timing. English Display Data Channel (DDC) To make installation easier, so long as your system supports the DDC protocol, the monitor is a communication protocol through which the monitor automatically informs the host system about its capabilities; The DDC is able to plug-and-play. Description 1 Red 2 Green 3 Blue 4 Monitor ground 5 DDC...
User Manual
Page 16
... 1 TMDS Data2+ 3 TMDS Data25 TMDS Data1 Shield 7 TMDS Data0+ 9 TMDS Data011 TMDS Clock Shield 13 CEC 15 SCL 17 DDC/CEC Ground 19 Hot Plug Detect PIN No. Description 1 TMDS data 22 TMDS data 2+- 3 TMDS data 2/4 shield 4 NC 5 NC 6 DDC clock 7 DDC data 8 NC 9... Power 24-pin color display signal cable PIN No. Description 13 NC 14 +5 V power 15 GND (return for +5 V hsync. vsync) 16 Hot-plug detection 17 TMDS data 0- 18 TMDS data 0+ 19 TMDS data 0/5 shield 20 NC 21 NC 22 TMDS clock shield 23 TMDS clock+ 24 DDC TMDS clock- 5 19-pin color display signal cable English ...
... 1 TMDS Data2+ 3 TMDS Data25 TMDS Data1 Shield 7 TMDS Data0+ 9 TMDS Data011 TMDS Clock Shield 13 CEC 15 SCL 17 DDC/CEC Ground 19 Hot Plug Detect PIN No. Description 1 TMDS data 22 TMDS data 2+- 3 TMDS data 2/4 shield 4 NC 5 NC 6 DDC clock 7 DDC data 8 NC 9... Power 24-pin color display signal cable PIN No. Description 13 NC 14 +5 V power 15 GND (return for +5 V hsync. vsync) 16 Hot-plug detection 17 TMDS data 0- 18 TMDS data 0+ 19 TMDS data 0/5 shield 20 NC 21 NC 22 TMDS clock shield 23 TMDS clock+ 24 DDC TMDS clock- 5 19-pin color display signal cable English ...
User Manual
Page 18
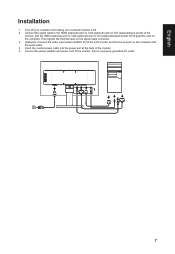
English Installation 1. Connect the signal cable to a properly grounded AC outlet. Then tighten the thumbscrews on the signal cable connector. 3. (Optional): Connect the audio input socket (AUDIO IN) of the graphics card on the computer with the audio cable. 4. Insert the monitor power cable into the power port at the back of the monitor. 5. HDMI DVI VGA AUDIO IN 2 7 Connect the power adapter and power cord to the monitor, then to the HDMI (optional) and /or VGA (optional) and /or DVI (optional)input socket of the...
English Installation 1. Connect the signal cable to a properly grounded AC outlet. Then tighten the thumbscrews on the signal cable connector. 3. (Optional): Connect the audio input socket (AUDIO IN) of the graphics card on the computer with the audio cable. 4. Insert the monitor power cable into the power port at the back of the monitor. 5. HDMI DVI VGA AUDIO IN 2 7 Connect the power adapter and power cord to the monitor, then to the HDMI (optional) and /or VGA (optional) and /or DVI (optional)input socket of the...

User Manual
Page 19
... again to enter next function in the Function Menu.. 2 Input Function key Press to view Main page.Press again to enter Input select function. 3 Function key Press to view Main page.Press again to enter Volume adjustment function. 4 Empowering Key When the Function Menu is active, press to select scenario mode. 5 POWER POWER Turns the monitor on/off.Blue indicates power on. Amber indicates Button standby/ power saving mode.
... again to enter next function in the Function Menu.. 2 Input Function key Press to view Main page.Press again to enter Input select function. 3 Function key Press to view Main page.Press again to enter Volume adjustment function. 4 Empowering Key When the Function Menu is active, press to select scenario mode. 5 POWER POWER Turns the monitor on/off.Blue indicates power on. Amber indicates Button standby/ power saving mode.

User Manual
Page 20
... side of your monitor. (a) VGA input (b) DVI input (c) HDMI input As you cycle through the sources you quickly select the most commonly accessed settings. Press the MENU key to open the Acer eColor Management OSD and access the scenario modes. 9 English Using the Shortcut Menu Note: The following content is selected ,but the VGA and DVI and HDMI cables are not con-nected, a floating dialog box indicates: "No Cable Connect" or "No Signal" Volume Press this...
... side of your monitor. (a) VGA input (b) DVI input (c) HDMI input As you cycle through the sources you quickly select the most commonly accessed settings. Press the MENU key to open the Acer eColor Management OSD and access the scenario modes. 9 English Using the Shortcut Menu Note: The following content is selected ,but the VGA and DVI and HDMI cables are not con-nected, a floating dialog box indicates: "No Cable Connect" or "No Signal" Volume Press this...
User Manual
Page 21
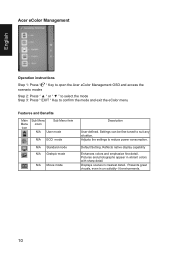
.... Pictures and photographs appear in un suitably- Settings can be fine-tuned to reduce power consumption. Reflects native display capability Enhances colors and emphasize fine detail. Displays scenes in clearest detail. lit environments. 10 Adjusts the settings to suit any situation. Default Setting. English Acer eColor Management Operation instructions Step 1: Press " " Key to open the Acer eColor Management OSD and access the scenario modes...
.... Pictures and photographs appear in un suitably- Settings can be fine-tuned to reduce power consumption. Reflects native display capability Enhances colors and emphasize fine detail. Displays scenes in clearest detail. lit environments. 10 Adjusts the settings to suit any situation. Default Setting. English Acer eColor Management Operation instructions Step 1: Press " " Key to open the Acer eColor Management OSD and access the scenario modes...
User Manual
Page 22
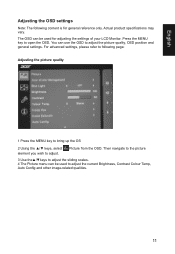
English Adjusting the OSD settings Note: The following page: Adjusting the picture quality 1 Press the MENU key to bring up the OS 2 Using the ▲/▼ keys, select element you wish to adjust the current Brightness, Contrast Colour Temp, Auto Config and other image-related qualities. 11 You can use the OSD to open the OSD. Picture from the OSD. Press the MENU key to adjust the picture quality, OSD position and general settings. For advanced...
English Adjusting the OSD settings Note: The following page: Adjusting the picture quality 1 Press the MENU key to bring up the OS 2 Using the ▲/▼ keys, select element you wish to adjust the current Brightness, Contrast Colour Temp, Auto Config and other image-related qualities. 11 You can use the OSD to open the OSD. Picture from the OSD. Press the MENU key to adjust the picture quality, OSD position and general settings. For advanced...
User Manual
Page 23
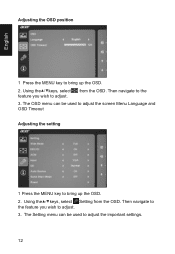
from the OSD. The Setting menu can be used to adjust the screen Menu Language and OSD Timeout Adjusting the setting 1 Press the MENU key to bring up the OSD. 2. Using the▲/▼keys, select feature you wish to adjust. 3. The OSD menu can be used to adjust the important settings. 12 English Adjusting the OSD position 1 Press the MENU key to bring up the OSD. 2. Then navigate to the feature you wish to the 3. Then navigate to adjust. Using the▲/▼keys, select Setting from the OSD.
from the OSD. The Setting menu can be used to adjust the screen Menu Language and OSD Timeout Adjusting the setting 1 Press the MENU key to bring up the OSD. 2. Using the▲/▼keys, select feature you wish to adjust. 3. The OSD menu can be used to adjust the important settings. 12 English Adjusting the OSD position 1 Press the MENU key to bring up the OSD. 2. Then navigate to the feature you wish to the 3. Then navigate to adjust. Using the▲/▼keys, select Setting from the OSD.

User Manual
Page 25
HDMI/VGA/DVI Mode (Optional) Problem LED status Remedy No picture visible Blue Using the OSD menu, adjust brightness and contrast to maximum or reset to see if you can self-diagnose the problem. Off Check the power switch. Check if the video signal cable is switched on and in power saving/standby mode. 14 Check if the computer system is properly connected at the back of monitor. English Troubleshooting Before sending your LCD monitor for servicing, please check the troubleshooting list below to their default setting. Amber Check if the...
HDMI/VGA/DVI Mode (Optional) Problem LED status Remedy No picture visible Blue Using the OSD menu, adjust brightness and contrast to maximum or reset to see if you can self-diagnose the problem. Off Check the power switch. Check if the video signal cable is switched on and in power saving/standby mode. 14 Check if the computer system is properly connected at the back of monitor. English Troubleshooting Before sending your LCD monitor for servicing, please check the troubleshooting list below to their default setting. Amber Check if the...


