
User Manual
Page 3
.... Keep this case, the screen is displayed for your monitor Please carefully follow these instructions carefully. Cleaning your safety and comfort Safety instructions Read these guidelines when cleaning the monitor: • Always unplug the monitor before cleaning. • Use a soft cloth to the nature of the previous screen may remain after switching the image, when the same image is recovered slowly by changing the image or turning off the power switch...
.... Keep this case, the screen is displayed for your monitor Please carefully follow these instructions carefully. Cleaning your safety and comfort Safety instructions Read these guidelines when cleaning the monitor: • Always unplug the monitor before cleaning. • Use a soft cloth to the nature of the previous screen may remain after switching the image, when the same image is recovered slowly by changing the image or turning off the power switch...

User Manual
Page 4
.... Using electrical power • This product should never be blocked or covered. iv Accessibility Be sure that the power outlet you plug the power cord into is easily accessible and located as close to the equipment operator as they may touch dangerous voltage points or short-out parts that the total If the product falls, it could result in installation...
.... Using electrical power • This product should never be blocked or covered. iv Accessibility Be sure that the power outlet you plug the power cord into is easily accessible and located as close to the equipment operator as they may touch dangerous voltage points or short-out parts that the total If the product falls, it could result in installation...

User Manual
Page 5
... wall outlet and refer servicing to replace the power cord set . Make sure the power outlet is a safety feature. If you to qualified service personnel. The overall system load must not exceed 80% of this product. • Use the product only with a three-wire grounded plug. Unplug this product yourself, as opening or removing covers may interfere with the performance of the branch circuit rating...
... wall outlet and refer servicing to replace the power cord set . Make sure the power outlet is a safety feature. If you to qualified service personnel. The overall system load must not exceed 80% of this product. • Use the product only with a three-wire grounded plug. Unplug this product yourself, as opening or removing covers may interfere with the performance of the branch circuit rating...

User Manual
Page 6
... at service stations. Disposal instructions Do not throw this website: http://www.acer-group.com/public/Sustainability/sustainability01.htm Visit www.acer-group.com for further information on the features and benefits of our other controls may contain small parts. vi Note: Adjust only those controls that are covered by a qualified technician to restore the product to turn off your...
... at service stations. Disposal instructions Do not throw this website: http://www.acer-group.com/public/Sustainability/sustainability01.htm Visit www.acer-group.com for further information on the features and benefits of our other controls may contain small parts. vi Note: Adjust only those controls that are covered by a qualified technician to restore the product to turn off your...
User Manual
Page 7
... set by the U.S. For lamp-specific disposal information, check www.lamprecycle.org. This has no effect on the recorded image and does not constitute a malfunction. What is in front of a computer. Products that help customers save you money by pushing the power button. ENERGY STAR ® Acer's ENERGY STAR qualified products save money, conserve energy and improve the quality of user...
... set by the U.S. For lamp-specific disposal information, check www.lamprecycle.org. This has no effect on the recorded image and does not constitute a malfunction. What is in front of a computer. Products that help customers save you money by pushing the power button. ENERGY STAR ® Acer's ENERGY STAR qualified products save money, conserve energy and improve the quality of user...
User Manual
Page 8
... looking at the middle of the display. • Adjust the display brightness and/or contrast to remove the strain on your leg muscles Taking care of the monitor, using a task light • changing the display's viewing angle The following sections provide suggestions on a distant point. • Blink frequently to keep your eyes from staying too long in one fixed posture • avoid slouching forward and...
... looking at the middle of the display. • Adjust the display brightness and/or contrast to remove the strain on your leg muscles Taking care of the monitor, using a task light • changing the display's viewing angle The following sections provide suggestions on a distant point. • Blink frequently to keep your eyes from staying too long in one fixed posture • avoid slouching forward and...
User Manual
Page 9
... from the display's top front edge • Avoid adjusting your computer use more relaxing and productive: • Take short breaks regularly and often. • Perform some stretching exercises. • Breathe fresh air as often as attested by conformity with the requirements. Year to an awkward viewing angle. • Avoid looking at bright light sources, such as open windows, for...
... from the display's top front edge • Avoid adjusting your computer use more relaxing and productive: • Take short breaks regularly and often. • Perform some stretching exercises. • Breathe fresh air as often as attested by conformity with the requirements. Year to an awkward viewing angle. • Avoid looking at bright light sources, such as open windows, for...
User Manual
Page 11
... the base (for selected models) 3 Screen position adjustment 4 Connecting the power cord 4 Power saving 4 Connecting the docking device (for selected models) 5 Display Data Channel (DDC) 5 Connector pin assignment 5 15-pin color display signal cable 5 24-pin color display signal cable 6 19-pin color display signal cable* 6 Standard timing table 7 Installation 8 Users controls 9 Front panel controls 9 Acer eColor Management 10 Operation instructions 10 Features and benefits 10 Adjusting the OSD settings 11 Adjusting the picture quality 11 Adjusting the OSD...
... the base (for selected models) 3 Screen position adjustment 4 Connecting the power cord 4 Power saving 4 Connecting the docking device (for selected models) 5 Display Data Channel (DDC) 5 Connector pin assignment 5 15-pin color display signal cable 5 24-pin color display signal cable 6 19-pin color display signal cable* 6 Standard timing table 7 Installation 8 Users controls 9 Front panel controls 9 Acer eColor Management 10 Operation instructions 10 Features and benefits 10 Adjusting the OSD settings 11 Adjusting the picture quality 11 Adjusting the OSD...
User Manual
Page 13
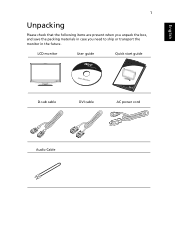
English 1 Unpacking Please check that the following items are present when you unpack the box, and save the packing materials in case you need to ship or transport the monitor in the future. LCD monitor User guide Quick start guide D-sub cable DVI cable AC power cord Audio Cable
English 1 Unpacking Please check that the following items are present when you unpack the box, and save the packing materials in case you need to ship or transport the monitor in the future. LCD monitor User guide Quick start guide D-sub cable DVI cable AC power cord Audio Cable
User Manual
Page 15
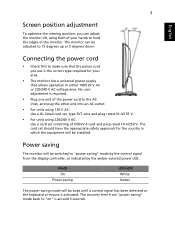
.... 3 English Screen position adjustment To optimize the viewing position, you use is the correct type required for the country in either 100/120 V AC or 220/240 V AC voltage area. The monitor can adjust the monitor tilt, using 220/240 V AC: Use a cord set should have the appropriate safety approvals for your hands to hold the edges of H05VV-F cord and plug rated 10 A/250 V. Mode On Power saving LED light White Amber The power saving mode will...
.... 3 English Screen position adjustment To optimize the viewing position, you use is the correct type required for the country in either 100/120 V AC or 220/240 V AC voltage area. The monitor can adjust the monitor tilt, using 220/240 V AC: Use a cord set should have the appropriate safety approvals for your hands to hold the edges of H05VV-F cord and plug rated 10 A/250 V. Mode On Power saving LED light White Amber The power saving mode will...
User Manual
Page 16
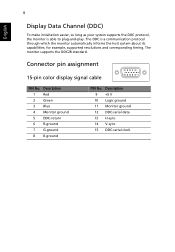
... 4 English Display Data Channel (DDC) To make installation easier, so long as your system supports the DDC protocol, the monitor is a communication protocol through which the monitor automatically informs the host system about its capabilities; The monitor supports the DDC2B standard. Description 1 Red 2 Green 3 Blue 4 Monitor ground 5 DDC-return 6 R-ground 7 G-ground 8 B-ground PIN No. for example, supported resolutions and corresponding timing. Connector pin assignment 15-pin color display signal cable...
... 4 English Display Data Channel (DDC) To make installation easier, so long as your system supports the DDC protocol, the monitor is a communication protocol through which the monitor automatically informs the host system about its capabilities; The monitor supports the DDC2B standard. Description 1 Red 2 Green 3 Blue 4 Monitor ground 5 DDC-return 6 R-ground 7 G-ground 8 B-ground PIN No. for example, supported resolutions and corresponding timing. Connector pin assignment 15-pin color display signal cable...
User Manual
Page 19
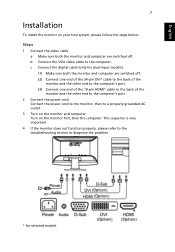
... VGA video cable to diagnose the problem * for dual-input models). (1) Make sure both the monitor and computer are switched off. (2) Connect one end of the 24-pin DVI* cable to the back of the monitor and the other end to the computer's port. (3) Connect one end of the 19-pin HDMI* cable to the back of the monitor and the other end to the computer's port. 2 Connect the power cord Connect the power cord...
... VGA video cable to diagnose the problem * for dual-input models). (1) Make sure both the monitor and computer are switched off. (2) Connect one end of the 24-pin DVI* cable to the back of the monitor and the other end to the computer's port. (3) Connect one end of the 19-pin HDMI* cable to the back of the monitor and the other end to the computer's port. 2 Connect the power cord Connect the power cord...
User Manual
Page 20
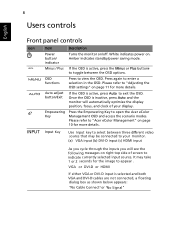
8 Users controls English Front panel controls Icon Item Description Power button/ indicator Turns the monitor on . OSD functions Press to enter a selection in the OSD. Press again to view the OSD. Empowering Key Press the Empowering Key to toggle between three different video source that may take 1 or 2 seconds for the image to indicate currently selected input source. VGA or DVI-D or HDMI If either VGA or DVI-D input is active, press Auto to your monitor. (a) VGA input (b) DVI-D input (c) HDMI input As...
8 Users controls English Front panel controls Icon Item Description Power button/ indicator Turns the monitor on . OSD functions Press to enter a selection in the OSD. Press again to view the OSD. Empowering Key Press the Empowering Key to toggle between three different video source that may take 1 or 2 seconds for the image to indicate currently selected input source. VGA or DVI-D or HDMI If either VGA or DVI-D input is active, press Auto to your monitor. (a) VGA input (b) DVI-D input (c) HDMI input As...
User Manual
Page 21
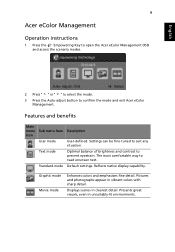
.... Displays scenes in vibrant colors with sharp detail. Pictures and photographs appear in clearest detail. Presents great visuals, even in unsuitably-lit environments. English 9 Acer eColor Management Operation instructions 1 Press the Empowering Key to open the Acer eColor Management OSD and access the scenario modes. 2 Press " " or " " to select the mode. 3 Press the Auto-adjust button to prevent eyestrain. Text mode Optimal balance of brightness and contrast to...
.... Displays scenes in vibrant colors with sharp detail. Pictures and photographs appear in clearest detail. Presents great visuals, even in unsuitably-lit environments. English 9 Acer eColor Management Operation instructions 1 Press the Empowering Key to open the Acer eColor Management OSD and access the scenario modes. 2 Press " " or " " to select the mode. 3 Press the Auto-adjust button to prevent eyestrain. Text mode Optimal balance of brightness and contrast to...

User Manual
Page 22
... to the picture element you wish to adjust. 3 Use the / keys to adjust the sliding scales. 4 The Picture menu can use the OSD to adjust the current Brightness, Contrast, Colour Temp, Auto Config and other image-related qualities. You can be used to adjust the picture quality, OSD position and general settings. For advanced settings, please refer to open the OSD. Press the Menu key to following content is for adjusting the settings of your LCD Monitor.
... to the picture element you wish to adjust. 3 Use the / keys to adjust the sliding scales. 4 The Picture menu can use the OSD to adjust the current Brightness, Contrast, Colour Temp, Auto Config and other image-related qualities. You can be used to adjust the picture quality, OSD position and general settings. For advanced settings, please refer to open the OSD. Press the Menu key to following content is for adjusting the settings of your LCD Monitor.
User Manual
Page 26
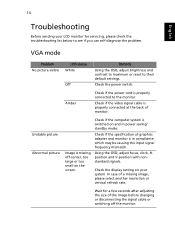
... their default settings. VGA mode Problem No picture visible LED status White Off Remedy Using the OSD, adjust brightness and contrast to maximum or reset to the monitor. Check if the video signal cable is in power saving/ standby mode. Unstable picture Abnormal picture Check if the computer system is switched on your LCD monitor for a few seconds after adjusting the size of graphics adapter and monitor is properly connected at the back of a missing image, please select another resolution or vertical refresh rate. Check if the specification of the image...
... their default settings. VGA mode Problem No picture visible LED status White Off Remedy Using the OSD, adjust brightness and contrast to maximum or reset to the monitor. Check if the video signal cable is in power saving/ standby mode. Unstable picture Abnormal picture Check if the computer system is switched on your LCD monitor for a few seconds after adjusting the size of graphics adapter and monitor is properly connected at the back of a missing image, please select another resolution or vertical refresh rate. Check if the specification of the image...

User Manual
Page 27
Amber Check if the AC power cord is properly connected to their default settings. Check the power switch. Check if the video signal cable is switched on and in power saving/ standby mode. * for selected models 15 English DVI/HDMI* mode Problem No picture visible LED status White Off Remedy Using the OSD, adjust brightness and contrast to maximum or reset to the monitor. Check that the computer system is properly connected at the back of monitor.
Amber Check if the AC power cord is properly connected to their default settings. Check the power switch. Check if the video signal cable is switched on and in power saving/ standby mode. * for selected models 15 English DVI/HDMI* mode Problem No picture visible LED status White Off Remedy Using the OSD, adjust brightness and contrast to maximum or reset to the monitor. Check that the computer system is properly connected at the back of monitor.
Brochure
Page 3
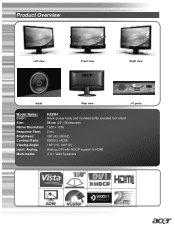
Product Overview Left view Front view Right view detail Rear view I/O ports Model Name: Color: Size: Native Resolution: Response Time: Brightness: Contrast Ratio: Viewing Angle: Input: Analog, Multi-media: H233H Black glossy body and rounded softly rounded foot stand 58 cm (23") Widescreen 1920 x 1050 2 ms 300 nits (cd/m2) 80000:1 (ACM) 160° (H), 160° (V) Analog, DVI with HDCP support & HDMI 2 X 1 Watt Speakers
Product Overview Left view Front view Right view detail Rear view I/O ports Model Name: Color: Size: Native Resolution: Response Time: Brightness: Contrast Ratio: Viewing Angle: Input: Analog, Multi-media: H233H Black glossy body and rounded softly rounded foot stand 58 cm (23") Widescreen 1920 x 1050 2 ms 300 nits (cd/m2) 80000:1 (ACM) 160° (H), 160° (V) Analog, DVI with HDCP support & HDMI 2 X 1 Watt Speakers

Brochure
Page 4
... digital HDMI™ interface slots you can enjoy powerful and thrilling audio performance thanks integrated speaker system. • Rich Color and Crisp Details Integrating the Acer ACM advanced Adaptive Contrast Management enabling a contrast ratio of 80,000:1 technology for stunning picture quality with Visual Precision With the amazing response rate of class. Acer have also developed and integrated the innovative SensorTouch OSD for easy display...
... digital HDMI™ interface slots you can enjoy powerful and thrilling audio performance thanks integrated speaker system. • Rich Color and Crisp Details Integrating the Acer ACM advanced Adaptive Contrast Management enabling a contrast ratio of 80,000:1 technology for stunning picture quality with Visual Precision With the amazing response rate of class. Acer have also developed and integrated the innovative SensorTouch OSD for easy display...
Brochure
Page 5
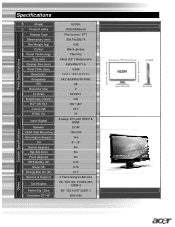
Specifications Panel Specifications Model Product name Display Type Dimensions (mm) Net Weight (kg) Colour Panel Technology Size Inch Display Size (mm) Pixel Pitch (mm) Resolution Frequency PPI Rsp time (ms) Contrast Brightness (cd/m2) H/V° CR 10:1 Colors (M) NTSC (%) Input Signal Speaker VESA Wall Mounting Kensington Support Tilt Swivel degrees Hgt Adj (mm) Pivot degrees Off/Standby (W) Sleep (W) EnergyStar On (W) Service & Support Certificates Pallet Qty / Size Container 20"/40" H233H H233HQEbmid Flat screen / TFT 509.76x286.74 4.92 Black glossy TN+Film 58cm...
Specifications Panel Specifications Model Product name Display Type Dimensions (mm) Net Weight (kg) Colour Panel Technology Size Inch Display Size (mm) Pixel Pitch (mm) Resolution Frequency PPI Rsp time (ms) Contrast Brightness (cd/m2) H/V° CR 10:1 Colors (M) NTSC (%) Input Signal Speaker VESA Wall Mounting Kensington Support Tilt Swivel degrees Hgt Adj (mm) Pivot degrees Off/Standby (W) Sleep (W) EnergyStar On (W) Service & Support Certificates Pallet Qty / Size Container 20"/40" H233H H233HQEbmid Flat screen / TFT 509.76x286.74 4.92 Black glossy TN+Film 58cm...


