

User Manual
Page 1
TABLE OF CONTENTS Special notes on LCD monitors 1 Information for your safety and comfort 2 Unpacking 5 Attaching/Removing the base 6 Screen position adjustment 6 Connecting the power cord 7 Safety precaution 7 Cleaning your monitor 7 Power saving 8 DDC 8 Connector Pin Assignment 9 Standard Timing Table 11 Installation 12 User controls 13 Troubleshooting 19
TABLE OF CONTENTS Special notes on LCD monitors 1 Information for your safety and comfort 2 Unpacking 5 Attaching/Removing the base 6 Screen position adjustment 6 Connecting the power cord 7 Safety precaution 7 Cleaning your monitor 7 Power saving 8 DDC 8 Connector Pin Assignment 9 Standard Timing Table 11 Installation 12 User controls 13 Troubleshooting 19

User Manual
Page 2
... brightness on the screen depending on again to the nature of the LCD screen, an afterimage of the previous screen may flicker during initial use . • The LCD screen has effective pixels of the fluorescent light, the screen may remain after switching the image, when the same image is displayed for hours. In this case, the screen is recovered slowly by changing the image or turning off the Power Switch and then turn...
... brightness on the screen depending on again to the nature of the LCD screen, an afterimage of the previous screen may flicker during initial use . • The LCD screen has effective pixels of the fluorescent light, the screen may remain after switching the image, when the same image is displayed for hours. In this case, the screen is recovered slowly by changing the image or turning off the Power Switch and then turn...

User Manual
Page 3
... be blocked or covered. When you need to disconnect power to the equipment, be blocked by hearing experts,to protect your safety and comfort Safety instructions Read these instructions, suggested by placing the product on a vibrating surface. • Never use this product near water. • Do not place this product on the product. These openings must not...
... be blocked or covered. When you need to disconnect power to the equipment, be blocked by hearing experts,to protect your safety and comfort Safety instructions Read these instructions, suggested by placing the product on a vibrating surface. • Never use this product near water. • Do not place this product on the product. These openings must not...

User Manual
Page 4
... the monitor, using a footrest, or raising your sitting height to qualified service personnel. Unplug this product yourself, as black or red dots. Users are covered by adjusting the viewing angle of physical injury after prolonged use , consult a physician immediately and inform your company's health and safety department. Incorrect computer usage may complain of eyestrain and headaches after long hours of working conditions...
... the monitor, using a footrest, or raising your sitting height to qualified service personnel. Unplug this product yourself, as black or red dots. Users are covered by adjusting the viewing angle of physical injury after prolonged use , consult a physician immediately and inform your company's health and safety department. Incorrect computer usage may complain of eyestrain and headaches after long hours of working conditions...

User Manual
Page 5
... open windows, for extended periods of the display. • Adjust the display brightness and/or contrast to a comfortable level for only short periods, take short rests to relax your neck and shoulders • avoid tensing your muscles or shrugging your shoulders • install the external display, keyboard and mouse properly and within comfort able reach • if you view your monitor...
... open windows, for extended periods of the display. • Adjust the display brightness and/or contrast to a comfortable level for only short periods, take short rests to relax your neck and shoulders • avoid tensing your muscles or shrugging your shoulders • install the external display, keyboard and mouse properly and within comfort able reach • if you view your monitor...

User Manual
Page 6
UNPACKING Please check the following items are present when you unpack the box, and save the packing materials in case you will need to ship or transport the monitor in future. • LCD Monitor • AC Power Cord • D-Sub Cable • DVI Cable (Only Dual-Input Model) • Audio Cable (Only Audio-Input Model) • (Optional) User Manual • Quick Start Guide EN-5
UNPACKING Please check the following items are present when you unpack the box, and save the packing materials in case you will need to ship or transport the monitor in future. • LCD Monitor • AC Power Cord • D-Sub Cable • DVI Cable (Only Dual-Input Model) • Audio Cable (Only Audio-Input Model) • (Optional) User Manual • Quick Start Guide EN-5
User Manual
Page 7
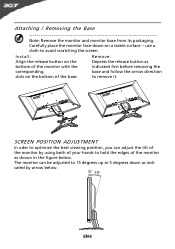
... on a stable surface -- use a cloth to remove it. to avoid scratching the screen. The monitor can adjust the tilt of the monitor by arrow below . EN-6 Attaching / Removing the Base Note: Remove the monitor and monitor base from its packaging. SCREEN POSITION ADJUSTMENT In oder to optimize the best viewing position, you can be adjusted to hold the edges of the monitor as bottom of the base. Install: Remove: Align the release button on the Depress...
... on a stable surface -- use a cloth to remove it. to avoid scratching the screen. The monitor can adjust the tilt of the monitor by arrow below . EN-6 Attaching / Removing the Base Note: Remove the monitor and monitor base from its packaging. SCREEN POSITION ADJUSTMENT In oder to optimize the best viewing position, you can be adjusted to hold the edges of the monitor as bottom of the base. Install: Remove: Align the release button on the Depress...

User Manual
Page 8
... equipment will be installed. No user-adjustment is fragile. SAFETY PRECAUTION • Avoid placing the monitor, or any other light sources may reflect on the power cord to avoid damage to the cable. • Do not expose the monitor to rain, excessive moisture, or dust. • Do not cover the ventilation slots or openings of H05VV-F cord and plug rated 10 A, 250 V. CLEANING YOUR MONITOR Please carefully...
... equipment will be installed. No user-adjustment is fragile. SAFETY PRECAUTION • Avoid placing the monitor, or any other light sources may reflect on the power cord to avoid damage to the cable. • Do not expose the monitor to rain, excessive moisture, or dust. • Do not cover the ventilation slots or openings of H05VV-F cord and plug rated 10 A, 250 V. CLEANING YOUR MONITOR Please carefully...

User Manual
Page 9
... the display controller, as indicated by the amber-color power LED. The DDC (Display Data Channel) is around 3 seconds. EN-8 State ON Power Saving Mode LED Light Blue Orange The power saving states will be kept until a control signal has been detected or the keyboard or mouse is activated. The monitor supports DDC2B standard. Power saving The monitor will be driven into Power Saving" mode by the control signal from Active OFF state back to Plug and...
... the display controller, as indicated by the amber-color power LED. The DDC (Display Data Channel) is around 3 seconds. EN-8 State ON Power Saving Mode LED Light Blue Orange The power saving states will be kept until a control signal has been detected or the keyboard or mouse is activated. The monitor supports DDC2B standard. Power saving The monitor will be driven into Power Saving" mode by the control signal from Active OFF state back to Plug and...

User Manual
Page 10
CONNECTOR PIN ASSIGNMENT 5 1 10 6 15 11 15-Pin Color Display Signal Cable PIN NO. 1. 2. 3. 4. 5. 6. 7. 8. DESCRIPTION Red Green Blue Monitor Ground Self Test R-Ground G-Ground B-Ground PIN NO. 9. 10. 11. 12. 13. 14. 15. DESCRIPTION +5V Logic Ground Monitor Ground DDC-Serial Data H-Sync V-Sync DDC-Serial Clock EN-9
CONNECTOR PIN ASSIGNMENT 5 1 10 6 15 11 15-Pin Color Display Signal Cable PIN NO. 1. 2. 3. 4. 5. 6. 7. 8. DESCRIPTION Red Green Blue Monitor Ground Self Test R-Ground G-Ground B-Ground PIN NO. 9. 10. 11. 12. 13. 14. 15. DESCRIPTION +5V Logic Ground Monitor Ground DDC-Serial Data H-Sync V-Sync DDC-Serial Clock EN-9

User Manual
Page 11
.... 9. TMDS Data0- 18. 19. * only for certain models EN-10 Meaning TMDS Clock+ TMDS Clock Shield TMDS Clock- 24-Pin Color Display Signal Cable* PIN Meaning PIN 1. TMDS Data2- 12. 4. TMDS Data1 Shield 14. 6. CEC Reserved (N.C. TMDS Data2+ 10. 2. TMDS Data1+ 13. 5. Meaning NC +5V Power Logic Ground Hot Plug Detect TMDS Data0TMDS Data0+ TMDS Data 0/5 Shield...
.... 9. TMDS Data0- 18. 19. * only for certain models EN-10 Meaning TMDS Clock+ TMDS Clock Shield TMDS Clock- 24-Pin Color Display Signal Cable* PIN Meaning PIN 1. TMDS Data2- 12. 4. TMDS Data1 Shield 14. 6. CEC Reserved (N.C. TMDS Data2+ 10. 2. TMDS Data1+ 13. 5. Meaning NC +5V Power Logic Ground Hot Plug Detect TMDS Data0TMDS Data0+ TMDS Data 0/5 Shield...
User Manual
Page 13
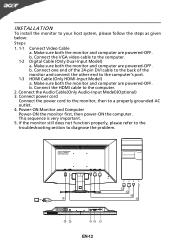
... 24-pin DVI cable to the back of the monitor and connect the other end to the computer. 1-2 Digital Cable (Only Dual-Input Model) a. Connect the VGA video cable to the computer's port. 1-3 HDMI Cable (Only HDMI-Input Model) a. b. b. Connect power cord Connect the power cord to the monitor, then to diagnose the problem. 1-1 1-2 1-3 3 2 32 1-3 1-2 1-1 EN-12 If the monitor still does not function properly, please refer to the troubleshooting section to a properly grounded AC outlet. 4. Connect the HDMI cable to...
... 24-pin DVI cable to the back of the monitor and connect the other end to the computer. 1-2 Digital Cable (Only Dual-Input Model) a. Connect the VGA video cable to the computer's port. 1-3 HDMI Cable (Only HDMI-Input Model) a. b. b. Connect power cord Connect the power cord to the monitor, then to diagnose the problem. 1-1 1-2 1-3 3 2 32 1-3 1-2 1-1 EN-12 If the monitor still does not function properly, please refer to the troubleshooting section to a properly grounded AC outlet. 4. Connect the HDMI cable to...

User Manual
Page 14
... monitor. (a) VGA input (b) DVI input (c) HDMI input As you cycle through the sources you quickly select the most commonly accessed settings. MENU OSD functions Press this button to activate the OSD menu. It may be connected to indicate currently selected input source. USER CONTROLS Power Switch / Power LED: To turn the monitor ON or OFF. VGA or DVI or HDMI If either VGA or DVI input is selected ,but the VGA and DVI cables are not connected, a floating dialog box indicates: "No Cable Connect" or "No Signal" EN-13 AUTO Auto Adjust...
... monitor. (a) VGA input (b) DVI input (c) HDMI input As you cycle through the sources you quickly select the most commonly accessed settings. MENU OSD functions Press this button to activate the OSD menu. It may be connected to indicate currently selected input source. USER CONTROLS Power Switch / Power LED: To turn the monitor ON or OFF. VGA or DVI or HDMI If either VGA or DVI input is selected ,but the VGA and DVI cables are not connected, a floating dialog box indicates: "No Cable Connect" or "No Signal" EN-13 AUTO Auto Adjust...

User Manual
Page 15
... suit any situation Optimal balance of brightness and contrast N/A Text mode prevent eyestrain. Pictures and photographs appear in vibrant colors with sharp detail. EN-14 Acer eColor Management Operation instructions Step 1: Press " " Key to open the Acer eColor Management OSD and access the scenario modes Step 2: Press " " or " " to select the mode Step 3: Press " Adjust/Exit " Key to confirm the mode and run Auto Adjust. Features and...
... suit any situation Optimal balance of brightness and contrast N/A Text mode prevent eyestrain. Pictures and photographs appear in vibrant colors with sharp detail. EN-14 Acer eColor Management Operation instructions Step 1: Press " " Key to open the Acer eColor Management OSD and access the scenario modes Step 2: Press " " or " " to select the mode Step 3: Press " Adjust/Exit " Key to confirm the mode and run Auto Adjust. Features and...

User Manual
Page 16
... adjust the picture quality, OSD Timeout and general settings. Press the MENU key to bring up the OSD. 2 Using the / keys, select Picture from the OSD. For advanced settings, please refer to following content is for adjusting the settings of your LCD Monitor. Use the to Enter to the item page. 3 Use the / keys to adjust the current Brightness, Contrast, Colour Temp, Auto Config and other image-related qualities. Actual product specifications...
... adjust the picture quality, OSD Timeout and general settings. Press the MENU key to bring up the OSD. 2 Using the / keys, select Picture from the OSD. For advanced settings, please refer to following content is for adjusting the settings of your LCD Monitor. Use the to Enter to the item page. 3 Use the / keys to adjust the current Brightness, Contrast, Colour Temp, Auto Config and other image-related qualities. Actual product specifications...

User Manual
Page 20
... full-screen size image, please select other resolution or other vertical refresh timing. · Wait for servicing, please check the troubleshooting list below to see if you can self-diagnose the problem. (VGA Mode) Problems Current Status Remedy LED ON · Using OSD, adjust brightness and contrast to maximum or reset to the monitor. No Picture · Check if AC power cord is · Using OSD, adjust RESOLUTION, CLOCK, missing, center CLOCK-PHASE, H-POSITION and V- Abnormal Picture Display is properly connected to their default settings. LED...
... full-screen size image, please select other resolution or other vertical refresh timing. · Wait for servicing, please check the troubleshooting list below to see if you can self-diagnose the problem. (VGA Mode) Problems Current Status Remedy LED ON · Using OSD, adjust brightness and contrast to maximum or reset to the monitor. No Picture · Check if AC power cord is · Using OSD, adjust RESOLUTION, CLOCK, missing, center CLOCK-PHASE, H-POSITION and V- Abnormal Picture Display is properly connected to their default settings. LED...

User Manual
Page 21
...; Using OSD, adjust brightness and contrast to maximum or reset to the monitor. No Picture · Check if AC power cord is in minimum position and try to raise the volume level. Abnormal Sound (Only AudioInput model) (Optional) No sound, or sound level is too low · Check the audio cable with the host PC is connected. · Check if the volume setup of computer system is ON. LED OFF · Check the power switch. EN-20 LED displays amber color...
...; Using OSD, adjust brightness and contrast to maximum or reset to the monitor. No Picture · Check if AC power cord is in minimum position and try to raise the volume level. Abnormal Sound (Only AudioInput model) (Optional) No sound, or sound level is too low · Check the audio cable with the host PC is connected. · Check if the volume setup of computer system is ON. LED OFF · Check the power switch. EN-20 LED displays amber color...
Brochure
Page 2
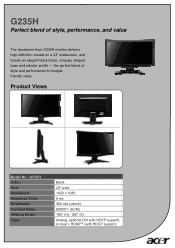
G235H Perfect blend of style and performance for budgetfriendly value. the perfect blend of style, performance, and value The handsome Acer G235H monitor delivers high-definition visuals on a 23" widescreen, and boasts an elegant black bezel, uniquely shaped base and slender profile - Product Views Model No.: G235H Color: Size: Resolution: Response Time: Brightness: Contrast Ratio: Viewing Angle: Input: Black 23" wide 1920 x 1080 5 ms 300 nits (cd/m2) 80000:1 (ACM) 160° (H), 160° (V) Analog, optional DVI with HDCP support, or dual + HDMI™ (with HDCP support)
G235H Perfect blend of style and performance for budgetfriendly value. the perfect blend of style, performance, and value The handsome Acer G235H monitor delivers high-definition visuals on a 23" widescreen, and boasts an elegant black bezel, uniquely shaped base and slender profile - Product Views Model No.: G235H Color: Size: Resolution: Response Time: Brightness: Contrast Ratio: Viewing Angle: Input: Black 23" wide 1920 x 1080 5 ms 300 nits (cd/m2) 80000:1 (ACM) 160° (H), 160° (V) Analog, optional DVI with HDCP support, or dual + HDMI™ (with HDCP support)

Brochure
Page 3
... very bright or dim scenes. Convenient digital input via DVI with ACM, the LCD monitor uses less power and saves energy. What's more, with HDCP support A DVI input maximizes the connection quality between LCD monitors and other digital sources, including PC graphics cards. This is the most important factor for achieving the best possible image quality. grants full access to deliver high-quality moving images. Acer eColor Management A single button - High-bandwidth Digital Content...
... very bright or dim scenes. Convenient digital input via DVI with ACM, the LCD monitor uses less power and saves energy. What's more, with HDCP support A DVI input maximizes the connection quality between LCD monitors and other digital sources, including PC graphics cards. This is the most important factor for achieving the best possible image quality. grants full access to deliver high-quality moving images. Acer eColor Management A single button - High-bandwidth Digital Content...

Brochure
Page 4
Resolution and Refresh Rate Glare (Y/N) Response Time Contrast Ratio Brightness Viewing Angle Colors 23″ wide 1920 x 1080 @ 60Hz Yes 5 ms 80000:1 (ACM) 300 nits (cd/m2) 160° (H), 160° (V) 16.7 million Bits Input Signal VESA Wall Mounting 6 + Hi-FRC Analog Optional DVI with HDCP or Dual + HDMI™ (with HDCP) 100 x 100mm Speaker Two 1.5 W (optional) Tilt -5° to ensure reliability and comfortable viewing. and adheres to high safety...
Resolution and Refresh Rate Glare (Y/N) Response Time Contrast Ratio Brightness Viewing Angle Colors 23″ wide 1920 x 1080 @ 60Hz Yes 5 ms 80000:1 (ACM) 300 nits (cd/m2) 160° (H), 160° (V) 16.7 million Bits Input Signal VESA Wall Mounting 6 + Hi-FRC Analog Optional DVI with HDCP or Dual + HDMI™ (with HDCP) 100 x 100mm Speaker Two 1.5 W (optional) Tilt -5° to ensure reliability and comfortable viewing. and adheres to high safety...

