
User Manual
Page 1
TABLE OF CONTENTS Special notes on LCD monitors 1 Information for your safety and comfort 2 Unpacking 5 Attaching/Removing the base 6 Screen position adjustment 7 Connecting the power cord 9 Safety precaution 9 Cleaning your monitor 9 Power saving 1 0 DDC 1 0 Connector Pin Assignment 1 1 Standard Timing Table 13 Installation 14 User controls 15 How to adjust a setting 16 Troubleshooting 21
TABLE OF CONTENTS Special notes on LCD monitors 1 Information for your safety and comfort 2 Unpacking 5 Attaching/Removing the base 6 Screen position adjustment 7 Connecting the power cord 9 Safety precaution 9 Cleaning your monitor 9 Power saving 1 0 DDC 1 0 Connector Pin Assignment 1 1 Standard Timing Table 13 Installation 14 User controls 15 How to adjust a setting 16 Troubleshooting 21

User Manual
Page 2
... switching the image, when the same image is recovered slowly by changing the image or turning off the Power Switch and then turn it on again to the nature of 99.99% or more. In this case, the screen is displayed for hours. EN-1 Turn off the Power Switch for hours. SPECIAL NOTES ON LCD MONITORS The following symptoms are normal with LCD monitor and do not indicate a problem...
... switching the image, when the same image is recovered slowly by changing the image or turning off the Power Switch and then turn it on again to the nature of 99.99% or more. In this case, the screen is displayed for hours. EN-1 Turn off the Power Switch for hours. SPECIAL NOTES ON LCD MONITORS The following symptoms are normal with LCD monitor and do not indicate a problem...

User Manual
Page 3
...After setting the volume level, do not place the product on a vibrating surface. • Never use this product near water. • Do not place this product on an unstable cart, stand or table. These openings must not be sure to unplug the power cord ...volume. • Avoid turning up the volume to block out noisy surroundings. • Turn the volume down if you need to disconnect power to the equipment, be blocked or covered. This product should never be placed near you plug the power cord into this document for future reference. Follow all warnings and instructions...
...After setting the volume level, do not place the product on a vibrating surface. • Never use this product near water. • Do not place this product on an unstable cart, stand or table. These openings must not be sure to unplug the power cord ...volume. • Avoid turning up the volume to block out noisy surroundings. • Turn the volume down if you need to disconnect power to the equipment, be blocked or covered. This product should never be placed near you plug the power cord into this document for future reference. Follow all warnings and instructions...
User Manual
Page 4
... black or red dots. Incorrect computer usage may complain of a computer. The following symptoms may appear in front of eyestrain and headaches after prolonged use Computer users may lead to qualified service person- This has no effect on your company's health and safety department. Users are covered by the operating instructions, since improper adjustment of other musculoskeletal disorders. Long work...
... black or red dots. Incorrect computer usage may complain of a computer. The following symptoms may appear in front of eyestrain and headaches after prolonged use Computer users may lead to qualified service person- This has no effect on your company's health and safety department. Users are covered by the operating instructions, since improper adjustment of other musculoskeletal disorders. Long work...

User Manual
Page 5
... • install the external display, keyboard and mouse properly and within comfort able reach • if you view your monitor more than your documents, place the display at bright light sources, such as open windows, for extended periods of your vision Long viewing hours, wearing incorrect glasses or contact lenses, glare, excessive room lighting, poorly focused screens, very small typefaces and low-contrast displays could...
... • install the external display, keyboard and mouse properly and within comfort able reach • if you view your monitor more than your documents, place the display at bright light sources, such as open windows, for extended periods of your vision Long viewing hours, wearing incorrect glasses or contact lenses, glare, excessive room lighting, poorly focused screens, very small typefaces and low-contrast displays could...

User Manual
Page 6
UNPACKING Please check the following items are present when you unpack the box, and save the packing materials in case you will need to ship or transport the monitor in future. • LCD Monitor • AC Power Cord • D-Sub Cable • DVI Cable • USB Cable (Only Dual-Input Model) (Only USB-Input Model) (Optional) • Audio Cable • (Only Audio-Input Model) (Optional) User Manual • Quick Start Guide EN-5
UNPACKING Please check the following items are present when you unpack the box, and save the packing materials in case you will need to ship or transport the monitor in future. • LCD Monitor • AC Power Cord • D-Sub Cable • DVI Cable • USB Cable (Only Dual-Input Model) (Only USB-Input Model) (Optional) • Audio Cable • (Only Audio-Input Model) (Optional) User Manual • Quick Start Guide EN-5

User Manual
Page 7
Remove: Reverse the steps to remove the base. EN-6 ATTACHING/REMOVING THE BASE Install: Align the base with the stand and push the base towards the top of the monitor, and then rotate the base clockwise until it stops. Tighten the screw clockwise.
Remove: Reverse the steps to remove the base. EN-6 ATTACHING/REMOVING THE BASE Install: Align the base with the stand and push the base towards the top of the monitor, and then rotate the base clockwise until it stops. Tighten the screw clockwise.

User Manual
Page 8
SCREEN POSITION ADJUSTMENT In oder to optimize the best viewing position, you can adjust the height/tilt/ swivel of the monitor. • Height Adjustment After pressing the top of the monitor, push the lock button towards right, then you can adjust the height of the monitor. 110mm • Tilt Please see the illustration below for an example of the tilt range. EN-7
SCREEN POSITION ADJUSTMENT In oder to optimize the best viewing position, you can adjust the height/tilt/ swivel of the monitor. • Height Adjustment After pressing the top of the monitor, push the lock button towards right, then you can adjust the height of the monitor. 110mm • Tilt Please see the illustration below for an example of the tilt range. EN-7
User Manual
Page 10
... or openings of the monitor. No user-adjustment is fragile. The cord set should have the appropriate safety approvals for the country in a place where there is the correct type required for your area. • This monitor has a universal power supply that allows operation in either 100/120V AC or 220/240 V AC voltage area. CONNECTING THE POWER CORD • Check first to make...
... or openings of the monitor. No user-adjustment is fragile. The cord set should have the appropriate safety approvals for the country in a place where there is the correct type required for your area. • This monitor has a universal power supply that allows operation in either 100/120V AC or 220/240 V AC voltage area. CONNECTING THE POWER CORD • Check first to make...
User Manual
Page 11
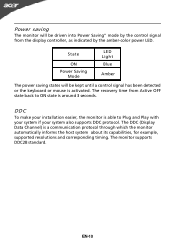
..., for example, supported resolutions and corresponding timing. State ON Power Saving Mode LED Light Blue Amber The power saving states will be kept until a control signal has been detected or the keyboard or mouse is activated. The recovery time from the display controller, as indicated by the amber-color power LED. Power saving The monitor will be driven into Power Saving" mode by the control signal from Active OFF state back to Plug and Play with...
..., for example, supported resolutions and corresponding timing. State ON Power Saving Mode LED Light Blue Amber The power saving states will be kept until a control signal has been detected or the keyboard or mouse is activated. The recovery time from the display controller, as indicated by the amber-color power LED. Power saving The monitor will be driven into Power Saving" mode by the control signal from Active OFF state back to Plug and Play with...

User Manual
Page 12
CONNECTOR PIN ASSIGNMENT 15-Pin Color Display Signal Cable PIN NO. 1. 2. 3. 4. 5. 6. 7. 8. DESCRIPTION Red Green Blue Monitor Ground DDC-return R-Ground G-Ground B-Ground PIN NO. 9. 10. 11. 12. 13. 14. 15. DESCRIPTION +5V Logic Ground Monitor Ground DDC-Serial Data H-Sync V-Sync DDC-Serial Clock EN-11
CONNECTOR PIN ASSIGNMENT 15-Pin Color Display Signal Cable PIN NO. 1. 2. 3. 4. 5. 6. 7. 8. DESCRIPTION Red Green Blue Monitor Ground DDC-return R-Ground G-Ground B-Ground PIN NO. 9. 10. 11. 12. 13. 14. 15. DESCRIPTION +5V Logic Ground Monitor Ground DDC-Serial Data H-Sync V-Sync DDC-Serial Clock EN-11

User Manual
Page 13
TMDS Data2- 13. NC 2. DDC Clock 18. TMDS Data0+ 7. TMDS Data 0/5 Shield 8. TMDS Data1- 21. NC 24. TMDS Data 2/4 Shield 15. NC 17. NC 9. TMDS Clock+ 12. TMDS Data2+ 14. +5V Power 3. NC 20. TMDS Clock Shield 11. Hot Plug Detect 5. GND(return for +5V hsync.vsync) 4. TMDS Data0- 6. EN-12 NC 16. TMDS Data 1/3 Shield 23. DDC Data 19. DDC TMDS Clock- NC 10. TMDS Data1+ 22. 24-Pin Color Display Signal Cable PIN Meaning PIN Meaning 1.
TMDS Data2- 13. NC 2. DDC Clock 18. TMDS Data0+ 7. TMDS Data 0/5 Shield 8. TMDS Data1- 21. NC 24. TMDS Data 2/4 Shield 15. NC 17. NC 9. TMDS Clock+ 12. TMDS Data2+ 14. +5V Power 3. NC 20. TMDS Clock Shield 11. Hot Plug Detect 5. GND(return for +5V hsync.vsync) 4. TMDS Data0- 6. EN-12 NC 16. TMDS Data 1/3 Shield 23. DDC Data 19. DDC TMDS Clock- NC 10. TMDS Data1+ 22. 24-Pin Color Display Signal Cable PIN Meaning PIN Meaning 1.

User Manual
Page 15
... the troubleshooting section to the computer. 1-2 Digital Cable (Only Dual-Input Model) a. Connect one end of the 24-pin DVI cable to the back of the monitor and connect the other end to your host system, please follow the steps as given below: Steps 1. 1-1 Connect Video Cable a. Connect the Audio Cable(Only Audio-Input Model)(Optional) 3. Main power switch EN-14 INSTALLATION To install the monitor to the computer's port. 1-3 HDMI Cable (Only HDMI-Input Model) a. Make sure both the monitor and...
... the troubleshooting section to the computer. 1-2 Digital Cable (Only Dual-Input Model) a. Connect one end of the 24-pin DVI cable to the back of the monitor and connect the other end to your host system, please follow the steps as given below: Steps 1. 1-1 Connect Video Cable a. Connect the Audio Cable(Only Audio-Input Model)(Optional) 3. Main power switch EN-14 INSTALLATION To install the monitor to the computer's port. 1-3 HDMI Cable (Only HDMI-Input Model) a. Make sure both the monitor and...
User Manual
Page 16
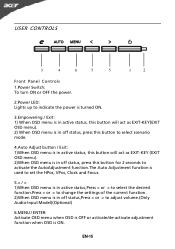
USER CONTROLS 3 4 6 5 5 1 2 Front Panel Controls 1.Power Switch: To turn ON or OFF the power. 2.Power LED: Lights up to indicate the power is turned ON. 3.Empowering / Exit: 1) When OSD menu is in active status, this button will act as EXIT-KEY(EXIT OSD menu). 2) When OSD menu is in off status, press this button to select scenario mode. 4.Auto Adjust button / Exit: 1)When OSD menu is in active status, this button will act as EXIT-KEY (EXIT OSD menu). 2)When OSD menu is...
USER CONTROLS 3 4 6 5 5 1 2 Front Panel Controls 1.Power Switch: To turn ON or OFF the power. 2.Power LED: Lights up to indicate the power is turned ON. 3.Empowering / Exit: 1) When OSD menu is in active status, this button will act as EXIT-KEY(EXIT OSD menu). 2) When OSD menu is in off status, press this button to select scenario mode. 4.Auto Adjust button / Exit: 1)When OSD menu is in active status, this button will act as EXIT-KEY (EXIT OSD menu). 2)When OSD menu is...

User Manual
Page 17
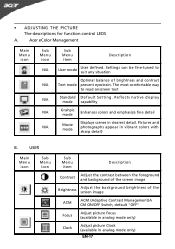
... TO ADJUST A SETTING 1. Press < or > to activate the OSD window. 2. To exit and save, select the exit function. Only Analog Input Model II. If you want to adjust any other function, repeat steps 2-4. • P/X Series OSD behave When user press "MENU" button on front bezel A B A. Only Dual Input Model EN-16 Press the MENU-button to select the desired function. 3. Press < or > to adjust. 4. Acer eColor Management If selected to "USER...
... TO ADJUST A SETTING 1. Press < or > to activate the OSD window. 2. To exit and save, select the exit function. Only Analog Input Model II. If you want to adjust any other function, repeat steps 2-4. • P/X Series OSD behave When user press "MENU" button on front bezel A B A. Only Dual Input Model EN-16 Press the MENU-button to select the desired function. 3. Press < or > to adjust. 4. Acer eColor Management If selected to "USER...
User Manual
Page 18
... situation Optimal balance of the screen image ACM ACM (Adaptive Contrast Management)A CM ON/OFF Switch, default "OFF" Focus Adjust picture Focus (available in analog mode only) Clock Adjust picture Clock (available in analog mode only) EN-17 Pictures and photographs appear in clearest detail. USER Main Menu icon Sub Menu icon Sub Menu item Description Contrast Adjust the contrast between the foreground and background of the screen image Brightness Adjust the background brightness of brightness and contrast Text mode prevent...
... situation Optimal balance of the screen image ACM ACM (Adaptive Contrast Management)A CM ON/OFF Switch, default "OFF" Focus Adjust picture Focus (available in analog mode only) Clock Adjust picture Clock (available in analog mode only) EN-17 Pictures and photographs appear in clearest detail. USER Main Menu icon Sub Menu icon Sub Menu item Description Contrast Adjust the contrast between the foreground and background of the screen image Brightness Adjust the background brightness of brightness and contrast Text mode prevent...
User Manual
Page 19
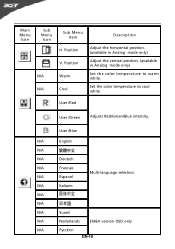
N/A Italiano N/A N/A N/A Suomi N/A Nederlands EMEA version OSD only N/A Pyccknn EN-18 Set the color temperature to warm white. Position Warm Cool Description Adjust the horizontal position. (available in Analog mode only) Adjust the vertical position. (available in Analog mode only) Set the color temperature to cool white. User /Red User /Green Adjusts Red/Green/Blue intensity. Main Menu Icon Sub Menu Icon N/A N/A Sub Menu Item H. User /Blue N/A English N/A N/A Deutsch N/A Francais N/A Espanol Multi-language selection. Position V.
N/A Italiano N/A N/A N/A Suomi N/A Nederlands EMEA version OSD only N/A Pyccknn EN-18 Set the color temperature to warm white. Position Warm Cool Description Adjust the horizontal position. (available in Analog mode only) Adjust the vertical position. (available in Analog mode only) Set the color temperature to cool white. User /Red User /Green Adjusts Red/Green/Blue intensity. Main Menu Icon Sub Menu Icon N/A N/A Sub Menu Item H. User /Blue N/A English N/A N/A Deutsch N/A Francais N/A Espanol Multi-language selection. Position V.

User Manual
Page 20
... Exit Save user adjustment and OSD disappear. EN-19 OSD Timeout Adjust the OSD timeout. Position Adjust the horizontal position of current input timing. N/A Input Source Select input signal from D-Sub or DVI-D or HDMI N/A Wide Mode Select Wide mode setting for Full screen, Aspect ratio or 1:1 mode N/A DDC/CI Turn ON/OFF DDC/CI support N/A Information Show the resolution, H/V frequency andinput port of the OSD. N/A Reset Clear each old status of the OSD. V. Main Menu Icon Sub Menu Icon Sub Menu Item Description H. Position Adjust the vertical position of Auto...
... Exit Save user adjustment and OSD disappear. EN-19 OSD Timeout Adjust the OSD timeout. Position Adjust the horizontal position of current input timing. N/A Input Source Select input signal from D-Sub or DVI-D or HDMI N/A Wide Mode Select Wide mode setting for Full screen, Aspect ratio or 1:1 mode N/A DDC/CI Turn ON/OFF DDC/CI support N/A Information Show the resolution, H/V frequency andinput port of the OSD. N/A Reset Clear each old status of the OSD. V. Main Menu Icon Sub Menu Icon Sub Menu Item Description H. Position Adjust the vertical position of Auto...
User Manual
Page 22
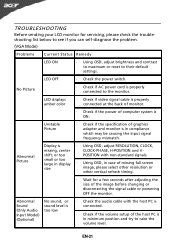
...; Check the audio cable with non-standard signals. Abnormal Picture Display is in case of missing full-screen size image, please select other resolution or other vertical refresh timing. · Wait for servicing, please check the troubleshooting list below to see if you can self-diagnose the problem. (VGA Mode) Problems Current Status Remedy LED ON · Using OSD, adjust brightness and contrast to maximum or reset to raise the volume level. LED displays amber color · Check if video signal cable is properly connected...
...; Check the audio cable with non-standard signals. Abnormal Picture Display is in case of missing full-screen size image, please select other resolution or other vertical refresh timing. · Wait for servicing, please check the troubleshooting list below to see if you can self-diagnose the problem. (VGA Mode) Problems Current Status Remedy LED ON · Using OSD, adjust brightness and contrast to maximum or reset to raise the volume level. LED displays amber color · Check if video signal cable is properly connected...
User Manual
Page 23
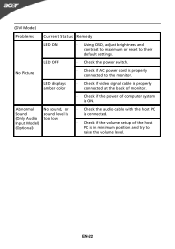
... Remedy LED ON · Using OSD, adjust brightness and contrast to maximum or reset to the monitor. Abnormal Sound (Only Audio Input Model) (Optional) No sound, or sound level is too low · Check the audio cable with the host PC is connected. · Check if the volume setup of computer system is in minimum position and try to raise the volume level. EN-22 No Picture · Check if AC power cord is properly connected to their default settings.
... Remedy LED ON · Using OSD, adjust brightness and contrast to maximum or reset to the monitor. Abnormal Sound (Only Audio Input Model) (Optional) No sound, or sound level is too low · Check the audio cable with the host PC is connected. · Check if the volume setup of computer system is in minimum position and try to raise the volume level. EN-22 No Picture · Check if AC power cord is properly connected to their default settings.

