
User Manual
Page 2
... model number are used herein for a particular purpose. Record the model number, serial number, purchase date and place of merchantability or fitness for identification purposes only and belong to your unit should include the serial number, model number and purchase information. Acer LCD Monitor User's Guide Model number Serial number Date of purchase Place of purchase Acer and the Acer logo are registered trademarks of this manual or supplementary documents and publications. Such changes...
... model number are used herein for a particular purpose. Record the model number, serial number, purchase date and place of merchantability or fitness for identification purposes only and belong to your unit should include the serial number, model number and purchase information. Acer LCD Monitor User's Guide Model number Serial number Date of purchase Place of purchase Acer and the Acer logo are registered trademarks of this manual or supplementary documents and publications. Such changes...

User Manual
Page 3
... more effective pixels. Information for a few hours. Turn off the power switch for your monitor Please carefully follow these instructions carefully. In this document for hours. Keep this case, the screen is recovered slowly by unplugging all power cords from the LCD monitor: • Make sure the monitor is displayed for future reference. Special notes on LCD monitors The following guidelines when connecting and disconnecting power from the power supplies. It...
... more effective pixels. Information for a few hours. Turn off the power switch for your monitor Please carefully follow these instructions carefully. In this document for hours. Keep this case, the screen is recovered slowly by unplugging all power cords from the LCD monitor: • Make sure the monitor is displayed for future reference. Special notes on LCD monitors The following guidelines when connecting and disconnecting power from the power supplies. It...

User Manual
Page 4
... blocked or covered. Warnings • Do not use it clearly and comfortably and without distortion. • After setting the volume level, do not place the product on the power cord. Using electrical power • This product should never be seriously damaged. • Slots and openings are not sure of the type of power indicated on an unstable cart, stand or table...
... blocked or covered. Warnings • Do not use it clearly and comfortably and without distortion. • After setting the volume level, do not place the product on the power cord. Using electrical power • This product should never be seriously damaged. • Slots and openings are not sure of the type of power indicated on an unstable cart, stand or table...

User Manual
Page 5
... other nearby electrical devices that the total rating of the power strip's input rating. • This product's power cord is properly grounded before inserting the power cord plug. If power strips are used, the load should not exceed 80% of all servicing to replace the power cord set . Make sure the power outlet is equipped with the supplied power supply cord set , make sure that may expose you need for details. Warning! The grounding pin...
... other nearby electrical devices that the total rating of the power strip's input rating. • This product's power cord is properly grounded before inserting the power cord plug. If power strips are used, the load should not exceed 80% of all servicing to replace the power cord set . Make sure the power outlet is equipped with the supplied power supply cord set , make sure that may expose you need for details. Warning! The grounding pin...

User Manual
Page 6
... result in damage and will often require extensive work by the operating instructions, since improper adjustment of other products. IT Equipment Recycling Information Acer is strongly committed to normal condition. We at service stations. Potentially explosive environments Switch off your vehicle engine. chemical plants; For more information and help when recycling, please go to reduce the environmental...
... result in damage and will often require extensive work by the operating instructions, since improper adjustment of other products. IT Equipment Recycling Information Acer is strongly committed to normal condition. We at service stations. Potentially explosive environments Switch off your vehicle engine. chemical plants; For more information and help when recycling, please go to reduce the environmental...
User Manual
Page 7
... global environment, please recycle. For lamp-specific disposal information, check www.lamprecycle.org. More information This has no effect on the Waste from Electrical and Electronics Equipment (WEEE) regulations, visit http://global.acer.com/about/sustainability.htm Mercury advisory For projectors or electronic products containing an LCD/CRT monitor or display: lamp(s) inside this electronic device into...
... global environment, please recycle. For lamp-specific disposal information, check www.lamprecycle.org. More information This has no effect on the Waste from Electrical and Electronics Equipment (WEEE) regulations, visit http://global.acer.com/about/sustainability.htm Mercury advisory For projectors or electronic products containing an LCD/CRT monitor or display: lamp(s) inside this electronic device into...

User Manual
Page 8
...; stand up and walk around regularly to computer use . Tips and information for power management: • Activate display's Sleep mode within 15 minutes of user inactivity. • Activate computer's Sleep mode within 30 minutes of the monitor, using a footrest, or raising your sitting height to carpal tunnel syndrome, tendonitis, tenosynovitis or other recurring or persistent discomfort and/or pain related to remove the...
...; stand up and walk around regularly to computer use . Tips and information for power management: • Activate display's Sleep mode within 15 minutes of user inactivity. • Activate computer's Sleep mode within 30 minutes of the monitor, using a footrest, or raising your sitting height to carpal tunnel syndrome, tendonitis, tenosynovitis or other recurring or persistent discomfort and/or pain related to remove the...

User Manual
Page 9
... extended from drying out. The following work habits to an awkward viewing angle. • Avoid looking at bright light sources, such as open windows, for enhanced text readability and graphics clarity. • Eliminate glare and reflections by using drapes, shades or blinds • using a task light • changing the display's viewing angle • using a glare-reduction filter • using a display visor, such as possible. • Exercise...
... extended from drying out. The following work habits to an awkward viewing angle. • Avoid looking at bright light sources, such as open windows, for enhanced text readability and graphics clarity. • Eliminate glare and reflections by using drapes, shades or blinds • using a task light • changing the display's viewing angle • using a glare-reduction filter • using a display visor, such as possible. • Exercise...

User Manual
Page 14
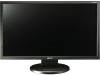
... safety information vi IT equipment recycling information vi Disposal instructions vii LCD pixel statement vii Tips and information for comfortable use viii Federal Communications Commission Declaration of Conformity xi Unpacking 1 Attaching/removing the base 2 Screen position adjustment 2 Connecting the power cord 3 Power saving 3 Display Data Channel (DDC) 3 Connector pin assignment 4 Standard timing table 6 Installation 7 User controls 8 How to adjust a setting 9 Acer eColor Management 10 User 11 Troubleshooting 13 VGA mode 13 DVI mode 14
... safety information vi IT equipment recycling information vi Disposal instructions vii LCD pixel statement vii Tips and information for comfortable use viii Federal Communications Commission Declaration of Conformity xi Unpacking 1 Attaching/removing the base 2 Screen position adjustment 2 Connecting the power cord 3 Power saving 3 Display Data Channel (DDC) 3 Connector pin assignment 4 Standard timing table 6 Installation 7 User controls 8 How to adjust a setting 9 Acer eColor Management 10 User 11 Troubleshooting 13 VGA mode 13 DVI mode 14

User Manual
Page 17
The monitor can adjust the monitor tilt by using both of the monitor as indicated, then pull in the direction of the base. English Attaching/removing the base Attaching: Align the release button on the bottom of the monitor with the corresponding slots on the bottom of the arrow to remove the base. Screen position adjustment To optimize the viewing position, you can be adjusted to hold the edges of your hands to 15 degrees up or 5 degrees down. Removing: Press the release button as shown below.
The monitor can adjust the monitor tilt by using both of the monitor as indicated, then pull in the direction of the base. English Attaching/removing the base Attaching: Align the release button on the bottom of the monitor with the corresponding slots on the bottom of the arrow to remove the base. Screen position adjustment To optimize the viewing position, you can be adjusted to hold the edges of your hands to 15 degrees up or 5 degrees down. Removing: Press the release button as shown below.

User Manual
Page 18
... monitor has a universal power supply that the power cord you use is the correct type required for your system supports the DDC protocol, the monitor is able to plug-and-play. Display Data Channel (DDC) To make sure that allows operation in which the monitor automatically informs the host system about its capabilities; No user-adjustment is around 3 seconds. Mode On Power saving LED light Blue Amber The power saving mode will be switched...
... monitor has a universal power supply that the power cord you use is the correct type required for your system supports the DDC protocol, the monitor is able to plug-and-play. Display Data Channel (DDC) To make sure that allows operation in which the monitor automatically informs the host system about its capabilities; No user-adjustment is around 3 seconds. Mode On Power saving LED light Blue Amber The power saving mode will be switched...

User Manual
Page 20
... 23 TMDS clock+ 24 DDC TMDS clock- 19-pin color display signal cable* 1917151311 9 7 5 3 1 1816141210 8 6 4 2 PIN No. Description 2 TMDS Data2 Shield 4 TMDS Data1+ 6 TMDS Data1- 8 TMDS Data0 Shield 10 TMDS Clock+ 12 TMDS Clock- 14 Reserved (N.C. Description 13 NC 14 +5 V power 15 GND (return for certain models Description 1 TMDS data 2- 2 TMDS data 2+ 3 TMDS data 2/4 ...+ 3 TMDS Data2- 5 TMDS Data1 Shield 7 TMDS Data0+ 9 TMDS Data0- 11 TMDS Clock Shield 13 CEC 15 SCL 17 DDC/CEC Ground 19 Hot Plug Detect PIN No. English 24-pin color display signal cable PIN No.
... 23 TMDS clock+ 24 DDC TMDS clock- 19-pin color display signal cable* 1917151311 9 7 5 3 1 1816141210 8 6 4 2 PIN No. Description 2 TMDS Data2 Shield 4 TMDS Data1+ 6 TMDS Data1- 8 TMDS Data0 Shield 10 TMDS Clock+ 12 TMDS Clock- 14 Reserved (N.C. Description 13 NC 14 +5 V power 15 GND (return for certain models Description 1 TMDS data 2- 2 TMDS data 2+ 3 TMDS data 2/4 ...+ 3 TMDS Data2- 5 TMDS Data1 Shield 7 TMDS Data0+ 9 TMDS Data0- 11 TMDS Clock Shield 13 CEC 15 SCL 17 DDC/CEC Ground 19 Hot Plug Detect PIN No. English 24-pin color display signal cable PIN No.
User Manual
Page 22
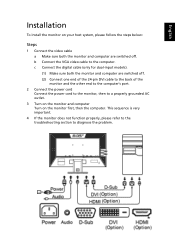
...-pin DVI cable to the back of the monitor and the other end to the computer's port. 2 Connect the power cord Connect the power cord to the monitor, then to a properly grounded AC outlet. 3 Turn on the monitor and computer Turn on your host system, please follow the steps below: Steps 1 Connect the video cable a Make sure both the monitor and computer are switched off. b Connect the VGA video cable to diagnose the problem. This...
...-pin DVI cable to the back of the monitor and the other end to the computer's port. 2 Connect the power cord Connect the power cord to the monitor, then to a properly grounded AC outlet. 3 Turn on the monitor and computer Turn on your host system, please follow the steps below: Steps 1 Connect the video cable a Make sure both the monitor and computer are switched off. b Connect the VGA video cable to diagnose the problem. This...

User Manual
Page 23
... Auto Adjustment function. When the OSD menu is inactive, press this button to select scenario mode. English User controls Front panel controls 1 Power LED: Lights up to indicate the power is on or off. 3.4 < / > : Press < or > to navigate to the desired function, press Enter to select the function. Press < or > to set the HPos, VPos, Clock and Focus. 7 Empowering Key/Exit: a. When the OSD menu is used to change the settings...
... Auto Adjustment function. When the OSD menu is inactive, press this button to select scenario mode. English User controls Front panel controls 1 Power LED: Lights up to indicate the power is on or off. 3.4 < / > : Press < or > to navigate to the desired function, press Enter to select the function. Press < or > to set the HPos, VPos, Clock and Focus. 7 Empowering Key/Exit: a. When the OSD menu is used to change the settings...

User Manual
Page 24
B. English How to adjust a setting 1 Press the Menu button to activate the OSD window. 2 Press < or > to select the desired function. 3 Press the Menu button again to select the function that you want to adjust. 4 Press < or > to 4. Only digital-input mode User: If "User" is selected, the Acer eColor Management OSD will appear. Only analog-input mode II. Acer eColor Management: If "Acer eColor Management" is selected, the standard OSD will appear. I. If...
B. English How to adjust a setting 1 Press the Menu button to activate the OSD window. 2 Press < or > to select the desired function. 3 Press the Menu button again to select the function that you want to adjust. 4 Press < or > to 4. Only digital-input mode User: If "User" is selected, the Acer eColor Management OSD will appear. Only analog-input mode II. Acer eColor Management: If "Acer eColor Management" is selected, the standard OSD will appear. I. If...

User Manual
Page 25
... Main menu icon Sub menu item User mode Text mode Standard mode Graphic mode Movie mode Description User-defined. Default settings. English Acer eColor Management • Operation instructions 1 Press the Empowering Key to open the Acer eColor Management OSD and access the scenario modes. 2 Press "" to select the mode. 3 Press the Auto-adjust button to suit any situation. Displays scenes in vibrant colors with sharp detail. The most comfortable way to prevent eyestrain. Reflects native display...
... Main menu icon Sub menu item User mode Text mode Standard mode Graphic mode Movie mode Description User-defined. Default settings. English Acer eColor Management • Operation instructions 1 Press the Empowering Key to open the Acer eColor Management OSD and access the scenario modes. 2 Press "" to select the mode. 3 Press the Auto-adjust button to suit any situation. Displays scenes in vibrant colors with sharp detail. The most comfortable way to prevent eyestrain. Reflects native display...

User Manual
Page 26
...Adjusts the background brightness of the screen image. Sets the color temperature to warm white. Adjusts red intensity. ACM ACM (Adaptive Contrast Management) ACM On/Off switch, default Off. Clock Adjusts the picture clock (available in analog mode only). Position Adjusts the horizontal position (available in analog mode only). User/blue Adjusts blue intensity. Position Adjusts the vertical position (available in analog mode only). User/green Adjusts green intensity. Focus Adjusts picture focus (available in analog mode only). V. H. N/A Warm N/A Cool User/red Sets...
...Adjusts the background brightness of the screen image. Sets the color temperature to warm white. Adjusts red intensity. ACM ACM (Adaptive Contrast Management) ACM On/Off switch, default Off. Clock Adjusts the picture clock (available in analog mode only). Position Adjusts the horizontal position (available in analog mode only). User/blue Adjusts blue intensity. Position Adjusts the vertical position (available in analog mode only). User/green Adjusts green intensity. Focus Adjusts picture focus (available in analog mode only). V. H. N/A Warm N/A Cool User/red Sets...

User Manual
Page 27
...Source N/A Wide Mode N/A DDC/CI N/A Information N/A Reset N/A Exit Select input signal from D-Sub or DVI-D or HDMI Select Wide mode setting for Full screen, Aspect ratio or 1:1 mode Turns on/off DDC/CI support Shows the resolution, H/V frequency, input port and serial number for current input. Position Description Language selection. Saves user changes and closes the OSD. Clears Auto-configuration changes and sets the color temperature to Warm. EMEA version OSD only. Position Adjusts the vertical position of the OSD. English Main menu icon Sub menu icon N/A N/A Sub menu...
...Source N/A Wide Mode N/A DDC/CI N/A Information N/A Reset N/A Exit Select input signal from D-Sub or DVI-D or HDMI Select Wide mode setting for Full screen, Aspect ratio or 1:1 mode Turns on/off DDC/CI support Shows the resolution, H/V frequency, input port and serial number for current input. Position Description Language selection. Saves user changes and closes the OSD. Clears Auto-configuration changes and sets the color temperature to Warm. EMEA version OSD only. Position Adjusts the vertical position of the OSD. English Main menu icon Sub menu icon N/A N/A Sub menu...

User Manual
Page 28
... monitor. Image is switched on the screen. VGA mode Problem No picture visible LED status Blue Off Remedy Using the OSD, adjust brightness and contrast to maximum or reset to the monitor. Check if the video signal cable is in power saving/ standby mode. Check the display setting on your LCD monitor for a few seconds after adjusting the size of graphics adapter and monitor is properly connected at the back of a missing image, please select another resolution or vertical refresh rate. Check if the specification of the image before changing or disconnecting the signal...
... monitor. Image is switched on the screen. VGA mode Problem No picture visible LED status Blue Off Remedy Using the OSD, adjust brightness and contrast to maximum or reset to the monitor. Check if the video signal cable is in power saving/ standby mode. Check the display setting on your LCD monitor for a few seconds after adjusting the size of graphics adapter and monitor is properly connected at the back of a missing image, please select another resolution or vertical refresh rate. Check if the specification of the image before changing or disconnecting the signal...
User Manual
Page 29
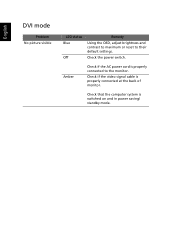
Check if the video signal cable is switched on and in power saving/ standby mode. Check that the computer system is properly connected at the back of monitor. English DVI mode Problem No picture visible LED status Blue Off Remedy Using the OSD, adjust brightness and contrast to maximum or reset to the monitor. Amber Check if the AC power cord is properly connected to their default settings. Check the power switch.
Check if the video signal cable is switched on and in power saving/ standby mode. Check that the computer system is properly connected at the back of monitor. English DVI mode Problem No picture visible LED status Blue Off Remedy Using the OSD, adjust brightness and contrast to maximum or reset to the monitor. Amber Check if the AC power cord is properly connected to their default settings. Check the power switch.

