

User Manual
Page 2
... their respective companies. Copyright © 2009. Record the model number, serial number, purchase date and place of Acer Incorporated. Acer LCD Monitor User's Guide Model number Serial number Date of purchase Place of purchase Acer and the Acer logo are registered trademarks of purchase information in this manual or supplementary documents and publications. All Rights Reserved. This company makes no representations or warranties, either expressed or implied, with...
... their respective companies. Copyright © 2009. Record the model number, serial number, purchase date and place of Acer Incorporated. Acer LCD Monitor User's Guide Model number Serial number Date of purchase Place of purchase Acer and the Acer logo are registered trademarks of purchase information in this manual or supplementary documents and publications. All Rights Reserved. This company makes no representations or warranties, either expressed or implied, with...

User Manual
Page 3
... make sure the flicker disappears. • You may remain after switching the image, when the same image is recovered slowly by changing the image or turning off the power switch and then turn it on the product. Cleaning your safety and comfort Safety instructions Read these guidelines when cleaning the monitor: • Always unplug the monitor before cleaning. • Use a soft cloth to the nature of the previous screen...
... make sure the flicker disappears. • You may remain after switching the image, when the same image is recovered slowly by changing the image or turning off the power switch and then turn it on the product. Cleaning your safety and comfort Safety instructions Read these guidelines when cleaning the monitor: • Always unplug the monitor before cleaning. • Use a soft cloth to the nature of the previous screen...

User Manual
Page 4
... this product on the power cord. Safe listening To protect your hearing, follow these instructions. • Gradually increase the volume until you can 't hear people speaking near you need to rest on an unstable cart, stand or table. These openings must not be operated from the electrical outlet. The openings should be blocked or covered. Using electrical power • This product...
... this product on the power cord. Safe listening To protect your hearing, follow these instructions. • Gradually increase the volume until you can 't hear people speaking near you need to rest on an unstable cart, stand or table. These openings must not be operated from the electrical outlet. The openings should be blocked or covered. Using electrical power • This product...

User Manual
Page 5
... change in a grounded power outlet. If you to replace the power cord set . Also, make sure that may result in too many devices. Do not insert the plug into the wall outlet does not exceed the fuse rating. • Do not overload a power outlet, strip or receptacle by other risks. Product servicing Do not attempt to service this product yourself, as opening or removing covers may...
... change in a grounded power outlet. If you to replace the power cord set . Also, make sure that may result in too many devices. Do not insert the plug into the wall outlet does not exceed the fuse rating. • Do not overload a power outlet, strip or receptacle by other risks. Product servicing Do not attempt to service this product yourself, as opening or removing covers may...

User Manual
Page 6
... controls may contain small parts. chemical plants; Switch off the device near gas pumps at Acer are very conscious of the environmental effects of our business and strive to identify and provide the best working procedures...use of used equipment, as grain, dust or metal powders. Additional safety information Your device and its enhancements may result in bodily injury or even death. We at service stations. Sparks in such areas could cause an explosion or fire resulting in damage and will often require extensive work by the operating instructions, since improper adjustment...
... controls may contain small parts. chemical plants; Switch off the device near gas pumps at Acer are very conscious of the environmental effects of our business and strive to identify and provide the best working procedures...use of used equipment, as grain, dust or metal powders. Additional safety information Your device and its enhancements may result in bodily injury or even death. We at service stations. Sparks in such areas could cause an explosion or fire resulting in damage and will often require extensive work by the operating instructions, since improper adjustment...
User Manual
Page 7
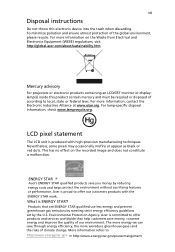
...pixels may occasionally misfire or appear as black or red dots. This has no effect on the Waste from Electrical and Electronics Equipment (WEEE) regulations, visit http://global.acer.com/about/sustainability.htm Mercury advisory For projectors or electronic products containing an LCD/CRT monitor or display.... For lamp-specific disposal information, check www.lamprecycle.org. Acer is produced with the ENERGY STAR mark. Acer is ENERGY STAR? For more wereduce greenhouse gases and the risks of the global environment, please recycle. Products that help customers save you money by...
...pixels may occasionally misfire or appear as black or red dots. This has no effect on the Waste from Electrical and Electronics Equipment (WEEE) regulations, visit http://global.acer.com/about/sustainability.htm Mercury advisory For projectors or electronic products containing an LCD/CRT monitor or display.... For lamp-specific disposal information, check www.lamprecycle.org. Acer is produced with the ENERGY STAR mark. Acer is ENERGY STAR? For more wereduce greenhouse gases and the risks of the global environment, please recycle. Products that help customers save you money by...

User Manual
Page 8
... provides tips for comfortable use . The following tips: • refrain from Sleep mode by adjusting the viewing angle of physical injury. Finding your comfort zone Find your sitting height to carpal tunnel syndrome, tendonitis, tenosynovitis or other factors greatly increase the risk of the monitor, using a footrest, or raising your comfort zone by pushing the power button. Tips and information...
... provides tips for comfortable use . The following tips: • refrain from Sleep mode by adjusting the viewing angle of physical injury. Finding your comfort zone Find your sitting height to carpal tunnel syndrome, tendonitis, tenosynovitis or other factors greatly increase the risk of the monitor, using a footrest, or raising your comfort zone by pushing the power button. Tips and information...

User Manual
Page 9
...; Blink frequently to keep your display to an awkward viewing angle. • Avoid looking at bright light sources, such as open windows, for enhanced text readability and graphics clarity. • Eliminate glare and reflections by: • placing your display in such a way that the side faces the window or any light source • minimizing room light by looking away from drying out. Display • Keep your display clean...
...; Blink frequently to keep your display to an awkward viewing angle. • Avoid looking at bright light sources, such as open windows, for enhanced text readability and graphics clarity. • Eliminate glare and reflections by: • placing your display in such a way that the side faces the window or any light source • minimizing room light by looking away from drying out. Display • Keep your display clean...

User Manual
Page 14
... Accessibility Safe listening Warnings Using electrical power Product servicing Additional safety information IT equipment recycling information Disposal instructions LCD pixel statement Tips and information for comfortable use Federal Communications Commission Declaration of Conformity Unpacking Attaching/removing the base Screen position adjustment Connecting the power cord Power saving Display Data Channel (DDC) Connector pin assignment Standard timing table Installation User controls How to adjust a setting Acer eColor Management User Troubleshooting VGA mode DVI mode 1 iii iii iii iii...
... Accessibility Safe listening Warnings Using electrical power Product servicing Additional safety information IT equipment recycling information Disposal instructions LCD pixel statement Tips and information for comfortable use Federal Communications Commission Declaration of Conformity Unpacking Attaching/removing the base Screen position adjustment Connecting the power cord Power saving Display Data Channel (DDC) Connector pin assignment Standard timing table Installation User controls How to adjust a setting Acer eColor Management User Troubleshooting VGA mode DVI mode 1 iii iii iii iii...

User Manual
Page 17
... 15o Slovenščina Screen position adjustment To optimize the viewing position, you can be tilted to lock. a. The monitor can adjust the monitor tilt,height and rotate the monitor horizontally and vertically, using the integrated tab or a suitable coin. Ensure that the base in locked onto the stand. 3) Secure the base to the stand by turning the screw using both of your hands to hold the edges of assemble. Removing: Reverse the steps of the...
... 15o Slovenščina Screen position adjustment To optimize the viewing position, you can be tilted to lock. a. The monitor can adjust the monitor tilt,height and rotate the monitor horizontally and vertically, using the integrated tab or a suitable coin. Ensure that the base in locked onto the stand. 3) Secure the base to the stand by turning the screw using both of your hands to hold the edges of assemble. Removing: Reverse the steps of the...

User Manual
Page 19
...-listed cord set, type SVT wire and plug rated 10 A/125 V. • For units using 220/240 V AC: Use a cord set should have the appropriate safety approvals for example, supported resolutions and corresponding timing. Power saving The monitor will be kept until a control signal has been detected or the keyboard or mouse is a communication protocol through which the equipment will be switched to "power saving" mode by the amber-colored power LED.
...-listed cord set, type SVT wire and plug rated 10 A/125 V. • For units using 220/240 V AC: Use a cord set should have the appropriate safety approvals for example, supported resolutions and corresponding timing. Power saving The monitor will be kept until a control signal has been detected or the keyboard or mouse is a communication protocol through which the equipment will be switched to "power saving" mode by the amber-colored power LED.

User Manual
Page 21
... models on device) 16 SDA 18 +5V Power * only for +5 V hsync.vsync) 16 Hot-plug detection 17 TMDS data 0- 18 TMDS data 0+ 19 TMDS data 0/5 shield 20 NC 21 NC 22 TMDS clock shield 23 TMDS clock+ 24 DDC TMDS clock- 19-pin color display signal cable* 1917151311 9 7 5 3 1 1816141210 8 6 4 2 PIN No. 5 Slovenščina 24-pin color display signal cable...
... models on device) 16 SDA 18 +5V Power * only for +5 V hsync.vsync) 16 Hot-plug detection 17 TMDS data 0- 18 TMDS data 0+ 19 TMDS data 0/5 shield 20 NC 21 NC 22 TMDS clock shield 23 TMDS clock+ 24 DDC TMDS clock- 19-pin color display signal cable* 1917151311 9 7 5 3 1 1816141210 8 6 4 2 PIN No. 5 Slovenščina 24-pin color display signal cable...

User Manual
Page 23
...'s port. 2 Connect the power cord Connect the power cord to the monitor, then to a properly grounded AC outlet. 3 Turn on the monitor and computer Turn on the monitor first, then the computer. b Connect the VGA video cable to diagnose the problem. This sequence is very important. 4 If the monitor does not function properly, please refer to the troubleshooting section to the computer. c Connect the digital cable (only for dual-input models). (1) Make sure both the monitor...
...'s port. 2 Connect the power cord Connect the power cord to the monitor, then to a properly grounded AC outlet. 3 Turn on the monitor and computer Turn on the monitor first, then the computer. b Connect the VGA video cable to diagnose the problem. This sequence is very important. 4 If the monitor does not function properly, please refer to the troubleshooting section to the computer. c Connect the digital cable (only for dual-input models). (1) Make sure both the monitor...
User Manual
Page 24
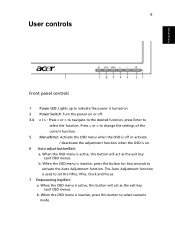
...: a. Press < or > to change the settings of the current function. 5 Menu/Enter: Activate the OSD menu when the OSD is off . 3.4 < / > : Press < or > to navigate to the desired function, press Enter to select the function. The Auto Adjustment function is used to select scenario mode. b. Slovenščina 9 User controls Front panel controls 1 Power LED: Lights up to indicate the power is turned on. 2 Power Switch: Turn the power on or off...
...: a. Press < or > to change the settings of the current function. 5 Menu/Enter: Activate the OSD menu when the OSD is off . 3.4 < / > : Press < or > to navigate to the desired function, press Enter to select the function. The Auto Adjustment function is used to select scenario mode. b. Slovenščina 9 User controls Front panel controls 1 Power LED: Lights up to indicate the power is turned on. 2 Power Switch: Turn the power on or off...

User Manual
Page 25
... Acer eColor Management OSD will appear. B. If you want to adjust any other function, repeat steps 2 to change the settings of the current function. 5 To exit and save, select the exit function. Only digital-input mode Acer eColor Management: If "Acer eColor Management" is selected, the standard OSD will appear. Slovenščina 10 How to adjust a setting 1 Press the Menu button to activate the OSD window...
... Acer eColor Management OSD will appear. B. If you want to adjust any other function, repeat steps 2 to change the settings of the current function. 5 To exit and save, select the exit function. Only digital-input mode Acer eColor Management: If "Acer eColor Management" is selected, the standard OSD will appear. Slovenščina 10 How to adjust a setting 1 Press the Menu button to activate the OSD window...

User Manual
Page 26
... contrast to read onscreen text. The most comfortable way to prevent eyestrain. Reflects native display capability. Displays scenes in unsuitably-lit environments. Enhances colors and emphasizes fine detail. Slovenščina 11 Acer eColor Management • Operation instructions 1 Press the Empowering Key to open the Acer eColor Management OSD and access the scenario modes. 2 Press "" to select the mode. 3 Press the Auto-adjust button...
... contrast to read onscreen text. The most comfortable way to prevent eyestrain. Reflects native display capability. Displays scenes in unsuitably-lit environments. Enhances colors and emphasizes fine detail. Slovenščina 11 Acer eColor Management • Operation instructions 1 Press the Empowering Key to open the Acer eColor Management OSD and access the scenario modes. 2 Press "" to select the mode. 3 Press the Auto-adjust button...

User Manual
Page 27
... menu icon icon Sub menu item Contrast Brightness Description Adjusts the contrast between the foreground and background of the screen image. Position Adjusts the horizontal position (available in analog mode only). N/A Warm N/A Cool User/red Sets the color temperature to cool white. User/green Adjusts green intensity. Position Adjusts the vertical position (available in analog mode only). User/blue Adjusts blue intensity. Focus Adjusts picture focus (available in analog mode only). Clock Adjusts the picture clock (available in analog mode only). V. ACM ACM (Adaptive...
... menu icon icon Sub menu item Contrast Brightness Description Adjusts the contrast between the foreground and background of the screen image. Position Adjusts the horizontal position (available in analog mode only). N/A Warm N/A Cool User/red Sets the color temperature to cool white. User/green Adjusts green intensity. Position Adjusts the vertical position (available in analog mode only). User/blue Adjusts blue intensity. Focus Adjusts picture focus (available in analog mode only). Clock Adjusts the picture clock (available in analog mode only). V. ACM ACM (Adaptive...

User Manual
Page 28
.... OSD Timeout Adjusts the OSD timeout. Adjusts the horizontal position of the OSD. N/A Input Source N/A Wide Mode N/A DDC/CI N/A Information N/A Reset N/A Exit Select input signal from D-Sub or DVI-D or HDMI Select Wide mode setting for Full screen, Aspect ratio or 1:1 mode Turns on/off DDC/CI support Shows the resolution, H/V frequency, input port and serial number for current input. Position Description Language selection. V. Position Adjusts the vertical position of the OSD. Slovenščina 13 Main menu icon Sub menu icon N/A N/A Sub menu item English...
.... OSD Timeout Adjusts the OSD timeout. Adjusts the horizontal position of the OSD. N/A Input Source N/A Wide Mode N/A DDC/CI N/A Information N/A Reset N/A Exit Select input signal from D-Sub or DVI-D or HDMI Select Wide mode setting for Full screen, Aspect ratio or 1:1 mode Turns on/off DDC/CI support Shows the resolution, H/V frequency, input port and serial number for current input. Position Description Language selection. V. Position Adjusts the vertical position of the OSD. Slovenščina 13 Main menu icon Sub menu icon N/A N/A Sub menu item English...

User Manual
Page 29
... VGA mode Problem No picture visible LED status Blue Off Remedy Using the OSD, adjust brightness and contrast to maximum or reset to the monitor. Unstable picture Abnormal picture Check if the computer system is switched on and in compliance which may be causing the input signal frequency mismatch. Check the display setting on the screen. Check if the specification of the image before changing or disconnecting the signal cable or switching off -center, too large or too small on your LCD monitor...
... VGA mode Problem No picture visible LED status Blue Off Remedy Using the OSD, adjust brightness and contrast to maximum or reset to the monitor. Unstable picture Abnormal picture Check if the computer system is switched on and in compliance which may be causing the input signal frequency mismatch. Check the display setting on the screen. Check if the specification of the image before changing or disconnecting the signal cable or switching off -center, too large or too small on your LCD monitor...
User Manual
Page 30
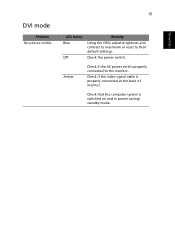
DVI mode Problem No picture visible 15 LED status Blue Off Remedy Using the OSD, adjust brightness and contrast to maximum or reset to the monitor. Check if the video signal cable is switched on and in power saving/ standby mode. Check the power switch. Slovenščina Amber Check if the AC power cord is properly connected to their default settings. Check that the computer system is properly connected at the back of monitor.
DVI mode Problem No picture visible 15 LED status Blue Off Remedy Using the OSD, adjust brightness and contrast to maximum or reset to the monitor. Check if the video signal cable is switched on and in power saving/ standby mode. Check the power switch. Slovenščina Amber Check if the AC power cord is properly connected to their default settings. Check that the computer system is properly connected at the back of monitor.

