
User Manual
Page 1
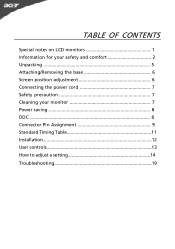
TABLE OF CONTENTS Special notes on LCD monitors 1 Information for your safety and comfort 2 Unpacking 5 Attaching/Removing the base 6 Screen position adjustment 6 Connecting the power cord 7 Safety precaution 7 Cleaning your monitor 7 Power saving 8 DDC 8 Connector Pin Assignment 9 Standard Timing Table 11 Installation 12 User controls 13 How to adjust a setting 14 Troubleshooting 19
TABLE OF CONTENTS Special notes on LCD monitors 1 Information for your safety and comfort 2 Unpacking 5 Attaching/Removing the base 6 Screen position adjustment 6 Connecting the power cord 7 Safety precaution 7 Cleaning your monitor 7 Power saving 8 DDC 8 Connector Pin Assignment 9 Standard Timing Table 11 Installation 12 User controls 13 How to adjust a setting 14 Troubleshooting 19
User Manual
Page 2
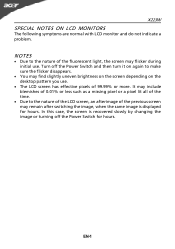
... to make sure the flicker disappears. · You may find slightly uneven brightness on the screen depending on the desktop pattern you use. · The LCD screen has effective pixels of the fluorescent light, the screen may remain after switching the image, when the same image is displayed for hours. X223W SPECIAL NOTES ON LCD MONITORS The following symptoms are normal with LCD monitor and do not indicate a problem.
... to make sure the flicker disappears. · You may find slightly uneven brightness on the screen depending on the desktop pattern you use. · The LCD screen has effective pixels of the fluorescent light, the screen may remain after switching the image, when the same image is displayed for hours. X223W SPECIAL NOTES ON LCD MONITORS The following symptoms are normal with LCD monitor and do not indicate a problem.

User Manual
Page 3
... cabinet slots as they may touch dangerous voltage points or short-out parts that could be blocked or covered. If the system has multiple sources of power, disconnect power from overheating. Keep this document for plug as disconnecting device Observe the follwing guidelines when connecting and disconnecting power to the power supply unit: Install the power supply unit before removing the power supply unit from lithium battery pack...
... cabinet slots as they may touch dangerous voltage points or short-out parts that could be blocked or covered. If the system has multiple sources of power, disconnect power from overheating. Keep this document for plug as disconnecting device Observe the follwing guidelines when connecting and disconnecting power to the power supply unit: Install the power supply unit before removing the power supply unit from lithium battery pack...
User Manual
Page 4
... zone Find your sitting height to remove the strain on the recorded image and does not constitute a malfunction. Users are covered by adjusting the viewing angle of the monitor, using a footrest, or raising your comfort zone by the operating instructions, since improper adjustment of eyestrain and headaches after long hours of physical injury. Long work periods, bad posture, poor work by a qualified technician...
... zone Find your sitting height to remove the strain on the recorded image and does not constitute a malfunction. Users are covered by adjusting the viewing angle of the monitor, using a footrest, or raising your comfort zone by the operating instructions, since improper adjustment of eyestrain and headaches after long hours of physical injury. Long work periods, bad posture, poor work by a qualified technician...
User Manual
Page 5
...; using a task light • changing the display's viewing angle • using a glare-reduction filter • using the product on a couch or bed. If this is unavoidable, work habits to make your eyes. X223W • take breaks regularly, and do not recommend using a display visor, such as a piece of cardboard extended from the display's top front edge • Avoid adjusting your eyes from the monitor...
...; using a task light • changing the display's viewing angle • using a glare-reduction filter • using the product on a couch or bed. If this is unavoidable, work habits to make your eyes. X223W • take breaks regularly, and do not recommend using a display visor, such as a piece of cardboard extended from the display's top front edge • Avoid adjusting your eyes from the monitor...
User Manual
Page 6
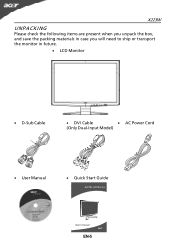
X223W UNPACKING Please check the following items are present when you unpack the box, and save the packing materials in case you will need to ship or transport the monitor in future. · LCD Monitor · D-Sub Cable · DVI Cable · AC Power Cord (Only Dual-Input Model) · User Manual · Quick Start Guide X223W LCD Monitor EN-5
X223W UNPACKING Please check the following items are present when you unpack the box, and save the packing materials in case you will need to ship or transport the monitor in future. · LCD Monitor · D-Sub Cable · DVI Cable · AC Power Cord (Only Dual-Input Model) · User Manual · Quick Start Guide X223W LCD Monitor EN-5

User Manual
Page 7
... below . SCREEN POSITION ADJUSTMENT In oder to optimize the best viewing position, you can be adjusted to 15 degrees up or 5 degrees down as indicated first before removing the base and follow the arrow direction to hold the edges of the base. Remove: Depress the release button as indicated by using both of your hands to remove it. EN-6 The monitor can adjust the tilt of the monitor by...
... below . SCREEN POSITION ADJUSTMENT In oder to optimize the best viewing position, you can be adjusted to 15 degrees up or 5 degrees down as indicated first before removing the base and follow the arrow direction to hold the edges of the base. Remove: Depress the release button as indicated by using both of your hands to remove it. EN-6 The monitor can adjust the tilt of the monitor by...
User Manual
Page 8
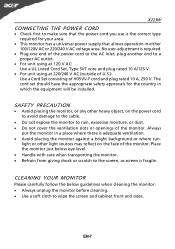
... slots or openings of H05VV-F cord and plug rated 10 A, 250 V. CLEANING YOUR MONITOR Please carefully follow the below eye level. · Handle with care when transporting the monitor. · Refrain from giving shock or scratch to the screen, as screen is adequate ventilation. · Avoid placing the monitor against a bright background or where sun- X223W CONNECTING THE POWER CORD · Check first to make sure...
... slots or openings of H05VV-F cord and plug rated 10 A, 250 V. CLEANING YOUR MONITOR Please carefully follow the below eye level. · Handle with care when transporting the monitor. · Refrain from giving shock or scratch to the screen, as screen is adequate ventilation. · Avoid placing the monitor against a bright background or where sun- X223W CONNECTING THE POWER CORD · Check first to make sure...

User Manual
Page 9
... activated. The monitor supports DDC2B standard. State ON Power Saving Mode LED Light Blue Amber The power saving states will be kept until a control signal has been detected or the keyboard or mouse is a communication protocol through which the monitor automatically informs the host system about its capabilities, for example, supported resolutions and corresponding timing. The recovery time from the display controller, as indicated by the amber-color power LED.
... activated. The monitor supports DDC2B standard. State ON Power Saving Mode LED Light Blue Amber The power saving states will be kept until a control signal has been detected or the keyboard or mouse is a communication protocol through which the monitor automatically informs the host system about its capabilities, for example, supported resolutions and corresponding timing. The recovery time from the display controller, as indicated by the amber-color power LED.

User Manual
Page 10
DESCRIPTION +5V Logic Ground Monitor Ground DDC-Serial Data H-Sync V-Sync DDC-Serial Clock EN-9 DESCRIPTION Red Green Blue Monitor Ground DDC-return R-Ground G-Ground B-Ground PIN NO. 9. 10. 11. 12. 13. 14. 15. CONNECTOR PIN ASSIGNMENT X223W 15-Pin Color Display Signal Cable PIN NO. 1. 2. 3. 4. 5. 6. 7. 8.
DESCRIPTION +5V Logic Ground Monitor Ground DDC-Serial Data H-Sync V-Sync DDC-Serial Clock EN-9 DESCRIPTION Red Green Blue Monitor Ground DDC-return R-Ground G-Ground B-Ground PIN NO. 9. 10. 11. 12. 13. 14. 15. CONNECTOR PIN ASSIGNMENT X223W 15-Pin Color Display Signal Cable PIN NO. 1. 2. 3. 4. 5. 6. 7. 8.

User Manual
Page 11
TMDS Data2+ 14. +5V Power 3. TMDS Data 2/4 Shield 15. TMDS Data 1/3 Shield 23. DDC Clock 18. X223W 24-Pin Color Display Signal Cable PIN Meaning PIN Meaning 1. Hot Plug Detect 5. DDC Data 19. TMDS Data 0/5 Shield 8. NC 10. TMDS Clock Shield 11. TMDS Data0+ 7. NC 9. TMDS Data1+ 22. TMDS Clock+ 12. EN-10 TMDS Data2- 13. NC 2. GND(return for +5V hsync.vsync) 4. NC 16. NC 17. TMDS Data0- 6. NC 20. TMDS Data1- 21. NC 24. DDC TMDS Clock-
TMDS Data2+ 14. +5V Power 3. TMDS Data 2/4 Shield 15. TMDS Data 1/3 Shield 23. DDC Clock 18. X223W 24-Pin Color Display Signal Cable PIN Meaning PIN Meaning 1. Hot Plug Detect 5. DDC Data 19. TMDS Data 0/5 Shield 8. NC 10. TMDS Clock Shield 11. TMDS Data0+ 7. NC 9. TMDS Data1+ 22. TMDS Clock+ 12. EN-10 TMDS Data2- 13. NC 2. GND(return for +5V hsync.vsync) 4. NC 16. NC 17. TMDS Data0- 6. NC 20. TMDS Data1- 21. NC 24. DDC TMDS Clock-
User Manual
Page 12
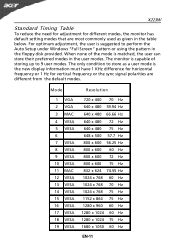
... difference for horizontal frequency or 1 Hz for different modes, the monitor has default setting modes that are different from the default modes. When none of the mode is capable of storing up to perform the Auto Setup under Windows "Full Screen" pattern or using the pattern in the user modes. X223W Standard Timing Table To reduce the need for adjustment for vertical frequency or the sync signal polarities are most commonly used as given...
... difference for horizontal frequency or 1 Hz for different modes, the monitor has default setting modes that are different from the default modes. When none of the mode is capable of storing up to perform the Auto Setup under Windows "Full Screen" pattern or using the pattern in the user modes. X223W Standard Timing Table To reduce the need for adjustment for vertical frequency or the sync signal polarities are most commonly used as given...
User Manual
Page 13
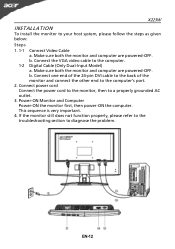
...-pin DVI cable to the back of the monitor and connect the other end to diagnose the problem. If the monitor still does not function properly, please refer to the troubleshooting section to the computer's port. 2. Make sure both the monitor and computer are powered-OFF. b. This sequence is very important. 4. b. EN-12 Make sure both the monitor and computer are powered-OFF. Connect power cord Connect the power cord...
...-pin DVI cable to the back of the monitor and connect the other end to diagnose the problem. If the monitor still does not function properly, please refer to the troubleshooting section to the computer's port. 2. Make sure both the monitor and computer are powered-OFF. b. This sequence is very important. 4. b. EN-12 Make sure both the monitor and computer are powered-OFF. Connect power cord Connect the power cord...
User Manual
Page 14
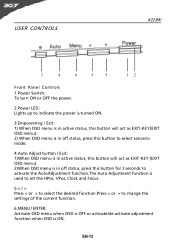
EN-13 USER CONTROLS X223W 3 4 6 5 5 12 Front Panel Controls 1.Power Switch: To turn ON or OFF the power. 2.Power LED: Lights up to indicate the power is turned ON. 3.Empowering / Exit: 1) When OSD menu is in active status, this button will act as EXIT-KEY(EXIT OSD menu). 2) When OSD menu is in off status, press this button to select scenario mode. 4.Auto Adjust button / Exit: 1)When OSD menu is in active status, this button will act as EXIT...
EN-13 USER CONTROLS X223W 3 4 6 5 5 12 Front Panel Controls 1.Power Switch: To turn ON or OFF the power. 2.Power LED: Lights up to indicate the power is turned ON. 3.Empowering / Exit: 1) When OSD menu is in active status, this button will act as EXIT-KEY(EXIT OSD menu). 2) When OSD menu is in off status, press this button to select scenario mode. 4.Auto Adjust button / Exit: 1)When OSD menu is in active status, this button will act as EXIT...

User Manual
Page 15
... MENU-button to "Acer eColor Management " item, will appear the Standard OSD I. To exit and save, select the exit function. Acer eColor Management If selected to activate the OSD window. 2. Press < or > to adjust any other function, repeat steps 2-4. · P/X Series OSD behave When user press "MENU" button on front bezel A B A. Only Analog Input Model II. If you want to select the desired function. 3. X223W HOW TO ADJUST A SETTING 1. USER...
... MENU-button to "Acer eColor Management " item, will appear the Standard OSD I. To exit and save, select the exit function. Acer eColor Management If selected to activate the OSD window. 2. Press < or > to adjust any other function, repeat steps 2-4. · P/X Series OSD behave When user press "MENU" button on front bezel A B A. Only Analog Input Model II. If you want to select the desired function. 3. X223W HOW TO ADJUST A SETTING 1. USER...
User Manual
Page 16
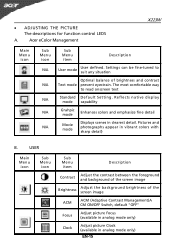
... Movie mode Displays scenes in vibrant colors with sharp detail) B. · ADJUSTING THE PICTURE The descriptions for function control LEDS A. Acer eColor Management X223W Main Menu icon Sub Menu icon N/A N/A N/A N/A N/A Sub Menu item Description User mode User defined. Pictures and photographs appear in clearest detail. The most comfortable way to suit any situation Optimal balance of the screen image ACM ACM (Adaptive Contrast Management)A CM ON/OFF Switch, default "OFF" Focus Adjust picture Focus...
... Movie mode Displays scenes in vibrant colors with sharp detail) B. · ADJUSTING THE PICTURE The descriptions for function control LEDS A. Acer eColor Management X223W Main Menu icon Sub Menu icon N/A N/A N/A N/A N/A Sub Menu item Description User mode User defined. Pictures and photographs appear in clearest detail. The most comfortable way to suit any situation Optimal balance of the screen image ACM ACM (Adaptive Contrast Management)A CM ON/OFF Switch, default "OFF" Focus Adjust picture Focus...
User Manual
Page 17
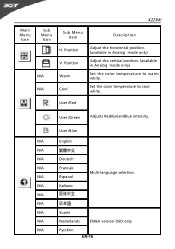
Set the color temperature to warm white. N/A Italiano N/A N/A N/A Suomi N/A Nederlands EMEA version OSD only N/A Pyccknn EN-16 Position V. User /Red User /Green Adjusts Red/Green/Blue intensity. User /Blue N/A English N/A N/A Deutsch N/A Francais N/A Espanol Multi-language selection. X223W Main Menu Icon Sub Menu Icon N/A N/A Sub Menu Item H. Position Warm Cool Description Adjust the horizontal position. (available in Analog mode only) Adjust the vertical position. (available in Analog mode only) Set the color temperature to cool white.
Set the color temperature to warm white. N/A Italiano N/A N/A N/A Suomi N/A Nederlands EMEA version OSD only N/A Pyccknn EN-16 Position V. User /Red User /Green Adjusts Red/Green/Blue intensity. User /Blue N/A English N/A N/A Deutsch N/A Francais N/A Espanol Multi-language selection. X223W Main Menu Icon Sub Menu Icon N/A N/A Sub Menu Item H. Position Warm Cool Description Adjust the horizontal position. (available in Analog mode only) Adjust the vertical position. (available in Analog mode only) Set the color temperature to cool white.
User Manual
Page 18
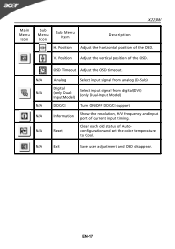
... Analog Select input signal from analog (D-Sub) N/A Digital (only DualInputModel) Select input signal from digital(DVI) (only Dual-Input Model) N/A DDC/CI Turn ON/OFF DDC/CI support N/A Information Show the resolution, H/V frequency andinput port of the OSD. Position Description Adjust the horizontal position of current input timing. N/A Exit Save user adjustment and OSD disappear. Position Adjust the vertical position of Autoconfigurationand set the color temperature to Cool. EN-17 Main Menu Icon X223W Sub Menu Icon Sub Menu Item H. V. N/A Reset Clear...
... Analog Select input signal from analog (D-Sub) N/A Digital (only DualInputModel) Select input signal from digital(DVI) (only Dual-Input Model) N/A DDC/CI Turn ON/OFF DDC/CI support N/A Information Show the resolution, H/V frequency andinput port of the OSD. Position Description Adjust the horizontal position of current input timing. N/A Exit Save user adjustment and OSD disappear. Position Adjust the vertical position of Autoconfigurationand set the color temperature to Cool. EN-17 Main Menu Icon X223W Sub Menu Icon Sub Menu Item H. V. N/A Reset Clear...
User Manual
Page 20
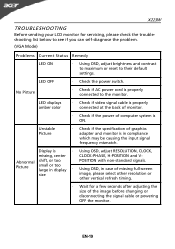
..., H-POSITION and V- Using OSD, in case of missing full-screen size image, please select other resolution or other vertical refresh timing. · Wait for servicing, please check the troubleshooting list below to see if you can self-diagnose the problem. (VGA Mode) Problems Current Status Remedy LED ON · Using OSD, adjust brightness and contrast to maximum or reset to the monitor. LED displays amber color · Check if video signal cable is properly connected at the back of monitor. · Check if the power...
..., H-POSITION and V- Using OSD, in case of missing full-screen size image, please select other resolution or other vertical refresh timing. · Wait for servicing, please check the troubleshooting list below to see if you can self-diagnose the problem. (VGA Mode) Problems Current Status Remedy LED ON · Using OSD, adjust brightness and contrast to maximum or reset to the monitor. LED displays amber color · Check if video signal cable is properly connected at the back of monitor. · Check if the power...
User Manual
Page 21
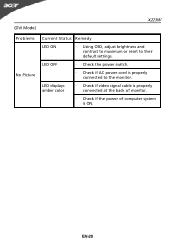
EN-20 LED displays amber color · Check if video signal cable is properly connected at the back of monitor. · Check if the power of computer system is properly connected to their default settings. (DVI Mode) X223W Problems No Picture Current Status Remedy LED ON · Using OSD, adjust brightness and contrast to maximum or reset to the monitor. LED OFF · Check the power switch. · Check if AC power cord is ON.
EN-20 LED displays amber color · Check if video signal cable is properly connected at the back of monitor. · Check if the power of computer system is properly connected to their default settings. (DVI Mode) X223W Problems No Picture Current Status Remedy LED ON · Using OSD, adjust brightness and contrast to maximum or reset to the monitor. LED OFF · Check the power switch. · Check if AC power cord is ON.

