B223W LCD Monitor User's Guide
Page 2
... serial number and model number are used herein for a particular purpose. All correspondence concerning your computer. This company makes no representations or warranties, either expressed or implied, with respect to the contents hereof and specifically disclaims the implied warranties of this publication may be made periodically to notify any means, electronically, mechanically, by any person of Acer Incorporated. Acer LCD Monitor User's Guide Model number Serial number...
... serial number and model number are used herein for a particular purpose. All correspondence concerning your computer. This company makes no representations or warranties, either expressed or implied, with respect to the contents hereof and specifically disclaims the implied warranties of this publication may be made periodically to notify any means, electronically, mechanically, by any person of Acer Incorporated. Acer LCD Monitor User's Guide Model number Serial number...

B223W LCD Monitor User's Guide
Page 3
... fluorescent light, the screen may remain after switching the image, when the same image is attached to its base before connecting the power cord to the AC power outlet. • Make sure both the LCD monitor and the computer are normal with the LCD monitor and do not indicate a problem. • Due to wipe the screen and cabinet front and sides. In this document for a few hours. Turn...
... fluorescent light, the screen may remain after switching the image, when the same image is attached to its base before connecting the power cord to the AC power outlet. • Make sure both the LCD monitor and the computer are normal with the LCD monitor and do not indicate a problem. • Due to wipe the screen and cabinet front and sides. In this document for a few hours. Turn...
B223W LCD Monitor User's Guide
Page 4
... have adjusted. • Limit the amount of any vibrating environment which will walk on the cord. • If an extension cord is used with this product, make sure that the power outlet you plug the power cord into is provided. • Never push objects of time listening to music at high volume. • Avoid turning up the volume to unplug the power cord from...
... have adjusted. • Limit the amount of any vibrating environment which will walk on the cord. • If an extension cord is used with this product, make sure that the power outlet you plug the power cord into is provided. • Never push objects of time listening to music at high volume. • Avoid turning up the volume to unplug the power cord from...
B223W LCD Monitor User's Guide
Page 5
... system load must not exceed 80% of this product. • Use the product only with the supplied power supply cord set , make sure that the new power cord meets the following the operating instructions Product servicing Do not attempt to service this product from unexpected noise produced by plugging in performance, indicating a need to dangerous voltage points or other nearby electrical devices that is...
... system load must not exceed 80% of this product. • Use the product only with the supplied power supply cord set , make sure that the new power cord meets the following the operating instructions Product servicing Do not attempt to service this product from unexpected noise produced by plugging in performance, indicating a need to dangerous voltage points or other nearby electrical devices that is...

B223W LCD Monitor User's Guide
Page 6
...used equipment, as grain, dust or metal powders. Switch off your device in the form of salvaging and disposal of our products. Observe restrictions on the features and benefits of small children. Keep them out of the reach of our other controls may contain small parts.... covered by the operating instructions, since improper adjustment of radio equipment in bodily injury or even death. or where blasting operations are very conscious of the environmental effects of our business and strive to identify and provide the best working procedures to this website: http://global.acer....
...used equipment, as grain, dust or metal powders. Switch off your device in the form of salvaging and disposal of our products. Observe restrictions on the features and benefits of small children. Keep them out of the reach of our other controls may contain small parts.... covered by the operating instructions, since improper adjustment of radio equipment in bodily injury or even death. or where blasting operations are very conscious of the environmental effects of our business and strive to identify and provide the best working procedures to this website: http://global.acer....
B223W LCD Monitor User's Guide
Page 7
... containing an LCD/CRT monitor or display: lamp(s) inside this electronic device into the trash when discarding. More information Nevertheless, some pixels may occasionally misfire or appear as black or red dots. ENERGY STAR (for selected models) is produced with high-precision manufacturing techniques. Products that gives people the power to local, state or federal laws. vii Disposal instructions Do...
... containing an LCD/CRT monitor or display: lamp(s) inside this electronic device into the trash when discarding. More information Nevertheless, some pixels may occasionally misfire or appear as black or red dots. ENERGY STAR (for selected models) is produced with high-precision manufacturing techniques. Products that gives people the power to local, state or federal laws. vii Disposal instructions Do...
B223W LCD Monitor User's Guide
Page 8
... complain of the monitor, using a footrest, or raising your sitting height to computer use . Observe the following tips: • refrain from Sleep mode by adjusting the viewing angle of eyestrain and headaches after long hours of working conditions, personal health...stand up and walk around regularly to carpal tunnel syndrome, tendonitis, tenosynovitis or other musculoskeletal disorders. As an ENERGY STAR partner, Acer Inc. Users are also at risk of physical injury after prolonged use Computer users may lead to remove the strain on your comfort zone by pushing the power button...
... complain of the monitor, using a footrest, or raising your sitting height to computer use . Observe the following tips: • refrain from Sleep mode by adjusting the viewing angle of eyestrain and headaches after long hours of working conditions, personal health...stand up and walk around regularly to carpal tunnel syndrome, tendonitis, tenosynovitis or other musculoskeletal disorders. As an ENERGY STAR partner, Acer Inc. Users are also at risk of physical injury after prolonged use Computer users may lead to remove the strain on your comfort zone by pushing the power button...

B223W LCD Monitor User's Guide
Page 9
... • using a task light • changing the display's viewing angle • using a glare-reduction filter • using a display visor, such as a piece of cardboard extended from the display's top front edge • Avoid adjusting your display to an awkward viewing angle. • Avoid looking away from the monitor and focusing on how to make your eyes from drying out. Display • Keep your display clean. • Keep your head...
... • using a task light • changing the display's viewing angle • using a glare-reduction filter • using a display visor, such as a piece of cardboard extended from the display's top front edge • Avoid adjusting your display to an awkward viewing angle. • Avoid looking away from the monitor and focusing on how to make your eyes from drying out. Display • Keep your display clean. • Keep your head...
B223W LCD Monitor User's Guide
Page 13
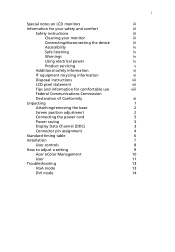
... Accessibility Safe listening Warnings Using electrical power Product servicing Additional safety information IT equipment recycling information Disposal instructions LCD pixel statement Tips and information for comfortable use Federal Communications Commission Declaration of Conformity Unpacking Attaching/removing the base Screen position adjustment Connecting the power cord Power saving Display Data Channel (DDC) Connector pin assignment Standard timing table Installation User controls How to adjust a setting Acer eColor Management User Troubleshooting VGA mode DVI mode 1 iii iii iii iii...
... Accessibility Safe listening Warnings Using electrical power Product servicing Additional safety information IT equipment recycling information Disposal instructions LCD pixel statement Tips and information for comfortable use Federal Communications Commission Declaration of Conformity Unpacking Attaching/removing the base Screen position adjustment Connecting the power cord Power saving Display Data Channel (DDC) Connector pin assignment Standard timing table Installation User controls How to adjust a setting Acer eColor Management User Troubleshooting VGA mode DVI mode 1 iii iii iii iii...

B223W LCD Monitor User's Guide
Page 16
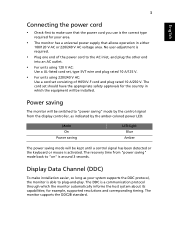
The monitor can adjust the monitor tilt by using both of your hands to hold the edges of the monitor as indicated, then pull in the direction of the base. English 2 Attaching/removing the base Attaching: Align the release button on the bottom of the monitor with the corresponding slots on the bottom of the arrow to remove the base. Screen position adjustment To optimize the viewing position, you can be adjusted to 15 degrees up or 5 degrees down. Removing: Press the release button as shown below.
The monitor can adjust the monitor tilt by using both of your hands to hold the edges of the monitor as indicated, then pull in the direction of the base. English 2 Attaching/removing the base Attaching: Align the release button on the bottom of the monitor with the corresponding slots on the bottom of the arrow to remove the base. Screen position adjustment To optimize the viewing position, you can be adjusted to 15 degrees up or 5 degrees down. Removing: Press the release button as shown below.
B223W LCD Monitor User's Guide
Page 17
... be switched to "power saving" mode by the amber-colored power LED. 3 English Connecting the power cord • Check first to make installation easier, so long as indicated by the control signal from "power saving" mode back to the AC inlet, and plug the other end into an AC outlet. • For units using 120 V AC: Use a UL-listed cord set, type SVT wire and plug rated 10 A/125 V. • For units using 220/240 V AC: Use a cord set should...
... be switched to "power saving" mode by the amber-colored power LED. 3 English Connecting the power cord • Check first to make installation easier, so long as indicated by the control signal from "power saving" mode back to the AC inlet, and plug the other end into an AC outlet. • For units using 120 V AC: Use a UL-listed cord set, type SVT wire and plug rated 10 A/125 V. • For units using 220/240 V AC: Use a cord set should...

B223W LCD Monitor User's Guide
Page 19
Description 1 TMDS data 2- 2 TMDS data 2+ 3 TMDS data 2/4 shield 4 NC 5 NC 6 DDC clock 7 DDC data 8 NC 9 TMDS data 1- 10 TMDS data 1+ 11 TMDS data 1/3 shield 12 NC PIN No. Description 13 NC 14 +5 V power 15 GND (return for +5 V hsync.vsync) 16 Hot-plug detection 17 TMDS data 0- 18 TMDS data 0+ 19 TMDS data 0/5 shield 20 NC 21 NC 22 TMDS clock shield 23 TMDS clock+ 24 DDC TMDS clock- 5 English 24-pin color display signal cable PIN No.
Description 1 TMDS data 2- 2 TMDS data 2+ 3 TMDS data 2/4 shield 4 NC 5 NC 6 DDC clock 7 DDC data 8 NC 9 TMDS data 1- 10 TMDS data 1+ 11 TMDS data 1/3 shield 12 NC PIN No. Description 13 NC 14 +5 V power 15 GND (return for +5 V hsync.vsync) 16 Hot-plug detection 17 TMDS data 0- 18 TMDS data 0+ 19 TMDS data 0/5 shield 20 NC 21 NC 22 TMDS clock shield 23 TMDS clock+ 24 DDC TMDS clock- 5 English 24-pin color display signal cable PIN No.
B223W LCD Monitor User's Guide
Page 21
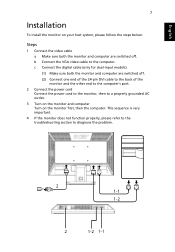
... digital cable (only for dual-input models). (1) Make sure both the monitor and computer are switched off . English 7 Installation To install the monitor on your host system, please follow the steps below: Steps 1 Connect the video cable a Make sure both the monitor and computer are switched off . (2) Connect one end of the 24-pin DVI cable to the back of the monitor and the other end to the computer's port. 2 Connect the power cord Connect the power cord...
... digital cable (only for dual-input models). (1) Make sure both the monitor and computer are switched off . English 7 Installation To install the monitor on your host system, please follow the steps below: Steps 1 Connect the video cable a Make sure both the monitor and computer are switched off . (2) Connect one end of the 24-pin DVI cable to the back of the monitor and the other end to the computer's port. 2 Connect the power cord Connect the power cord...
B223W LCD Monitor User's Guide
Page 22
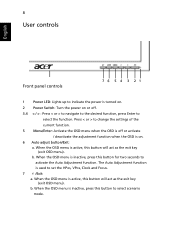
.... 3.4 < / > : Press < or > to navigate to the desired function, press Enter to select the function. When the OSD menu is inactive, press this button will act as the exit key (exit OSD menu). 8 User controls English Front panel controls 76 5 4 3 21 1 Power LED: Lights up to indicate the power is turned on. 2 Power Switch: Turn the power on . 6 Auto adjust button/Exit: a. The Auto Adjustment function is used to set the HPos, VPos, Clock and Focus. 7 /Exit: a.
.... 3.4 < / > : Press < or > to navigate to the desired function, press Enter to select the function. When the OSD menu is inactive, press this button will act as the exit key (exit OSD menu). 8 User controls English Front panel controls 76 5 4 3 21 1 Power LED: Lights up to indicate the power is turned on. 2 Power Switch: Turn the power on . 6 Auto adjust button/Exit: a. The Auto Adjustment function is used to set the HPos, VPos, Clock and Focus. 7 /Exit: a.
B223W LCD Monitor User's Guide
Page 23
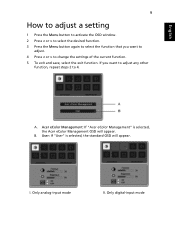
... change the settings of the current function. 5 To exit and save, select the exit function. Only digital-input mode B. Only analog-input mode II. Acer eColor Management: If "Acer eColor Management" is selected, the standard OSD will appear. User: If "User" is selected, the Acer eColor Management OSD will appear. A. English 9 How to adjust a setting 1 Press the Menu button to activate the OSD window. 2 Press < or > to select the desired function. 3 Press the Menu button...
... change the settings of the current function. 5 To exit and save, select the exit function. Only digital-input mode B. Only analog-input mode II. Acer eColor Management: If "Acer eColor Management" is selected, the standard OSD will appear. User: If "User" is selected, the Acer eColor Management OSD will appear. A. English 9 How to adjust a setting 1 Press the Menu button to activate the OSD window. 2 Press < or > to select the desired function. 3 Press the Menu button...
B223W LCD Monitor User's Guide
Page 24
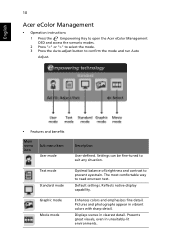
... clearest detail. Optimal balance of brightness and contrast to confirm the mode and run Auto Adjust. • Features and benefits Main menu icon Sub menu item User mode Text mode Standard mode Graphic mode Movie mode Description User-defined. Reflects native display capability. Pictures and photographs appear in vibrant colors with sharp detail. English 10 Acer eColor Management • Operation instructions 1 Press the Empowering Key to open the Acer eColor Management OSD and access the...
... clearest detail. Optimal balance of brightness and contrast to confirm the mode and run Auto Adjust. • Features and benefits Main menu icon Sub menu item User mode Text mode Standard mode Graphic mode Movie mode Description User-defined. Reflects native display capability. Pictures and photographs appear in vibrant colors with sharp detail. English 10 Acer eColor Management • Operation instructions 1 Press the Empowering Key to open the Acer eColor Management OSD and access the...

B223W LCD Monitor User's Guide
Page 25
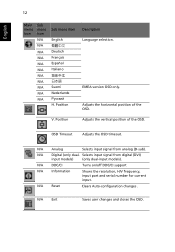
...Adjusts green intensity. V. Adjusts the background brightness of the screen image. User/blue Adjusts blue intensity. Focus Adjusts picture focus (available in analog mode only). H. Adjusts red intensity. Sets the color temperature to warm white. Position Adjusts the vertical position (available in analog mode only). Position Adjusts the horizontal position (available in analog mode only). N/A Warm N/A Cool User/red Sets the color temperature to cool white. ACM ACM (Adaptive Contrast Management) ACM On/Off switch, default Off. English 11 User Main Sub menu...
...Adjusts green intensity. V. Adjusts the background brightness of the screen image. User/blue Adjusts blue intensity. Focus Adjusts picture focus (available in analog mode only). H. Adjusts red intensity. Sets the color temperature to warm white. Position Adjusts the vertical position (available in analog mode only). Position Adjusts the horizontal position (available in analog mode only). N/A Warm N/A Cool User/red Sets the color temperature to cool white. ACM ACM (Adaptive Contrast Management) ACM On/Off switch, default Off. English 11 User Main Sub menu...
B223W LCD Monitor User's Guide
Page 26
.... EMEA version OSD only. Selects input signal from analog (D-sub). Adjusts the horizontal position of the OSD. Position Adjusts the vertical position of the OSD. V. N/A Digital (only dual- N/A Reset Clears Auto-configuration changes . N/A Exit Saves user changes and closes the OSD. N/A DDC/CI Turns on/off DDC/CI support N/A Information Shows the resolution, H/V frequency, input port and serial number for current input. N/A Analog Selects input signal from digital (DVI) input models) (only dual-input models). English 12 Main Sub menu menu icon icon...
.... EMEA version OSD only. Selects input signal from analog (D-sub). Adjusts the horizontal position of the OSD. Position Adjusts the vertical position of the OSD. V. N/A Digital (only dual- N/A Reset Clears Auto-configuration changes . N/A Exit Saves user changes and closes the OSD. N/A DDC/CI Turns on/off DDC/CI support N/A Information Shows the resolution, H/V frequency, input port and serial number for current input. N/A Analog Selects input signal from digital (DVI) input models) (only dual-input models). English 12 Main Sub menu menu icon icon...
B223W LCD Monitor User's Guide
Page 27
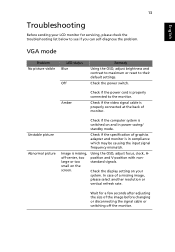
... image, please select another resolution or vertical refresh rate. Using the OSD, adjust focus, clock, Hposition and V-position with nonstandard signals. Wait for servicing, please check the troubleshooting list below to their default settings. VGA mode Problem No picture visible LED status Blue Off Remedy Using the OSD, adjust brightness and contrast to maximum or reset to see if you can self-diagnose the problem. Check the power switch. Unstable picture Abnormal picture Check if the computer system is properly connected to the monitor. 13 English Troubleshooting...
... image, please select another resolution or vertical refresh rate. Using the OSD, adjust focus, clock, Hposition and V-position with nonstandard signals. Wait for servicing, please check the troubleshooting list below to their default settings. VGA mode Problem No picture visible LED status Blue Off Remedy Using the OSD, adjust brightness and contrast to maximum or reset to see if you can self-diagnose the problem. Check the power switch. Unstable picture Abnormal picture Check if the computer system is properly connected to the monitor. 13 English Troubleshooting...
B223W LCD Monitor User's Guide
Page 28
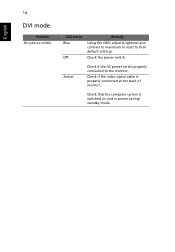
Check that the computer system is properly connected at the back of monitor. English 14 DVI mode Problem No picture visible LED status Blue Off Remedy Using the OSD, adjust brightness and contrast to maximum or reset to the monitor. Check if the video signal cable is switched on and in power saving/ standby mode. Check the power switch. Amber Check if the AC power cord is properly connected to their default settings.
Check that the computer system is properly connected at the back of monitor. English 14 DVI mode Problem No picture visible LED status Blue Off Remedy Using the OSD, adjust brightness and contrast to maximum or reset to the monitor. Check if the video signal cable is switched on and in power saving/ standby mode. Check the power switch. Amber Check if the AC power cord is properly connected to their default settings.

