User Manual
Page 3
... monitor: • Always unplug the monitor before cleaning. • Use a soft cloth to make sure the flicker disappears. • You may find slightly uneven brightness on the screen depending on the desktop pattern you use . Keep this case, the screen is displayed for your monitor Please carefully follow these instructions carefully. Connecting/disconnecting the device Observe the following are turned off before connecting any cable or unplugging the power cord...
... monitor: • Always unplug the monitor before cleaning. • Use a soft cloth to make sure the flicker disappears. • You may find slightly uneven brightness on the screen depending on the desktop pattern you use . Keep this case, the screen is displayed for your monitor Please carefully follow these instructions carefully. Connecting/disconnecting the device Observe the following are turned off before connecting any cable or unplugging the power cord...

User Manual
Page 4
... extension cord is used with this product, make sure that the power outlet you plug the power cord into the product. • To avoid damage of time listening to music at high volume. • Avoid turning up the volume to block out noisy surroundings. • Turn the volume down if you are provided for ventilation to rest on the marking label. These openings...
... extension cord is used with this product, make sure that the power outlet you plug the power cord into the product. • To avoid damage of time listening to music at high volume. • Avoid turning up the volume to block out noisy surroundings. • Turn the volume down if you are provided for ventilation to rest on the marking label. These openings...
User Manual
Page 5
.... Using a power outlet that is equipped with the performance of the equipment plugged into the wall outlet does not exceed the fuse rating. • Do not overload a power outlet, strip or receptacle by other risks. Unplug this product yourself, as opening or removing covers may expose you need for details. Also, make sure that may result in a grounded power outlet. Product servicing Do...
.... Using a power outlet that is equipped with the performance of the equipment plugged into the wall outlet does not exceed the fuse rating. • Do not overload a power outlet, strip or receptacle by other risks. Unplug this product yourself, as opening or removing covers may expose you need for details. Also, make sure that may result in a grounded power outlet. Product servicing Do...

User Manual
Page 6
.... Keep them out of the reach of radio equipment in progress. We at service stations. Switch off the device near gas pumps at Acer are in fuel depots, storage and distribution areas; or where blasting operations are very conscious of the environmental effects of our business and strive to identify and provide the best working procedures...
.... Keep them out of the reach of radio equipment in progress. We at service stations. Switch off the device near gas pumps at Acer are in fuel depots, storage and distribution areas; or where blasting operations are very conscious of the environmental effects of our business and strive to identify and provide the best working procedures...
User Manual
Page 7
... Electronics Equipment (WEEE) regulations, visit http://global.acer.com/about/sustainability.htm Mercury advisory For projectors or electronic products containing an LCD/CRT monitor or display: lamp(s) inside this electronic device into the trash when discarding. For lamp-specific disposal information, check www.lamprecycle.org. For more information on the recorded image and does not constitute a malfunction. In...
... Electronics Equipment (WEEE) regulations, visit http://global.acer.com/about/sustainability.htm Mercury advisory For projectors or electronic products containing an LCD/CRT monitor or display: lamp(s) inside this electronic device into the trash when discarding. For lamp-specific disposal information, check www.lamprecycle.org. For more information on the recorded image and does not constitute a malfunction. In...

User Manual
Page 8
... is applicable only to remove the strain on your comfort zone by pushing the power button. Incorrect computer usage may complain of eyestrain and headaches after long hours of working conditions, personal health and other musculoskeletal disorders. Users are also at risk of a computer. The following tips: • refrain from Sleep mode by adjusting the viewing angle of physical...
... is applicable only to remove the strain on your comfort zone by pushing the power button. Incorrect computer usage may complain of eyestrain and headaches after long hours of working conditions, personal health and other musculoskeletal disorders. Users are also at risk of a computer. The following tips: • refrain from Sleep mode by adjusting the viewing angle of physical...
User Manual
Page 13
... Accessibility Safe listening Warnings Using electrical power Product servicing Additional safety information IT equipment recycling information Disposal instructions LCD pixel statement Tips and information for comfortable use Federal Communications Commission Declaration of Conformity Unpacking Attaching/removing the base Screen position adjustment Connecting the power cord Power saving Display Data Channel (DDC) Connector pin assignment Standard timing table Installation User controls How to adjust a setting Acer eColor Management User Troubleshooting VGA mode DVI mode 1 iii iii iii iii...
... Accessibility Safe listening Warnings Using electrical power Product servicing Additional safety information IT equipment recycling information Disposal instructions LCD pixel statement Tips and information for comfortable use Federal Communications Commission Declaration of Conformity Unpacking Attaching/removing the base Screen position adjustment Connecting the power cord Power saving Display Data Channel (DDC) Connector pin assignment Standard timing table Installation User controls How to adjust a setting Acer eColor Management User Troubleshooting VGA mode DVI mode 1 iii iii iii iii...
User Manual
Page 17
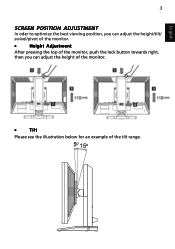
English 3 SCREEN POSITION ADJUSTMENT In oder to optimize the best viewing position, you can adjust the height/tilt/ swivel/pivot of the monitor. • Height Adjustment After pressing the top of the monitor, push the lock button towards right, then you can adjust the height of the monitor. • Tilt Please see the illustration below for an example of the tilt range. 5o 15o
English 3 SCREEN POSITION ADJUSTMENT In oder to optimize the best viewing position, you can adjust the height/tilt/ swivel/pivot of the monitor. • Height Adjustment After pressing the top of the monitor, push the lock button towards right, then you can adjust the height of the monitor. • Tilt Please see the illustration below for an example of the tilt range. 5o 15o
User Manual
Page 19
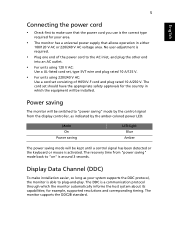
... capabilities; Mode On Power saving LED light Blue Amber The power saving mode will be kept until a control signal has been detected or the keyboard or mouse is activated. The monitor supports the DDC2B standard. for your system supports the DDC protocol, the monitor is able to plug-and-play. No user-adjustment is required. • Plug one end of H05VV-F cord and plug rated 10 A/250 V. The cord set consisting of the power cord to...
... capabilities; Mode On Power saving LED light Blue Amber The power saving mode will be kept until a control signal has been detected or the keyboard or mouse is activated. The monitor supports the DDC2B standard. for your system supports the DDC protocol, the monitor is able to plug-and-play. No user-adjustment is required. • Plug one end of H05VV-F cord and plug rated 10 A/250 V. The cord set consisting of the power cord to...
User Manual
Page 23
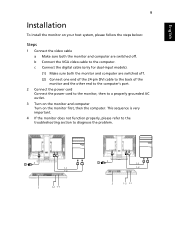
c Connect the digital cable (only for dual-input models). (1) Make sure both the monitor and computer are switched off. (2) Connect one end of the 24-pin DVI cable to the back of the monitor and the other end to the computer's port. 2 Connect the power cord Connect the power cord to the monitor, then to a properly grounded AC outlet. 3 Turn on the monitor and computer Turn on your host system, please follow the steps...
c Connect the digital cable (only for dual-input models). (1) Make sure both the monitor and computer are switched off. (2) Connect one end of the 24-pin DVI cable to the back of the monitor and the other end to the computer's port. 2 Connect the power cord Connect the power cord to the monitor, then to a properly grounded AC outlet. 3 Turn on the monitor and computer Turn on your host system, please follow the steps...
User Manual
Page 24
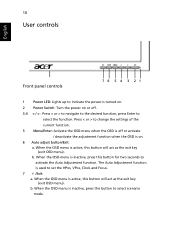
10 User controls English Front panel controls 76 5 4 3 21 1 Power LED: Lights up to indicate the power is inactive, press this button to select scenario mode. b. When the OSD menu is turned on. 2 Power Switch: Turn the power on . 6 Auto adjust button/Exit: a. When the OSD menu is active, this button will act as the exit key (exit OSD menu). When the OSD menu is active, this button for two seconds to set the HPos, VPos, Clock and Focus. 7 /Exit: a. b. Press...
10 User controls English Front panel controls 76 5 4 3 21 1 Power LED: Lights up to indicate the power is inactive, press this button to select scenario mode. b. When the OSD menu is turned on. 2 Power Switch: Turn the power on . 6 Auto adjust button/Exit: a. When the OSD menu is active, this button will act as the exit key (exit OSD menu). When the OSD menu is active, this button for two seconds to set the HPos, VPos, Clock and Focus. 7 /Exit: a. b. Press...
User Manual
Page 25
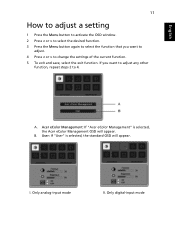
... other function, repeat steps 2 to change the settings of the current function. 5 To exit and save, select the exit function. Acer eColor Management: If "Acer eColor Management" is selected, the standard OSD will appear. B. Only digital-input mode User: If "User" is selected, the Acer eColor Management OSD will appear. I. English 11 How to adjust a setting 1 Press the Menu button to activate the OSD window. 2 Press < or > to select the...
... other function, repeat steps 2 to change the settings of the current function. 5 To exit and save, select the exit function. Acer eColor Management: If "Acer eColor Management" is selected, the standard OSD will appear. B. Only digital-input mode User: If "User" is selected, the Acer eColor Management OSD will appear. I. English 11 How to adjust a setting 1 Press the Menu button to activate the OSD window. 2 Press < or > to select the...

User Manual
Page 26
... mode Description User-defined. Default settings. English 12 Acer eColor Management • Operation instructions 1 Press the Empowering Key to open the Acer eColor Management OSD and access the scenario modes. 2 Press "" to select the mode. 3 Press the Auto-adjust button to read onscreen text. Reflects native display capability. Presents great visuals, even in clearest detail. Settings can be fine-tuned to prevent eyestrain. Pictures and photographs appear in vibrant colors...
... mode Description User-defined. Default settings. English 12 Acer eColor Management • Operation instructions 1 Press the Empowering Key to open the Acer eColor Management OSD and access the scenario modes. 2 Press "" to select the mode. 3 Press the Auto-adjust button to read onscreen text. Reflects native display capability. Presents great visuals, even in clearest detail. Settings can be fine-tuned to prevent eyestrain. Pictures and photographs appear in vibrant colors...

User Manual
Page 27
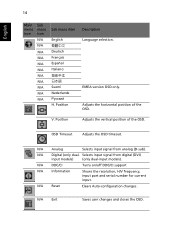
... ACM (Adaptive Contrast Management) ACM On/Off switch, default Off. Focus Adjusts picture focus (available in analog mode only). Position Adjusts the horizontal position (available in analog mode only). Adjusts red intensity. H. Sets the color temperature to warm white. User/green Adjusts green intensity. Clock Adjusts the picture clock (available in analog mode only). English 13 User Main Sub menu menu icon icon Sub menu item Contrast Brightness Description Adjusts the contrast between the foreground and background of the screen image. User/blue Adjusts blue...
... ACM (Adaptive Contrast Management) ACM On/Off switch, default Off. Focus Adjusts picture focus (available in analog mode only). Position Adjusts the horizontal position (available in analog mode only). Adjusts red intensity. H. Sets the color temperature to warm white. User/green Adjusts green intensity. Clock Adjusts the picture clock (available in analog mode only). English 13 User Main Sub menu menu icon icon Sub menu item Contrast Brightness Description Adjusts the contrast between the foreground and background of the screen image. User/blue Adjusts blue...
User Manual
Page 28
Position Adjusts the vertical position of the OSD. Selects input signal from analog (D-sub). N/A Reset Clears Auto-configuration changes . N/A Analog Selects input signal from digital (DVI) input models) (only dual-input models). V. OSD Timeout Adjusts the OSD timeout. EMEA version OSD only. N/A Digital (only dual- Adjusts the horizontal position of the OSD. N/A DDC/CI Turns on/off DDC/CI support N/A Information Shows the resolution, H/V frequency, input port and serial number for current input. N/A Exit Saves user changes and closes the OSD. English ...
Position Adjusts the vertical position of the OSD. Selects input signal from analog (D-sub). N/A Reset Clears Auto-configuration changes . N/A Analog Selects input signal from digital (DVI) input models) (only dual-input models). V. OSD Timeout Adjusts the OSD timeout. EMEA version OSD only. N/A Digital (only dual- Adjusts the horizontal position of the OSD. N/A DDC/CI Turns on/off DDC/CI support N/A Information Shows the resolution, H/V frequency, input port and serial number for current input. N/A Exit Saves user changes and closes the OSD. English ...
User Manual
Page 29
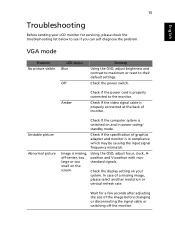
... the input signal frequency mismatch. VGA mode Problem No picture visible LED status Blue Off Remedy Using the OSD, adjust brightness and contrast to maximum or reset to see if you can self-diagnose the problem. Using the OSD, adjust focus, clock, Hposition and V-position with nonstandard signals. Check the display setting on your LCD monitor for a few seconds after adjusting the size of monitor. 15 English Troubleshooting Before sending your system. In case of graphics adapter and monitor is properly connected to the monitor...
... the input signal frequency mismatch. VGA mode Problem No picture visible LED status Blue Off Remedy Using the OSD, adjust brightness and contrast to maximum or reset to see if you can self-diagnose the problem. Using the OSD, adjust focus, clock, Hposition and V-position with nonstandard signals. Check the display setting on your LCD monitor for a few seconds after adjusting the size of monitor. 15 English Troubleshooting Before sending your system. In case of graphics adapter and monitor is properly connected to the monitor...
User Manual
Page 30
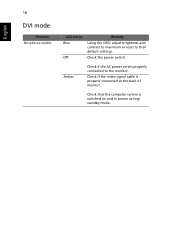
Amber Check if the AC power cord is switched on and in power saving/ standby mode. Check that the computer system is properly connected to their default settings. Check the power switch. Check if the video signal cable is properly connected at the back of monitor. English 16 DVI mode Problem No picture visible LED status Blue Off Remedy Using the OSD, adjust brightness and contrast to maximum or reset to the monitor.
Amber Check if the AC power cord is switched on and in power saving/ standby mode. Check that the computer system is properly connected to their default settings. Check the power switch. Check if the video signal cable is properly connected at the back of monitor. English 16 DVI mode Problem No picture visible LED status Blue Off Remedy Using the OSD, adjust brightness and contrast to maximum or reset to the monitor.
Brochure
Page 3
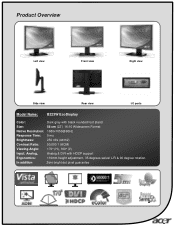
In addition Zero bright dot pixel guarantee Product Overview Left view Front view Right view Side view Rear view I/O ports Model Name: B223W EcoDisplay Color: Dark gray with black rounded foot stand Size: 56 cm (22") 16:10 Widescreen Format Native Resolution: 1680x1050@60Hz Response Time: 5 ms Brightness: 250 nits (cd/m2) Contrast Ratio: 50,000:1 (ACM) Viewing Angle: 170° (H), 160° (V) Input: Analog, Analog & DVI with HDCP support Ergonomics: 110mm height adjustment, 35 degrees swivel L/R & 90 degree rotation.
In addition Zero bright dot pixel guarantee Product Overview Left view Front view Right view Side view Rear view I/O ports Model Name: B223W EcoDisplay Color: Dark gray with black rounded foot stand Size: 56 cm (22") 16:10 Widescreen Format Native Resolution: 1680x1050@60Hz Response Time: 5 ms Brightness: 250 nits (cd/m2) Contrast Ratio: 50,000:1 (ACM) Viewing Angle: 170° (H), 160° (V) Input: Analog, Analog & DVI with HDCP support Ergonomics: 110mm height adjustment, 35 degrees swivel L/R & 90 degree rotation.
Brochure
Page 4
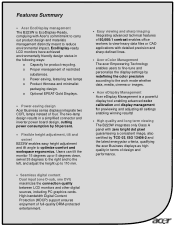
... a simplified connector and inverter power board design, cutting power consumption by 50 percent. • Flexible height adjustment, tilt and swivel B223W enables easy height adjustment and tilt angle to 110 mm. • Seamless digital content Dual input (one D-sub, one DVI) maximizes the connection quality between LCD monitors and other digital sources, including PC graphics cards. Features Summary • Acer EcoDisplay management The B223W is a powerful display tool enabling advanced color calibration and display management...
... a simplified connector and inverter power board design, cutting power consumption by 50 percent. • Flexible height adjustment, tilt and swivel B223W enables easy height adjustment and tilt angle to 110 mm. • Seamless digital content Dual input (one D-sub, one DVI) maximizes the connection quality between LCD monitors and other digital sources, including PC graphics cards. Features Summary • Acer EcoDisplay management The B223W is a powerful display tool enabling advanced color calibration and display management...
Brochure
Page 5
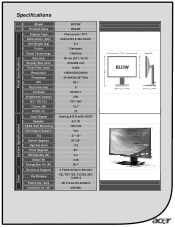
Specifications Panel Specifications Model Product name Display Type Dimensions (mm) Net Weight (kg) Colour Panel Technology Size Inch Display Size (mm) Pixel Pitch (mm) Resolution Frequency PPI Rsp time (ms) Contrast Brightness (cd/m2) H/V° CR 10:1 Colors (M) NTSC (%) Input Signal Speaker VESA Wall Mounting Kensington Support Tilt Swivel degrees Hgt Adj (mm) Pivot degrees Off/Standby (W) Sleep (W) EnergyStar On (W) Service & Support Certificates Pallet Qty / Size Container 20"/40" B223W B223W Flat screen / TFT 505.5x357.5-467.5x216 6.4 Darkgrey TN+Film 56...
Specifications Panel Specifications Model Product name Display Type Dimensions (mm) Net Weight (kg) Colour Panel Technology Size Inch Display Size (mm) Pixel Pitch (mm) Resolution Frequency PPI Rsp time (ms) Contrast Brightness (cd/m2) H/V° CR 10:1 Colors (M) NTSC (%) Input Signal Speaker VESA Wall Mounting Kensington Support Tilt Swivel degrees Hgt Adj (mm) Pivot degrees Off/Standby (W) Sleep (W) EnergyStar On (W) Service & Support Certificates Pallet Qty / Size Container 20"/40" B223W B223W Flat screen / TFT 505.5x357.5-467.5x216 6.4 Darkgrey TN+Film 56...

