
User Manual
Page 3
... pixels. Cleaning your safety and comfort Safety instructions Read these guidelines when cleaning the monitor: • Always unplug the monitor before connecting any cable or unplugging the power cord. • If the system has multiple sources of the fluorescent light, the screen may find slightly uneven brightness on the screen depending on the desktop pattern you use . Connecting/disconnecting the device Observe the following are turned off the power switch...
... pixels. Cleaning your safety and comfort Safety instructions Read these guidelines when cleaning the monitor: • Always unplug the monitor before connecting any cable or unplugging the power cord. • If the system has multiple sources of the fluorescent light, the screen may find slightly uneven brightness on the screen depending on the desktop pattern you use . Connecting/disconnecting the device Observe the following are turned off the power switch...
User Manual
Page 4
... out noisy surroundings. • Turn the volume down if you can't hear people speaking near or over a radiator or heat register, or in a built-in installation unless proper ventilation is provided. • Never push objects of power available, consult your hearing, follow these instructions. • Gradually increase the volume until you plug the power cord into the product. •...
... out noisy surroundings. • Turn the volume down if you can't hear people speaking near or over a radiator or heat register, or in a built-in installation unless proper ventilation is provided. • Never push objects of power available, consult your hearing, follow these instructions. • Gradually increase the volume until you plug the power cord into the product. •...
User Manual
Page 5
... before inserting the power cord plug. Using a power outlet that may interfere with the supplied power supply cord set , make sure that the new power cord meets the following the operating instructions Note: The grounding pin also provides good protection from the wall outlet and refer servicing to service this product. • Use the product only with the performance of this product yourself, as opening or removing covers may result in...
... before inserting the power cord plug. Using a power outlet that may interfere with the supplied power supply cord set , make sure that the new power cord meets the following the operating instructions Note: The grounding pin also provides good protection from the wall outlet and refer servicing to service this product. • Use the product only with the performance of this product yourself, as opening or removing covers may result in...

User Manual
Page 6
...covered by a qualified technician to restore the product to turn off the device near gas pumps at Acer are often, but not always, marked. Keep them out of the reach of our other controls may contain small parts. Potentially explosive environments Switch off your vehicle engine. Observe restrictions on the use... provide the best working procedures to environmental protection and views recycling, in bodily injury or even death. Areas with a potentially explosive atmosphere and obey all signs and instructions. chemical plants; IT Equipment Recycling Information Acer is strongly ...
...covered by a qualified technician to restore the product to turn off the device near gas pumps at Acer are often, but not always, marked. Keep them out of the reach of our other controls may contain small parts. Potentially explosive environments Switch off your vehicle engine. Observe restrictions on the use... provide the best working procedures to environmental protection and views recycling, in bodily injury or even death. Areas with a potentially explosive atmosphere and obey all signs and instructions. chemical plants; IT Equipment Recycling Information Acer is strongly ...
User Manual
Page 7
... black or red dots. vii Disposal instructions Do not throw this product contain mercury and must be recycled or disposed of the global environment, please recycle. For more information on the recorded image and...acer.com/about/sustainability.htm Mercury advisory For projectors or electronic products containing an LCD/CRT monitor or display: lamp(s) inside this electronic device into the trash when discarding. For lamp-specific disposal information, check www.lamprecycle.org. For more information, contact the Electronic Industries Alliance at www.eiae.org. LCD pixel statement The LCD...
... black or red dots. vii Disposal instructions Do not throw this product contain mercury and must be recycled or disposed of the global environment, please recycle. For more information on the recorded image and...acer.com/about/sustainability.htm Mercury advisory For projectors or electronic products containing an LCD/CRT monitor or display: lamp(s) inside this electronic device into the trash when discarding. For lamp-specific disposal information, check www.lamprecycle.org. For more information, contact the Electronic Industries Alliance at www.eiae.org. LCD pixel statement The LCD...

User Manual
Page 8
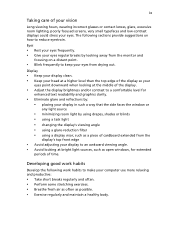
..., poor work habits, stress, inadequate working in one fixed posture • avoid slouching forward and/or leaning backward • stand up and walk around regularly to achieve maximum comfort. Users are also at risk of a computer. The following tips: • refrain from Sleep mode by adjusting the viewing angle of the monitor, using a footrest, or raising your sitting height to remove the strain...
..., poor work habits, stress, inadequate working in one fixed posture • avoid slouching forward and/or leaning backward • stand up and walk around regularly to achieve maximum comfort. Users are also at risk of a computer. The following tips: • refrain from Sleep mode by adjusting the viewing angle of the monitor, using a footrest, or raising your sitting height to remove the strain...
User Manual
Page 9
... or blinds • using a task light • changing the display's viewing angle • using a glare-reduction filter • using a display visor, such as open windows, for enhanced text readability and graphics clarity. • Eliminate glare and reflections by: • placing your display in such a way that the side faces the window or any light source • minimizing room light by looking at bright light sources, such as a piece...
... or blinds • using a task light • changing the display's viewing angle • using a glare-reduction filter • using a display visor, such as open windows, for enhanced text readability and graphics clarity. • Eliminate glare and reflections by: • placing your display in such a way that the side faces the window or any light source • minimizing room light by looking at bright light sources, such as a piece...
User Manual
Page 13
... Accessibility Safe listening Warnings Using electrical power Product servicing Additional safety information IT equipment recycling information Disposal instructions LCD pixel statement Tips and information for comfortable use Federal Communications Commission Declaration of Conformity Unpacking Attaching/removing the base Screen position adjustment Connecting the power cord Power saving Display Data Channel (DDC) Connector pin assignment Standard timing table Installation User controls How to adjust a setting Acer eColor Management User Troubleshooting VGA mode DVI mode 1 iii iii iii iii...
... Accessibility Safe listening Warnings Using electrical power Product servicing Additional safety information IT equipment recycling information Disposal instructions LCD pixel statement Tips and information for comfortable use Federal Communications Commission Declaration of Conformity Unpacking Attaching/removing the base Screen position adjustment Connecting the power cord Power saving Display Data Channel (DDC) Connector pin assignment Standard timing table Installation User controls How to adjust a setting Acer eColor Management User Troubleshooting VGA mode DVI mode 1 iii iii iii iii...
User Manual
Page 17
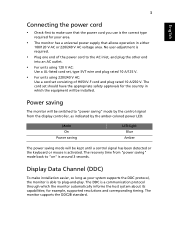
... Channel (DDC) To make sure that the power cord you use is the correct type required for your system supports the DDC protocol, the monitor is able to "on" is around 3 seconds. The cord set consisting of the power cord to "power saving" mode by the control signal from "power saving" mode back to plug-and-play. 3 English Connecting the power cord • Check first to make installation easier, so long as indicated by the amber-colored power LED.
... Channel (DDC) To make sure that the power cord you use is the correct type required for your system supports the DDC protocol, the monitor is able to "on" is around 3 seconds. The cord set consisting of the power cord to "power saving" mode by the control signal from "power saving" mode back to plug-and-play. 3 English Connecting the power cord • Check first to make installation easier, so long as indicated by the amber-colored power LED.
User Manual
Page 19
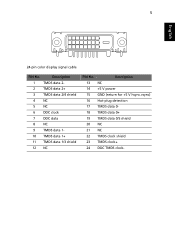
Description 13 NC 14 +5 V power 15 GND (return for +5 V hsync.vsync) 16 Hot-plug detection 17 TMDS data 0- 18 TMDS data 0+ 19 TMDS data 0/5 shield 20 NC 21 NC 22 TMDS clock shield 23 TMDS clock+ 24 DDC TMDS clock- Description 1 TMDS data 2- 2 TMDS data 2+ 3 TMDS data 2/4 shield 4 NC 5 NC 6 DDC clock 7 DDC data 8 NC 9 TMDS data 1- 10 TMDS data 1+ 11 TMDS data 1/3 shield 12 NC PIN No. 5 English 24-pin color display signal cable PIN No.
Description 13 NC 14 +5 V power 15 GND (return for +5 V hsync.vsync) 16 Hot-plug detection 17 TMDS data 0- 18 TMDS data 0+ 19 TMDS data 0/5 shield 20 NC 21 NC 22 TMDS clock shield 23 TMDS clock+ 24 DDC TMDS clock- Description 1 TMDS data 2- 2 TMDS data 2+ 3 TMDS data 2/4 shield 4 NC 5 NC 6 DDC clock 7 DDC data 8 NC 9 TMDS data 1- 10 TMDS data 1+ 11 TMDS data 1/3 shield 12 NC PIN No. 5 English 24-pin color display signal cable PIN No.
User Manual
Page 21
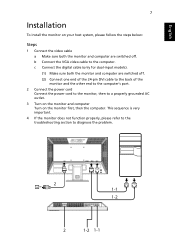
... monitor and computer are switched off . (2) Connect one end of the 24-pin DVI cable to the back of the monitor and the other end to the computer's port. 2 Connect the power cord Connect the power cord to the monitor, then to a properly grounded AC outlet. 3 Turn on the monitor and computer Turn on the monitor first, then the computer. b Connect the VGA video cable to diagnose the problem. c Connect the digital cable (only for dual-input models). (1) Make...
... monitor and computer are switched off . (2) Connect one end of the 24-pin DVI cable to the back of the monitor and the other end to the computer's port. 2 Connect the power cord Connect the power cord to the monitor, then to a properly grounded AC outlet. 3 Turn on the monitor and computer Turn on the monitor first, then the computer. b Connect the VGA video cable to diagnose the problem. c Connect the digital cable (only for dual-input models). (1) Make...

User Manual
Page 22
... button will act as the exit key (exit OSD menu). b. When the OSD menu is inactive, press this button to select scenario mode. The Auto Adjustment function is used to set the HPos, VPos, Clock and Focus. 7 /Exit: a. When the OSD menu is inactive, press this button for two seconds to activate the Auto Adjustment function. b. English 8 User controls Front panel controls 1 Power LED: Lights up to indicate the power is turned on. 2 Power Switch: Turn the power on . 6 Auto adjust button/Exit...
... button will act as the exit key (exit OSD menu). b. When the OSD menu is inactive, press this button to select scenario mode. The Auto Adjustment function is used to set the HPos, VPos, Clock and Focus. 7 /Exit: a. When the OSD menu is inactive, press this button for two seconds to activate the Auto Adjustment function. b. English 8 User controls Front panel controls 1 Power LED: Lights up to indicate the power is turned on. 2 Power Switch: Turn the power on . 6 Auto adjust button/Exit...

User Manual
Page 23
... "User" is selected, the Acer eColor Management OSD will appear. If you want to adjust any other function, repeat steps 2 to change the settings of the current function. 5 To exit and save, select the exit function. Acer eColor Management: If "Acer eColor Management" is selected, the standard OSD will appear. Only digital-input mode I. A. Only analog-input mode II. English 9 How to adjust a setting 1 Press the Menu button to activate the OSD window...
... "User" is selected, the Acer eColor Management OSD will appear. If you want to adjust any other function, repeat steps 2 to change the settings of the current function. 5 To exit and save, select the exit function. Acer eColor Management: If "Acer eColor Management" is selected, the standard OSD will appear. Only digital-input mode I. A. Only analog-input mode II. English 9 How to adjust a setting 1 Press the Menu button to activate the OSD window...
User Manual
Page 24
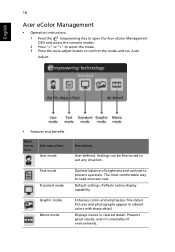
... mode Description User-defined. Presents great visuals, even in clearest detail. Default settings. Pictures and photographs appear in vibrant colors with sharp detail. English 10 Acer eColor Management • Operation instructions 1 Press the Empowering Key to open the Acer eColor Management OSD and access the scenario modes. 2 Press "" to select the mode. 3 Press the Auto-adjust button to suit any situation. Enhances colors and emphasizes fine detail. Reflects native display...
... mode Description User-defined. Presents great visuals, even in clearest detail. Default settings. Pictures and photographs appear in vibrant colors with sharp detail. English 10 Acer eColor Management • Operation instructions 1 Press the Empowering Key to open the Acer eColor Management OSD and access the scenario modes. 2 Press "" to select the mode. 3 Press the Auto-adjust button to suit any situation. Enhances colors and emphasizes fine detail. Reflects native display...

User Manual
Page 25
... Sub menu item Contrast Brightness Description Adjusts the contrast between the foreground and background of the screen image. Focus Adjusts picture focus (available in analog mode only). User/blue Adjusts blue intensity. Position Adjusts the vertical position (available in analog mode only). N/A Warm N/A Cool User/red Sets the color temperature to cool white. User/green Adjusts green intensity. Adjusts the background brightness of the screen image. ACM ACM (Adaptive Contrast Management) ACM On/Off switch, default Off. Position Adjusts the horizontal...
... Sub menu item Contrast Brightness Description Adjusts the contrast between the foreground and background of the screen image. Focus Adjusts picture focus (available in analog mode only). User/blue Adjusts blue intensity. Position Adjusts the vertical position (available in analog mode only). N/A Warm N/A Cool User/red Sets the color temperature to cool white. User/green Adjusts green intensity. Adjusts the background brightness of the screen image. ACM ACM (Adaptive Contrast Management) ACM On/Off switch, default Off. Position Adjusts the horizontal...
User Manual
Page 26
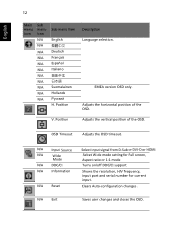
... Adjusts the OSD timeout. N/A Input Source N/A W ide Mode N/A DDC/CI N/A Information N/A Reset Select input signal from D‐Sub or DVI‐D or HDMI Selcet Wide mode setting for Full screen, Aspect ratio or 1:1 mode Turns on/off DDC/CI support Shows the resolution, H/V frequency, input port and serial number for current input. V. EMEA version OSD only. Position Adjusts the vertical position of the OSD. Clears Auto-configuration changes . Position Description Language selection. N/A Exit Saves user changes and closes the OSD. English 12 Main Sub menu menu...
... Adjusts the OSD timeout. N/A Input Source N/A W ide Mode N/A DDC/CI N/A Information N/A Reset Select input signal from D‐Sub or DVI‐D or HDMI Selcet Wide mode setting for Full screen, Aspect ratio or 1:1 mode Turns on/off DDC/CI support Shows the resolution, H/V frequency, input port and serial number for current input. V. EMEA version OSD only. Position Adjusts the vertical position of the OSD. Clears Auto-configuration changes . Position Description Language selection. N/A Exit Saves user changes and closes the OSD. English 12 Main Sub menu menu...

User Manual
Page 27
... a missing image, please select another resolution or vertical refresh rate. VGA mode Problem No picture visible LED status Blue Off Remedy Using the OSD, adjust brightness and contrast to maximum or reset to the monitor. Using the OSD, adjust focus, clock, Hposition and V-position with nonstandard signals. Check if the power cord is properly connected at the back of graphics adapter and monitor is in power saving/ standby mode. English 13 Troubleshooting Before sending your system. Amber Check if the video signal cable is properly connected to their default settings.
... a missing image, please select another resolution or vertical refresh rate. VGA mode Problem No picture visible LED status Blue Off Remedy Using the OSD, adjust brightness and contrast to maximum or reset to the monitor. Using the OSD, adjust focus, clock, Hposition and V-position with nonstandard signals. Check if the power cord is properly connected at the back of graphics adapter and monitor is in power saving/ standby mode. English 13 Troubleshooting Before sending your system. Amber Check if the video signal cable is properly connected to their default settings.
User Manual
Page 28
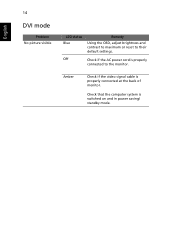
Check that the computer system is properly connected to their default settings. Off Check if the AC power cord is switched on and in power saving/ standby mode. Amber Check if the video signal cable is properly connected at the back of monitor. English 14 DVI mode Problem No picture visible LED status Blue Remedy Using the OSD, adjust brightness and contrast to maximum or reset to the monitor.
Check that the computer system is properly connected to their default settings. Off Check if the AC power cord is switched on and in power saving/ standby mode. Amber Check if the video signal cable is properly connected at the back of monitor. English 14 DVI mode Problem No picture visible LED status Blue Remedy Using the OSD, adjust brightness and contrast to maximum or reset to the monitor.
Brochure
Page 4
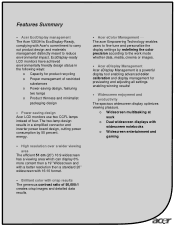
o Widescreen multitasking at work mode whether data, media, cinema or images. • Acer eDisplay Management Acer eDisplay Management is EcoDisplay-Ready, complying with widescreen notebooks o Widescreen entertainment and gaming EcoDisplay-ready LCD monitors have achieved environmentally friendly design status in a simplified connector and inverter power board design, cutting power consumption by redefining the color precision according to the work o Dual widescreen displays with Acer's commitment to...
o Widescreen multitasking at work mode whether data, media, cinema or images. • Acer eDisplay Management Acer eDisplay Management is EcoDisplay-Ready, complying with widescreen notebooks o Widescreen entertainment and gaming EcoDisplay-ready LCD monitors have achieved environmentally friendly design status in a simplified connector and inverter power board design, cutting power consumption by redefining the color precision according to the work o Dual widescreen displays with Acer's commitment to...
Brochure
Page 5
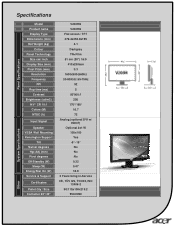
Specifications Panel Specifications Model Product name Display Type Dimensions (mm) Net Weight (kg) Colour Panel Technology Size cm/ Inch Display Size (mm) Pixel Pitch (mm) Resolution Frequency PPI Rsp time (ms) Contrast Brightness (cd/m2) H/V° CR 10:1 Colors (M) NTSC (%) Input Signal Speaker VESA Wall Mounting Kensington Support Tilt Swivel degrees Hgt Adj (mm) Pivot degrees Off/Standby (W) Sleep (W) EnergyStar On (W) Service & Support Certificates Pallet Qty / Size Container 20"/40" V203HQ V203HQ Flat screen / TFT 476.4x353.8x195 4.1 Darkgrey TN+Film 51...
Specifications Panel Specifications Model Product name Display Type Dimensions (mm) Net Weight (kg) Colour Panel Technology Size cm/ Inch Display Size (mm) Pixel Pitch (mm) Resolution Frequency PPI Rsp time (ms) Contrast Brightness (cd/m2) H/V° CR 10:1 Colors (M) NTSC (%) Input Signal Speaker VESA Wall Mounting Kensington Support Tilt Swivel degrees Hgt Adj (mm) Pivot degrees Off/Standby (W) Sleep (W) EnergyStar On (W) Service & Support Certificates Pallet Qty / Size Container 20"/40" V203HQ V203HQ Flat screen / TFT 476.4x353.8x195 4.1 Darkgrey TN+Film 51...

