
User Manual
Page 13
... Connecting the power cord Power saving Display Data Channel (DDC) Connector pin assignment Standard timing table Installation User controls How to adjust a setting Acer eColor Management User Troubleshooting VGA mode DVI mode 1 iii iii iii iii iii iv iv iv iv v vi vi vii vii viii xi 1 2 2 3 3 3 4 6 7 8 9 10 11 13 13 14
... Connecting the power cord Power saving Display Data Channel (DDC) Connector pin assignment Standard timing table Installation User controls How to adjust a setting Acer eColor Management User Troubleshooting VGA mode DVI mode 1 iii iii iii iii iii iv iv iv iv v vi vi vii vii viii xi 1 2 2 3 3 3 4 6 7 8 9 10 11 13 13 14
User Manual
Page 15
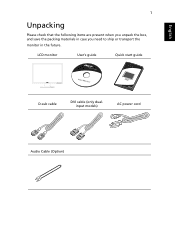
English 1 Unpacking Please check that the following items are present when you unpack the box, and save the packing materials in case you need to ship or transport the monitor in the future. LCD monitor User's guide Quick start guide D-sub cable DVI cable (only dualinput models) AC power cord Audio Cable (Option)
English 1 Unpacking Please check that the following items are present when you unpack the box, and save the packing materials in case you need to ship or transport the monitor in the future. LCD monitor User's guide Quick start guide D-sub cable DVI cable (only dualinput models) AC power cord Audio Cable (Option)
User Manual
Page 21
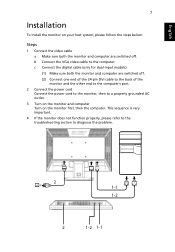
DVI D-Sub 2 1-1 1-2 2 1-2 1-1 English 7 Installation To install the monitor on the monitor first, then the computer. c Connect the digital cable (only for dual-input models). (1) Make sure ... the steps below: Steps 1 Connect the video cable a Make sure both the monitor and computer are switched off . (2) Connect one end of the 24-pin DVI cable to the back of the monitor and the other end to the computer's port. 2 Connect the power cord Connect the power cord to the...
DVI D-Sub 2 1-1 1-2 2 1-2 1-1 English 7 Installation To install the monitor on the monitor first, then the computer. c Connect the digital cable (only for dual-input models). (1) Make sure ... the steps below: Steps 1 Connect the video cable a Make sure both the monitor and computer are switched off . (2) Connect one end of the 24-pin DVI cable to the back of the monitor and the other end to the computer's port. 2 Connect the power cord Connect the power cord to the...

User Manual
Page 26
Adjusts the horizontal position of the OSD. OSD Timeout Adjusts the OSD timeout. Selects input signal from analog (D-sub). N/A Analog Selects input signal from digital (DVI) input models) (only dual-input models). EMEA version OSD only. Position Description Language selection. N/A Exit Saves user changes and closes the OSD. V. N/A Digital (only dual- N/A ...
Adjusts the horizontal position of the OSD. OSD Timeout Adjusts the OSD timeout. Selects input signal from analog (D-sub). N/A Analog Selects input signal from digital (DVI) input models) (only dual-input models). EMEA version OSD only. Position Description Language selection. N/A Exit Saves user changes and closes the OSD. V. N/A Digital (only dual- N/A ...

User Manual
Page 28
Check if the video signal cable is properly connected to their default settings. Check the power switch. Amber Check if the AC power cord is properly connected at the back of monitor. English 14 DVI mode Problem No picture visible LED status Blue Off Remedy Using the OSD, adjust brightness and contrast to maximum or reset to the monitor. Check that the computer system is switched on and in power saving/ standby mode.
Check if the video signal cable is properly connected to their default settings. Check the power switch. Amber Check if the AC power cord is properly connected at the back of monitor. English 14 DVI mode Problem No picture visible LED status Blue Off Remedy Using the OSD, adjust brightness and contrast to maximum or reset to the monitor. Check that the computer system is switched on and in power saving/ standby mode.

